11
1st Edition, April 1993
Clearing Paper Jams
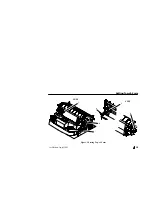
1. Open the floor cabinet front door and tear off the paper near the paper slot.
2. Open the printer cover. Fully raise the forms thickness adjustment lever (A).
3. Open both tractor gates (B) and remove the paper from the tractor sprockets (C).
4. Open the paper fence (D).
5. Gently pull the paper up through the paper slot. Slide the paper over the paper guide assembly (E) and
down into the paper stacking area in the rear of the cabinet.
6. Check the paper path for bunched or torn paper. Remove any pieces of paper in the paper path.
7. Check the narrow passageway between the face of the platen and the ribbon mask for bits of torn
paper or ribbon lint. Check the holes in the ribbon mask surrounding each hammer tip. Gently remove
paper or lint particles with a wooden stick or pair of tweezers. (Do not pry or apply force to the
hammer tips.)
8. Check that the ribbon mask has not been deformed in such a way as to block the paper path. (If the
ribbon mask is damaged or bent, contact an authorized service representative.)
9. Close the paper fence (D) and load paper. (See page 7.)
Содержание LG06
Страница 1: ...LG06 LG12 TEXT AND GRAPHICS PRINTER Operators Guide Order Number FW LG0A2 A8 l a t i g i d...
Страница 13: ...10 1st Edition April 1993 Setting Top of Form C B A LG06 LG12 A C B Figure 5 Setting Top of Form...
Страница 15: ...12 1st Edition April 1993 Clearing Paper Jams B E A D C LG06 LG12 A B C D E Figure 6 Clearing Paper Jams...


