82275345-00
3
QUANTUM DS
®
Series Installation
and Operations Guide
April
201
8
© 201
Digital Check Corp
.
All rights reserved.
Страница 1: ...82275345 003 QUANTUM DS Series Installation and Operations Guide April 2018 2018 Digital Check Corp All rights reserved...
Страница 2: ...computing equipment installed in the United States of America Digital Check is taking appropriate steps to be in compliance with FCC regulations and similar regulations of other countries Note This e...
Страница 3: ...ent Preparation 2 4 Align Checks for Loading 2 6 Inserting Documents 2 7 Processing Documents Document Flow 2 7 Start Stop Button 2 8 Remove Items from Pocket and Check Work 2 8 Stopped Document in Tr...
Страница 4: ...82275345 003 Tables Table 3 1 Cleaning Supplies for Rapid and Detailed Cleaning 3 2 Table 3 2 QUANTUM DS Series Cleaning Kit 3 2 Table 4 1 Replacement Items 4 2...
Страница 5: ...82275345 003...
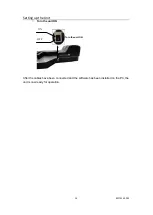
Страница 6: ...agnetic ink character recognition MICR reader inside the unit At rear to connect the power cord from the power supply the USB interface cable and protect those connections Near PC or network connectio...
Страница 7: ...rator to restart the Quantum DS and its application s If this occurs Plug the Quantum DS into an electrical outlet on a different branch of the power distribution system where large electrical equipme...
Страница 8: ...n the unit shipping box For additional replacement cartridges order the Ink Jet Cartridge 822120984 from Digital Check see Section 4 of this guide Ink Jet Cartridge Capacity The operational life of th...
Страница 9: ...usage Connect the Cables Follow these steps to connect the cables to the unit Refer to the following figures 1 Turn the unit OFF 2 Connect the AC power cord to the unit 3 Load the software and drivers...
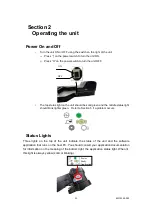
Страница 10: ...Setting up the Unit 1 5 82275345 003 5 Turn the unit ON ON OFF Turn the unit ON After the cables have been connected and the software has been installed on the PC the unit is now ready for operation...
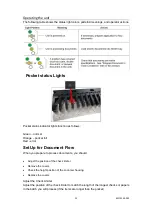
Страница 11: ...unit should be solid green and the middle status light should blink lighter green Refer to Section 5 if a problem occurs Status Lights Three lights on the top of the unit indicate the status of the u...
Страница 12: ...ge pocket full Red error Set Up for Document Flow When you prepare to process documents you should Adjust the position of the check limiter Remove the covers Check the height position of the endorser...
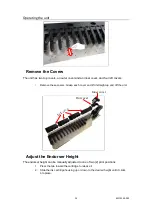
Страница 13: ...se covers Grasp each cover and lift it straight up and off the unit Left cover Out cover Inner cover Adjust the Endorser Height The endorser height can be manually adjusted to one of two 2 print posit...
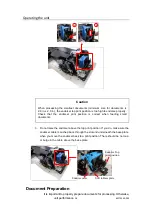
Страница 14: ...Do not raise the endorser above the top print position If you do make sure the endorser cable is pushed back through the slot and underneath the base plate when you move the endorser back to a print...
Страница 15: ...lly follow the steps in this section to prepare documents for processing 1 Check for acceptable size 2 Smooth out creases folds curls and dog ear corners 3 Remove rubber bands paper clips staples or f...
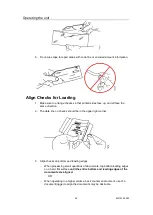
Страница 16: ...he same direction 2 The date line on checks should be in the upper right corner 3 Align checks on bottom and leading edges When processing small quantities of documents tap bottom leading edges on a h...
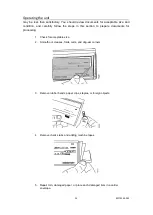
Страница 17: ...ion Wait for two green status lights Slide documents forward to the end of the feeder bay printed sides face the side of the unit not the feeder flag Caution If feeding more than one item do not slide...
Страница 18: ...jams you should remove items from the pocket when the pocket is nearly full Pocket capacity is up to 200 items depending on thickness and condition Verify that endorsements are clearly printed and tha...
Страница 19: ...emove the item from the track Using the Start Stop Button to Move Stopped Items to a Pocket You should first try to flush the stopped item from the track using the Start Stop button 1 Press and hold d...
Страница 20: ...emove covers if necessary and check the location of the stopped item in the track a For items that are stopped on the track on the pocket side pull the item out toward the back or front of the pocket...
Страница 21: ...it pull the item out toward the back of the unit 3 Replace the unit covers if they were taken off of the unit to remove items from the track 4 Consult your application documentation for the necessary...
Страница 22: ...recommended for use with the QUANTUM DS product a rapid cleaning and a detailed cleaning procedure Rapid Cleaning To perform the rapid cleaning procedure run the check scanner cleaning card through t...
Страница 23: ...f four 10 oz cans 750501900 Cotton Wiping Cloths 6 in x 6 in box of 150 752010884 The QUANTUM DS Series Cleaning Kit supply order number 756190992 shown in Table 3 2 provides a selection of cleaning s...
Страница 24: ...duster Clean the front and rear image glass and the fixed rear image camera wall Clean ink off the endorser cartridge and cartridge housing as needed to maintain print quality omit this procedure if...
Страница 25: ...e wall with cleaning Pad 75 1804 907 to remove any accumulated debris and or ink 2 Do not wipe inside window or on ink pad Remove staples paper clips and visible debris from the track Caution Metal ob...
Страница 26: ...ong entire track paper path with micro duster Clean front and rear image glass and fixed rear image camera wall Note Use a new unused Cleaning Pad 751804907 for this cleaning procedure 1 Clean the ent...
Страница 27: ...Cleaning the Unit 3 6 82275345 003 Front CIS Rear CIS...
Страница 28: ...e endorser cartridge and cartridge housing If the unit is producing acceptable print quality for the endorsement it is recommended that this portion of the cleaning procedure which cleans the ink cart...
Страница 29: ...and out of the housing 3 4 2 Dampen a clean lint free cloth with a small amount of water Caution The cloth should not be too wet as water must not drip into or remain on the unit When cleaning the pri...
Страница 30: ...all amount of water Note The cloth should not be too wet as water must not drip or remain on the unit Caution Do not use alcohol to wipe the cartridge nozzles This will cause damage Do not use the Ima...
Страница 31: ...y sideways as shown here 8 With a clean section of the cloth or another lint free cloth dampened with a small amount of water repeat steps 6 and 7 9 Allow the cartridge nozzles and contacts to dry com...
Страница 32: ...to place 1 2 Press the top of the cartridge housing assembly down until it is latched and closed 4 3 11 If print quality does not improve repeat steps 1 through 10 of this procedure one more time 12 I...
Страница 33: ...products Most replacement items come with installation instructions to guide the operator on the proper replacement procedure including the following items Ink cartridge Rear image camera removable w...
Страница 34: ...emovable wall when the ink pad is completely saturated with ink 82275247 000 Feeder Rollers and Separator Assembly Includes Two feeder rollers One separator assembly triangle shape Replace worn separa...
Страница 35: ...ction 2 to reduce or eliminate exception conditions that may result in decreased unit performance Check that documents are of acceptable size and condition and ensure that the following common documen...
Страница 36: ...through unit Indicators controls status lights or Start Stop button Jams or unexpected document stops incorrect feeding Feeder incorrect feeding double feeds skew Reader MICR optical reader rejects I...
Страница 37: ...the QUANTUM DS unit Turn off the QUANTUM DS unit and leave the PC powered on Wait 5 seconds and then turn the QUANTUM DS unit back on Listen for a chime on the host PC indicating that the host PC has...
Страница 38: ...Multiple causes See Power Supply conditions Papers do not feed when Start Stop button pressed Start Stop button held down too long Press tap Start Stop button momentarily to start feeding paper Unit...
Страница 39: ...bay Items skew as they feed Inadequate document preparation before feeding items Ensure documents are properly jogged aligned and loaded correctly into the feeder bay Incorrect document position inser...
Страница 40: ...air with Micro duster through the paper path where feeder bay touches unit Defective feeder sensor Return unit for service Broken belt Call for service of unit Automatic feeder flag does not open Soft...
Страница 41: ...ent preparation Ensure documents are properly jogged aligned and loaded correctly in the feeder bay so items are presented properly to the read head Incorrect reader font and or incorrect reader confi...
Страница 42: ...ed and removable rear image camera walls See Section 3 for cleaning procedures Replace the rear image camera removable wall with built in ink pad See Section 4 for information on ordering the rear ima...
Страница 43: ...4 for information on ordering a new cartridge No print Ink jet cartridge out of ink Replace the ink jet cartridge See Section 4 for information on ordering a new cartridge Ink accumulation on ink jet...
Страница 44: ...jam in pockets stack poorly Check limiters not set correctly Move check limiter out far enough to accommodate the longest document All documents flow to wrong pocket Defective pocketing mechanism If...