background image

DG-SC8860VI User Manual

86

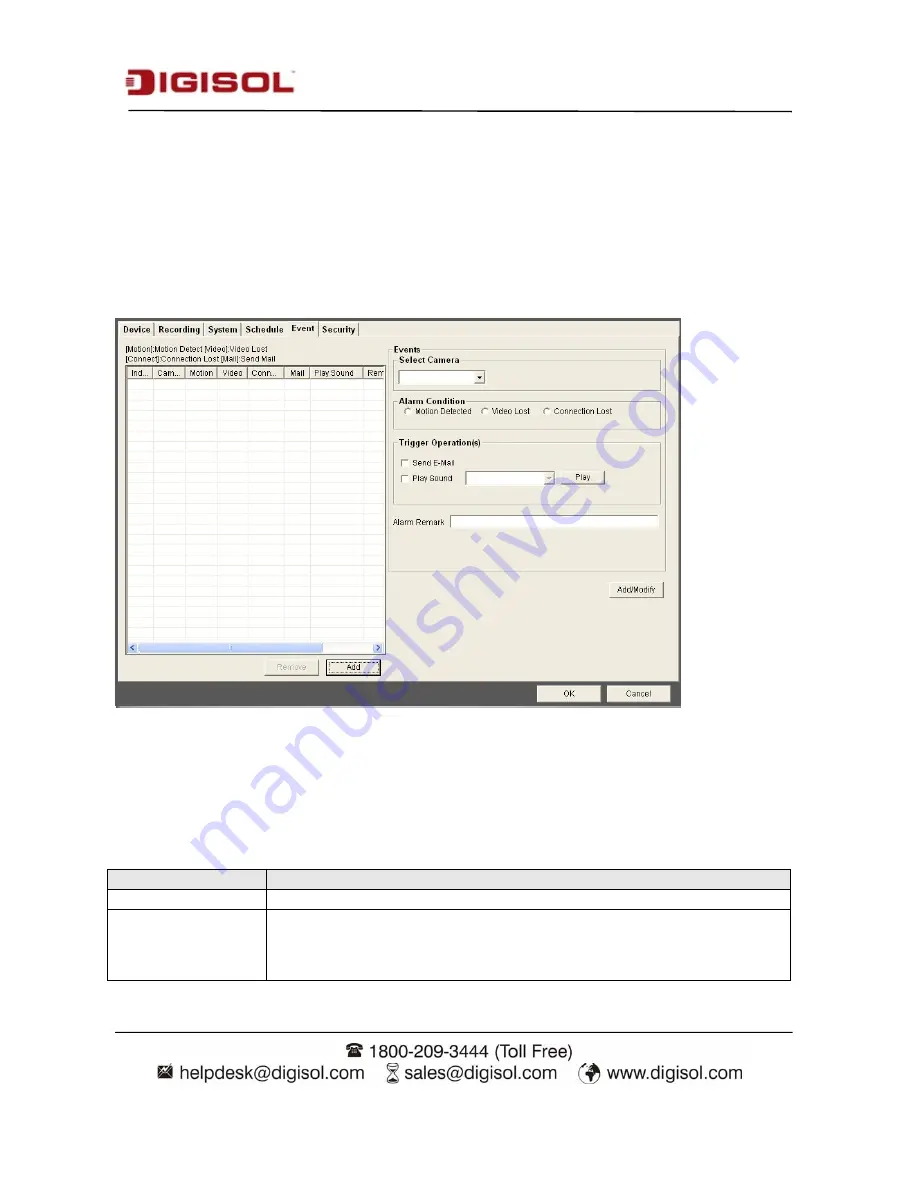
5-1-5 Event

SKYROS iView can send you an alarm email message so you can know something happened on
the IP camera (motion detected, video lost, or connection lost). A sound can be played to notify the
operator at the computer where SKYROS iView is installed, too.

To add a new event, click ‘

Add

’ button, and a new window will appear on the right for you to setup

a new event.
To remove an existing event, select an event in the list and click ‘

Remove

’ button.

The description of every setup item is listed below:

Item

Description

Select Camera

Select the IP camera to define its event detail.

Alarm Condition

Define the type of event which will trigger an alarm:

Motion detected: Alarm will be triggered when motion is detected at this

Содержание DG-SC8860VI

Страница 1: ...xel Vandal Proof Fixed Dome IP Camera with IR LED IR Cut Filter Digital WDR feature User Manual V1 0 2014 06 05 As our products undergo continuous development the specifications are subject to change...

Страница 2: ...chase the buyer and not this company its distributor or its dealer assumes the entire cost of all necessary servicing repair and any incidental or consequential damages resulting from any defect in th...

Страница 3: ...he IP address of Network IP Camera 15 2 2 Connect to IP camera s Web User Interface 16 2 3 Viewing Live Video 20 2 4 Client Settings 23 3 Advanced Configuration 25 3 1 System 26 3 2 Security 27 3 3 Ne...

Страница 4: ...ure SKYROS iview 74 5 1 1 Device 75 5 1 2 Recording 78 5 1 3 System 81 5 1 4 Schedule 85 5 1 5 Event 88 5 1 6 Security 89 5 2 Video Playback 92 5 2 1 Start Video Playback 92 5 2 2 Advanced Search 94 5...

Страница 5: ...camera DG SC8860VI supports Digital WDR a software based technique that enables the camera to produce clearer images in less than ideal lighting conditions Digital WDR balances the contrast of light...

Страница 6: ...CHILDREN If you want to use this IP Camera at any place that may be spilled by water or dirt a secure and water proof camera housing is required DO NOT pull any cord that is connected to this IP Camer...

Страница 7: ...ur dealer of purchase to claim for missing items DG SC8860VI Megapixel Fixed Dome IP Camera 1 No PU foam pad Installation Guide CD includes User Manual QIG Utility Tools Package includes one allen key...

Страница 8: ...DG SC8860VI User Manual 8 1 5 Get Familiar with your new Network Fixed Dome IP Camera Front cover Item Description 1 Front Cover Transparent Metal cover 2 Rear Cover Metal Cover 1 2 3...

Страница 9: ...s and LEDs protection 2 Black inner cover Inside protection 3 Anti drop line Protective front cover drop during installation Rear Cover Item Description 1 IR LED Board IR illumination 2 Top Mount For...

Страница 10: ...8 Reset button For resetting function on SD card board 9 Power Terminal Block J15 10 RJ45 connector Network connection 1 6 Installation of the Network IP Camera Please follow the instructions mention...

Страница 11: ...ttach your PU foam pad on the bottom of your rear cover Please refer to the definition of the terminal blocks chart below It is also printed on the motherboard Power Terminal Blocks J15 2pins Pin No F...

Страница 12: ...onduit hole labeled B This plug will not be provided along with the product 4 Connect all your cables to their respective terminals Insert your micro SD SDHC card for storage option 5 If this camera i...

Страница 13: ...ired then insert micro SD card in the slot then the camera can detect the card and enable the UI of SD card 9 See the above image and find the location of reset button on the SD card board Press the b...

Страница 14: ...rowser You must know the IP address of IP Camera before you can connect to it The IP Camera will use DHCP server on your local network to obtain an IP address automatically by default So you can check...

Страница 15: ...change then click Change IP button to change selected dome camera s IP address setting If you no longer need to use this utility click Exit button to close it 2 2 Connect to IP camera s Web User Inter...

Страница 16: ...hen you finish entering username and password When you connect to IP Camera for the first time you ll see the following message This message prompts you that you need to install ActiveX plug in before...

Страница 17: ...If you re prompted that Windows Firewall has blocked some features of this program as shown below Click Allow access or IP Camera will not be able to function properly When you re installing Internet...

Страница 18: ...l the Active X control After ActiveX plug in is installed you should be able to see the video stream from camera NOTE If this is the first time you use this IP Camera you can refer to chapter 2 4 for...

Страница 19: ...all setup pages of IP camera and you can go back to live video view by clicking this button when you re in other tab Stream Select video stream type H 264 or MJPEG MPEG4 option is visible when you na...

Страница 20: ...apshot and save image file on your computer When you click this button a new window will appear Click Save button when you see the image you wish to save and you ll be prompted to indicate the folder...

Страница 21: ...jects in the video in detail Note Digital zoom uses computer algorithm to enlarge the video and some details may be lost If you need to focus on the detail of specific objects in video view please use...

Страница 22: ...Client Settings menu you configure basic IP camera settings like data transfer protocol and data storage folder To access Client Settings menu click Client Settings button on the left of the web page...

Страница 23: ...use select RTSP Folder Select a folder on your computer to save recorded video Click Browse button and you ll be prompted to select a folder Prefix When saving video files the characters you typed in...

Страница 24: ...camera s settings you can access IP camera s Configuration menu which provides various kinds of system setting To access configuration menu click Configuration button on the left of the webpage The C...

Страница 25: ...a when you have many IP cameras installed Indicator LED The LED lights located at the back of IP camera is switched on by default But if you don t want other people to know the status of this IP camer...

Страница 26: ...Please note that if this IP camera can t access Internet you must have a time server on local area network or set the time manually Set Manually Set IP camera s date and time manually Please set curr...

Страница 27: ...ts all users existing in IP camera If you want to remove one user click it in the list and then click Remove button If no user is existing New Account message will be shown here User Name Input new us...

Страница 28: ...tup item Item Description LAN Select this option to assign an IP address to LAN port or obtain an address from DHCP server automatically Available options are DHCP IPv4 Obtain an IPv4 IP address from...

Страница 29: ...PPPoE Select this option to use PPPoE to connect to network You have to input PPPoE username and password assigned by network operator to get connected HTTP Port Input IP camera s web connection port...

Страница 30: ...nded for advanced settings only and this IP camera will work fine even you don t make any changes to this page Here is the description of every setup item Item Description Multicast En Enable video mu...

Страница 31: ...n select Video Audio s QoS DSCP value 0 to 63 or both video and audio DDNS Enable DDNS support if your ISP assigns dynamic IP address to you You must register a dynamic IP service first Currently this...

Страница 32: ...escription Enable Filter Check this box to enable IP address filter uncheck this box to disable this function Accepted IP list Here lists all IP address that can build connections to this IP camera If...

Страница 33: ...list click on the IP address and click Remove button IP Address Deny IP list Input the starting and ending IP address of IP camera you wish to deny connections here IP camera will deny connections es...

Страница 34: ...860VI User Manual 34 There are 3 sub menus in this menu Image Setting Video Setting and Overlay which can be accessed by tabs on the top 3 5 1 Image Setting You can adjust the image parameters in this...

Страница 35: ...P camera Manual Camera sensor adjusts the lens based on a user defined setting Manual exposure is recommended only for indoor applications that have a single unchanging primary light source Day Mode S...

Страница 36: ...W You ll be using this IP camera in dark places where lights are insufficient Tungsten To be used for yellow orange lighting conditions IR cut Day Night An IR cut filter is built in this IP camera to...

Страница 37: ...ansfer parameters in this page Here is the description of every setup item Item Description H 264 MPEG4 Select the compression of main stream H 264 MPEG4 Video Resolution Select video resolution H 264...

Страница 38: ...rate Video quality There are 5 levels of video quality select very high to improve video quality but consumes more network bandwidth and selecting very low will decrease video quality and consumes les...

Страница 39: ...lor of the text Time Stamp Check this box to remove time stamp s background color which will help the readability of time stamp text in some cases Enable Text Display Check this box to display certain...

Страница 40: ...nd help people to identify this IP camera Click Browse button to pick a picture on your computer then click Update button to use the picture Please note that there are certain restrictions 1 Select bm...

Страница 41: ...define up to 3 motion detection areas Here is the description of every setup item Item Description Enable Motion Detection Check this box to enable motion detection Enable Windows 1 to Windows 3 Check...

Страница 42: ...etection area s title text so you can identify it Please note that you have to click Apply button and the text will change Percentage Select the percentage of pixel change that will trigger motion det...

Страница 43: ...scription of every setup item Item Description Enable Privacy Mask Check this box to enable Privacy Masking Enable Mask 1 to Mask 3 Check this box to enable Privacy Mask window You can select Mask 1 t...

Страница 44: ...e Mask Window select the desired color for Masking window 3 8 Event When there s an event you can use this setup page to define what IP camera should do like send an Email or trigger digital output to...

Страница 45: ...ing To add a new event click New button and the description of every setup item is listed below Item Description Enable Setting Check this box to enable this event If you just want to disable this eve...

Страница 46: ...s activated Enable Samba Net Storage Check this box and IP camera will save file on samba server refer to Samba Server setting in Event Server tab when this event is activated Enable SD CARD Check thi...

Страница 47: ...otion detection window When you finish with above settings click Apply button to save changes 3 8 3 Event Server You can define the details of remote media server FTP File SMTP Email and Samba File A...

Страница 48: ...ame Password Input FTP server s password File Path Name Input the path where you want to save file on FTP server like upload record If you want to save file on this FTP user s home directory you can l...

Страница 49: ...spam software Receiver 1 Email Address Input primary recipient s Email address This field is required Receiver 2 Email Address Input backup recipient s Email address This field is optional Subject Inp...

Страница 50: ...ad Samba Server Address Input Samba server s IP address or host name Path Input the path where you want to save file on Samba server like upload record If you want to save file on this user s home dir...

Страница 51: ...card is inserted into IP camera you can save video files on it Note 1 Be sure that the SD Card format should be FAT32 The NTFS format cannot be supported by this camera 2 Unlike motion detection this...

Страница 52: ...ecord 24 hours in selected weekday s Storage Option Memory Card Select this option to save the recorded video files of defined size on continuous schedule basis to SD card Samba Server Select this opt...

Страница 53: ...tab There are three sub menus under this option as shown below Status Under Status it displays the capacity of inserted Micro SD card It will display as None if Micro SD card is not inserted If you cl...

Страница 54: ...ard feature Click All file to list all files You can also search the files depending on Time Date range Event This tab will display the files stored by defining an Event triggered by Motion Detection...

Страница 55: ...You can check the usage log of IP camera here In this page you can click 1 First page Final page Jump to first final page of log 2 Previous Next Jump to previous or next page of log 3 Remove Clear log...

Страница 56: ...3 12 Device Info You can check the information and network settings of this IP camera This information is very useful when you need to repair or fix the problem of this IP camera An example of device...

Страница 57: ...fault setting Reset Clear all settings of IP camera except for the IP time zone and daylight saving parameters to factory default setting Backup Backup IP camera s setting and save it on your computer...

Страница 58: ...n SD card Upgrade Upgrade IP camera s firmware Click Browse button to select a firmware image file on your computer first then click Upgrade button 3 14 Language You can change the display language of...

Страница 59: ...View software provides various functions like video recording After this software is installed you can use your IP camera to safeguard your property Please follow the below mentioned instructions to...

Страница 60: ...DG SC8860VI User Manual 60 2 Double click on Setup exe to install the SKYROS iView software The wizard as shown below will appear 3 The screen as shown below will appear Click Next to continue...

Страница 61: ...DG SC8860VI User Manual 61 4 Now click on Install as shown below 5 Please wait while installation is being performed This may take few minutes please be patient...

Страница 62: ...DG SC8860VI User Manual 62 6 Second part of installation will start automatically 7 A new setup window will appear please click Next button to continue...

Страница 63: ...DG SC8860VI User Manual 63 8 Now click on Next as shown below 9 The screen shown below will appear Click on Install as shown below...

Страница 64: ...DG SC8860VI User Manual 64 10 Installation will take few minutes please be patient 11 Click Finish when you see this message...

Страница 65: ...DG SC8860VI User Manual 65 12 MSDE Microsoft SQL Database Engine installation procedure will start at the same time Please wait until it completes...

Страница 66: ...DG SC8860VI User Manual 66 13 Following screen will appear Click on Finish A new icon will appear on your computer s desktop you can double click on it to start SKYROS iView...

Страница 67: ...al 67 5 Getting familiar with SKYROS iView Software To start SKYROS iView double click SKYROS iView icon on your computer s desktop Or click Start button of Windows and select All Programs SKYROS iVie...

Страница 68: ...l appear as shown below Default user ID is admin and default password is none leave it blank click OK The main window of SKYROS iView will appear EXIT Date Time Remaining disk space Camera Index Selec...

Страница 69: ...ly IP camera s video will be displayed To leave full screen mode press Esc key on your keyboard Camera Scan When you click this button SKYROS iView will scan the camera for the video display and switc...

Страница 70: ...camera you wish to add from Camera dropdown list and check the box Image Lost and or Motion Detected then select the direction of camera icon this will help you to remember the orientation of camera o...

Страница 71: ...video recording When recording video this button will appear as red Schedule Enable schedule recording You must define schedule in advance before you can enable schedule recording Camera Index Select...

Страница 72: ...e bottom right area of SKYROS iView The description of the items is listed as follows Item Description Pan Tilt control Click the direction arrow to control camera s pan tilt Pan Tilt speed Drag the s...

Страница 73: ...cruise This function is only available for supported cameras 5 1 Configure SKYROS iview Before you can use SKYROS iView you must configure at least one IP camera To enter configuration menu click Conf...

Страница 74: ...figure SKYROS i view user list Detailed description of every sub menu will be given in following sections 5 1 1 Device You should configure at least one IP camera video server before you can use SKYRO...

Страница 75: ...d on your local area network will be listed In this example an IP camera has been found at IP address 192 168 1 10 Add the password of the respective IP camera and click on Detect Device to verify the...

Страница 76: ...Input the network settings of IP camera including IP address HTTP port number user name password After you found an IP camera add it manually click Add to list button and the IP camera will be listed...

Страница 77: ...ing at all Please note that if you don t have any IP camera added in the camera list you will not be able to enter this setup menu The description of every item is listed as follows Item Description S...

Страница 78: ...camera from the list and its video will appear with a grid pattern Use the mouse to click blocks on the grid pattern to assign the areas you wish SKYROS iView to detect ignore motion SKYROS iView will...

Страница 79: ...is menu without saving changes You also have to setup sensitivity Drag the slide bar to setup sensitivity level from 1 to 10 Larger number indicates more sensitivity To apply this motion detection set...

Страница 80: ...or not No Do not display caption on camera view Camera ID Displays Camera s ID Camera ID Camera Name Displays both camera s ID and camera s name Data Storage Setting Setup hard disk data storage Enab...

Страница 81: ...its parameter Remove Select a pre defined storage space and click this button to remove it from the list Start up Condition Select the behavior of SKYROS iView when computer starts up You can select...

Страница 82: ...the image of camera by email 1 to 10 attachments only Email alerts Interval Input the time interval between two emails A new email will not be sent within the interval you specified here even a new ev...

Страница 83: ...Manual 83 5 1 4 Schedule You can configure recording schedule in this sub menu When you enter this sub menu for first time click Add Job button to add a new schedule recording job A new window will ap...

Страница 84: ...dule There are total 48 x 7 blocks in a week schedule where every block represents half an hour You can use mouse to click on the block to add or delete time period If recording is activated in that t...

Страница 85: ...every week you can use this function to specify a time period Select Start and End date time and click Add Modify button to add the time period to the list You can also select an existing time period...

Страница 86: ...stalled too To add a new event click Add button and a new window will appear on the right for you to setup a new event To remove an existing event select an event in the list and click Remove button T...

Страница 87: ...ail An email will be sent when alarm is triggered Play Sound Play a sound on the computer where SKYROS iView is installed To add a new sound file copy the wav file to the following directory C Program...

Страница 88: ...a and perform limited system configuration schedule record camera map and video playback Administrator s user ID is always admin and cannot be changed You can only change admin s password in Administr...

Страница 89: ...r Check the boxes that you wish to give privilege Multi Camera View Operation Allows multi camera view Camera Map Operation Allows to show E MAP Scheduling User can start or stop schedule recording Re...

Страница 90: ...DG SC8860VI User Manual 90 5 2 Video Playback 5 2 1 Start Video Playback To view recorded video you can click Playback button in SKYROS iview s main screen A new window will appear...

Страница 91: ...f following two functions Please refer to following chapters for detailed instructions of every search mode 5 2 2 Advanced Search You can search for recorded video within specific time period and get...

Страница 92: ...a day field by keyboard directly When you finish click SEARCH button to search for recorded video and You will get a similar output like this In this picture a recorded video of Camera 1 has been fou...

Страница 93: ...DG SC8860VI User Manual 93 Blue Manual Recording Green Recording is triggered by motion To view the video check the box of camera ID then click Play button...

Страница 94: ...DG SC8860VI User Manual 94 And the video will be prepared for playback For instructions of video playback please see section 5 2 4 for detailed instructions Recorded Video Clip...

Страница 95: ...ou can search for video for playback by triggering event round the clock motion detection or digital input To search for video you have to specify 1 Starting and Ending time for video searching in Sta...

Страница 96: ...search for 3 Camera You can check all cameras you wish to search for video To select camera ID more than 16 click right or left button to select camera ID up to 64 or click Select All to select all ca...

Страница 97: ...DG SC8860VI User Manual 97 You can select the video clip you wish to play and click Play button RECORDED VIDEO FILES...

Страница 98: ...DG SC8860VI User Manual 98 For instructions of video playback please see section 5 2 4 for detailed instructions...

Страница 99: ...video playback screen will look like this The description of every item is listed as below Item Description Close Window Click X mark to close video playback window Video Playback Control Start video...

Страница 100: ...is stopped you can click or button to adjust video playback speed from 1 4 to 4x speed You cannot adjust video playback speed when video is playing Image Processing Click this button to take a snapsho...

Страница 101: ...ick Cancel Click Reset to reset image parameters back to default value Time Displays the current time displays video zoom in displays video zoom out 6 Secureview Application for Android phones devices...

Страница 102: ...VI User Manual 102 Step2 Click magnifier icon at upper right corner of Android market and input Secureview in search field You should be able to search the Secureview App If not please check the spell...

Страница 103: ...Manual 103 Step3 Tap on the Install button to download install Secureview App Step4 Once you tap Install Android will prompt you to confirm installation please tap Accept Download button below to sta...

Страница 104: ...DG SC8860VI User Manual 104 Please be patient while the application is getting installed Step 5 Once the application is installed tap on Open to launch the Secureview utility...

Страница 105: ...60VI User Manual 105 You can also launch the Secureview APP from the All Applications please refer the below screen for more detail Step6 Launch the utility by clicking on Secureview icon in the menu...

Страница 106: ...ly Name You can define a name for this IP camera for easy identification Host Here you need to enter an IP Address or a Domain name i e URL of an IP camera HTTP Port Enter the HTTP port of an IP camer...

Страница 107: ...is admin Password Input the password of IP camera Default password is admin Location If you click on this field it will open a window as shown below Click OK Then click on Add Device It will direct to...

Страница 108: ...has been added successfully it will be listed under Device List List Displays the added IP cameras under Device List Map Displays a Map window To view the video click on the desired camera You can vie...

Страница 109: ...his option to show the PTZ controls for PTZ supported IP cameras For non supported IP cameras this tab will be grayed out If you have added DG SC3800P IP camera which supports PTZ feature The followin...

Страница 110: ...wing screen will appear Enter the desired preset number as specified in the Web GUI of an IP camera click on OK to move the IP camera to that particular position 1 Patrol Tap this option to keep the I...

Страница 111: ...eature is enabled on an IP camera 5 Zoom Tap this option to enable the digital zoom 6 Snap Tap this option to take a snap of the current view of an IP camera To go back click on Device List tab on the...

Страница 112: ...lete an IP camera click Edit tab on the upper left corner under List tab Click Done to apply the changes It will direct to main interface To exit the Application click on back button of your phone in...

Страница 113: ...e follow the below mentioned instructions Step 1 To install Secureview application launch App Store In your Apple device tap All Apps menu Step 2 Click magnifier icon at upper right corner of App Stor...

Страница 114: ...DG SC8860VI User Manual 114 Step 3 Tap on the Install button to download install Secureview App Please be patient while the application is getting installed...

Страница 115: ...User Manual 115 Step 4 Once the application is installed tap on Open to launch the Secureview utility You can also launch the Secureview APP from the All Applications please refer the below screen for...

Страница 116: ...menu option If you are using an iPad go to App Store input Secureview in Search Field The following screen will be displayed Under iPhone Apps Secureview application will be listed Click on it to inst...

Страница 117: ...ra HTTP Port Enter the HTTP port of an IP camera Default port is 80 if any other port is used then please enter that port RTSP Port Enter the RTSP port of an IP camera Default port is 554 if any other...

Страница 118: ...cation Click Ok Tap Save to add the IP Camera and proceed When an IP camera has been added successfully it will be listed under Device List List Displays the added IP cameras under Device List Map Dis...

Страница 119: ...er Configuration Video Video Setting Under Mobile View enable 3GPP with audio to get the real time audio video while streaming on an iPad iPhone using Secureview App To view the video click on the des...

Страница 120: ...supports PTZ feature The following icons will appear under the live view If you tap the PTZ button the following screen will be displayed The highlighted icons are for future update The arrows indica...

Страница 121: ...s option to capture the audio of an IP camera To disable this feature tap the same button again This tab will be highlighted only if Audio feature is enabled on an IP camera 4 Speak Tap this option to...

Страница 122: ...er Manual 122 To Edit modify the settings of an added IP camera Click on arrow mark in front of the desired IP camera Click on Edit tab on upper right corner make the modifications It will display the...

Страница 123: ...To remove delete an IP camera tap and hold the desired camera in the list It will display a delete button as shown in below image You can also click Edit tab on the upper left corner under List tab t...

Страница 124: ...cut filter Video Compression H 264 MPEG 4 MJPEG Image resolution 1080P 1920 x 1080 30 fps 960P 1280 x 960 30 fps 720P 1280 x 720 30 fps VGA 640 x 480 30 fps QVGA 320 x 240 30 fps Digital Zoom 10x ONVI...

Страница 125: ...address of IP Camera again Please make sure the network cable is correctly connected to your local area network Please make sure power cable is correctly connected to IP Camera Please make sure IP Cam...

Страница 126: ...Protocol over Ethernet Is a network protocol for encapsulating Point to Point Protocol PPP frames inside Ethernet frames TCP IP Transmission Control Protocol Internet Protocol TCP is used along with t...

Страница 127: ...P network cameras with less circuitry hence consumes less power produces higher frame rate is less costly as compared to CCD sensors Pan Tilt IP cameras with panning capabilities can move back and for...

Страница 128: ...nfrared radiation Reflection type filters are short pass interference filters that reflect infrared light with high efficiency Day Night function DG SC8860VI has IR LED array for better visibility und...

Отзывы: