background image

8

OPERATORS MANUAL | 

Copyright 

©

 2006 Digimerge Technologies Inc.

DHU500 Series - Front


SECTION 1

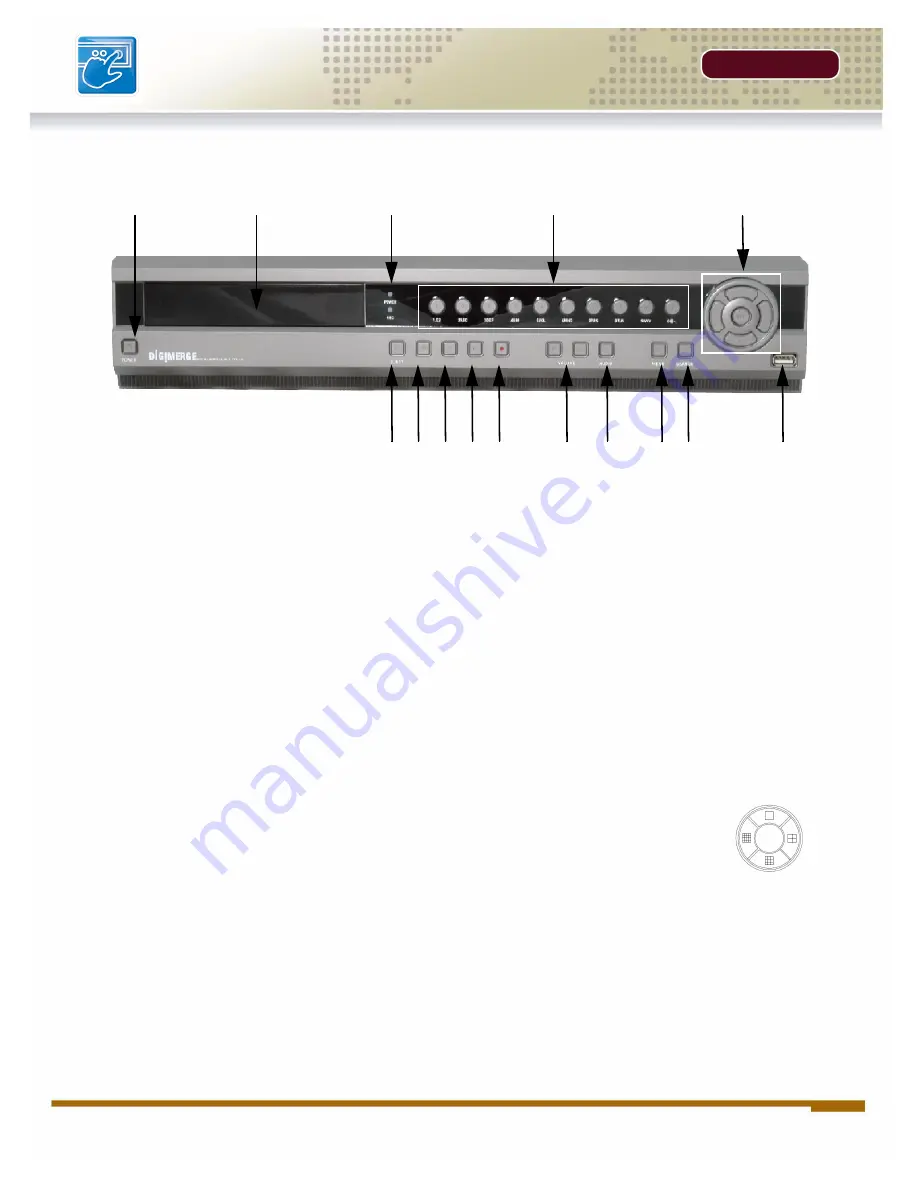
DHU500 Series - Front

1. 

POWER - 

Turns the DVR unit ON/OFF

.

2. 

CDRW DRIVE

 - Drive bay for CD-RW Drive

3. 

LED POWER AND HDD LIGHTS 

- Indicates unit power and HDD activity

4. NUMBER / LETTER PAD

• Use the numbers to switch between cameras in View mode.

• Use the Numbers and Letters for Menu data input.

5. 

SCREEN SELECT / MENU NAVIGATION - 

Performs a dual purpose:

• Changes the Camera view to Single, 4 Camera, 9 Camera or 16 Camera views.

• Use the 

KLIJ

 buttons to navigate through the MENU options (in MENU mode). 

6. 

STOP / EJECT - 

Stops the playback of a previously recorded event / Ejects the CDRW Drive.

7. 

PAUSE - 

Pauses the playback of a previously recorded event.

8. 

REV - 

REVERSES the playback of a previously recorded event.

1

2

3

4

5

6

7

8

9

11

12

13 14

10

15

Содержание DHU500

Страница 1: ...Copyright 2007 Digimerge Technologies Inc OPERATOR S MANUAL English version 1 0 DHU500 SERIES MPEG4 Networkable DVR ...

Страница 2: ...companying the appliance WARNING TO PREVENT FIRE OR SHOCK HAZARD DO NOT EXPOSE THIS UNIT TO RAIN OR MOISTURE CAUTION TO PREVENT ELECTRIC SHOCK MATCH WIDE BLADE OF PLUG TO WIDE SLOT FULLY INSERT Thank you for purchasing the DHU500 Series DVR Digimerge is committed to providing our customers with a high quality reliable security product The DHU500 Series line of Pentaplex Network DVR s offer a full ...

Страница 3: ...y examine the cord and if its appearance indicates damage or deteriorated insulation have it replaced by your service technician 7 Power Cord Protection Power supply cords should be routed so that they are not likely to be walked on or pinched by items placed upon or against them paying particular attention to cords at plugs convenience receptacles and the point where they exit from the video prod...

Страница 4: ... by the video product manufacturer can prevent fire electric shock or other hazards 16 Safety Check Upon completion of any service or repairs to this video product ask the service technician to perform safety checks recommended by the manufacturer to determine that the video product is in safe operating condition 17 Wall or Ceiling Mounting The cameras provided with this system should be mounted t...

Страница 5: ... is connected z Consult the dealer or an experienced radio or television technician for assistance DIGIMERGE TECHNOLOGIES INC http www digimerge com NOTE This equipment has been certified and found to comply with the limits regulated by FCC EMC and LVD Therefore it is designated to provide reasonable protection against interference and will not cause interference with other appliance usage However...

Страница 6: ...s 18 Date Time Search 19 Calendar Search 19 Backup Menu 20 Log View 21 Accessing with Web Client 22 Internet Explorer Settings Active X Controls 22 Internet Explorer Settings Allowing Pop Ups 23 DigiClient Software 24 Minimum System Requirements 24 Logging Into Live Monitoring 24 Web Client Main Window 25 Channels Window 26 Detail Tabs 26 Remote Local Controls 26 System 27 Remote Local Controls 28...

Страница 7: ...LOCATION AND CONTROL SECTION 1 DHU500 Series Front View 8 DHU500 Series Rear View 10 ...

Страница 8: ...cameras in View mode Use the Numbers and Letters for Menu data input 5 SCREEN SELECT MENU NAVIGATION Performs a dual purpose Changes the Camera view to Single 4 Camera 9 Camera or 16 Camera views Use the KLIJ buttons to navigate through the MENU options in MENU mode 6 STOP EJECT Stops the playback of a previously recorded event Ejects the CDRW Drive 7 PAUSE Pauses the playback of a previously reco...

Страница 9: ...he currently displayed camera 11 VOLUME UP DOWN Raises and Lowers the system volume 12 AUDIO Switches between cameras 1 4 to receive audio z Only one channel audio available on the 4 Channel DVR Model 13 MENU Accesses the DVR system menu options See page 16 for details 14 SEARCH Accesses the Search Menu See page 40 for Search Menu options 15 USB PORT Connection port for a removable USB Hard Drive ...

Страница 10: ...ased on the DVR model 4 Channel 8 Channel or 16 Channel 2 AC INPUT Connect the AC power using the power cord provided with the unit from the DVR to an electrical outlet 3 COMPOSITE A Composite Video OUT connection used to connect the DVR to a Slave Monitor or DVR 4 S VIDEO Outgoing connection for S VIDEO 5 VGA PORT Used to connect the DVR to a computer Monitor 6 AUDIO INPUTS Connect up to 4 camera...

Страница 11: ...ot available on 4 Channel DVR Model 9 ETHERNET PORT Connects the DVR to a router for connection to the internet Refer to the Instructions on Page 51 for Remote Connection 10 NTSC PAL SWITCH Changes the DVR unit between NTSC and PAL modes 11 ALARM SENSOR BLOCK Ports for connecting an Alarm or Sensor Device such as a Motion Sensor or Window Door Sensor 7 8 9 10 11 ...

Страница 12: ......

Страница 13: ...REMOTE CONTROL SECTION 2 Remote Control 14 ...

Страница 14: ...ses the DVR Menu System SEL CONTROLS Switch between display modes Single Quad 9 and 16 SEL used as the Select function in the Menu VOL Adjusts the Volume UP DOWN REC Starts Stops Manual Recording PTZ Accesses the Pan Tilt Zoom Setup menu OSD Configures the On Screen Display settings LOG View system log details AUDIO Switches the current Audio Channel only one audio channel on the 4 Channel DVR mod...

Страница 15: ... Starting the DVR Self Test Screens 16 Starting the DVR QUAD Display 16 Powering Off the DVR 16 Main Menu Control 17 Event Search Funstion 18 Accessign the DVR Locally Remotely 22 Web Client Software 24 Web Client Main Window 25 ...

Страница 16: ...UAD MODE with the following information displayed on screen CH1 CH4 Camera title indicators HDD Percentage of Hard Drive used MM DD YYYY HH MM SS The current system date and time If a camera is not detected or the Camera is in COVERT MODE the associated portion of the QUAD or MULTI screen will display a BLUE SCREEN Powering Off the DVR Stopping Recording In order to power down the DVR Unit or to m...

Страница 17: ...guration screen Outlined below are the buttons used to access menu settings NOTE After 60 seconds of inactivity in the Menu mode the system will go back to the previously displayed live camera screen KLIJ SEL MENU Scroll up and down within a menu option Change menu options Press this button to select and change the values in a menu option Complete modifications of a menu option exit a menu DISPLAY...

Страница 18: ...he Event Search Menu Search Event HDD Date PLAY ALL Internal 01 01 2006 01 01 01 Date Time Search Calendar Search Backup LOG LIST 1 01 01 2006 01 01 01 Power Fail 01 01 2006 02 02 02 Power On 01 01 2006 03 03 03 Video Loss 01 01 2006 04 04 04 Power Off 01 01 2006 05 05 05 Record Start 01 01 2006 05 05 06 Record Stop 01 01 2006 05 05 06 Record Error 01 01 2006 06 06 06 Motion CH3 Log Year Month 200...

Страница 19: ...s to highlight and press the SEL button to play Calendar Search Search and play previously recorded events in Calendar format Dates with recording set to ON will have brackets 1 YEAR Select the Year Press the K and L buttons to highlight and press IJ buttons to select a year 2 MONTH Select the Month Press the K and L buttons to highlight and press IJ buttons to select a month 3 DATE Select a date ...

Страница 20: ... the DVR unit where AVI can be played through WIndows Media Player FROM TO Specify the date range for backup CHANNEL Select an individual Channel 1 16 depending on the DVR model to backup to the Memory Stick in AVI Format If the File Format is set to Exclusive all channels will be backed up Transfer Sends the data to the memory stick or CDRW 3 Select the Calculate Backup Size option This will prov...

Страница 21: ...listing and pressing the SEL button to start the playback NOTE Not all events are viewable recordings i e Power Fail Menu Set etc These event types are displayed for record purposes only and do not provide corresponding video LOG LIST 1 01 01 2006 01 01 01 Power Fail 01 01 2006 02 02 02 Power On 01 01 2006 03 03 03 Video Loss 01 01 2006 04 04 04 Power Off 01 01 2006 05 05 05 Record Start 01 01 200...

Страница 22: ... http 216 15 59 221 http tomsmith digimerge net If you are using a different Web server port number you will need to add this to the end of the address i e using port 2005 http 216 15 59 221 2005 http tomsmith digimerge net 2005 Internet Explorer Settings Active X Controls To correctly load the Web Client Software the security settings in Internet Explorer may need to be adjusted 1 Open Internet E...

Страница 23: ...own menu 2 Select Always Allow Pop ups from This Site 3 A prompt window will appear to Allow the Pop Up from this site Select YES NOTE If you have a Pop Up blocker installed you may need to disable it prior to loading the Web Client Software Internet Explorer Settings Installing the Active X Controls The Web based client software requires the use of Active X Controls 1 Click on the Security warnin...

Страница 24: ...r Hard Drive Space Minimum of 30 MB Install Space Additional hard drive space is required for saving DVR data to the local PC Logging Into Live Monitoring Once the Web or Digi Client application has loaded through Internet Explorer a pop up window will appear Log in as Username admin Password 00000000 may be different if the default system password on your DVR was changed The Web Client or Digi Cl...

Страница 25: ...s are Live or previously recorded 6 Disconnect Exits the Web Client Software 7 Pan Tilt Zoom Controls for Pan Tilt Zoom enabled cameras 8 Display Options Changes the view of the currently displayed cameras 1 4 8 9 or 16 9 Connect Button Reconnect to the DVR if the connection is lost 10 Setup Controls features for the Remote DVR or Local PC and Firmware Updates 11 Channel Buttons Displays individua...

Страница 26: ...Displays camera event messages Motion Alarm Sensor and Video Loss NOTE Double clicking on a MOTION event will display a list of all events and double clicking on an event will start the playback of the previously recorded video 3 Info Displays system information retrieved from the DVR 4 Status Indicates the status of the DVR and Cameras Remote Local Controls Controls the playback of events at the ...

Страница 27: ... remote DVR and pressing the REC button a second time stops the recording The system password will need to be provided to stop the Recording 3 Playback Plays back previously recorded events from the DVR Pressing the PLAY Button opens the Event Search window Select a Start Time and End Time and click OK Select an event from the Playback list and click the START button to begin the playback Once the...

Страница 28: ...rding Pressing the REC Button starts recording from the remote DVR to the local PC 3 Playback Plays back previously recorded events recorded to the PC Pressing the PLAY Button opens the Event Search window Select options Download or Live Backup and press OK Select a Start and End Time and press OK Select and Event from the list and press Start Once the playback begins on the Web Client additional ...

Страница 29: ...nge for download Options within the Advanced options allow for specific channels to be retrieved all channels are retrieved by default Choose a Start Time and an End time to retrieve The data will be downloaded to the C DGClient Download directory 2 Save Saves an copy of the onscreen images to JPG to the C DGClient Saved directory A window will appear once the successful copying has been completed...

Страница 30: ...indow will appear Clicking YES will exit the software Pan Tilt Zoom Controls for Pan Tilt Zoom enabled cameras Pan Tilt Zoom Focus OSD Controls Panning Controls Left Right Up and Down Alert Indicators Alarm Motion and Video Loss Reset all Events 1 Pan Tilt Controls the Pan and Tilt of PTZ enabled cameras not available on the 4 channel model 2 Zoom Focus Controls the Zoom and Focus of PTZ enabled c...

Страница 31: ...the Username and Password Setup Controls features for the Remote DVR or Local PC 1 Remote Setup Setup and Configuration on the remote DVR 2 Local Setup Setup and Configuration on the local Web Client 3 Firmware Upgrade Use the local PC Web Client to update the Remote DVR Firmware Remote Setup Changes made to the Remote Setup will adjust the settings on the Remote DVR The setup controls 4 different...

Страница 32: ...lay sequence for all available cameras Any camera set to Bypass will not be displayed in DVR Sequencing mode QUADDisplaySequenceSubmenu ConfigurestheQUADdisplaysequenceforallavailable cameras Any page contains 4 cameras set to Bypass will not be displayed in DVR QUAD Sequencing mode Camera Covert Turns Camera display ON OFF The DVR unit will continue to record even if all cameras are set to OFF ...

Страница 33: ...ns the recording for audio channels ON or OFF z Repeat Recording Sets recording repeat to ON or OFF i e Overwrite options z Watermark Embedding Embeds a watermark into the recording Set to ON or OFF z Recording Resolution Changes the recording Resolution Recording Group Controls 4 subgroups Normal Alarm Motion and Schedule z Normal Page Configures the number of FPS Frames per Second and sets the R...

Страница 34: ...ailable Cameras The Alarm Duration in seconds can also be set to a maximum of 150 Seconds Use the SET Menu Button to turn Alarm Recording ON or OFF for each available camera z Motion Page Configures the number of FPS Frames per Second Recording Quality and Sensitivity for all available Cameras Use the SET Menu Button to set up the Motion Detection Area for each available camera ...

Страница 35: ...res the number of FPS Frames per Second and sets the Recording Quality for all available Cameras Use the SET Menu Button to set up the Motion Detection Area for each available camera Recording ON OFF Sets Recording for Alarm Motion and Schedule to ON or OFF ...

Страница 36: ...ration for any external sensor devices connected to the remote DVR such as Door or Window Sensors to a maximum of 4 Alarm OUT Setup Configuration for Alarm type devices maximum of 4 Auto Delete Mode Sets the time period for Auto Delete how long the DVR unit will retain recorded video data This dropdown can be set between 0 Days to 99 Days or to None PTZ Controller Settings for the PTZ Controller z...

Страница 37: ...Alarm to YES or NO for Alarm Motion Video Loss and Power Loss Also sets the duration for the alarm Local Setup Configuration settings for the Local PC Draw Mode Select the color format YUV of RGB Date Format Specifies the date format to be displayed on the image yyyy mm dd mm dd yyyy or dd mm yyyy Save Format Specifies the file format for the saved image JPG or BMP OSD Specifies what information w...

Страница 38: ...DGClient Upgrade folder on the PC 2 Select the Firmware Upgrade option from the Setup Menu IF the new firmware is detected an Upgrade dialogue box will appear Select the Upgrade button 3 A status indicator window appears during the upgrade process 4 Once the update has completed a success window will appear Press OK to the Upgrade window and reboot the remote DVR unit Channel Buttons Displays indi...

Страница 39: ...ICULAR USE OR PURPOSE REPAIR OR REPLACEMENT AS PROVIDED UNDER THIS LIMITED WARRANTY IS THE EXCLUSIVE REMEDY OF THE PURCHASER DIGIMERGE SHALL IN NO EVENT BE LIABLE FOR ANY SPECIAL INDIRECT INCIDENTAL PUNITIVE OR CONSEQUENTIAL DAMAGES OF ANY KIND OR CHARACTER INCLUDING WITHOUT LIMITATION PERSONAL INJURY LOSS OF REVENUE OR PROFITS FAILURE TO REALIZE SAVINGS OR OTHER BENEFITS OR CLAIMS AGAINST THE PUR...

Страница 40: ...It s all on the web Product Information User Manuals Quick Start Guides Specification Sheets Software Upgrades Firmware Upgrades Digimerge Technologies Inc VISIT www digimerge com www digimerge com ...

Отзывы: