background image

                                                                                                                                                    19.0 TFT Active Matrix LCD Panel User Manual                                          

                                                                                                                                                                           English 22 

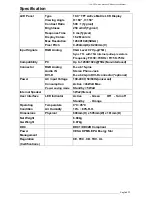
Specification                                                                                               


LCD Panel 

Type 
Viewing Angle 
Contrast Ratio 
Brightness 
Response Time 
Display Colors 
Max Resolution 
Pixel Pitch 

19.0” TFT Active Matrix LCD Display 
H:160° , V:150° 
500 : 1(Typical) 
250 cd/m

2

(Typical) 

8 ms(Typical) 
16.2M colors 
1280X1024(SXGA) 
0.294mm(H)x0.294mm(V) 

Input Signals 

RGB Analog 


VGA Level:0.7Vp-p(75

Sync TTL with 75

 internal pull-up resistors 

Frequency FH:30~79KHz / FV:56~75Hz 

Compatibility 

PC 

Up to 1280X1024@75Hz(Non-interlaced) 

Connector RGB 

Analog 

Audio IN 
DVI-D 

D-sub 15-pins 
Stereo Phone Jack 
D-sub 24-pin DVI-D connector(*optional) 

Power 

AC input Voltage 
Consumption 

Power saving mode 

100-240V, 50/60Hz(universal)   
Active < 48Watt Max 
Standby < 5Watt 

Internal Speaker   

3Wx2(Stereo) 

User Interface 

LED Indicator 

Active      - Green    


Off    - Turn off 

Standby  

-  Orange 

Operating 
Condition 

Temperature 
Air Humidity 

0°C~45°C 
10% ~ 80% R.H. 

Dimensions Physical 

609mm(H) x 505mm(W) x 161mm(D) 

Net Weight 
Gw Weight 

 6.68kg 

8.87kg 

DDC  

DDC1/DDC2B 

Compliant 

Power 
Management 


VESA DPMS, EPA Energy Star 

Regulation 
(Certifications) 


CE, FCC, CB, TUV, UL   


Содержание L-1925

Страница 1: ......

Страница 2: ...y Instructions 3 View of Monitor 4 Unpacking 6 Warning 6 Cleaning Notes 7 Precaution 7 Features 7 Hardware Installation 8 Hardware Installation Step by Step 10 Angle of Inclination 12 Monitor Setup Button 13 Troubleshooting 14 OSD On Screen Display Menu PC Mode 14 Display Mode 21 Specification 22 ...

Страница 3: ...should be noted 6 Never pour any liquid into opening this could cause fire or electrical shock 7 Never open the equipment For safety reason the equipment should only be opened by qualified service personnel 8 If one of the following situations arises get the equipment checked by a service personnel a Liquid has penetrated into the equipment b The equipment has been exposed to moisture c The equipm...

Страница 4: ...19 0 TFT Active Matrix LCD Panel User Manual English 4 View of Monitor Front View 1 Back View 2 ...

Страница 5: ...19 0 TFT Active Matrix LCD Panel User Manual English 5 View of Monitor Side View 3 Top View 4 5degrees 15 degrees ...

Страница 6: ...al cable DVI and Video are optional Power Cord Audio Cable with Stereo Phone Jack Quick Start Guide CD User s Manual Warning 1 Make sure that the system power is turned off 2 Plug the signal cable to the signal connector at the rear of PC 3 Plug adapter output cable to the jack at the rear of LCD monitor and the power cord to the adapter 4 Connect the power cord to power source 5 Turn on the compu...

Страница 7: ...arby 5 Do not use harsh chemicals or strong cleaning solvents to clean the monitor screen Wipe it with clean soft clothes applied with mild solution 6 Do not place anything on your monitor Bad ventilation may elevate temperature in the monitor 7 Don t use your fingers to touch the LCD screen directly Fingerprint contains oil and may be difficult to clean Features Power Saving The power management ...

Страница 8: ...LCD monitor It s very delicate and easy to break Turn off LCD s and PC s power before installation Follow the installation step by step described below Input 1 POWER IN This is for connecting the power cable 2 AUDIO IN This can be connected to the audio out connector of any sound resource 1 3 2 4 ...

Страница 9: ...19 0 TFT Active Matrix LCD Panel User Manual English 9 3 VGA IN This can be connected with the D Sub 15 pin signal cable 4 DVI D input This is the connector for digital video signal inputs option ...

Страница 10: ...llation Step by Step 1 Open the sealed cover of the rear connectors on the monitor 2 Turn your monitor upside down carefully with panel facing you to locate all connector port 3 Plug in signal cable to VGA IN of the monitor and the other side of the cable to the computer ...

Страница 11: ...ect the audio cable to AUDIO IN on the monitor and the other side to computer line out 5 Plug in signal cable to DVI D of the monitor and the other side of the cable to the computer 6 Plug power cord onto the AC IN on monitor 7 Seal the cover and get ready to turn on the monitor with your computers ...

Страница 12: ...t the forward inclination of 5 degrees or backward inclination of 15 degrees The flexible design of this monitor allows user to store from the perpendicular angle to horizontal angle by keeping the locking hitch unlocked showing above Please refer to the figures below With the space saving ideas this monitor offers you with the most reasonable way to store or move from one place to another ...

Страница 13: ...on below 1 Power Turn the LCD power on and off When the power is on the light turns green and standby in the color of orange 2 AUTO Exit and save the setting Hot key for auto adjustment 3 MENU Press the button to display OSD main menu and select OSD Option 4 Up Increase the value in the OSD option 5 Down Decrease the value in the OSD option Hot key for volume adjustment Power Up Auto Adjust OSD Me...

Страница 14: ...rchased the monitor Characters look too dark or too bright Check 1 Using OSD Menu to adjust the Contrast When shall your monitor be adjusted Check 1 After reset 2 If the resolution of frequency is being changed The text on the screen is unclear Check 1 Make sure the resolution matches with the display mode OSD On Screen Display Menu PC Mode Option select 1 Press the MENU button to access menu 2 Us...

Страница 15: ...ode BRIGHTNESS Adjust the difference between light and dark area BRIGHTNESS COLOR ADJUST Adjust the RED GREEN and BLUE colors of the display Click ENTER to adjust the R G B color separately COLOR ADJUST RED Adjust the RED color of the display RED BLUE Adjust the BLUE color of the display BLUE ...

Страница 16: ...Display Menu Mode PC Mode COLOR TEMP Adjust the color temperature of the display COLOR TEMP BACK Return to the Main Menu Screen BACK COLOCK Adjust the re flash ratio of the vertical scanning area CLOCK PHASE Adjust the re flash ratio of the horizontal scanning area PHASE ...

Страница 17: ...ADJUST Automatically adjust the re flash ratio of both vertical and horizontal scanning areas of the display AUTO ADJUST H POSITION Adjust the horizontal viewing area of the display H POSITION V POSITION Adjust the Vertical viewing area of the display V POSITION BACK Return to the Main Menu Screen BACK ...

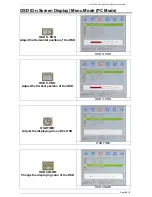
Страница 18: ...reen Display Menu Mode PC Mode OSD H POS Adjust the Horizontal position of the OSD OSD H POS OSD V POS Adjust the Vertical position of the OSD OSD V POS OSD TIME Adjust the displaying time of the OSD OSD TIME OSD COLOR Change the displaying color of the OSD OSD COLOR ...

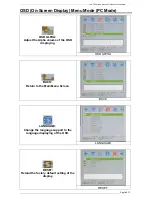
Страница 19: ...play Menu Mode PC Mode OSD ALPHA Adjust the Alpha volume of the OSD displaying OSD ALPHA BACK Return to the Main Menu Screen BACK LANGUAGE Change the language support to the language displaying of the OSD LANGUAGE RESET Reload the factory default setting of the display RESET ...

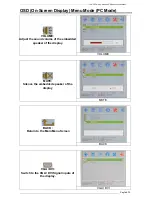
Страница 20: ...een Display Menu Mode PC Mode VOLUME Adjust the sound volume of the embedded speaker of the display VOLUME MUTE Silence the embedded speaker of the display MUTE BACK Return to the Main Menu Screen BACK VGA DVI Switch to the VGA DVI Signal inputs of the display VGA DVI ...

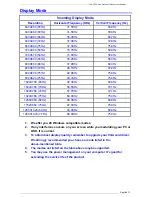
Страница 21: ...024X768 60Hz 48 3KHz 60 0Hz 1024X768 70Hz 56 5KHz 70 1Hz 1024X768 72Hz 57 7KHz 72 1Hz 1024X768 75Hz 60 0KHz 75 0Hz 1280X960 60Hz 60 0KHz 60 0Hz 1152X864 75Hz 67 5KHz 75 0Hz 1280X1024 60Hz 64 0KHz 60 0Hz 1280X1024 75Hz 80 0KHz 75 0Hz 1 We offer you 20 Windows compatible modes 2 If any interference occurs on your screen while you modulating your PC or OSD It is normal 3 To obtain best display qualit...

Страница 22: ...FV 56 75Hz Compatibility PC Up to 1280X1024 75Hz Non interlaced Connector RGB Analog Audio IN DVI D D sub 15 pins Stereo Phone Jack D sub 24 pin DVI D connector optional Power AC input Voltage Consumption Power saving mode 100 240V 50 60Hz universal Active 48Watt Max Standby 5Watt Internal Speaker 3Wx2 Stereo User Interface LED Indicator Active Green Off Turn off Standby Orange Operating Condition...

Отзывы: