background image

LX-DANTE 

User’s Guide 

v1.00 

- Look for the device name ending in the last six characters of its MAC address, or: 
- After selecting a device at random, use the Identify feature in the Dante Controller (see below) to check which card it is. 
 

Device View Window


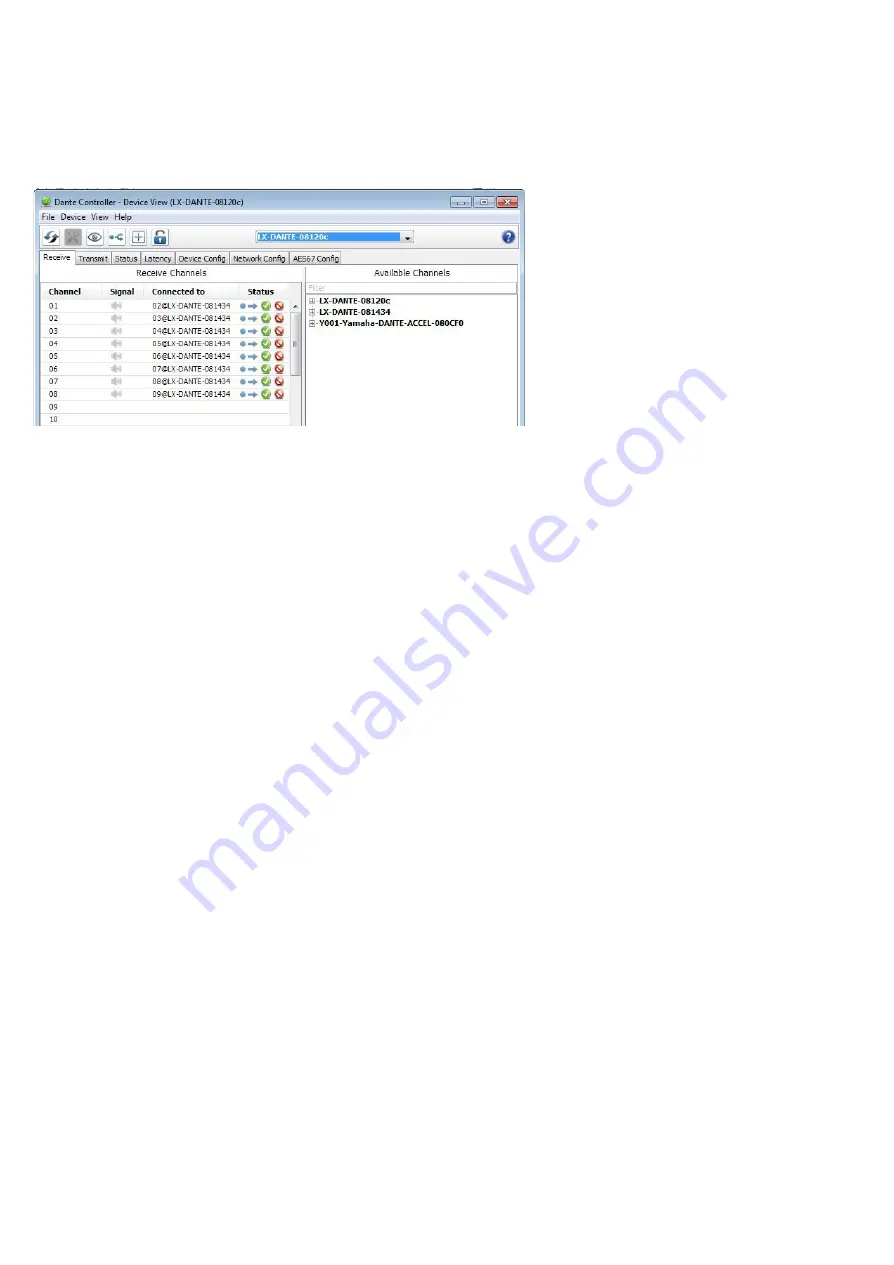
The Device View has five tabs: Receive, Transmit, Status, Device Config and Network Config. The Receive tab for a configured 
LX-DANTE card is shown below. 


Identifying Individual LX-DANTE cards


When there are multiple computers with LX-DANTE card in your network, you can use the Identify feature to know which card is which. 
Once you have selected a particular card within Device View in the Dante Controller, you can click on the Identify icon in the Device View 
toolbar. This will cause all of the LEDs on the LX-DANTE card to flash green for about ten seconds. 
 

Changing the Device Name


 By default the device name for the LX-DANTE card  is ****- nnnnnn, where **** is the name of the card and nnnnnn is a unique 
alphanumeric identifier consisting of the last six digits of the MAC address. This is the name the card will have when you first use it. It is 
possible to replace the LX-DANTE card default device name with a custom, user-defined name. To do this open Device View in the Dante 
Controller, select the card you wish to modify in the Device View, and change the Device Name in the Device Config tab. If you rename a 
device, you must re-establish any existing audio routing to and from the re-named device using its new name. Please refer to the Dante 
Controller User Guide for more information on renaming devices. 
 

Changing Channel Labels 


To change channel labels in Dante Controller:  

Open the Device View for the relevant device.  

Click the Receive or Transmit tab (depending on which channel labels you want to edit).  

Double-click the channel label. 

Enter a new value. Tx (transmit) labels must be specific to that device. 


Changing the Sample Rate 


Audio routing can only be set up between devices that are operating at the same sample rate. It is possible to set the sample rate to any 
one of the following values: 44.1, 48, 88.2, 96, 176.4, and 192 kHz. To do this, open Device View in the Dante Controller, select the card 
you wish to modify in the Device View, and change the sample rate in the Device Config tab. Pull-up/pull-down (+4.1667, +0.1, - 0.1, and 
-4.0 %) is also supported. Please refer to the Dante Controller User Guide for more information on changing sample rates. 
 

Setting the Latency 


To adjust the latency setting, open a Device View for the selected device in Dante Controller, and select the Device Config tab. This allows 
several device settings to be viewed and modified. It shows the current receive latency setting and allows the user to change the operating 
receive latency for the selected device.  
The allowed values are:  

0.15ms (150 microseconds) - a suitable setting for a network containing a single network switch  

0.25ms - a suitable setting for a network containing 3 network switches  

0.5ms - a suitable setting for a network containing where the signal path may encompass up to five network switches  

1.0ms - a suitable setting for a network containing where the signal path may encompass up to ten network switches  

5.0ms – a safe value for a network of almost any conceivable size 


NOTE  
Even if you set values suited for your network, various factors may cause some noises. If a value other than the current setting is selected 
a message will be displayed warning the user that the effect of changing the latency is that any existing audio routing to the device will be 
temporarily suspended, resulting in some loss of audio data. If you wish to make the change select Yes button; otherwise select No. 
 

13


Содержание LX-DANTE

Страница 1: ...LX DANTE Professional Multichannel Sound Cards with Dante connectivity User s guide Version 1 00 June 2018 ...

Страница 2: ...er Digigram S A Parc de Pré Milliet 38330 Montbonnot FRANCE Tel 33 0 4 76 52 55 01 Fax 33 0 4 76 52 53 07 E mail info digigram com Digigram Asia Pte Ltd 60 Albert Street 19 11OG Albert Complex Singapore 189969 Singapore Tel 65 6291 2234 Fax 65 6291 3433 E mail info_asia digigram com 2 ...

Страница 3: ...terrupt and memory address 6 DRIVER INSTALLATION 7 The installation of the driver package requires administrator rights on your computer 7 1 Installation under Windows 7 2 Removing the driver 8 HOW TO CHECK THE INSTALLATION 9 SELECTING THE ASIO PARAMETERS 10 CONFIGURATION OF THE DANTE PARAMETERS 10 1 Connecting to a Network 10 2 Using Dante Controller 10 3 AES67 compatibility mode 11 Troubleshooti...

Страница 4: ...n unshielded peripheral data cable could also result in harmful interference to radio or television reception The user is cautioned that any changes or modifications not expressly approved by the party responsible for compliance could void the user s authority to operate this equipment To ensure that the use of this product does not contribute to interference it is necessary to use shielded I O ca...

Страница 5: ...hannels 3 2 Main software features Real time simultaneous recording and playback of up to 128 mono I O channels in PCM 24 bits from to a Dante network Exposed software audio devices ASIO devices under Windows Alsa devices under Linux 4 REQUIREMENTS 4 1 Supported operating systems LX DANTE runs under the following operating systems Windows OS from Windows 7 32 bits and 64 bits Windows Server as of ...

Страница 6: ...assis or case provides a dedicated support to keep the card securely in place in order to avoid physical damage The card has to be installed in the computer prior to installing its driver 5 1 Installing the card Gently plug the card in a free PCIe slot at least 4x PCIe and press it down to position it firmly Tighten the screw 5 2 Interrupt and memory address Hardware interrupt and addresses are au...

Страница 7: ...the same software components have already been installed in your computer you can use the same procedure as described in the installation instructions here to update the software 7 1 Installation under Windows Restart your computer once the card is correctly inserted in it Click on Cancel if the Found New Hardware Wizard appears Double click on the LX DANTE driver package icon to launch the driver...

Страница 8: ...ound video and game controllers Confirm that the Digigram LX DANTE Card appears in the list Start an ASIO capable software application From this application select ASIO for the type of supported driver Select LX DANTE card You can then select the input channels LX DANTE Rx1 to LX DANTE Rx128 and the output channels LX DANTE Tx1 to LX DANTE Tx128 9 SELECTING THE ASIO PARAMETERS The size of the buff...

Страница 9: ...m LX DANTE control panel opens ASIO Buffer size buffer size for the ASIO driver Setting value 32 to 2048 samples DMA Transaction Size buffer size for the card Setting value 16 32 samples Installation of the LX DANTE driver is now complete 9 ...

Страница 10: ...udinate com Choosing Ethernet Cabling Dante uses completely standard Ethernet and IP so it also uses standard Ethernet cabling STP including Cat5e or higher and fiber optic Make sure your Ethernet cables and ports are in good condition Remember that Ethernet cables which are Cat5e or higher have a maximum length of 100 meters at speeds of 1Gbps the cable length limit depend on the cable type If yo...

Страница 11: ...t support redundancy should be connected to both the Primary and Secondary networks The primary and secondary networks MUST NOT be interconnected at any point 1 Make sure all computers are set to automatically configure their IP address 2 Power on the network switch 3 Connect your Primary Ethernet cables from each device to the Gigabit ports of the Primary network switch 4 Connect your Secondary E...

Страница 12: ... Channels can be viewed by clicking on the symbol next to Dante Transmitters or Dante Receivers or the symbol next to a particular Dante device The Dante Controller User Guide contains detailed information about all aspects of using the Dante Controller This section is only a brief overview you will need to refer to the Dante Controller User Guide to be able to use all features of the Dante Contro...

Страница 13: ...which channel labels you want to edit Double click the channel label Enter a new value Tx transmit labels must be specific to that device Changing the Sample Rate Audio routing can only be set up between devices that are operating at the same sample rate It is possible to set the sample rate to any one of the following values 44 1 48 88 2 96 176 4 and 192 kHz To do this open Device View in the Dan...

Страница 14: ...es transmitting to Dante devices 48 kHz sampling rate only The Dante audio flows from to the device will also be limited to 48 kHz if the device is engaged in AES67 mode 24 bit L24 only for transmission and reception 2 milliseconds fixed latency for reception Primary network only 100 Mbps or slower connections are not supported It is necessary to enable the AES67 mode of the LX DANTE card through ...

Страница 15: ...nable the Dante card Preferred Master status Disable Preferred Master for all Dante devices that have AES67 disabled Disable Sync to External for all devices Assign a PTPv2 priority level of between 128 and 255 for all non Dante devices If another AES67 device Grandmaster Clock or another AES67 device is the Master Make sure the PTP v2 Master has a priority of between 1 and 100 and is using the Me...

Страница 16: ... Obtain an IP address from a DHCP server if it is present on the network The PC or Mac must be connected to the Primary Dante network and must have a correct IP address How do I check which interface Dante Controller is using The selected network interface can be viewed or changed via the Interface Selection button in the Network View toolbar of the Dante Controller How do I check what IP address ...

Страница 17: ...abling Checklist Are all the connected link status lights on the network switch lit or flashing as expected Is the network switch powered on Is the cable correctly plugged in at the network switch and the computer device Is the network switch correctly configured Has QoS been set up correctly Are you using a network switch from another application with an unchecked or untested configuration Did yo...

Страница 18: ...tion Master or slave Audio Audio Channels 128 128 I O channels up to 96kHz 64 64 I O channels 192kHz Supported Sample Rates 44 1 48 88 2 96 176 4 and 192kHz Sample bit depth 24 bit PCM Audio Latency Round trip latency as low as 2 99ms Software environment OS Supported From Windows 7 and from Windows Server 2008 R2 Linux on request Drivers Windows ASIO Linux Alsa Compatibility with expansion chassi...

Отзывы: