Digicam Premium DPI series Скачать руководство пользователя страница 56

User Manual of Network Video Recorder 


56 

4.6


Configuring Holiday Record 

Purpose:   

Follow the steps to configure the record schedule on holiday for that year. You may want to have different plan for 

recording on holiday.   

Steps: 

1.


Enter the Record setting interface. 

Menu>Record> Holiday 
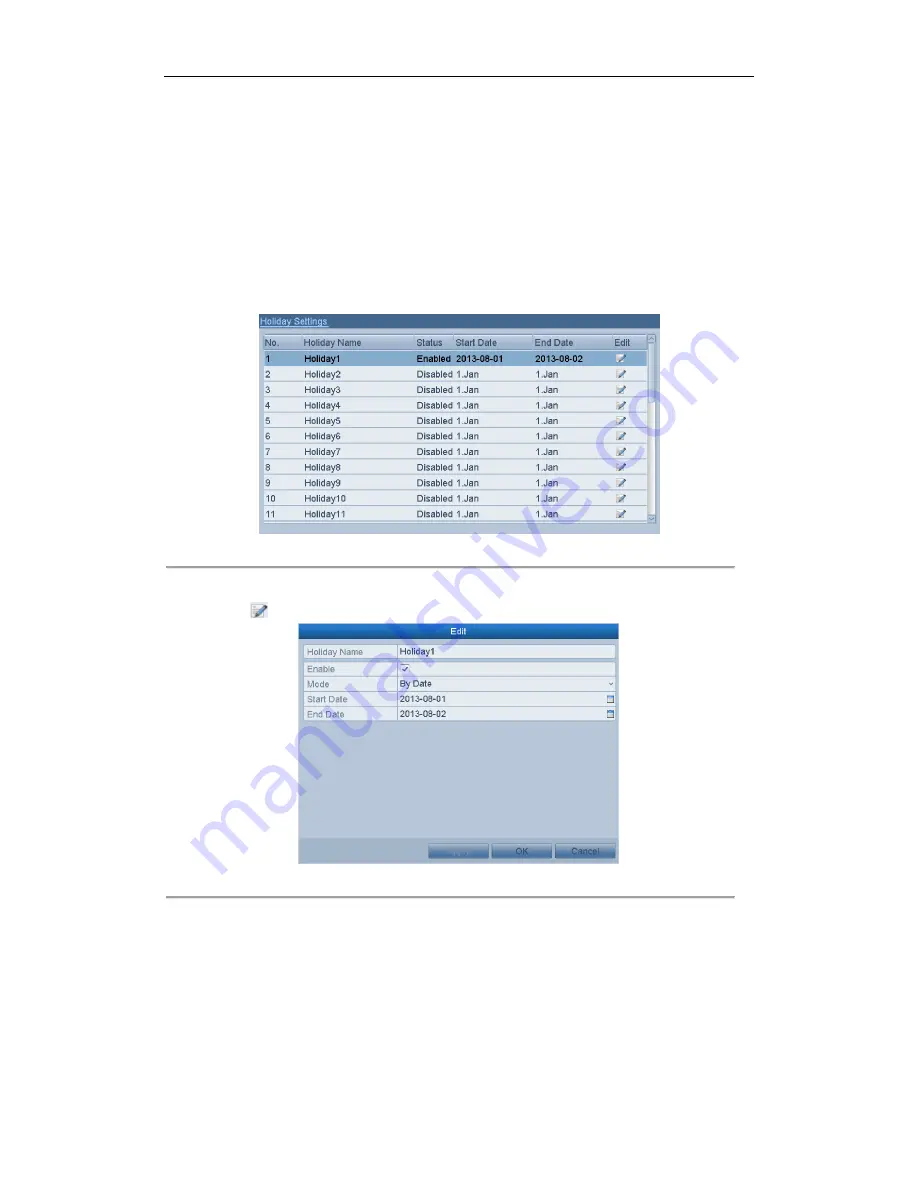
 

Figure 4. 19


Holiday Settings 


2.


Enable Edit Holiday schedule. 

1)


Click 

  to enter the Edit interface. 


Figure 4. 20


Edit Holiday Settings 


2)


Check the checkbox after 

Enable Holiday

3)


Select Mode from the dropdown list. 

There are three different modes for the date format to configure holiday schedule. 

4)


Set the start and end date. 

5)


Click 

Apply

 to save settings. 

6)


Click 

OK

 to exit the Edit interface. 

3.


Enter Record Schedule settings interface to edit the holiday recording schedule. See 

Chapter 5.2 Configuring 

Record Schedule.


Содержание DPI series

Страница 1: ...DPI xxxx series Network Video Recorder User Manual UD 6L0202D1420A02...

Страница 2: ...ce received including interference that may cause undesired operation EU Conformity Statement This product and if applicable the supplied accessories too are marked with CE and comply therefore with t...

Страница 3: ...s properly secured to a rack or shelf Major shocks or jolts to the unit as a result of dropping it may cause damage to the sensitive electronics within the unit Use the device in conjunction with an U...

Страница 4: ...es Model Type 7100NI SN DS 7104NI SN DS 7108NI SN DS 7116NI SN Network Video Recorder 7100NI SN N DS 7104NI SN N DS 7108NI SN N DS 7116NI SN N Network Video Recorder 7100NI SN P DS 7104NI SN P DS 7108...

Страница 5: ...tions Privacy mask Multiple PTZ protocols supported PTZ preset patrol and pattern Zooming in by clicking the mouse and PTZ tracing by dragging mouse HDD Management Up to 2 SATA hard disk can be connec...

Страница 6: ...M network interface for DS 7116NI SN DS 7116NI SN N DS 7116NI SN P DS 7616NI SN DS 7616NI SN N and DS 7616NI SN P and 1 self adaptive 10M 100M network interface for other models Up to 8 independent Po...

Страница 7: ...User Manual of Network Video Recorder 7 Development Scalability SDK for Windows and Linux system Source code of application software for demo Development support and training for application system...

Страница 8: ...iew 38 3 2 Operations in Live View Mode 39 3 2 1 Using the Mouse in Live View 39 3 2 2 Quick Setting Toolbar in Live View Mode 40 3 3 Adjusting Live View Settings 42 3 4 User Logout 44 Chapter 4 Recor...

Страница 9: ...guring DDNS 98 8 2 3 Configuring NTP Server 102 8 2 4 Configuring Remote Alarm Host 103 8 2 5 Configuring Multicast 103 8 2 6 Configuring RTSP 104 8 2 7 Configuring Server and HTTP Ports 104 8 2 8 Con...

Страница 10: ...es 131 11 3 Importing Exporting Configuration Files 134 11 4 Upgrading System 135 11 4 1 Upgrading by Local Backup Device 135 11 4 2 Upgrading by FTP 135 11 5 Restoring Default Settings 137 Chapter 12...

Страница 11: ...User Manual of Network Video Recorder 11 Chapter 1 Introduction...

Страница 12: ...n network connection is functioning properly Figure 1 2 Front Panel of DS 7600NI Series Table 1 2 Description of Front Panel No Name Description 1 Status Indicator Power Power indicator turns yellow w...

Страница 13: ...scription 1 POWER Power on off the device 2 DEV Enables Disables Remote Control 3 Alphanumeric Buttons Switch to the corresponding channel in Live view or PTZ Control mode Input numbers and characters...

Страница 14: ...11 PREV Button Switch between single screen and multi screen mode In PTZ Control mode it is used to adjust the focus in conjunction with the A FOCUS button 12 DIRECTION Button Navigate between differe...

Страница 15: ...trol panel or the mouse 2 Check and remember NVR ID The default ID is 255 This ID is valid for all the IR remote controls 3 Press the DEV button on the remote control 4 Enter the NVR ID you set in ste...

Страница 16: ...ovider The operation of the mouse Table 1 4 Description of the Mouse Control Name Action Description Left Click Single Click Live view Select channel and show the quick set menu Menu Select and enter...

Страница 17: ...Input Method Description Figure 1 4 Soft Keyboard Description of the buttons on the soft keyboard Table 1 5 Description of the Soft Keyboard Icons Icons Description Icons Description Lowercase Upperca...

Страница 18: ...al Area Network 5 Audio Out RCA connector for audio output 6 VGA Output DB9 connector for VGA output Display local video output and menu 7 USB Interface Universal Serial Bus USB ports for additional d...

Страница 19: ...1 8 DS 7104NI SN P Figure 1 9 DS 7108 7116NI SN P Table 1 8 Description of Rear Panel No Item Description 1 Power Supply 48VDC power supply 2 Audio In RCA connector for two way audio input 3 HDMI Int...

Страница 20: ...k 5 Audio Out RCA connector for audio output 6 VGA Output DB9 connector for VGA output Display local video output and menu 7 USB Interface Universal Serial Bus USB ports for additional devices such as...

Страница 21: ...tor for LAN Local Area Network 5 Audio Out RCA connector for audio output 6 VGA Output DB9 connector for VGA output Display local video output and menu 7 USB Interface Universal Serial Bus USB ports f...

Страница 22: ...User Manual of Network Video Recorder 22 Chapter 2 Getting Started...

Страница 23: ...s HIGHLY recommended that an Uninterruptible Power Supply UPS be used in conjunction with the device 2 After startup the Power LED indicator blinks red for the DS 7100NI series or turns yellow for the...

Страница 24: ...User Manual of Network Video Recorder 24 Steps 1 Enter the Shutdown menu by clicking Menu Shutdown 2 Click the Logout button to lock the NVR or the Reboot button to reboot the NVR...

Страница 25: ...tarts once the NVR has loaded as shown in Figure below Figure 2 4 Start Wizard Interface Operating the Setup Wizard 1 The Setup Wizard can walk you through some important settings of the NVR If you do...

Страница 26: ...ew Admin Password checkbox Enter the new password and confirm the password in the given fields 5 Click the Next button to enter the date and time settings window as shown in Figure 2 6 Figure 2 6 Date...

Страница 27: ...ndow shown in Figure 2 8 Figure 2 8 HDD Management 8 To initialize the HDD click the Init button Initialization removes all the data saved in the HDD 9 Click Next button to enter the Adding IP Camera...

Страница 28: ...Next button Configure the recording for the searched IP Cameras Figure 2 10 Record Settings 12 Click Copy to copy the settings to other channels as shown in Figure 2 11 Figure 2 11 Copy Record Setting...

Страница 29: ...Network Traffic and Chapter Configuring Network Detection OPTION 1 Steps 1 Move the mouse to the top of the screen or right click the mouse when you in the live view mode to show the right click menu...

Страница 30: ...era is connected The camera is disconnected you can click the icon to get the exception information of camera Delete the IP camera Advanced settings of the camera 2 To add other IP cameras i Click the...

Страница 31: ...u 2 Click the button to add the camera 3 Repeat the step 2 of manual adding of IP camera to add other IP cameras Figure 2 17 IP Camera Management Interface 4 For the encoders with multiple channels on...

Страница 32: ...IP cameras the basic information of the camera lists in the page you can configure the setting of the IP cameras Steps 1 Click the icon to edit the parameters you can edit the IP address protocol and...

Страница 33: ...ation of the Camera 3 Click Apply to save the settings and click OK to exit the interface Configuring the customized protocols Purpose To connect the network cameras which are not configured with the...

Страница 34: ...otocol type and the transfer protocols must be supported by the connected network camera After adding the customized protocols you can see the protocol name is listed in the dropdown list please refer...

Страница 35: ...ls for the details The NVR provide up to 8 extra network interfaces which can connect to 8 network cameras directly and if you disable one you can also connect to the online network cameras And the ex...

Страница 36: ...ace Plug and Play Manual You can disable the extra network interface by selecting the manual while the current channel can be used as a normal channel and the parameters can also be edited Figure 2 26...

Страница 37: ...User Manual of Network Video Recorder 37 Chapter 3 Live View...

Страница 38: ...there are icons at the right top of the screen for each channel showing the status of the record and alarm in the channel so that you can know whether the channel is recorded or whether there are alar...

Страница 39: ...or Vivid Playback playback the recorded videos for current day 3 2 1 Using the Mouse in Live View Right click on the live view window and a live view toolbar appears on the top of the screen as follow...

Страница 40: ...on of Quick Setting Toolbar Icons Icons Description Icons Description Icons Description Enable Disable Record Instant Playback Mute Audio on Digital Zoom Image Settings Live View Strategy Close Instan...

Страница 41: ...r 41 You can set the image parameters like brightness contrast saturation and hue Figure 3 4 Image Settings Customize Live View Strategy can be selected to set strategy including Real time Balanced Fl...

Страница 42: ...ble in this menu include Video Output Interface Designates the output to configure the settings for Only VGA HDMI is selectable by default Live View Mode Designates the display mode to be used for Liv...

Страница 43: ...ew mode in 2 Select the small window and double click on the channel number to display the channel on the window You can click button to start live view for all the channels and click to stop all the...

Страница 44: ...e and if you want to do some operation you need to enter user name and password tog in again Steps 1 Enter the Shutdown menu Menu Shutdown Figure 3 8 Shutdown 2 Click Logout After you have logged out...

Страница 45: ...User Manual of Network Video Recorder 45 Chapter 4 Record Settings...

Страница 46: ...ure You can configure the stream type the resolution and other parameters on your demand Pre record The time you set to record before the scheduled time or event For example when an alarm triggered th...

Страница 47: ...disable audio recording 2 Click Apply to save the settings The parameters of Main Stream Event are read only 3 Parameters Settings for Sub stream 1 Enter the Sub stream tab page Figure 4 3 Sub stream...

Страница 48: ...le Figure 4 4 Record Schedule 2 Choose the camera you want to configure 3 Select the check box after the Enable Schedule item 4 Click Edit button or click on the color icon under the edit button and d...

Страница 49: ...ule recording for other days in the week If the schedule can also be applied to other days click Copy Figure 4 7 Copy Schedule to Other Days IV Click OK to save setting and back to upper level menu V...

Страница 50: ...corder 50 2 Click the Apply button to validate the settings 3 Optional If the settings can also be used to other channels click Copy and then choose the channel to which you want to copy Figure 4 10 C...

Страница 51: ...ter and so on In this chapter you can follow the steps to schedule a record which triggered by the detected motion Steps 1 Enter the Motion Detection interface Menu Camera Motion Figure 4 11 Motion De...

Страница 52: ...you want the motion detection event to trigger recording 6 Click Apply to save the settings 7 Click OK to back to the upper level menu 8 Exit the Motion Detection menu 3 Edit the Motion Detection Reco...

Страница 53: ...playback are supported Purpose Follow the procedure to configure alarm triggered recording Steps 1 Enter the Alarm setting interface Menu Configuration Alarm Figure 4 14 Alarm Settings 2 Click the Ala...

Страница 54: ...o back to the upper level menu Repeat the above steps to configure other alarm input parameters If the settings can also be applied to other alarm inputs click Copy and choose the alarm input number F...

Страница 55: ...ettings interface Menu Manual Or press the REC button on the remote control Figure 4 18 Manual Record 2 Enabling Manual Record 1 Select Record on the left bar 2 Click the status button before camera n...

Страница 56: ...y Settings 2 Enable Edit Holiday schedule 1 Click to enter the Edit interface Figure 4 20 Edit Holiday Settings 2 Check the checkbox after Enable Holiday 3 Select Mode from the dropdown list There are...

Страница 57: ...els you want to investigate by checking the checkbox to 3 Configure the record type file type start end time 4 Click Search to show the results Figure 4 22 Playback Search Result 5 Protect the record...

Страница 58: ...User Manual of Network Video Recorder 58 Figure 4 23 Unlocking Attention...

Страница 59: ...User Manual of Network Video Recorder 59 Chapter 5 Playback...

Страница 60: ...record files recorded during the last five minutes on this channel will be played back Figure 5 1 Instant Playback Interface Playback by channel 1 Enter the Playback interface Right click on the live...

Страница 61: ...bar Button Operation Button Operation Button Operation Button Operation Mute Audio on Start Stop clipping Add default tag Add customized tag Tag management Digital Zoom Pause Play reverse Pause Play S...

Страница 62: ...heck the checkbox of channel s in the channel list and then double click to select a date on the calendar Figure 5 4 Playback Calendar If there are record files for that camera in that day in the cale...

Страница 63: ...Slow forward Fast forward Previous day Next day Scaling up down time bar Process bar Full screen Exit Normal playback Playback progress bar use the mouse to click any point of the progress bar or dra...

Страница 64: ...ck button to play back the file You can click the Back button to back to the search interface Pre play and post play can be configured If the event is set to trigger the recording of multiple channels...

Страница 65: ...Operation Mute Audio on Start Stop clipping Add default tag Add customized tag Tag management Digital Zoom Pause Play reverse Pause Play Stop 30s reverse 30s forward Slow forward Fast forward Previous...

Страница 66: ...e s Refer to Chapter 5 1 1 for the detailed information about searching and playback of the record files Figure 5 11 Interface of Playback by Time Click button to add default tag Click button to add c...

Страница 67: ...earch the tag on your command Figure 5 13 Video Search by Tag 3 Click button to play back the file You can click the Back button to back to the search interface Pre play and post play can be configure...

Страница 68: ...revious day Next day Scaling up down time bar Process bar Full screen Exit Tag playback Playback progress bar use the mouse to click any point of the progress bar or drag the progress bar to locate sp...

Страница 69: ...g Search 4 Playback interface The toolbar in the bottom part of Playback interface can be used to control playing process Figure 5 18 Interface of Playback by Log 5 1 6 Playing Back External File Purp...

Страница 70: ...User Manual of Network Video Recorder 70 You can click the Refresh button to refresh the file list 3 Select and click the button to play back it Figure 5 19 Interface of External File Playback...

Страница 71: ...es to Single frame and one click on the playback screen represents adverse playback of one frame It is also feasible to use button in toolbar 5 2 2 Digital Zoom Steps 1 Click the button on the playbac...

Страница 72: ...resolution reverse playback is supported Steps 1 Enter Playback interface Menu Playback 2 Check more than one checkboxes to select multiple channels and click to select a date on the calendar Figure 5...

Страница 73: ...User Manual of Network Video Recorder 73 Chapter 6 Backup...

Страница 74: ...enu Export Normal 2 Set search condition and click Search button to enter the search result interface Figure 6 1 Normal Video Search for Backup 3 Select record files you want to back up Click to play...

Страница 75: ...want to delete it Select a record file in the backup device and click button to play it Click Format button to format the backup device Figure 6 3 Export by Normal Video Search using USB Flash Drive U...

Страница 76: ...ecord file in Export interface and click button to check it Figure 6 6 Checkup of Export Result using USB Flash Drive 6 1 2 Backing up by Event Search Purpose Back up event related record files using...

Страница 77: ...record files to export Clicking Quick Export button will export record files of all channels triggered by the selected alarm input Clicking Details button will take you to the interface with detailed...

Страница 78: ...rive 5 Select the backup device from the drop down list click the button Export And then click OK button in the popup confirmation dialog So far backup the player is not supported Stay in the Exportin...

Страница 79: ...or stop clipping record file s 3 Quit Playback interface after finishing clipping and you will then be prompted to save the clips A maximum of 30 clips can be selected for each channel Figure 6 13 In...

Страница 80: ...ice from the drop down list click the button Export And then click OK button in the popup confirmation dialog So far backup the player is not supported Stay in the Exporting interface until all record...

Страница 81: ...At least one channel shall be selected Figure 6 18 Normal Video Search for Backup 2 Select record files you want to back up Click Export button to enter Export interface At least one record file shal...

Страница 82: ...ce and click button if you want to delete it Select a record file in the backup device and click button to play it Click Format button to format the backup device Figure 6 20 USB Flash Drive Managemen...

Страница 83: ...User Manual of Network Video Recorder 83 Chapter 7 Alarm Settings...

Страница 84: ...sensitivity Click button and set alarm response actions 3 Click Trigger Channel tab and select one or more channels which will start to record or become full screen monitoring when motion alarm is tri...

Страница 85: ...t up alarm response actions of motion alarm please refer to Chapter 7 6 Setting Alarm Response Actions Repeat the above steps to set up arming schedule of other days of a week You can also use Copy bu...

Страница 86: ...to set up its alarm response actions Figure 7 5 Alarm Input Setup Interface 3 Select Trigger Channel tab and select one or more channels which will start to record or become full screen monitoring whe...

Страница 87: ...py an arming schedule to other days Figure 7 6 Set Arming Schedule of Alarm Input 6 If you want to set handling action of another alarm input repeat the above steps or just copy the above settings to...

Страница 88: ...Setup Interface 2 Set up handling method of video loss Check the checkbox of Enable Video Loss Alarm and click button to set up handling action of video loss 3 Set up arming schedule of the channel 1...

Страница 89: ...action of video loss please refer to Chapter7 6 Setting Alarm Response Actions Repeat the above steps to set up arming schedule of other days of a week You can also use Copy button to copy an arming s...

Страница 90: ...l Check the checkbox of Enable Video Tampering Drag the sensitivity bar and choose a proper sensitivity level Use the mouse to draw an area you want to detect video tampering Click button to set handl...

Страница 91: ...alarm response actions of video tampering alarm please refer to Chapter 7 6 Setting Alarm Response Actions Repeat the above steps to set up arming schedule of other days of a week You can also use Co...

Страница 92: ...twork Disconnected Disconnected network cable IP Conflicted Duplicated IP address Illegal Login Incorrect user ID or password Record Exception No space for saving recorded files Steps Enter Exception...

Страница 93: ...ou must select during Trigger Channel settings the channel s you want to make full screen monitoring Audible Warning Trigger an audible beep when an alarm is detected Notify Surveillance Center Sends...

Страница 94: ...s shall not be repeated or overlapped Figure 7 15 Set Arming Schedule of Alarm Output 3 Repeat the above steps to set up arming schedule of other days of a week You can also use Copy button to copy an...

Страница 95: ...alarm can be cleared only by clicking Clear button in the following interface Steps Select the alarm output you want to trigger or clear and make related operations Menu Manual Alarm Click Trigger Cle...

Страница 96: ...User Manual of Network Video Recorder 96 Chapter 8 Network Settings...

Страница 97: ...gure the following settings NIC Type IPv4 Address IPv4 Gateway MTU DNS Server and Default Route For the DS 7100NI SN N DS 7100NI SN P DS 7600NI SN N and DS 7600NI SN P series NVR you need to configure...

Страница 98: ...save and exit the interface 6 After successful settings the system asks you to reboot the device to enable the new settings and the PPPoE dial up is automatically connected after reboot You can go to...

Страница 99: ...Server Address for IPServer Figure 8 4 IPServer Settings Interface DynDNS 1 Input Server Address for DynDNS i e members dyndns org 2 In the NVR Domain Name text field enter the domain obtained from th...

Страница 100: ...www hiddns com by default 2 Enter the Device Domain Name You can use the alias you registered in the HiDDNS server or define a new device domain name If a new alias of the device domain name is defin...

Страница 101: ...via Web Browser Open a web browser and enter http www hiddns com alias in the address bar Alias refers to the Device Domain Name on the device or the Device Name on the HiDDNS server Example http www...

Страница 102: ...in Figure 8 12 Figure 8 12 NTP Settings Interface 3 Check the Enable NTP checkbox to enable this feature 4 Configure the following NTP settings Interval Time interval between the two synchronizing act...

Страница 103: ...Network Video Surveillance Software is installed and the Alarm Host Port must be the same as the alarm monitoring port configured in the software 4 Click Apply button to save and exit the interface 8...

Страница 104: ...e default RTSP port is 554 and you can change it according to different requirements 4 Click Apply button to save and exit the menu 8 2 7 Configuring Server and HTTP Ports Purpose You can change the s...

Страница 105: ...save the settings 4 Select the Email tab to enter the Email Settings interface Figure 8 15 Email Settings Interface 5 Configure the following Email settings Enable Server Authentication optional Check...

Страница 106: ...multi address the Default Route of the device should be in the same network segment as that of the LAN IP address of the router Steps 1 Enter the Network Settings interface Menu Configuration Network...

Страница 107: ...UPnP settings under the same router the value of the port No for each device should be unique Figure 8 18 External Port Settings Dialog Box 2 Click OK button to save the settings 3 You can click Refre...

Страница 108: ...ngs tab to enter the More Settings interface as shown in Figure 8 13 3 Check the checkbox of Enable High speed Download And click the OK button in the pop up message box to confirm the settings Figure...

Страница 109: ...in real time information of NVR such as linking status MTU sending receiving rate etc Steps 1 Enter the Network Traffic interface Menu Maintenance Net Detect Figure 8 21 Network Traffic Interface 2 Yo...

Страница 110: ...rk delay and packet loss The testing result pops up on the window If the testing is failed the error message box will pop up as well 8 4 2 Exporting Network Packet Purpose By connecting the NVR to net...

Страница 111: ...orting is complete click OK to finish the packet export Figure 8 24 Packet Export Attention Up to 1M data can be exported each time 8 4 3 Checking the Network Status Purpose You can also check the net...

Страница 112: ...f the message box pops out with other information instead of this one you can click Network button to show the quick setting interface of the network parameters 8 4 4 Checking Network Statistics Purpo...

Страница 113: ...gure 8 27 Network Stat Interface 3 Check the bandwidth of IP Camera bandwidth of Remote Live View bandwidth of Remote Playback bandwidth of Net Receive Idle and bandwidth of Net Send Idle 4 You can cl...

Страница 114: ...User Manual of Network Video Recorder 114 Chapter 9 HDD Management...

Страница 115: ...d HDD Click Yes button to initialize it immediately or you can perform the following steps to initialize the HDD Steps 1 Enter the HDD Information interface Menu HDD General Figure 9 2 HDD Information...

Страница 116: ...User Manual of Network Video Recorder 116 Figure 9 5 HDD Status Changes to Normal Initializing the HDD will erase all data on it...

Страница 117: ...ure 9 6 The NVR must be rebooted to enable the changes to take effect Figure 9 6 Storage Mode Settings Interface 3 Select a camera for which you want to configure quota 4 Enter the storage capacity in...

Страница 118: ...th the same quota settings You can also click the checkbox of IP Camera to select all cameras 7 Click the OK button to finish the Copy settings and back to the Storage Mode interface 8 Click the Apply...

Страница 119: ...is displayed on the list as shown in Figure 9 9 Figure 9 9 View HDD Status 1 If the status of HDD is Normal or Sleeping it works normally If the status is Uninitialized or Abnormal please initialize...

Страница 120: ...T information list as shown in Figure 9 11 Figure 9 11 S M A R T Settings Interface The related information of the S M A R T is shown on the interface You can choose the self test types as Short Test...

Страница 121: ...er Manual of Network Video Recorder 121 Figure 9 12 Bad Sector Detection And you can click Error info button to see the detailed damage information And you can also pause resume or cancel the detectio...

Страница 122: ...Configuration Exceptions 2 Select the Exception Type to HDD Error from the dropdown list 3 Click the checkbox s below to select the HDD error alarm type s as shown in Figure 9 13 The alarm type can b...

Страница 123: ...User Manual of Network Video Recorder 123 Chapter 10 Camera Settings...

Страница 124: ...nu Camera OSD 2 Select the camera to configure OSD settings 3 Edit the Camera Name in the text field 4 Configure the Display Name Display Date and Display Week by clicking the checkbox 5 Select the Da...

Страница 125: ...cy mask 3 Click the checkbox of Enable Privacy Mask to enable this feature Figure 10 2 Privacy Mask Settings Interface 4 Use the mouse to draw a zone on the window The zones will be marked with differ...

Страница 126: ...Parameters Steps 1 Enter the Image Settings interface Menu Camera Image Figure 10 4 Image Settings Interface 2 Select the camera to set image parameters 3 You can click on the arrow to change the valu...

Страница 127: ...User Manual of Network Video Recorder 127 Chapter 11 NVR Management and Maintenance...

Страница 128: ...1 Device Information Interface 11 1 2Viewing Camera Information Steps 1 Enter the System Information interface Menu Maintenance System Info 2 Click the Camera tab to enter the Camera Information menu...

Страница 129: ...Info 2 Click the Alarm tab to enter the Alarm Information menu to view the alarm information as shown in Figure 11 4 Figure 11 4 Alarm Information Interface 11 1 5Viewing Network Information Steps 1...

Страница 130: ...terface 11 1 6Viewing HDD Information Steps 1 Enter the System Information interface Menu Maintenance System Info 2 Click the HDD tab to enter the HDD Information menu to view the HDD status free spac...

Страница 131: ...xported at any time Steps 1 Enter the Log Information interface Menu Maintenance Log Information Figure 11 7 Log Search Interface 2 Set the log search conditions to refine your search including the St...

Страница 132: ...logs you searched out Search the log files and then click Export on the Log Search interface to enter the Export interface All the logs you searched out will be exported to the backup device Option 2...

Страница 133: ...e Figure 11 12 Log Export Finished 4 The exported log files will be displayed on a list Click the icon and you can delete the selected log file from the backup device Figure 11 13 Log Export Result Pl...

Страница 134: ...e parameters Steps 1 Enter the Import Export Configuration File interface Menu Maintenance Import Export Figure 11 14 Import Export Config File 2 Click the Export button to export configuration files...

Страница 135: ...e 5 Click the Upgrade button to start upgrading 6 After the upgrading is complete reboot the NVR to activate the new firmware 11 4 2Upgrading by FTP Before you start Ensure the network connection of t...

Страница 136: ...User Manual of Network Video Recorder 136 4 Click the Upgrade button to start upgrading 5 After the upgrading is complete reboot the NVR to activate the new firmware...

Страница 137: ...face Menu Maintenance Default Figure 11 17 Restore Factory Default 2 Click the OK button to restore the default settings Except the network parameters including IP address subnet mask gateway MTU defa...

Страница 138: ...User Manual of Network Video Recorder 138 Chapter 12 Others...

Страница 139: ...following settings Language The default language used is English Resolution Select the output resolution which must be the same with the resolution of the monitor screen Time Zone Select the time zon...

Страница 140: ...ngs interface Menu Configuration General 2 Choose DST Settings tab Figure 12 2 DST Settings Interface You can check the checkbox before the Auto DST Adjustment item Or you can manually check the Enabl...

Страница 141: ...Device Name Edit the name of NVR Device No Edit the serial number of NVR The Device No can be set in the range of 1 255 and the default No is 255 The number is used for the remote and keyboard control...

Страница 142: ...or user name is admin and the password is 12345 The Administrator has the permission to add and delete user and configure user parameters 12 4 1Adding a User Steps 1 Enter the User Management interfac...

Страница 143: ...The added new user will be displayed on the list as shown in Figure 12 6 Figure 12 6 Added User Listed in User Management Interface 5 Select the user from the list and then click the button to enter...

Страница 144: ...ation Locally starting stopping manual recording and alarm output of the selected camera s Remote Manual Operation Remotely starting stopping manual recording and alarm output of the selected camera s...

Страница 145: ...enter the Edit User interface as shown in Figure 12 9 The admin user can also be edited Figure 12 9 Edit User Interface 4 Edit the user information including user name password level and MAC address...

Страница 146: ...User Manual of Network Video Recorder 146 Appendix...

Страница 147: ...S is a method protocol or network service that provides the capability for a networked device such as a router or computer system using the Internet Protocol Suite to notify a domain name server to ch...

Страница 148: ...further process There is an audible warning sound Di Di Di DiDi after a new bought NVR starts up Possible Reasons a No HDD is installed in the device b The installed HDD has not been initialized c The...

Страница 149: ...process The IP camera frequently goes online and offline and the status of it displays as Disconnected Possible Reasons a The IP camera and the NVR versions are not compatible b Unstable power supply...

Страница 150: ...t interfaces separately and digits like D1 and D2 stands for the channel number and X means the selected window has no image output 3 Check if the fault is solved by the above steps If it is solved fi...

Страница 151: ...l 1472 f the IP address may change according to the real condition and check if there exists packet loss Simultaneously press Ctrl and C to exit the ping command 2 Verify the network between NVR and P...

Страница 152: ...do the further process The image gets stuck when NVR is playing back by single or multi channel Possible Reasons a Poor network between NVR and IP camera and there exists packet loss during the trans...

Страница 153: ...he search condition is incorrect c The HDD is error or not detected Steps 1 Verify the system time setting is correct Select Menu Configuration General General and verify the Device Time is correct 2...

Страница 154: ...1600 1200 AV1305M 65175 1280 1024 AV2155 65143 1600 1200 AV2815 65220 1920 1080 AV3105M 65175 1920 1080 AV5105 65175 1920 1080 AXIS M1114 5 09 1 1024 640 M3011 ONVIF compatibility 5 21 640 480 Only A...

Страница 155: ...E DS 2CD852MF E DS 2CD852F E V2 0 build 110426 1600 1200 V5 0 build 100106 DS 2CD862MF E V2 0 build 110426 1280 960 V5 0 build 100106 DS 2CD8464F EI V5 0 2 build 130709 1280 960 DS 2CD863PF NF E V5 0...

Страница 156: ...S 2CD4132FWD I V5 0 4 build 130712 1920 1080 DS 2CD4232FWD I V5 0 4 build 130712 1920 1080 DS 2CD7133 E V5 0 2 build 130709 640 480 DS 2CD733F E I V5 0 2 build 130709 640 480 DS 2CD802NF DS 2CD812PF D...

Страница 157: ...W155 Application 1 66 1280 960 Image data 1 05 WV SW316 Application 1 66 1280 960 Image data 2 03 WV SP105 Application 1 66 1280 960 Image data 1 03 WV SF132 Application 1 66 640 360 Image data 1 03 W...

Страница 158: ...03 02 110315 00 1920 1080 SONY SNC CH220 1 50 00 1920 1080 SNCDH220T ONVIF compatibility 1 50 00 2048 1536 SNC RH124 ONVIF compatibility 1 73 00 1280 720 SNC EP580 ONVIF compatibility 1 53 00 1920 108...

Отзывы: