


7
User_Manual_RP3001k.doc
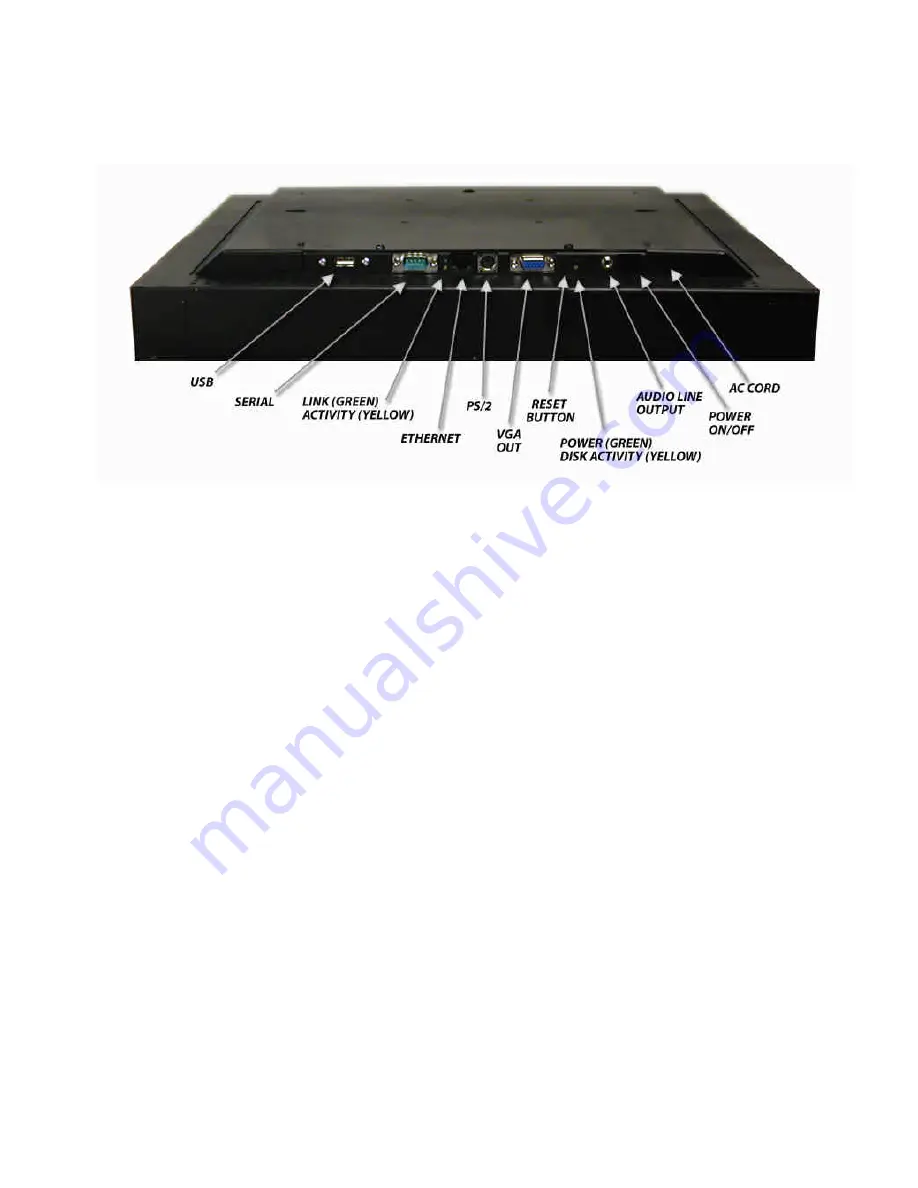
Rear Panel
Indicators:
•
The Network Link LED glows green when the Ethernet cable is connected properly to your hub.
•
The Network Activity LED will flash yellow indicating traffic on your network.
•
The Power LED glows green as long as there is power available to the unit and it is switched on.
•
The Hard Disk LED flashes yellow when the internal hard disk is being accessed.
Connectors:
•
USB Ports – You can plug a USB memory card reader or wireless LAN (wi-fi) module into either port.
See the sections of this manual dealing with those features for information on
supported/recommended devices.
•
Serial Port – This is used for factory service. It may also be used by optional peripherals in custom
applications.
•
Ethernet – Connect your 10baseT or 100baseT Ethernet cable here. NOTE: Due to the orientation of
the ethernet connector, it may be difficult to access the release clip on some types of ethernet cables
in order to disconnect them. We suggest slipping a plastic knife blade, wooden popsicle stick, or similar
non-scratching implement between the release clip and the DF-1710 housing to facilitate connector
release.
•
PS/2 – This connector is used for factory service and optional accessories.
•
VGA Out – You may connect an external VGA monitor, VGA splitter or VGA-to-TV converter here to
repeat the DF-1710’s display on multiple devices.
•
Reset – This button can be used to reset the DF-1710 if a problem is encountered. This should
normally not be necessary; this feature is intended for the convenience of third-party developers.
When planning your Digi-Frame installation, you do not need to allow access to this button.
•
Audio Line Output – This jack accepts a standard 3.5 mm stereo plug and provides stereo line-level
audio outputs for connections to external powered speakers or other audio playback system.
•
Power On/Off – Switches the DF-1710 on and off. When power is switched on the DF-1710’s
backlight will usually turn on automatically in a few seconds, if it does not, switch it on with the
backlight power button on the unit or remote control. You can switch power off at any time without
risk of software or hard disk damage.
•
AC Cord – Connect the attached cord to an AC supply 90 – 240 V 50/60Hz.


