11
Parts List
Profila Operator’s Manual Parts List
26
Страница 1: ...Profila 450 x 150 Road Profiler Operator s Manual...
Страница 2: ...ala Queensland Australia Phone 07 3807 3330Fax 07 3807 1499 Int l Phone 61 7 3807 3330 Fax 61 7 3807 1499 Web Site www digga com E mail mail digga com au Manufacturers of Planetary Drives Augers Trenc...
Страница 3: ...TABLE OF CONTENTS 1 2 TO THE PURCHASER 2 3 TECHNICAL SPECIFICATIONS 3 4 PREPARATION FOR USE 3 5 SAFETY 4 6 PRE OPERATION 9 7 INSTALLATION INSTRUCTIONS 11 8 MAINTENANCE AND SERVICE 17 9 TROUBLESHOOTING...
Страница 4: ...from the position of the operator when behind the product facing forward SAFETY ALERT SYMBOL This is the Safety Alert Symbol used by this industry This symbol is used to warn of possible injury Be sur...
Страница 5: ...s normally located on the machine arms near the front Attaching points on the Profila 150 are the same as the bucket attaching points on your machine Assemble Profila 150 if required Refer Pg 4 Prepar...
Страница 6: ...jury This signal word is to be limited to the most extreme situations typically for machine components which for functional purposes cannot be guarded WARNING Indicates a potentially hazardous situati...
Страница 7: ...hment operator s manuals before ever attempting to use the loader This knowledge is necessary for safe operation 2 Follow all safety decals Keep them clean and replace them if they become worn damaged...
Страница 8: ...trol 8 Always lower the loader arms to the ground shut off the engine and remove the key before getting off the unit TRANSPORTING THE ATTACHMENT 1 Follow all federal state and local regulations when t...
Страница 9: ...luid may develop gangrene or other permanent disabilities If injured by injected fluid see a doctor at once If your doctor is not familiar with this type of injury ask him to research it immediately t...
Страница 10: ...INTERNATIONAL SYMBOLS Profila Operator s Manual Safety 8...
Страница 11: ...uctions sections of this manual See Section B and G respectively Always choose hard level ground to park the attachment on and set the brake so the vehicle cannot roll SKID STEER The DIGGA 150 planers...
Страница 12: ...to various attachment components The purpose of this section is to acquaint you with the various names of these components This knowledge will be helpful when reading through the manual or when orderi...
Страница 13: ...from the front of the loader 3 Following all standard safety practices and the instructions for installing an attachment in your skid steer operator s manual install the planer onto your skid steer NO...
Страница 14: ...laner water kit Your planer is now installed and ready for operation DISCONNECT INSTRUCTIONS 1 Center the planer on the sideshift frame 2 Adjust depth and tilt setting to 0 3 Set Profila on a firm lev...
Страница 15: ...ies may be removed when distance is a factor such as milling next to an obstacle or building OPERATING INSTRUCTIONS 1 Clear area of all bystanders 2 Lift the planer until the drum is off the ground an...
Страница 16: ...the drum tends to ride up out of the cut decrease travel speed be sure the planer is level front to back and exert down pressure until the planer is riding on the skids wheel assemblies For optimal c...
Страница 17: ...e shifted to the right The planer is not designed to mill around tight corners therefore it is recommended that four to six passes be made on each side of the manhole NOTE The more passes the less amo...
Страница 18: ...and creating an uneven surface MILLING TAPER CUTS When adding to or joining new paved surfaces to existing paving a taper cut may be required at the interacting joints so the new paving would appear...
Страница 19: ...used on the lubrication diagram below It is reproduced here with its meaning for your convenience Lubricate daily or every 8 hours of operation whichever comes last with SAE Multi Purpose Lubricant o...
Страница 20: ...k skid steer hydraulic system to ensure an adequate level of hydraulic oil Check all hardware and tighten if necessary See Section O for Bolt Torque Specifications Check hydraulic system for hydraulic...
Страница 21: ...ories and or other damages as a result of their use PICK REPLACEMENT Picks should be replaced if you are changing to a different application pick they are broken worn flat spot or are seized in the pi...
Страница 22: ...ck in the pick holder on the drum and with a lead hammer or rubber headed mallet hit the raised pad of the tool to start the pick into the pick holder Clean out any foreign material from the pick hold...
Страница 23: ...lide the right side plate off 2 Remove the eight M16 hex nuts securing the drum to the planetary 3 Using a pry bar pry the drum off of the planetary and slide out until the drum clears the planetary l...
Страница 24: ...screws flat washers and lock nuts Check to ensure that the hydraulic motor is in the correct position with the ports turned up Torque to specification 6 Reinstall the drum as described in CHANGING THE...
Страница 25: ...blown Replace if necessary Hydraulic motor damaged or seals Call Digga service department for instructions Fittings loose or damaged Tighten or replace Cylinder seals damaged Replace cylinder seals I...
Страница 26: ...the cylinder for damage Cylinder seals damaged Replace cylinder seals Obstruction in hydraulic lines Remove obstruction and replace if necessary Hydraulic cylinders only operating in one direction Con...
Страница 27: ...250 300 338 8 406 5 580 696 786 5 943 8 900 1080 1220 4 1464 5 1 1 8 25 58 800 880 1084 8 1193 3 1280 1440 1735 7 1952 6 1 1 4 31 75 1120 1240 1518 7 1681 4 1820 2000 2467 9 2712 0 1 3 8 34 93 1460 1...
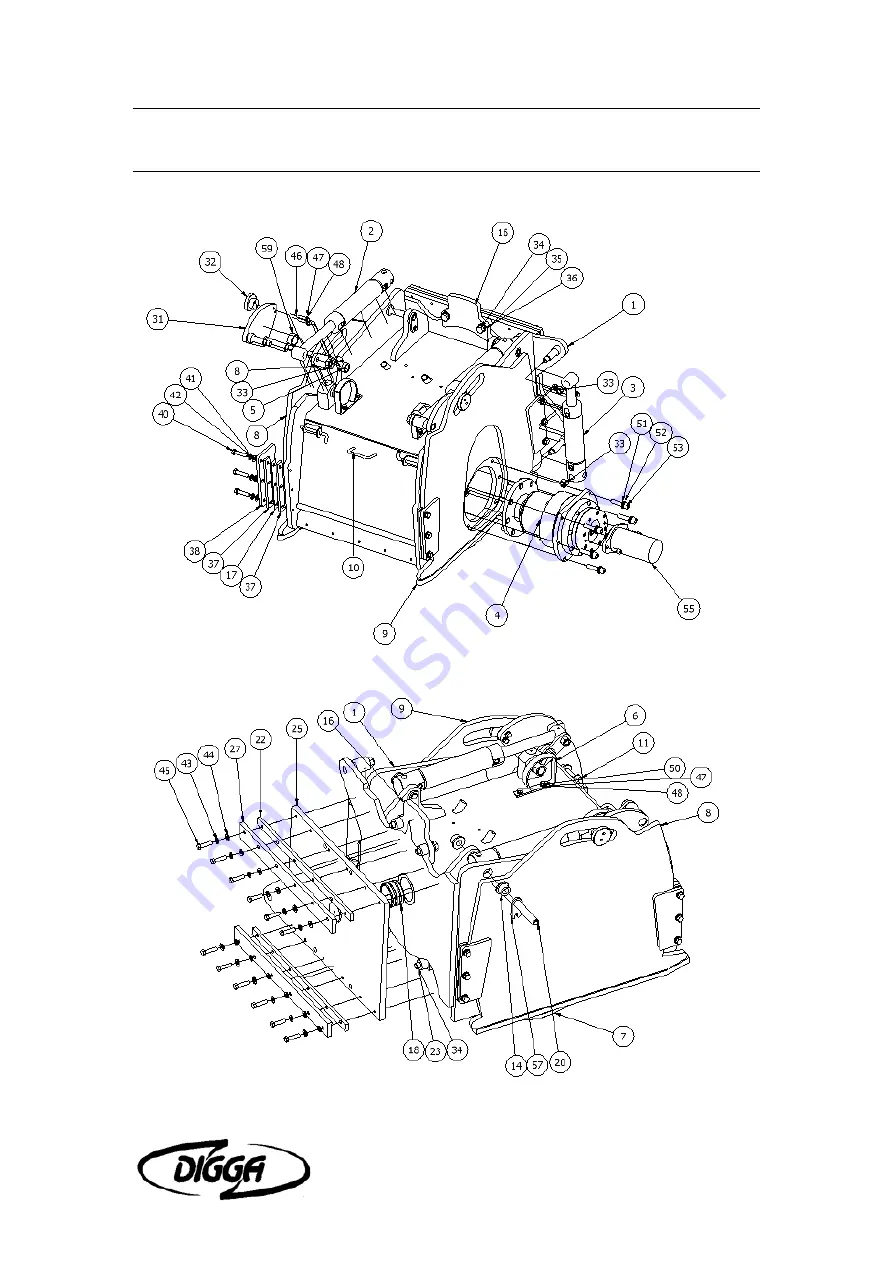
Страница 28: ...11 Parts List Profila Operator s Manual Parts List 26...
Страница 29: ...00240 Clevis Bush 15 2 CP 000290 Shackle Plate 16 1 CP 000300 Angle Indicator Plate 17 4 CP 000310 Spacer Shim 18 1 CP 000340 Bearing 19 1 CP 000360 Tilt Cylinder Pin 20 2 CP 000380 Pivot Pin 21 1 CP...
Страница 30: ...M10 x 1 5 x 55 Hex Bolt 47 14 ANSI B18 22 M 10 N Plain Washer 48 8 ASME B18 21 1 7 16 Helical Spring Lock Washer 49 4 ANSI B18 2 4 2M M10 x 1 5 Hex Nut Style 2 M16 50 4 ANSI B18 2 3 5M M10 x 1 5 x 35...
Страница 31: ...siness at Stapylton Queensland or to a location specified by Digga Any claims under this warranty must be made within fifteen 15 days after the Buyer learns of the facts upon which such claim is based...