


AIRCRAFT
DA 40 Series AMM
Temporary Revision
NLG Inspection & Maintenance
Details Steps/Work Items
Key Items
10.
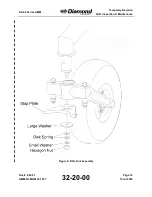
Examine the elastomer pack center tube:
Remove the elastomer pack.
Remove the elastomer elements.
Examine the elastomer pack center tube:
If the center tube shows signs of
deformation: Replace the center tube (refer
to Section 32-20).
If the center tube shows signs of wear:
Replace the center tube if a radial wear limit
(depth measured) of 0.8 mm is exceeded.
Remove the elastomer elements in the event
that they are worn or cracks are found.
Adjustment and installation of the elastomer
pack.
Refer to Section 32-20.
11.
Examine the top hat profile in the bottom of the
fuselage for delamination and disbonding. Look
specially in the area of the bearings for the
nose-gear assembly.
12.
Remove the load from the nose-gear and examine
it. Look specially for more than the usual play.
13.
Examine the control surfaces. Look specially for:
Correct attachment of the hinges.
Correct attachment of the mass balance to the
structure.
14.
Examine the leading edge of the wing for damage.
15.
Examine the area of the spar attachments to the
wing shells. Look specially for cracks.
16.
Examine the leading edge of the horizontal and
vertical stabilizers for damage.
17.
Examine the engine mount.
Doc # 6.02.01
AMM-TR-MÄM 40-1037
05-50-00
Page 11
13 Jul 2020


