background image


1

Introducing FlyBook V5 


Congratulations on purchasing FlyBook V5! 
FlyBook V5 supports both Windows XP and the 
newest member of the Windows operating 
system family, Windows Vista. 


The V5 is a powerful mobile computer which 
performs dual duty as a notebook or tablet 
computer. Advanced networking features include 
WLAN, WWAN, Bluetooth, and even an internal 
modem. 


FlyBook V5 uses a pointing device with mouse 
buttons on both sides of the unit and a clickable scroll bar for added convenience. 
The LCD monitor can be rotated and laid flat to enable you to use FlyBook V5 as 
a tablet computer. Using the stylus, you can write text and draw on the tablet as 
you would on conventional paper. 


The built-in webcam enables you to be seen by contacts using Windows MSN or 
other messaging software. The camera can be rotated 225 degrees for maximum 
flexibility. 


The powerful Li-ion rechargeable battery provides more than 3 hours of mobility, 
making FlyBook V5 the best choice for people on the go. 


Taking a Tour of FlyBook V5 


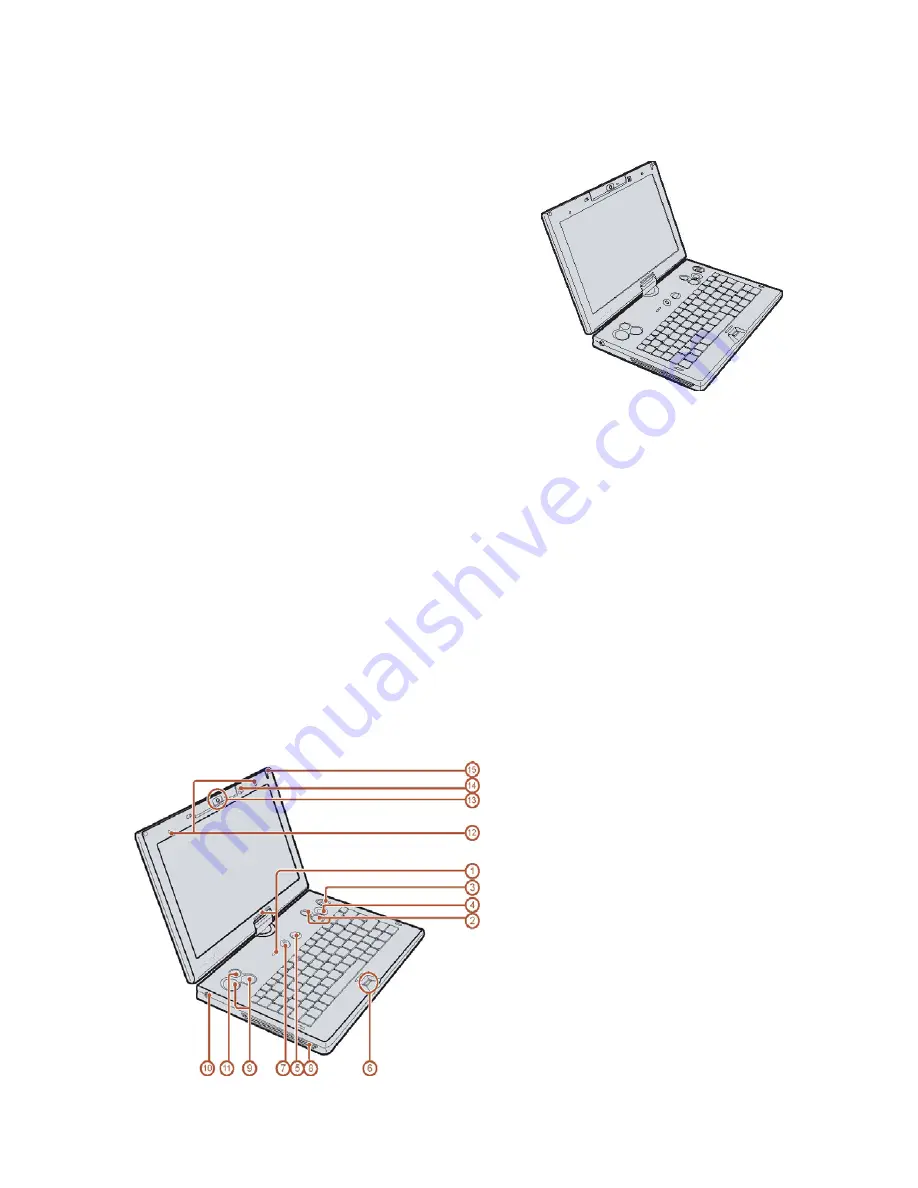
This section describes the major components of your new FlyBook V5. 


Front-Left View 


Содержание Flybook V5

Страница 1: ...FlyBook V5 User s Manual V51BBB...

Страница 2: ...ERPRINT READER 11 USING FLYBOOK V5 INPUT DEVICES 11 USING POINTING DEVICES 11 USING STYLUS 12 USING KEYBOARD 12 FLYBOOK CONTROL CENTER 15 OPENING CONTROL CENTER 15 USING CONTROL CENTER 16 AUTOMATIC BA...

Страница 3: ...28 USING THE BUILT IN BLUETOOTH MODULE 28 USING THE BUILT IN WEBCAM 29 ENABLING THE WEBCAM 29 ADJUSTING WEBCAM ORIENTATION 29 MANAGING POWER SYSTEM 30 CUSTOMIZING SYSTEM BIOS 30 ACCESSING BIOS SETUP...

Страница 4: ...BlueSoleil is a trademark of IVT Corporation Dialogue Technology Corporation is a registered trademark FlyBook is a trademark of the Dialogue Technology Corporation Windows is a registered trademark...

Страница 5: ...ved by the party responsible for compliance could void the user s authority to operate this equipment The antenna s used for this transmitter must not be colocated or operating in conjunction with any...

Страница 6: ...adiator Do not expose the computer to temperatures above 50 C or below 0 C Keep the computer away from direct sunlight or heat sources Do not expose the computer to rain or moisture Do not spill water...

Страница 7: ...modem LAN or power cables from FlyBook V5 before you clean it When using FlyBook V5 in tablet mode use the safety strap to avoid dropping FlyBook V5 Warning The safety strap is only to prevent droppi...

Страница 8: ...outside of the computer case with a soft cloth You can moisten the cloth with a non alkaline detergent Use a vacuum cleaner to clean dust from the keyboard Warning Before cleaning the computer turn i...

Страница 9: ...lickable scroll bar for added convenience The LCD monitor can be rotated and laid flat to enable you to use FlyBook V5 as a tablet computer Using the stylus you can write text and draw on the tablet a...

Страница 10: ...k pointer device The Stick Pointer moves the cursor in the direction of the pressure you apply with your finger RF kill switch Wireless transmission uses power Use this button to disable the wireless...

Страница 11: ...s to the center button on a conventional mouse Stereo Microphones Use the built in stereo microphones for recording sound video conferencing or video chatting with friends Webcam and webcam LED Use th...

Страница 12: ...he TV as an external display 5 Headphone jack Connect headphones or external speakers to the headphone jack 6 Microphone jack Connect a microphone to the microphone jack 7 USB connectors Connect USB d...

Страница 13: ...tablet mode enabling you to use the V5 as you would a tablet computer Using V5 in Clamshell Mode Follow these steps to use the V5 in clamshell mode 1 Open the display 2 Adjust the display to a comfort...

Страница 14: ...ge v 2 Tilt the display forwards until it is vertical Note You can adjust the tilt of the display to adjust for glare sunlight and other environmental factors to provide optimum viewing 3 Twist the di...

Страница 15: ...battery how to connect the AC adapter and how to power up the V5 for the first time Battery Installation When your FlyBook V5 ships the battery is not installed This section explains how to install th...

Страница 16: ...lock to the unlocked position 2 Align the guides on the sides of the battery with the guides in the bay and then install the battery 3 Slide the battery lock to the locked position Warning Always clo...

Страница 17: ...standard charging time is about three hours To charge the battery install it in the computer see Installing the Battery on page 8 and then connect the AC adapter see Connecting AC Adapter on page 9 Co...

Страница 18: ...rging LED blinks quickly Battery s capacity is below 10 Warning If no battery is installed then the battery LED is always off 2 Hard Disk Drive Red The hard drive is being accessed 3 Wireless LAN Off...

Страница 19: ...online help for the fingerprint reader utility Using FlyBook V5 Input Devices FlyBook V5 incorporates several ways to interact with the operating system and applications The V5 has a keyboard that emu...

Страница 20: ...ference Click Help in the pointing device utility for instructions on changing settings Using Stylus The stylus not only emulates a mouse when the V5 is in tablet mode it also enables you to interact...

Страница 21: ...d as follows Note Pressing some function key combinations for example Fn F8 shows an On Screen display OSD to indicate the function used Fn Resume system from suspend mode Fn Esc Repeatedly pressing t...

Страница 22: ...f Fn ScrLk Enables or disables scroll lock Whenenabled press the up or down arrow keys to scroll up or down one line respectively Fn PrtSc Print screen captures the on screen image to the clipboard Yo...

Страница 23: ...pplication key has the same function as the right mouse button Caps Lock Toggles uppercase on and off Note Refer to Windows Quick Start Guide for additional keyboard shortcuts FlyBook Control Center F...

Страница 24: ...nction buttons while the right side pane displays the health information of the system Using Control Center When Control Panel displays 1 Move the pointer over the buttons on the Control Center panel...

Страница 25: ...e wireless LAN WiFi Click to enable or disable the Bluetooth Click to disable all wireless communications devices Automatic Backlight Control Funtion Automatic Backlight Control is to automatically ad...

Страница 26: ...s started 6 You can try to block the Light Sensor with your hand When you do so for 2 seconds the backlight of display will turn dark and once you remove your hand after 2 seconds the backlight will r...

Страница 27: ...r V5 comes with Realtek Sound Manager which enables you to configure connected audio devices To access Realtek Sound Manager click Start Control Panel and then double click the Realtek HD Sound Effect...

Страница 28: ...ce as prompted Caution Be sure the USB icon on the connector is facing downwards as shown in the illustration Connecting a USB cable incorrectly can damage the connector on the computer Connecting an...

Страница 29: ...external monitor 1 Plug the 3 5 mm TV cable adapter into the TV cable jack at the rear of FlyBook V5 2 Connect the other end of the TV cable jack to a composite video RCA cable yellow connector 3 Pres...

Страница 30: ...an ExpressCard when the computer is in standby or hibernate mode Static electricity in your body can damage ExpressCards To reduce the static electricity in your body touch a bare metal table or a gr...

Страница 31: ...fore You Go Online Connecting your computer to the Internet opens the way to potential threats such as viruses and spyware To best secure your computer purchase security software or download it from a...

Страница 32: ...ying adds Once your computer is infected with spyware it can be very difficult to remove The key is to prevent infection in the first place by installing spyware blocker software Spyware blocking soft...

Страница 33: ...hoc mode also known as peer to peer mode wireless devices communicate with each other directly and do not use an access point To connect to a wireless network Press Fn F8 to enable the wireless LAN mo...

Страница 34: ...onnection To make a modem dial up connection 1 Connect a phone jack to the RJ 11 jack at the rear of FlyBook V5 to use the built in modem 2 In Network Connections panel double click the icon of the co...

Страница 35: ...ternet or use the V5 to make phone calls Before using the module you must apply for an access account and get a SIM card and dialing profile from your wireless WAN service provider The SIM card acts a...

Страница 36: ...you to select one and register 3 Double click the WAN connection status icon in system tray to check the connection status Refer to the FlyBook WWAN Utility Guide booklet or the online help for infor...

Страница 37: ...ations that support video messaging such as MSN Messenger or Skype Enabling the Webcam To use the webcam 1 Press Fn Alt to enable the built in webcam 2 Open your favorite application and launch the we...

Страница 38: ...in customizing the computer s power system To start the Power Options utility 1 Click Start Control Panel 2 Double click the Power Options icon to display Power Options Properties window 3 Following...

Страница 39: ...elected Updating BIOS Firmware You can download updated BIOS from the manufacturer s Web site and upgrade the BIOS on your computer New BIOS may provide support for new peripherals improvements in per...

Страница 40: ...board an error message is displayed on the screen and testing is stopped If your system does not successfully start but displays a blank screen emits a series of beeps or displays an error code consul...

Страница 41: ...lay is abnormal 1 The computer may be set to an external display device only Press Fn F1 to switch to the V5 display 2 The power management system may automatically blank the screen to save power and...

Страница 42: ...work key may be used Make sure you have set the network name SSID and key to the same values as the access point infrastructure connection or the computers to be connected Ad Hoc connection have 2 The...

Страница 43: ...em The information may be useful to the service personnel Return the computer to the place you purchased it Power Specification DC In Power Supply Through DC IN Power Jack z Input Rating 15 19Vdc 2 64...

Страница 44: ...2 Caps Lock key 15 clamshell mode 5 connect AC adapter 9 audio devices 18 external display 20 USB devices 20 control Automatic Backlight Control 17 Control Center function 16 opening 15 use 16 display...

Страница 45: ...switch location 2 screen orientation 17 scroll bar location 2 security firewall install 24 spyware blocker install 24 service contact vi having V5 serviced 35 SIM card description 27 install 27 speak...

Страница 46: ...orientation 29 enable disable 29 Windows key 15 Windows keys 15 Wireless LAN connect 25 WLAN enable disable 14 17 25 LED lights 10 WWAN accessing 27 connecting 28 enable disable 14 17 28 LED 10 SIM c...

Страница 47: ...s and software is protected under international copyright laws with all rights reserved Neither this manual nor any of the material contained herein may be reproduced without written consent of the ma...

Отзывы: