


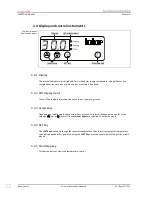


Setup mode
OPERATION MANUAL
Chapter 4
Water Cooler
Errors and omissions excepted.
V1.1.0en/13.12.12
38
4.2.1.2
Draining externally open applications
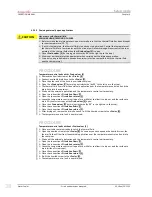
Hot or very cold thermal fluid
SERIOUS BURNS/FREEZING OF LIMBS
Before starting the draining process, you must make sure that the thermal fluid has been brought
to room temperature (20 °C).
If, at this temperature, the thermal fluid is too viscous to be drained: Control the temperature of
the thermal fluid for a few minutes until the viscosity will allow drainage. Never control the tem-
perature of the thermal fluid when the
>Drain valve<
[4] is open.
Close
>Drain valve<
[4] by turning clockwise (by 90° to the right up to the stop).
Wear your personal protective equipment when carrying out the drainage operation.
Drain only using suitable drain hose and container (must be compatible with the thermal fluid
and the temperature).
V14
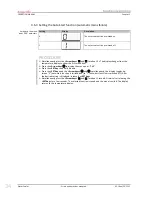
PROCEDURE
Temperature control units with >Drain valve< [4]
Remove the knurled screw at the
>Drain<
[8].
Connect a suitable drain hose to the
>Drain<
[8].
Place the other end of the hose in a suitable container.
Open the
>Drain valve<
[4] by turning anti-clockwise (by 90° to the left up to the stop).
The thermal fluid flows from the external application over the temperature control unit and the
drain hose into the container.
Wait until the external application and the temperature control unit are empty.
Open the connection
>Circulation flow<
[1].
Open the connection
>Circulation return<
[2].
Leave the temperature control unit open for a while for to allow it to dry out and the residue to
drain. Without screw caps with
>Drain valve<
[4] open.
Close the
>Drain valve<
[4] by turning clockwise (by 90° to the right up to the stop).
Close the connection
>Circulation flow<
[1].
Close the connection
>Circulation return<
[2].
After drying out, remove the drain hose and re-fit the knurled screw to the
>Drain<
[8].
The temperature control unit is now drained.
PROCEDURE
Temperature control units without >Drain valve< [4]
Have a suitable container ready to catch the thermal fluid.
Open the knurled screw at the
>Drain<
[8]. As soon as you have opened the knurled screw, the
thermal fluid will flow from the external application over the temperature control unit and into
the container.
Wait until the external application and the temperature control unit are empty.
Open the connection
>Circulation flow<
[1].
Open the connection
>Circulation return<
[2].
Leave the temperature control unit open for a while for to allow it to dry out and the residue to
drain (without screw caps).
Close the connection
>Circulation flow<
[1].
Close the connection
>Circulation return<
[2].
Re-fit the knurled screw to the
>Drain<
[8].
The temperature control unit is now drained.
CAUTION
Содержание BioAcc-cool
Страница 1: ...Cat No BioAcc cool Water Cooler Version 1 1 ...
Страница 6: ...OPERATION MANUAL Water Cooler Errors and omissions excepted V1 1 0en 13 12 12 6 ...
Страница 10: ...OPERATION MANUAL Water Cooler Errors and omissions excepted V1 1 0en 13 12 12 10 ...
Страница 28: ...Commissioning OPERATION MANUAL Chapter 2 Water Cooler Errors and omissions excepted V1 1 0en 13 12 12 28 ...
Страница 50: ...Service maintenance OPERATION MANUAL Chapter 7 Water Cooler Errors and omissions excepted V1 1 0en 13 12 12 50 ...
Страница 58: ......
Страница 59: ...PAGE 55 www diagenode com ...
Страница 60: ...orders diagenode com orders na diagenode com www diagenode com ...