DHS Fitness DHS 2621 Скачать руководство пользователя страница 1

MANUAL DE UTILIZARE

DHS 2621

IMPORTANT!

VA RUGAM SA CITITI CU ATENTIE ACEST MANUAL INAINTE DE A FOLOSI APARATUL.

Содержание DHS 2621

Страница 1: ...MANUAL DE UTILIZARE DHS 2621 IMPORTANT VA RUGAM SA CITITI CU ATENTIE ACEST MANUAL INAINTE DE A FOLOSI APARATUL...

Страница 2: ...a In acest caz trebuie sa consultati doctorul inainte de a va continua antrenamentul 4 Nu lasati copiii sau animalele in preajma aparatului Acest aparat a fost creat pentru a fi folosit doar de catre...

Страница 3: ...3 LISTA PARTILOR COMPONENTE 13 13a...

Страница 4: ...45 46 47 48 48 52 53 54 55 56 57 83 82 80 79 81 62 77 62 58 84 67 68 69 70 71 74 72 73 76 75 67 51 49 86 86 43L 85 43R 86 87 86 85 87 84 87 36 50 47 59 78 58 59 61 62 63 65 64 63 62 61 60 58 59 60 66...

Страница 5: ...5 Piese si unelte 19 d8 20 2 R30 8PCS 18 M8 16 S6 4PCS 39 M16 1 5 27 56 1PC 41 S6 1PC 42 S13 14 15 1PC...

Страница 6: ...1 9 Surub M8 30 S6 2 31 Dop cu rotita 60 70 95 2 10 Saiba arc d8 2 32 Surub ST3 10 5 6 2 11 Fire puls mana 2 33 Bolt M8 73 20 H5 4 12 Surub M5 12 8 2 34 Bara stabilizatoare fata 1 13 Consola 1 35 Piu...

Страница 7: ...54 Magnet rotund 15 7 1 77 Rotita intermediara 39 34 24 1 55 Volanta 220 20 S25 4 6 60 6PJ 1 78 Saiba d12 15 5 0 3 1 56 Brat pedalier 250 152 70 1 2 20 1 79 Arc tragere 2 2 12 51 N12 1 57 Curea 6PJ36...

Страница 8: ...35 M8 H16 S13 4PCS 36R 35 19 33 33 34 19 35 36L 40 33 38 a Asamblati bara stabilizatoare fata 34 si bara stabilizatoare spate 38 pe cadrul principal 40 folosind boltul 33 saiba arc 19 si piulita 35 b...

Страница 9: ...ageti firele reglajului tensiune 23 conectati firele sensor 22 si firele trunchiului 20 apoi introduceti suportul ghidonului 17 in cadrul principal 40 trageti firele reglajului tensiune 23 din locasul...

Страница 10: ...suportul sa 25 pe cadrul principal 40 fixati l folosind surubul 39 dupa ce l ati potrivit in pozitia dorita b Fixati suportul orizontal al seii 29 pe suportul sa 25 folosind saua 27 si surubul 26 c Fi...

Страница 11: ...ghidonului 17 folosind saiba arc 10 si surubul 9 apoi fixati clema capac 8 b Conectati firele trunchiului 20 folosind firele consolei 13a fixati consola 13 pe suportul ghidonului 17 folosind surubul...

Страница 12: ...si pentru piciorul stang Apoi relaxati va si repetati de 3 ori pentru fiecare picior fig 2 3 Intinderea calcaielor Asezati va la perete cu piciorul stang in fata celui drept si cu mainile inainte Pas...

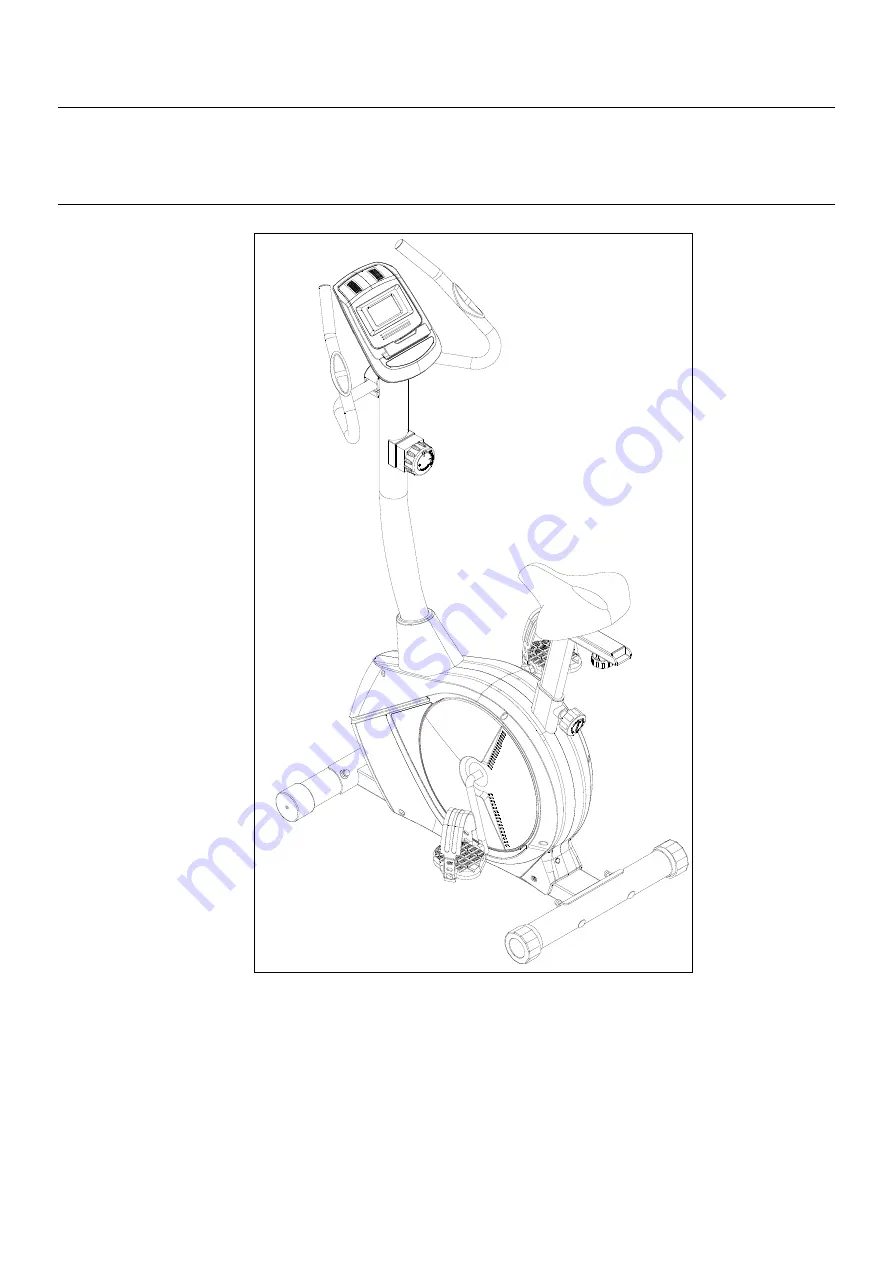
Страница 13: ...User s Manual IMPORTANT PLEASE READ THIS MANUAL CAREFULLY BEFORE USING THE BIKE...

Страница 14: ...ontinuing with your exercise program 4 Keep children and pets away from the equipment The equipment is designed for adult use only 5 Use the equipment on a solid flat level surface with a protective c...

Страница 15: ...EXPLODED VIEW 13 13a...

Страница 16: ...48 48 52 53 54 55 56 57 83 82 80 79 81 62 77 62 58 84 67 68 69 70 71 74 72 73 76 75 67 51 49 86 86 43L 85 43R 86 87 86 85 87 84 87 36 50 47 59 78 58 59 61 62 63 65 64 63 62 61 60 58 59 60 66 68 69 70...

Страница 17: ...PARTS AND TOOLS 19 d8 20 2 R30 8PCS 18 M8 16 S6 4PCS 39 M16 1 5 27 56 1PC 41 S6 1PC 42 S13 14 15 1PC...

Страница 18: ...8 2 1 9 Screw M8 30 S6 2 31 End cap with wheel 60 70 95 2 10 Spring washer d8 2 32 Screw ST3 10 5 6 2 11 Hand pulse wire 2 33 Bolt M8 73 20 H5 4 12 Screw M5 10 8 2 34 Front stabilizer 1 13 Console 1 3...

Страница 19: ...magnet 15 7 1 77 Idler 39 34 24 1 55 Belt plate 220 20 S25 4 6 60 6PJ 1 78 Wave washer d12 15 5 0 3 1 56 Crank 250 152 70 1 2 20 1 79 Pull spring 2 2 12 51 N12 1 57 Belt 6PJ360 1 80 Idler holder 1 58...

Страница 20: ...4PCS 19 d8 20 2 R30 4PCS 35 M8 H16 S13 4PCS 36R 35 19 33 33 34 19 35 36L 40 33 38 a Assemble front stabilizer 34 and rear stabilizer 38 to main frame 40 with bolt 33 arc washer 19 and nut 35 b Assemb...

Страница 21: ...ebar post 17 pull out the tension control wire 23 connect sensor wire 22 and trunk wire 20 then insert the handlebar post 17 into the mainframe 40 pull out the tension control wire 23 from the tension...

Страница 22: ...Insert saddle post 25 into mainframe 40 lock it with knob 39 after adjust it to suitable position b Lock the horizontal seat post 29 on saddle post 25 with bolt 26 and washer 27 c Lock the saddle 30 o...

Страница 23: ...bar 6 on handlebar post 17 with spring washer 10 and screw 9 attach the clamp cover 8 b Connect trunk wire 20 with console wire 13a lock the console 13 on the handlebar post 17 with screw 12 c Insert...

Страница 24: ...n repeat with left leg extend Then relax and repeat 3 times for each leg picture 2 3 Calf Achilles Stretch Lean against a wall with your left leg in front of the right and your arms forward Keep your...

Отзывы: