DGTEC DG-FHD42LCD Скачать руководство пользователя страница 24


23

TV Operation and System Setup                         
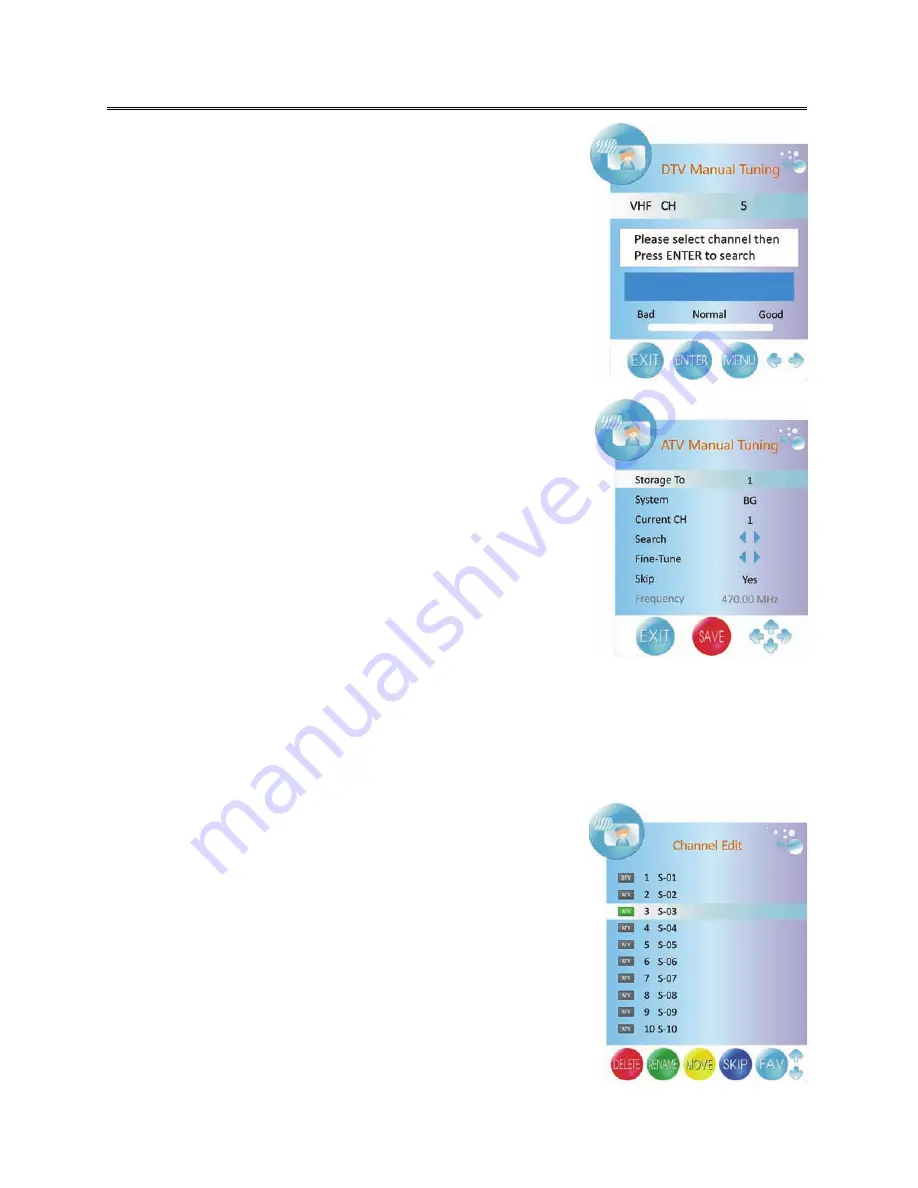
 

DTV Manual Tuning 

—


Press the 

▲▼

 button and navigate to the option 

DTV manual 

Tuning

. Press the ENTER or 

 button to enter. 

—


You can change the channel by using


or


 button. So you 

can define, on which channel shall be runs the search. 

—


Starts the searching by the ENTER button. 

—


To leave the DTV manual tuning, press the EXIT or MENU/BACK 

button. 


ATV Manual Tuning 

—


Press the 

▲▼

 button and navigate to the option 

ATV manual 

Tuning

. Press the ENTER or 

 button to enter. 

—


With the 

▲▼

 buttons you can browse to each setting. 

—


With the 

 or 

 button you can choose the position in the 

channel list, where the found TV channel is stored. 

—


Go to “System” and choose the system by using the 

 or 


button. 

—


Go to “Search” and start by the 

 or 

 button. 

—


By using the 

 or 

 button you can start the fine tuning of each 

TV channel, if the signal is too weak or distorted. 

—


By using the 

 or 

 button you can activate the Skip function. 

Yes - The channel is skipped by changing the TV channel with the CH

▲▼

 button. 

No - The Skip function is deactivated. 

—


Press the red button to save the settings. To leave the ATV manual tuning, press the EXIT or 

MENU/BACK button. 


Channel Edit 

The option Channel Edit includes settings for moving and sorting, 

skip and define favorites. 

—


Press the 

▲▼

 button and navigate to the option 

Channel Edit

Press the ENTER or 

 button to enter. 


Delete a channel 

With this option you can delete single TV channel from the TV list. 

—


With the


▲▼

 button you can choose the TV channel, which 

shall be deleted. 

—


Press the 

RED

 button and beside the chosen TV channel you can 

see a symbol “DELETE”. 

—


Confirm the deleting by pressing again the 

RED

 button. 

Содержание DG-FHD42LCD

Страница 1: ...42 FULL HD LCD TV Instruction Manual DG FHD42LCD Technical Support 1800 189 941 t e s r u o y g n i t a r e p o e r o f e b y l l u f e r a c l a u n a m s i h t d a e r e s a e l P...

Страница 2: ...ting to an External AV Signal Source AV2 13 Connecting to an External AV Signal Source YPBPR 14 Connecting to an External AV Signal Source HDMI 15 Connecting to an External Signal Source AV Output 16...

Страница 3: ...The manufacturer should not hold responsibility for the damage caused by any substitutions and modifications of the product without authorization from the manufacturer or authorized unit WARNING The...

Страница 4: ...pparatus and the mains plug shall remain readily operable 12 Protect the power cord from being walked on or pinched particularly at plugs convenience receptacles and the point where they exit from the...

Страница 5: ...MENU button Press to enter or exit system setup menu 3 CH buttons Press to page up or down through programs in DTV or ATV mode When in setup menu this button also serves as the direction button 4 VOL...

Страница 6: ...5 Controls and connections Rear Panel...

Страница 7: ...6 Power Supply Cord 7 VIDEO and L R Audio output Jacks Connect these outputs to the audio video inputs of the external equipment 8 S VIDEO Input Jack Connecting for S VIDEO signal input in S Video mod...

Страница 8: ...control Stand Installation Please refer to the procedures below to install the stand Before the operations below make sure that the TV set is unplugged and powered off 1 Cover the screen with a soft c...

Страница 9: ...r audio languages menu in DTV mode Press to select sound track in other modes except DTV mode 9 VOL button Press to increase or decrease the volume 10 MUTE button Press to turn on or off the audio out...

Страница 10: ...n Press repeatedly to select the picture mode 26 CH button In ATV or DTV mode press to select analog program or digital program 27 SLEEP button Press the button repeatedly to select the desired time t...

Страница 11: ...for an extended period as damage may result from corrosive leakage invalidating the warranty Batteries shall not be exposed to excessive heat such as direct sunshine fire or the like Using of Remote...

Страница 12: ...er supply cord to AC100 240V wall outlet see the figure below Connecting to TV Signal Input Connect the TV signal cable the antenna cable for example to the antenna input jack on the back of the unit...

Страница 13: ...l source Connect the unit and the external AV signal source to the respective jacks with the S Video cable After connection turn on the power of the TV and the external AV signal source Press the INPU...

Страница 14: ...ables to connect the external AV signal source to the AV input jacks on the rear panel of the unit After connection turn on the power of the TV and the external AV signal source Press the INPUT button...

Страница 15: ...ables to connect the Y PB PR input jacks on the rear panel of the unit to the external AV signal source After connection turn on the power of the TV and the external AV signal source Press the INPUT b...

Страница 16: ...he rear panel of the TV set After connection turn on the power of the TV and the external AV signal source Press the INPUT button then direction buttons to select HDMI1 HDMI2 or HDMI3 mode and then pr...

Страница 17: ...to connect the external AV input device to the AV output jacks on the rear panel of the unit After connection turn on the power of the TV and the external AV signal source Press the INPUT button then...

Страница 18: ...he other end to the PC 2 Connect one end of the audio cable to the VGA audio input jack on the rear panel of the unit and connect the other end to the VGA audio output jack 3 Set the PC video resoluti...

Страница 19: ...ial Digital Output Device This unit is designed with a coaxial digital audio jack can be connected to the digital amplifier see the figure below This feature is available only for amplifier equipped w...

Страница 20: ...designed with a USB update port can be connected to a USB device for upgrading the software see the figure below Make sure that upgrading files are stored in the USB device before connection After upg...

Страница 21: ...he direction button to select the desired input source After several seconds the TV will enter the selected source Or after you selected the desired source press the ENTER button to enter the selected...

Страница 22: ...he installation It helps to quickly set the language and get the channels The Installation Guide menu shown on the right will be displayed on the screen The Language option is highlighted and the defa...

Страница 23: ...Auto Tuning and press the ENTER or button A new popup window appears on the screen There you can see the option country selection Please choose the suitable country by pressing the or button If you ha...

Страница 24: ...and start by the or button By using the or button you can start the fine tuning of each TV channel if the signal is too weak or distorted By using the or button you can activate the Skip function Yes...

Страница 25: ...l by pressing the MENU BACK button To cancel the setting press the EXIT button Skip a Channel With this option you can define single TV channel which can not dial anymore by using the numeric buttons...

Страница 26: ...Picture Mode Press the button to select Picture Mode and press the button to select Standard Mild User or Dynamic The items Contrast Brightness Color Sharpness and Tint are only available when Picture...

Страница 27: ...ss the button to select User Warm Medium or Cool The items Red Green and Blue are only available when Color Temperature is set to User Within the adjusting bar you can select Red Green and Blue by pre...

Страница 28: ...l Pos Press the button to select Horizontal Pos and press the button to move the picture left or right across the screen Vertical Pos Press the button to select Vertical Pos and press the button to mo...

Страница 29: ...rom each other this function will normalize audio level from all channels Press the button to select Auto Volume and press the button to select On or Off Surround Sound Press the button to select Surr...

Страница 30: ...ode Off Time Press the button to select Off Time and press the or ENTER button to prompt a popup window as shown Within the sub menu press the button to select desired item and press the button to set...

Страница 31: ...Press the button to select Audio Language and press the or ENTER button to prompt a popup window as shown Within the sub menu press the button to select Primary or Secondary press the button to selec...

Страница 32: ...r ENTER button to prompt a popup window as shown Press the button to highlight Yes or No press the ENTER button to reset the settings to their default status or cancel This will delete all changes and...

Страница 33: ...EPG information is broadcasted by broadcasting companies Switch on off EPG Press the GUIDE button to switch on EPG Press the GUIDE or EXIT button again to exit EPG and return to TV viewing Button Func...

Страница 34: ...press the button to select desired item and press the button to set it Press the ENTER button to save your settings Press the EXIT button to exit Within the Reminder menu above press the green button...

Страница 35: ...er with the number buttons If during selecting you press a wrong number you must complete the three digit number and then re enter the correct page number FASTTEXT The teletext pages are color coded a...

Страница 36: ...ears Press this button to hold the current page and press again to resume TIME When viewing a TV program press this button to display the time at the top right hand corner of the screen Press this but...

Страница 37: ...ving stereo audio signals press the STEREO button on the remote control repeatedly to shift the sound tracks between Stereo and Mono and the screen will show the corresponding display as shown below 2...

Страница 38: ...r is unsteady Check if the connections with the external AV signal source are correct Correctly set the items in the picture menu Check if the video type input signal is not corresponding to the unit...

Страница 39: ...m 727 mm W D H Dimension without stand 1022 mm 118 mm 681 mm W D H Net Weight About 24 5 Kg Ambient Temperature 10 45 Specifications subject to change without pre notice Weight and dimensions are appr...

Страница 40: ......

Отзывы: