


23
Chapter 2
HARDWARE INSTALLATION
User's Manual |
PR810-C622
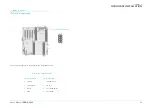
1
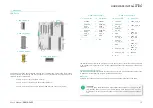
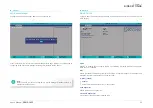
DDR4_12(CPU1)
DDR4_11(CPU1)
DDR4_10(CPU1)
DDR4_4(CPU0)
DDR4_5(CPU0)
DDR4_6(CPU0)
DDR4_1(CPU0)
DDR4_2(CPU0)
DDR4 3(CPU0)
CPU1 Socket LGA3647
DDR4_7(CPU1)
DDR4_8(CPU1)
DDR4_9(CPU1)
PCIe 2
(x16)
PCIe 4
(x16)
PCIe 5
(x16)
PCIe 6
(x16)
PCIe 1
(x8)
PCIe 3
(x4)
PCIe 3-1
(x8)
ATX Power
CPU FAN2
+12V
Power
CPU0 Socket LGA3647
COM1
VGA
LAN1
USB2 1/2
USB3 1/2
LAN2
USB2 3/4
10G_LAN 1/2
1
10
2
12
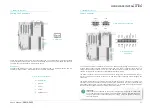
Front Audio
LPC
1
USB2
USB2 7
10
USB2/3
5/6
SM BUS
HEADER
SATA7~1
BMC
Front
Panel
SYS-FAN
JP8
J10
3
J45
J32
1
JP16
JP15
M.2-M
1
1
J16
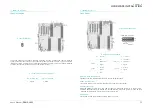
PCI Express x16 Slot
Install a PCI Express x16 graphics card that complies to the PCI Express specifications into the
PCI Express x16 slot. To install a graphics card into the x16 slot, align the graphics card to the
socket and perpendicularly to the board, be cautious in aligning the locations of notch and key,
and then press the card down firmly until it is completely seated. The retaining clip of the slot
will close up automatically to hold the graphics card in place.
PCI Express x8 / x4 Slots
Install PCI Express cards such as network cards, drives, or other cards that comply to the PCI
Express specifications into the PCI Express slots.
PCI Slot
The PCI slot supports expansion cards that comply with PCI specifications. You can install a
PCI expansion card or a customized riser card designed for only 2 PCI slots expansion (for low
profile PCI card only) into the PCI slot.
M.2 Socket
The M.2 socket is the Next Generation Form Factor (NGFF) which is designed to support mul-
tiple modules and make the M.2 more suitable in application for solid-state storage.
DDR4 SO-DIMM for SEM2500/SEM2510 (opt.)
This DDR4 SO-DIMM socket is to support SEM2500/
SEM2510 module for additional IPMI management, BMC, and
VGA output.
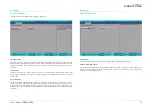
BIOS Setting
Configure PCIe root ports in the "Advanced > PCI Express Configuration” submenu of the BIOS.
Expansion Slots
In
nt
ern
nal
I/O
Con
n
nec
c
t
or
rs
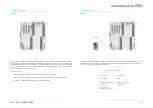
Installing the M.2 Module
In
nt
ern
n
al
I/O
Con
n
nec
c
t
or
rs
Ex
xp
a
an
s
io
on
Sl
lo
t
ts
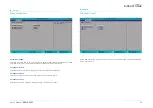
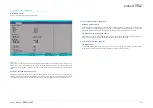
Before installing the M.2 module into the M.2 socket, please make sure that the following
safety cautions are well-attended.
1. Make sure the PC and all other peripheral devices connected to it has been powered
down.
2. Disconnect all power cords and cables.
3. Locate the M.2 socket on the system board
4. Make sure the notch on card is aligned to the key on the socket.
5. Make sure the standoff screw is removed from the standoff.
M.2 Module
M.2 Socket
Key
Stand-off
Notch
69.6mm
45mm