DFI EC70A-SU Скачать руководство пользователя страница 60

www.dfi.com

60

Chapter 9 Intel AMT Settings

Chapter 6

Chapter 9

Intel(R) Management Engine BIOS Extension v11.0.0.0005/Intel(R) ME v11.0.0.1205

Copyright(C) 2003-15 Intel Corporation. All Rights Reserved.

   Manageability Feature Selection                   

< Enabled>   

> SOL/Storage Redirection/KVM        

> User Consent


   Password Policy                                        <Anytime>

> Network Setup

   Activate Network Access 

   Unconfigure Network Access                      <Full Unprovision>

> Remote Setup And Configuration

> Power Control                 

Disabled

Enabled

INTEL (R) AMT CONFIGURATION

Intel(R) Management Engine BIOS Extension v11.0.0.0005/Intel(R) ME v11.0.0.1205

Copyright(C) 2003-15 Intel Corporation. All Rights Reserved.

SOL/Storage Redirection/KVM 

   Username and password                             < Enabled> 


   SOL                                                        

<Enabled>

   Storage Redirection                                   <Enabled>

   KVM Feature Selection                              <Enabled>


Disabled

Enabled

Intel(R) Management Engine BIOS Extension v11.0.0.0005/Intel(R) ME v11.0.0.1205

Copyright(C) 2003-15 Intel Corporation. All Rights Reserved..

SOL/Storage Redirection/KVM 

   Username and Password                             

< Enabled>   

   SOL                                                        <Enabled>

   Storage Redirection                                   <Enabled>

   KVM Feature Selection                              <Enabled>


Disabled

Enabled

[

↑↓

] = Move Highlight   [Enter] = Complete Entry  [Esc]= Discard Changes

[

↑↓

] = Move Highlight   [Enter] = Complete Entry  [Esc]= Discard Changes

[

↑↓

] = Move Highlight   [Enter] = Complete Entry  [Esc]= Discard Changes

Intel(R) Management Engine BIOS Extension v11.0.0.0005/Intel(R) ME v11.0.0.1197

Copyright(C) 2003-15 Intel Corporation. All Rights Reserved.

   Manageability Feature Selection               

    < Enabled>   

> SOL/Storage Redirection/KVM 


> User Consent


   Password Policy                                        <Anytime>

> Network Setup

   Activate Netwok Access  

   Unconfigure Network Access                      <Full Unprovi-

sion>

> Remote Setup And Configuration

> Power Control                 

INTEL (R) AMT CONFIGURATION

[

↑↓

] = Move Highlight   [Enter] = Select Entry  [Esc]= Exit

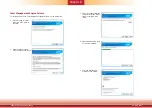
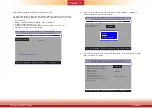
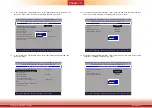
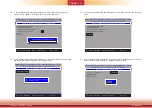
10.   In the “Intel(R) AMT Configuration”


menu,


select “Manageability Feature Selection” and 

then press “Enter”. Select “Enabled”


or “Disabled” and then press “Enter”. 

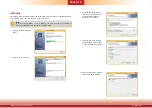
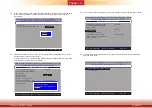
11.   In the “Intel(R) AMT Configuration”


menu, select “SOL/Storage Redirection/KVM” and 

then press “Enter”. 

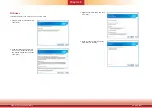
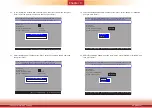
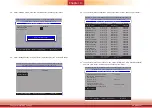
12.   In the “SOL/Storage Redirection/KVM”


menu

select “Username and Password” and then 

press “Enter”. Select “Enabled”


or “Disabled” and then press “Enter”. 

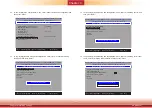
13.   In the “SOL/Storage Redirection/KVM”


menu

select “SOL” and then press “Enter”. Select 

“Enabled”


or “Disabled” and then press “Enter”. 

Содержание EC70A-SU

Страница 1: ...www dfi com 1 Chapter 1 Introduction EC70A SU User s Manual A44711911...

Страница 2: ...owners FCC and DOC Statement on Class A This equipment has been tested and found to comply with the limits for a Class A digital device pursuant to Part 15 of the FCC rules These limits are designed t...

Страница 3: ...tings 13 Clear CMOS Data 13 Auto Power on Select 13 Mini PCIe Signal SATA Select 14 COM4 DIO Select 14 Chapter 5 Ports and Connectors 15 Front Panel I O Ports 15 Rear Panel I O Ports 15 15 36V DC in 1...

Страница 4: ...physical damage You must take extra care in han dling them to ensure against electrostatic build up 1 To prevent electrostatic build up leave the system board in its anti static bag until you are rea...

Страница 5: ...s system away from humidity Place the system on a stable surface Dropping it or letting it fall may cause damage The openings on the system are for air ventilation to protect the system from overheati...

Страница 6: ...ocessor 6th Generation Intel CoreTM processors BGA 1356 LAN 2 LAN ports COM 4 COM ports Display VGA HDMI or DP upon request Audio Microphone and Line out USB 4 USB 3 0 Type A ports Power 15 36V DC in...

Страница 7: ...5W Intel CoreTM i3 6100U Processor Dual Core 3M Cache 2 3GHz 15W Memory Supports dual channel DDR4 2133MHz Supports 4GB 8GB memory onboard Graphics Intel HD Graphics GT Series OpenGL 5 0 DirectX 12 Op...

Страница 8: ...vices Switch Used to connect a power switch for distant power on off control Gigabit LAN Ports Used to connect the system to a local area network DC in DC15 36V power input via a DC in jack Antenna Ho...

Страница 9: ...mensions Chapter 1 57 00 118 40 181 60 Front View Right View Left View Rear View Motherboard Dimensions 115 00 98 20 165 00 0 00 0 00 18 00 103 20 8 00 75 40 129 90 5 00 160 00 7 29 40 27 23 77 58 99...

Страница 10: ...age Press DEL to run setup will appear on the screen Press the Delete key to enter the BIOS setup utility Installing the Operating System Most operating system software are provided in a CD therefore...

Страница 11: ...ack to the system and connect the SATA cable to the SATA connectors on the system board Mounting screw SATA cable SATA data connector SATA power connector 3 Align the mounting holes of a 2 5 SATA driv...

Страница 12: ...fer to jumper settings for signal selection for this slot The system board is equipped with 2 Mini PCIe slots one full size and one half size slot Here we will demonstrate the installation of a full s...

Страница 13: ...JP4 Auto PWR ON JP1 JP2 JP7 1 You can reconfigure the system with the default values stored in the ROM BIOS if you encoun ter the following situations a CMOS data becomes corrupted b You forgot the su...

Страница 14: ...1 USB 3 0 USB 4 USB 3 COM 3 COM 2 COM 1 VGA USB 3 0 SATA 3 0 SPI Flash BIOS JP2 JP1 Battery JP7 Mini PCIe MIC in LINE out DP or HDMI SATA 2 SATA Power Realtek ALC888 Intel WGI210AT JP3 JP4 COM4 DIO P...

Страница 15: ...rear panel I O consist of the following ports Serial port supporting RS232 Two antenna holes HDMI port or optional DP port Remote power on off switch Four USB 3 0 ports Mic in line out jack Two RJ45...

Страница 16: ...wer solution Connect a DC power cord to this DC in jack Using a voltage more than the recommended range may fail to boot the system or cause damage to the system board VGA Port The VGA port is used fo...

Страница 17: ...n your computer and a wide range of simultaneously accessible external Plug and Play peripherals BIOS Setting Configure the onboard USB in the Advanced menu USB Configuration submenu of the BIOS Refer...

Страница 18: ...per I O submenu of the BIOS Refer to Chapter 7 for more information COM 2 RS232 RS422 RS485 COM 3 RS232 COM 1 RS232 RS422 RS485 COM 4 or 8 bit DIO RS232 COM 1 RS232 422 485 COM 2 RS232 422 485 COM 3 R...

Страница 19: ...w the system board to connect to a local area network using a network hub Driver Installation Install the LAN drivers Refer to Chapter 8 for more information Audio Rear Audio The system board is equip...

Страница 20: ...SATA power connector and the other end to your storage device BIOS Setting Configure the Serial ATA drives in the Advanced menu SATA Configuration submenu of the BIOS Refer to Chapter 7 for more infor...

Страница 21: ...HDD LED This LED will be lit when the hard drive is being accessed RESET SW Reset Switch This switch allows you to reboot without having to power off the system PWR BTN Power Switch This switch is use...

Страница 22: ...y with the same or equivalent type recommend by the manufacturer Dispose of used batteries according to local ordinance Battery Battery Ground Battery 1 Connect to the battery connector Battery Standb...

Страница 23: ...f the rubber feet are not attached to the chassis use these screw holes to mount wall brackets 2 Use the provided mounting screws to attach the wall mount brackets to both sides on the bottom of the s...

Страница 24: ...ch both brackets to secure the system in place Mounting Screw The system VESA bracket A VESA bracket B Note The system unit used in the following illustrations may not resemble the actual one These il...

Страница 25: ...and put them in a safe place for later use 2 Align the mounting holes on the system and the mounting holes on the bracket and then use the screws removed in step 1 to secure the bracket in place 3 Th...

Страница 26: ...screen The BIOS Setup Utility does not require an operating system to run After you power up the system the BIOS message appears on the screen and the memory count begins After the memory test the mes...

Страница 27: ...econds from 00 to 59 System Date The date format is month date year Month displays the month from Janu ary to December Date displays the date from 1 to 31 Year displays the year from 1980 to 2099 Insy...

Страница 28: ...e system is in working state S5 State The system is in soft off state CPU Configuration This section configures the CPU Intel SpeedStep This field is used to enable or disable the Enhanced Intel Speed...

Страница 29: ...ally detect the internal graphics Always Enabled PEG Enable or disable PCIe Graphics devices Boot display Set the display device combination during system boot The options may vary depend ing on the B...

Страница 30: ...ces Disabled High definition audio devices will be unconditionally disabled Enabled High definition audio devices will be unconditionally enabled Auto High definition audio devices will be enabled if...

Страница 31: ...h serial ATA port SATA 1 Controls the SATA signal of the half size mini PCIe slot SATA 2 Controls the SATA signal of the SATA port on the system board USB Configuration This section configures the par...

Страница 32: ...hapter 7 www dfi com Chapter 7 BIOS Setup 32 PCI Express Configuration This section configures the settings of PCI Express root ports PCI Express Root Port Enable or disable each PCI Express Root Port...

Страница 33: ...3 PCIe Speed Select the speed of the PCI Express Root Port Auto Gen1 Gen2 or Gen3 ME Configuration This section configures flashing of the Intel Management Engine Me Fw Image Re Flash Enable or disabl...

Страница 34: ...ort Enable or disable Intel Active Management Technology BIOS extension Un Configure ME Clears all ME related configurations without requiring a password on the next boot SIO NUVOTON6106D This section...

Страница 35: ...Set the AC power loss to Always off or Always on When set to Always off the system s status will be power off after an AC power loss event When set to Always on the system s status will be power on af...

Страница 36: ...the current state Disable Disable and deactivate TPM Enable Enable and activate TPM Clear TPM Remove all TPM ownership contents Set Supervisor Password Set the administrative password for entering th...

Страница 37: ...E Boot to LAN Enable or disable Preboot eXecution Environment PXE boot to LAN USB Boot Enable or disable booting to USB boot devices Boot Menu Normal For this option determine the boot order for the d...

Страница 38: ...g BIOS setup utility Exit Saving Changes Select this field and press Enter to exit BIO setup and save your changes Load Optimal Defaults Select this field and press Enter to load the optimal defaults...

Страница 39: ...will not be updated and will cease to be effective Updating the BIOS To update the BIOS you will need the new BIOS file and a flash utility Please contact techni cal support or your sales representat...

Страница 40: ...pplications required to enhance the performance of the system board Insert the DVD into a DVD ROM drive The autorun screen Mainboard Utility DVD will appear If the Autorun does not automatically start...

Страница 41: ...lity is used for updating Windows INF files so that the Intel chipset can be recognized and configured properly in the system To install the utility click Intel Chipset Software Installation Utility o...

Страница 42: ...ady to install the graphics driver Click Next By default the Automatically run WinSAT and enable the Windows Aero desktop theme is enabled With this enabled after installing the graphics driver and th...

Страница 43: ...Yes I want to restart this computer now and then click Finish Restarting the system will allow the new software installation to take effect Audio Drivers To install the driver click Audio Drivers on...

Страница 44: ...rs on the main menu 1 Setup is ready to install the driver Click Next to continue 2 Click I accept the terms in the license agreement and then click Next 3 Select the program features you want install...

Страница 45: ...e Kernel Mode Driver For Windows 7 only To install the driver click Kernel Mode Driver on the main menu 1 Click Yes to install the update 2 The update is being installed now 3 Click Restart Now to res...

Страница 46: ...gine Drivers on the main menu 1 Setup is ready to install the driver Click Next to continue 2 Read the license agree ment and then click Next 3 Setup is currently installing the driver After the insta...

Страница 47: ...s 7 or later versions you need to access the operating sys tem as an administrator to be able to install the utility 1 Setup is ready to install the driver 2 Click Next to continue 3 Read the license...

Страница 48: ...n the utility Note The screenshot displayed above is for illustrative purpose only and may not resemble the actual screen The HW Utility has the following tabs Information HW Health HW Health set Watc...

Страница 49: ...ver on the main menu 2 Read the license agreement and then click Yes 1 Setup is ready to install the driver Click Next to continue 3 Go through the readme docu ment for more installation tips and then...

Страница 50: ...Driver on the main menu 1 Setup is ready to install the driver Click Next 2 Read the license agreement care fully Click I accept the terms in the License Agreement and then click Next 4 Setup is read...

Страница 51: ...Chapter 8 www dfi com 51 Chapter 8 Supported Software 5 Setup is now installing the driver 6 Click Finish to exit the setup...

Страница 52: ...Setup is now extracting files Note Before installing Microsoft Framework 4 5 2 make sure you have updated your Windows 7 operating system to Service Pack 1 or above 2 Read the license agreement care...

Страница 53: ...on the main menu 1 The setup program is preparing to install the driver 2 The setup program is now ready to install the utility Click Next to continue 3 Click I accept the terms in the license agreeme...

Страница 54: ...TPM requires installing the Micro soft Visual C package prior to installing the utility Click Install to start the installation 8 The setup program is currently installing the Microsoft Visual C pack...

Страница 55: ...er 9 3 To install the reader click Adobe Acrobat Reader 9 3 on the main menu 1 Click Next to install or click Change Destination Folder to select a different folder for installation 2 Click Install to...

Страница 56: ...desk side visits Repair Remotely repair systems after OS failures Alerting and event logging help detect problems quickly to reduce downtime Protect Intel AMT s System Defense capability remotely upd...

Страница 57: ...AMT Configuration MEBx Exit Intel R ME Password Move Highlight Enter Select Entry Esc Exit Set up Intel AMT using the Intel Management Engine BIOS Extension MEBX 1 After the system reboots press Del...

Страница 58: ...Enter Select Entry Esc Exit Verify Password Intel R Management Engine BIOS Extension v11 0 0 0005 Intel R ME v11 0 0 1205 Copyright C 2003 15 Intel Corporation All Rights Reserved MAIN MENU Intel R M...

Страница 59: ...trol Intel R Management Engine BIOS Extension v11 0 0 0005 Intel R ME v11 0 0 1205 Copyright C 2003 15 Intel Corporation All Rights Reserved Change ME Password Local FW Update Enabled Move Highlight E...

Страница 60: ...ction Enabled KVM Feature Selection Enabled Disabled Enabled Move Highlight Enter Complete Entry Esc Discard Changes Move Highlight Enter Complete Entry Esc Discard Changes Move Highlight Enter Comple...

Страница 61: ...0 0 1205 Copyright C 2003 15 Intel Corporation All Rights Reserved Move Highlight Enter Select Entry Esc Exit USER CONSENT User Opt in KVM Opt in Configurable from Remote IT Enabled Configure When Us...

Страница 62: ...ights Reserved Move Highlight Enter Select Entry Esc Exit Manageability Feature Selection Enabled SOL Storage Redirection KVM User Consent Password Policy Anytime Network Setup Activate Network Access...

Страница 63: ...Intel Corporation All Rights Reserved INTEL R ME NETWORK NAME SETTINGS Host Name _ Domain Name _ Shared Dedicated FQDN Shared Dynamic DNS Update Disabled Dedicated Shared Intel R Management Engine BI...

Страница 64: ...n Unconfigure Network Access Remote Setup And Configuration Power Control Move Highlight Enter Complete Entry Esc Discard Changes Full Unprovision Intel R Management Engine BIOS Extension v11 0 0 0005...

Страница 65: ...v11 0 0 1205 Copyright C 2003 15 Intel Corporation All Rights Reserved INTEL R REMOTE SETUP AND CONFIGURATION Current Provisioning Mode Provisioning Record Provisioning Server IPV4 IPV6 _ Provisionin...

Страница 66: ...ntel R ME v11 0 0 1205 Copyright C 2003 15 Intel Corporation All Rights Reserved INTEL R REMOTE CONFIGURATION Remote Configuration Enabled PKI DNS Suffix _ Manage Hashes Move Highlight Enter Select En...

Страница 67: ...efault Default Default Default SHA256 SHA256 SHA256 SHA256 SHA256 SHA256 SHA256 SHA256 SHA256 SHA256 SHA256 SHA256 SHA256 SHA256 SHA256 SHA256 SHA256 SHA256 Hash Name Active Default Algorithm VeriSign...

Страница 68: ...ntel Corporation All Rights Reserved INTEL R AMT POWER CONTROL This configurations are effective only after AMT provisioning has started Intel R ME ON in Host Sleep States Mobile ON in S0 ME Wake in S...

Страница 69: ...WDT Control WDT timer MOV DX 4EH MOV AL 07H Ready to Program Logical Device OUT DX AL MOV DX 4FH MOV AL 08H Select Logical Device 8 OUT DX AL MOV DX 4EH MOV AL F1H Select watchdog timer register OUT...

Страница 70: ...which setting is correct either turn off the system and change the jumper or enter Setup and change the VIDEO selection FLOPPY DISK S fail 80 Unable to reset floppy subsystem FLOPPY DISK S fail 40 Fl...

Страница 71: ...hat the video input cable is properly attached to the monitor and the system s display adapter 4 Adjust the brightness of the display by turning the monitor s brightness control knob The picture seems...

Страница 72: ...ks by attaching it to a serial port that is working and configured correctly If the serial device does not work either the cable or the serial device has a problem If the serial device works the probl...

Отзывы: