background image

15

2

Hardware Installation

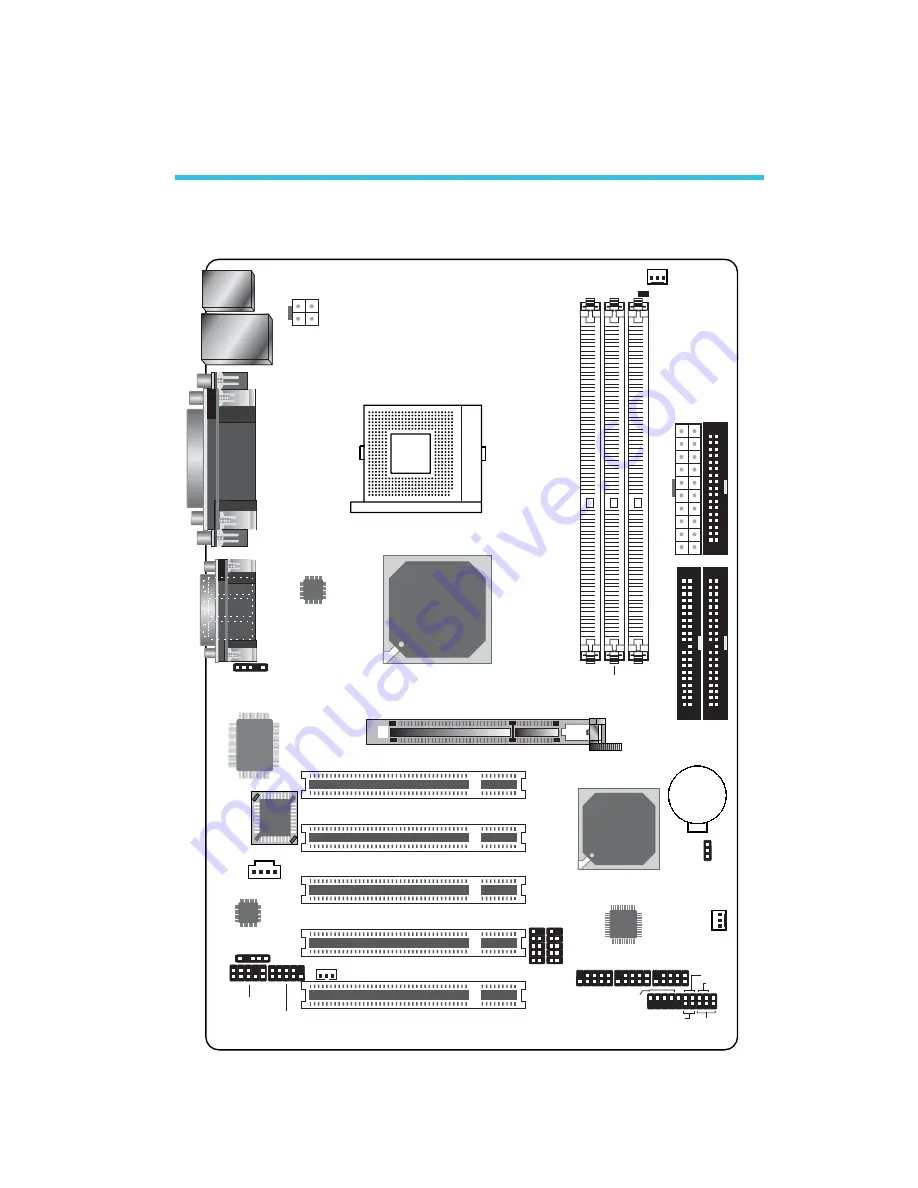
2.1 System Board Layout

Chapter 2 - Hardware Installation

KB/Mouse

Line-out

Line-in

LAN

USB 1-2

COM 1

COM 2

Pa

rallel

Game

Mic-in

1

+12V power

Sock

et
478

LAN

Phy

SiS

648FX

1

IrDA

I/O

chip

BIOS

1

Audio

Codec

CD-in

S/PDIF

1

1

1

Front audio

SURR_CON

1

WOL

DDR 1

DDR 2

DDR 3

1

CPU fan

DIMM LED

1

ATX

power

1

FDD

1

1

IDE 1

IDE 2

Battery

1

Chassis fan

1

Clear

CMOS

SiS

963

Agere

chip

1

1

USB

3-4

USB

5-6

1

1

1

1394-1 1394-2 1394-3

1

SPEAKER

RESET

PWR-LED

ATX-SW

AGP Slot

PCI Slot 1

PCI Slot 2

PCI Slot 3

PCI Slot 4

PCI Slot 5

HD-LED

648FX-AL

(Supports onboard IEEE 1394A)

Содержание 648FX-AL

Страница 1: ...648FX AL 648FX ALE Rev A System Board User s Manual 73300323...

Страница 2: ...ight to revise this publication and make changes to its contents at any time without obligation to notify any person or entity of such revisions or changes 2003 All Rights Reserved Trademarks Windows...

Страница 3: ...ot installed and used in accordance with the instruction manual may cause harmful interference to radio communications However there is no guarantee that interference will not occur in a particular in...

Страница 4: ...updated version The multilingual manual is included in the system board package To view the user s manual insert the CD into a CD ROM drive The autorun screen Mainboard Utility CD will appear Click t...

Страница 5: ...System Board Layout 2 2 System Memory 2 3 CPU 2 4 Jumper Settings 2 5 Rear Panel I O Ports 2 6 I O Connectors Chapter 3 BIOS Setup 3 1 Award BIOS Setup Utility 3 2 Updating the BIOS Chapter 4 Support...

Страница 6: ...A 1 Enabling the Hyper Threading Technology Appendix B Using the Suspend to RAM Function B 1 Using the Suspend to RAM Function Appendix C System Error Messages C 1 POST Beep C 2 Error Messages Appendi...

Страница 7: ...Technology 800MHz 533MHz system data bus Intel Pentium 4 Northwood processor 533MHz 400MHz system data bus Intel Celeron Northwood processor 400MHz system data bus Note Refer to section 1 2 and append...

Страница 8: ...ull duplex independent sample rate converter for audio recording and playback S PDIF in out interface 6 channel audio output S PDIF S PDIF is a standard audio file transfer format that transfers digit...

Страница 9: ...its high speed it also supports iso chronous data transfer which is ideal for video devices that need to transfer high levels of data in real time 1394A supports both Plug and Play and hot plugging U...

Страница 10: ...h memory Desktop Management Interface DMI The system board comes with a DMI 2 0 built into the BIOS The DMI utility in the BIOS automatically records various information about your system configuratio...

Страница 11: ...ssis fan connectors 1 1 2 Intelligence Dual Function Power Button Depending on the setting in the Soft Off By PWRBTN field of the Power Management Setup this switch will allow the system to enter the...

Страница 12: ...ws you to use the PS 2 keyboard or PS 2 mouse to power on the system Important The 5VSB power source of your power supply must support 720mA Wake On USB Keyboard Mouse This function allows you to use...

Страница 13: ...ving to go through the sometimes tiresome process of closing files applications and operating system This is because the system is capable of storing all programs and data files during the entire oper...

Страница 14: ...Technology Please refer to Appendix A for information about enabling the functionality of the Hyper Threading Technology For more infor mation on Hyper Threading Technology go to www intel com info hy...

Страница 15: ...X 1 IrDA I O chip BIOS 1 Audio Codec CD in S PDIF 1 1 1 Front audio SURR_CON 1 WOL DDR 1 DDR 2 DDR 3 1 CPU fan DIMM LED 1 ATX power 1 FDD 1 1 IDE 1 IDE 2 Battery 1 Chassis fan 1 Clear CMOS SiS 963 Age...

Страница 16: ...rallel Game Mic in 1 12V power Socket 478 LAN Phy SiS 648FX 1 IrDA I O chip BIOS 1 Audio Codec CD in S PDIF 1 1 1 Front audio SURR_CON 1 WOL DDR 1 DDR 2 DDR 3 1 CPU fan DIMM LED 1 ATX power 1 FDD 1 1...

Страница 17: ...rt of the system chassis If a wrist strap is unavailable establish and maintain contact with the system chassis throughout any procedures requiring ESD protection The system board supports DDR SDRAM D...

Страница 18: ...must correspond with Pin 1 of the socket 1 Pull the tabs which are at the ends of the socket to the side 2 Position the DIMM above the socket with the notch in the module aligned with the key on the...

Страница 19: ...is exclusively designed for installing an Intel processor 2 3 2 Installing the CPU 1 Locate Socket 478 on the system board 2 Unlock the socket by pushing the lever sideways away from the socket then l...

Страница 20: ...t Important Handle the CPU by its edges and avoid touching the pins Gold mark 4 Insert the CPU into the socket until it is seated in place The CPU will fit in only one orientation and can easily be in...

Страница 21: ...k the CPU will overheat damaging both the CPU and system board Note Only use Intel certified fan and heat sink An Intel boxed processor package contains a retention mechanism heat sink fan and install...

Страница 22: ...at sink and retention mechanism assembly on the CPU then align and snap the retention legs hooks to the retention holes at the 4 corners of the retention module base Note You will not be able to snap...

Страница 23: ...ever 4 Move the retention levers to their opposite directions then push them down This will secure the fan heat sink and retention mechanism assembly to the retention module base Note You will not be...

Страница 24: ...he system with the default values stored in the ROM BIOS To load the default values stored in the ROM BIOS please follow the steps below 1 Power off the system and unplug the power cord 2 Set JP1 pins...

Страница 25: ...nu and press Enter 6 Set the CPU Clock Ratio or CPU Frequency field to its default setting or an appropriate frequency ratio or bus clock Refer to the Frequency Voltage Control section in chapter 3 fo...

Страница 26: ...PS 2 K B RJ45 LAN USB 1 2 COM 1 Parallel GAME MIDI Line out Line in Mic in COM 2 The rear panel I O ports consist of the following PS 2 mouse port PS 2 keyboard port LAN port USB ports Parallel port...

Страница 27: ...Warning Make sure to turn off your computer prior to connecting or disconnecting a mouse or keyboard Failure to do so may damage the system board Wake On Keyboard Mouse The Wake On Keyboard Mouse fun...

Страница 28: ...a network hub BIOS Setting Enable or disable the onboard LAN in the Integrated Peripherals submenu SIS OnChip PCI Device section of the BIOS Refer to chapter 3 for more information To wake up the sys...

Страница 29: ...USB ports which are mounted on card edge brackets will be provided as options If you wish to use the optional USB ports install the card edge bracket to the system chassis then insert the connec tor t...

Страница 30: ...allows you to use a USB keyboard or USB mouse to wake up a system from the S3 STR Suspend To RAM state To use this function BIOS Setting USB Port Wake Up Control PM Wake Up Events sec tion in the Powe...

Страница 31: ...se color These ports are RS 232C asynchronous communication ports with 16C550A compatible UARTs that can be used with modems serial printers remote display terminals and other serial devices BIOS Sett...

Страница 32: ...Capabilities Port EPP Enhanced Parallel Port Function Allows normal speed operation but in one direction only Allows parallel port to operate in bidirectional mode and at a speed faster than the SPP s...

Страница 33: ...ct an analog joystick to the 15 pin D sub connector Gold at location CN8 of the system board This port works well with any application that is compat ible with the standard PC joystick BIOS Setting Co...

Страница 34: ...ut Jack Lime CN4 This jack is used to connect external speakers for audio output from the system board Using this jack disables the front audio s line out function SURR_CON W SL Ground SR Ground Groun...

Страница 35: ...mic in jacks that are at the front panel of your sys tem Using this connector will disable the rear audio s line out and mic in functions Remove the jumper caps from pins 5 6 and pins 9 10 of J3 prior...

Страница 36: ...system chassis Driver Installation Install the Audio Drivers The 3D Audio Configuration software which is an audio panel for setting basic audio configurations will at the same time be installed into...

Страница 37: ...stallation 2 6 1 CD in Internal Audio Connector The CD in J5 connector is used to receive audio from a CD ROM drive TV tuner or MPEG card 2 6 I O Connectors 1 4 Left audio channel Right audio channel...

Страница 38: ...onnector One card edge bracket mounted with S PDIF ports will be provided as an option Install the card edge bracket to the system chassis then connect the audio cable connector to J4 Make sure pin 1...

Страница 39: ...of the header Connecting the Floppy Disk Drive Cable Install one end of the floppy disk drive cable into the shrouded floppy disk header J20 on the system board and the other end most connector to th...

Страница 40: ...ard edge bracket to the system chassis then con nect one of the cable connectors to a 1394A connector on the system board Make sure pin 1 of the cable connector is aligned with pin 1 of the 1394A conn...

Страница 41: ...to connect the drives to the system board An IDE ribbon cable have 3 connectors on them one that plugs into an IDE connector on the system board and the other 2 connects to IDE devices The connector a...

Страница 42: ...ves We recommend that you use hard drives from the same manufacturer In a few cases drives from two different manufacturers will not function prop erly when used together The problem lies in the hard...

Страница 43: ...he cable to the IrDA connector according to their pin functions BIOS Setting Set UART Mode Select Onboard Super IO Device field in the Integrated Peripherals submenu of the BIOS to the type of IrDA st...

Страница 44: ...ardware Installation 2 6 7 CPU Fan Connector The CPU must be kept cool by using a fan with heatsink Connect the CPU fan to the 3 pin fan connector at location J15 of the system board X 1 3 Ground Powe...

Страница 45: ...assis Fan Connector The chassis fan connector J21 is used to connect a cooling fan The cooling fan will provide adequate airflow throughout the chassis to prevent overheating the CPU and system board...

Страница 46: ...ll detect Magic Packet and assert a wakeup signal to power up the system Refer to the add in card s manual for details Note Your LAN card must support the remote wake up function Important The 5VSB po...

Страница 47: ...en it is in the Suspend state Power On Sus pend or Suspend to RAM It will not light when the system is in the Soft Off state Important If the DIMM Standby Power LED is lighted you must power off the s...

Страница 48: ...4 pin 12V power connector enables the delivery of more 12VDC current to the processor s Voltage Regulator Module VRM The system board requires a minimum of 250 Watt power supply to operate Your system...

Страница 49: ...hus prolonging the life of the power supply or system SPEAKER Speaker Connector This connects to the speaker installed in the system chassis ATX SW ATX Power Switch Depending on the setting in the BIO...

Страница 50: ...ight after it was powered on it may indicate that the CPU or memory module was not installed properly Please make sure they are properly inserted into their corresponding socket Pin 3 5 14 16 8 10 18...

Страница 51: ...pter explains the Setup Utility for the Award BIOS After you power up the system the BIOS message appears on the screen and the memory count begins After the memory test the following message will app...

Страница 52: ...r Date displays the date from 1 to 31 Year displays the year from 1990 to 2098 3 1 1 2 Time The time format is hour minute second The time is based on the 24 hour military time clock For example 1 p m...

Страница 53: ...e BIOS will auto detect the HDD CD ROM drive at the POST stage and show the IDE for the HDD CD ROM drive If a hard disk has not been installed select None Access Mode For hard drives larger than 528MB...

Страница 54: ...anding Zone This field displays the number of cylinders specified as the landing zone for the read write heads Sector This field displays the number sectors per track 3 1 1 4 Drive A and Drive B These...

Страница 55: ...ed during power up The default setting is All Errors No Errors The system boot will not stop for any errors de tected All Errors The system boot will stop whenever the BIOS de tects a non fatal error...

Страница 56: ...56 3 BIOS Setup 3 1 1 8 Extended Memory Displays the amount of extended memory detected during boot up 3 1 1 9 Total Memory Displays the total memory available in the system...

Страница 57: ...to the boot sector or partition table of the hard disk drive the BIOS will halt the system and an error message will appear After seeing the error message if necessary you will be able to run an anti...

Страница 58: ...e ECC Checking The processors supported by the system board come with built in Level 2 cache By default ECC is enabled to check the Level 2 cache If you are not using this function set this field to D...

Страница 59: ...ou to determine the default state of the numeric keypad By default the system boots up with NumLock on wherein the function of the numeric keypad is the number keys When set to Off the function of the...

Страница 60: ...ystem will prompt for the pass word everytime the system boots or only when you enter the BIOS setup Set the password in the Set Supervisor User Pass word submenu System The system will not boot and a...

Страница 61: ...ng hard drives that support S M A R T set this field to Enabled SMART is supported in ATA 33 or later hard drives 3 1 2 19 Report No FDD For WIN 95 The options are Yes and No 3 1 2 20 Full Screen Logo...

Страница 62: ...sources These items should not be altered unless necessary The default settings have been chosen because they provide the best operating conditions for your system The only time you might consider mak...

Страница 63: ...s SPD Serial Pres ence Detect data structure that stores informa tion about the module such as the memory type memory size memory speed etc When this option is selected the system will run ac cording...

Страница 64: ...DRAM starts a read command after receiving it RAS Active Time tRAS This field controls RAS active to Protegra and refresh to RAS active delay in local memory clocks RAS Precharge Time tRP This field c...

Страница 65: ...CHE WC This field is used to enable the register that defines the starting address of the graphic windows for Graphic Unit Interface GUI 3 1 3 3 System BIOS Cacheable When this field is enabled access...

Страница 66: ...d into the memory space below 16MB When enabled the CPU assumes the 15 16MB memory range is allocated to the hidden ISA address range instead of the actual system DRAM When disabled the CPU assumes th...

Страница 67: ...re for reference only Your version may not be identical to this one 3 1 4 1 SIS OnChip IDE Device Move the cursor to this field and press Enter The following screen will appear The settings on the scr...

Страница 68: ...lave UltraDMA fields IDE Primary Master Slave PIO and IDE Secondary Master Slave PIO PIO means Programmed Input Output Rather than have the BIOS issue a series of commands to effect a transfer to or f...

Страница 69: ...nsfer Access This field when Enabled will enhance the IDE DMA transfer of a parallel ATA IDE hard disk drive To enable this function make sure the Internal PCI IDE field is not disabled IDE Burst Mode...

Страница 70: ...u can further configure the USB in the following 4 fields Disabled Disables the onboard USB USB Ports Number This field is used to select the number of USB ports you want enabled USB 2 0 Support If yo...

Страница 71: ...using the onboard AC97 codec Disabled Select this option when using a PCI sound card SIS 10 100M Ethernet This field is used to enable or disable the onboard LAN SIS 1394 Controller 648FX AL only The...

Страница 72: ...bled Enables the onboard floppy disk controller Disabled Disables the onboard floppy disk controller Onboard Serial Port 1 and Onboard Serial Port 2 Auto The system will automatically select an I O ad...

Страница 73: ...r IrDA peripheral device For better transmission of data your IrDA peripheral device must be within a 30o angle and within a distance of 1 me ter 3 Set the RxD TxD Active IR Transmission Delay UR2 Du...

Страница 74: ...operate in bidirectional mode and at a speed faster than the normal mode s data transfer rate EPP Enhanced Parallel Port Allows bidirectional parallel port operation at maximum speed If you selected E...

Страница 75: ...m boots it will first initialize the AGP PCI Slot When the system boots it will first initialize PCI 3 1 4 6 IDECH0 Access Interface and IDECH1 Access Interface These fields are used to select the acc...

Страница 76: ...t to use the Suspend to RAM function make sure this field is enabled then select S3 STR in the ACPI Suspend Type field 3 1 5 2 ACPI Suspend Type This field is used to select the type of Suspend mode S...

Страница 77: ...d mode ac cording to the power saving time selected the CPU and onboard peripherals will be shut off 3 1 5 5 Video Off Option Always On The system BIOS will never turn off the screen Suspend Off The s...

Страница 78: ...e HDD Power Down mode according to the power saving time selected the hard disk drive will be powered down while all other devices remain ac tive 3 1 5 10 Soft Off by PWRBTN This field allows you to s...

Страница 79: ...where you left off before power failure occurs If the system s power is off when AC power failure occurs it will remain off when power returns If the system s power is on when AC power failure occurs...

Страница 80: ...port the remote wake up func tion Refer to Wake On LAN Connector in chapter 2 for more information Resume On LAN Set this field to Enabled to wake up the system via the onboard LAN Resume On PCI Event...

Страница 81: ...m unplug the power cord and clear the CMOS data Follow the steps in the Jumper Settings for Clearing CMOS Data section in chapter 2 PS2MS Wakeup from S3 S4 S5 This field allows you to use the PS 2 mou...

Страница 82: ...h Alarm field the time set in this field must be later than the time of the RTC set in the Standard CMOS Fea tures submenu Reload Global Timer Events When enabled access to the specified field Primary...

Страница 83: ...ion Data ESCD once automatically It will then rec reate a new set of configuration data Disabled The BIOS will not reset the configuration data 3 1 6 2 Resources Controlled By The Award Plug and Play...

Страница 84: ...evice 3 1 6 4 PCI VGA Palette Snoop This field determines whether the MPEG ISA VESA VGA cards can work with PCI VGA or not The default value is Disabled Enabled MPEG ISA VESA VGA cards work with PCI V...

Страница 85: ...mportant The frequency ratio of some processors may have been locked by the manufacturer If you are using this kind of processor setting an extended ratio for the processor will have no effect The sys...

Страница 86: ...ck by 1MHz increment Important Selecting an external bus clock other than the default setting may result to the processor s or system s instability and are not guaranteed to provide better system perf...

Страница 87: ...alues permanently stored in the ROM chips These set tings are not optimal and turn off all high performance features You should use these values only if you have hardware problems Highlight this optio...

Страница 88: ...The Load Optimized Defaults option loads optimized settings from the BIOS ROM Use the default values as standard values for your system Highlight this option in the main menu and press Enter Type Y an...

Страница 89: ...e prompted for a password when you cold boot the system Use the arrow keys to highlight Set Supervisor Password and press Enter Type in the password You are limited to eight characters When done the m...

Страница 90: ...ess only Set User Password that appears in the main menu screen Access to all other options is denied Use the arrow keys to highlight Set User Password and press Enter Type in the password You are lim...

Страница 91: ...Enter Type Y and press Enter The modifications you have made will be written into the CMOS memory and the system will reboot You will once again see the initial diagnostics on the screen If you wish...

Страница 92: ...u have made highlight Exit Without Saving and press Enter Type Y and press Enter The system will reboot and you will once again see the initial diagnostics on the screen If you wish to make any change...

Страница 93: ...loppy disk 2 Reboot the system and enter the Award BIOS Setup Utility to set the first boot drive to Floppy 3 Save the setting and reboot the system 4 After the system booted from the floppy disk exec...

Страница 94: ...S in your sys tem We recommend that you save the current BIOS and its flash utility just in case you need to reinstall the BIOS To save the current BIOS press Y then enter the file name of the current...

Страница 95: ...umbers of hardware installed etc are automatically detected and stored in the DMI pool which is a part of the system board s Plug and Play BIOS Additional information such as ISA based peripherals whi...

Страница 96: ...r arrow keys then press Enter 3 The cursor will move to the screen you select allowing you to edit information The screen will also display the auto detected information 4 Press F10 to update the edit...

Страница 97: ...or arrow keys to select the Load DMI File menu 2 The following message will appear Press Enter to select DMI file for load Press Enter 3 The DMI files will appear on the screen Select the file you wo...

Страница 98: ...to enhance the perform ance of the system board Insert the CD into a CD ROM drive The autorun screen Mainboard Utility CD will appear If after inserting the CD Autorun did not automatically start whic...

Страница 99: ...nd SiS Miniport driver To install the AGP driver please follow the steps below 1 On the left side of the autorun screen click the CHIPSET icon 2 Click SiS AGP Drivers on the main screen The screen bel...

Страница 100: ...g sys tems Windows 98 Windows 98 SE Windows ME Windows NT 4 0 Windows 2000 and Windows XP To install the driver please follow the steps below 1 On the left side of the autorun screen click the AUDIO i...

Страница 101: ...ete installation 5 Reboot the system for the driver to take effect Note The 3D Audio Configuration software which is an audio panel for setting basic audio configurations will at the same time be inst...

Страница 102: ...pear 3 Click Yes to continue 4 Follow the prompts on the screen to complete installation 5 Restart the system Note A Yellow mark will appear in Windows 9x and Windows ME s Device Manager because these...

Страница 103: ...he LAN driver please follow the steps below 1 On the left side of the autorun screen click the NETWORK icon 2 Click LAN Drivers on the main screen The screen below will appear 3 Follow the prompts on...

Страница 104: ...the IDE driver please follow the steps below 1 On the left side of the autorun screen click the TOOLS icon 2 Click SiS IDE Drivers on the main screen The screen below will appear 3 Follow the prompts...

Страница 105: ...e follow the steps below 1 On the left side of the autorun screen click the TOOLS icon 2 Click Microsoft DirectX 9 0 on the main screen The screen below will appear 3 Click Yes to continue 4 Follow th...

Страница 106: ...e your computer is safe because it automatically scans for viruses and checks for virus updates so that PC protection stays up to date To install please follow the steps below 1 On the left side of th...

Страница 107: ...ge will pop up The utility can also be configured so that a beeping alarm will sound whenever an error occurs We recommend that you use the Default Setting which is the ideal setting that would keep t...

Страница 108: ...hannel and 6 channel audio modes as well as configure the audio effects After installing the audio driver and rebooting the system you can run 3D Audio Configuration either from the taskbar or from th...

Страница 109: ...ere you will configure analog output settings to speakers S PDIF This panel is used to configure S PDIF output which provides a low dis tortion digital data transfer between audio devices Volume Contr...

Страница 110: ...tual surround adjustable multi channel sound field innovative listening mode amazing sound effects and 3D positional audio It has 3 functional blocks Virtual Speaker Shifter Sound Ef fect and Multi ch...

Страница 111: ...ally start which is the Main Board Utility CD screen did not appear please go directly to the root directory of the CD and double click Setup 2 All steps or procedures to install software drivers are...

Страница 112: ...tall cooling fans The system requires adequate airflow throughout the chassis to prevent overheating the processor 3 The Hyper Threading Technology field in the Advanced BIOS Features submenu of the A...

Страница 113: ...113 d Now click the Hardware tab then click Device Manager The items shown under Computer and Processors should resemble the ones shown below c Click the General tab The processor shown under Compute...

Страница 114: ...hreading Technology e Lastly press the Ctrl Alt and Del keys simultaneously The Windows Task Manager dialog box will appear Click the Performance tab The diagram under CPU Usage History should resembl...

Страница 115: ...Appendix B Using the Suspend to RAM Function 4 Press Esc to return to the main menu 5 Select Save Exit Setup and press Enter Type Y and press Enter 6 Install Windows 98 by typing the following parame...

Страница 116: ...rsor to Settings then click Control Panel To check whether ACPI was properly installed double click the System icon In the System Properties dialog box click the Device Manager tab In View devices by...

Страница 117: ...og box Double click the Power Management icon 11 Click the Advanced tab In the When I press the power but ton on my computer field select Standby 9 Click File System In the Typical role of this comput...

Страница 118: ...ting session where you left off when you power off the computer will resume in not more than 8 seconds If you have changed the color or resolution in the Display Properties dialog box do not apply the...

Страница 119: ...de consists of a single long beep C 2 Error Messages One or more of the following messages may be displayed if the BIOS detects an error during the POST This list indicates the error messages for all...

Страница 120: ...fixed disk Hard Disk s fail 08 Sector Verify failed Keyboard is locked out Unlock the key The BIOS detects that the keyboard is locked Keyboard control ler is pulled low Keyboard error or no keyboard...

Страница 121: ...est the outlet by plugging in a lamp or other electrical device 4 The monitor is turned on 5 The display s brightness and contrast controls are adjusted properly 6 All add in boards in the expansion s...

Страница 122: ...hing happens 1 Check that one end of the AC power cord is plugged into a live outlet and the other end properly plugged into the back of the system 2 Make sure that the voltage selection switch on the...

Страница 123: ...a cable connection problem However if your hard drive has a large capacity it will take a longer time to format Parallel Port The parallel printer doesn t respond when you try to print 1 Make sure tha...

Страница 124: ...configured correctly Keyboard Nothing happens when a key on the keyboard was pressed 1 Make sure the keyboard is properly connected 2 Make sure there are no objects resting on the keyboard and that no...

Отзывы: