IT
EL
PL
RU
KZ
UA
RO
EN
160
WARNING: Do not continue to use the sander with a sanding paper
that is overworn or damaged.
WARNING: Do not use the same sanding paper for wood and metal.
Metal particles become embedded in the sanding paper and will
scour a wooden surface.
WARNING: Take care to regularly clean out the build up of dust on the
base underneath the sanding paper and not to let the sanding paper
Very Coarse
shaping wood
80 – 100
Coarse
Paint removal, rough surface preparation
(e.g. non-planed wood)
120 – 150
Medium
Surface preparation planed wood
180 – 220
Fine
Sanding between coats
240 or more
Very Fine
Final finishing
Select the required grade of sanding paper.
Remove any dust or debris from the hook and loop of the base.
To attach hook & loop type sanding paper simply align the holes in the sanding paper
To remove the sanding paper, peel it away from the base.
Ordinary (non Hook & Loop type) sanding paper can also be used.
Release the sandpaper clamp from both sides of the sander.
Insert the end of the sandpaper under one clamp and pull the paper tight over the base
ensuring the holes align with those in the base and then clamp the other side.
The sanding paper should be kept tightly clamped over the base, otherwise there could
be excessive wear of the base material.
1.
2.
3.
4.
5.
6.
7.
8.
power point before making any adjustment.
Attaching sanding paper
wear completely down before replacing it. Failure to observe these two
precautionary measures can lead to damage to the hooks and loops on the
base and the sanding paper will not attach properly.
KZ
UA
RO
EN
160
WARNING: Do not continue to use the sander with a sanding paper
that is overworn or damaged.
WARNING: Do not use the same sanding paper for wood and metal.
Metal particles become embedded in the sanding paper and will
scour a wooden surface.
WARNING: Take care to regularly clean out the build up of dust on the
base underneath the sanding paper and not to let the sanding paper
Select the required grade of sanding paper.
Remove any dust or debris from the hook and loop of the base.
To attach hook & loop type sanding paper simply align the holes in the sanding paper
To remove the sanding paper, peel it away from the base.
Ordinary (non Hook & Loop type) sanding paper can also be used.
Release the sandpaper clamp from both sides of the sander.
Insert the end of the sandpaper under one clamp and pull the paper tight over the base
ensuring the holes align with those in the base and then clamp the other side.
The sanding paper should be kept tightly clamped over the base, otherwise there could
be excessive wear of the base material.
1.
2.
3.
4.
5.
6.
7.
8.
power point before making any adjustment.
Attaching sanding paper
wear completely down before replacing it. Failure to observe these two
precautionary measures can lead to damage to the hooks and loops on the
base and the sanding paper will not attach properly.
PT
IT
EL
PL
RU
KZ
UA
RO
EN
160
WARNING: Do not continue to use the sander with a sanding paper
that is overworn or damaged.
WARNING: Do not use the same sanding paper for wood and metal.
Metal particles become embedded in the sanding paper and will
scour a wooden surface.
WARNING: Take care to regularly clean out the build up of dust on the
base underneath the sanding paper and not to let the sanding paper
GRIT CHART
Grit
Type
Example of use
60 or less
Very Coarse
Material removal, heavy paint removal,
shaping wood
80 – 100
Coarse
Paint removal, rough surface preparation
(e.g. non-planed wood)
120 – 150
Medium
Surface preparation planed wood
180 – 220
Fine
Sanding between coats
240 or more
Very Fine
Final finishing
Select the required grade of sanding paper.
Remove any dust or debris from the hook and loop of the base.
To attach hook & loop type sanding paper simply align the holes in the sanding paper
To remove the sanding paper, peel it away from the base.
Ordinary (non Hook & Loop type) sanding paper can also be used.
Release the sandpaper clamp from both sides of the sander.
Insert the end of the sandpaper under one clamp and pull the paper tight over the base
ensuring the holes align with those in the base and then clamp the other side.
The sanding paper should be kept tightly clamped over the base, otherwise there could
be excessive wear of the base material.
1.
2.
3.
4.
5.
6.
7.
8.
power point before making any adjustment.
Attaching sanding paper
wear completely down before replacing it. Failure to observe these two
precautionary measures can lead to damage to the hooks and loops on the
base and the sanding paper will not attach properly.
EL
PL
RU
KZ
UA
RO
EN
160
WARNING: Do not continue to use the sander with a sanding paper
that is overworn or damaged.
WARNING: Do not use the same sanding paper for wood and metal.
Metal particles become embedded in the sanding paper and will
scour a wooden surface.
WARNING: Take care to regularly clean out the build up of dust on the
base underneath the sanding paper and not to let the sanding paper
(e.g. non-planed wood)
120 – 150
Medium
Surface preparation planed wood
180 – 220
Fine
Sanding between coats
240 or more
Very Fine
Final finishing
Select the required grade of sanding paper.
Remove any dust or debris from the hook and loop of the base.
To attach hook & loop type sanding paper simply align the holes in the sanding paper
To remove the sanding paper, peel it away from the base.
Ordinary (non Hook & Loop type) sanding paper can also be used.
Release the sandpaper clamp from both sides of the sander.
Insert the end of the sandpaper under one clamp and pull the paper tight over the base
ensuring the holes align with those in the base and then clamp the other side.
The sanding paper should be kept tightly clamped over the base, otherwise there could
be excessive wear of the base material.
1.
2.
3.
4.
5.
6.
7.
8.
power point before making any adjustment.
Attaching sanding paper
wear completely down before replacing it. Failure to observe these two
precautionary measures can lead to damage to the hooks and loops on the
base and the sanding paper will not attach properly.
FR
ES
PT
IT
EL
PL
RU
KZ
UA
RO
EN
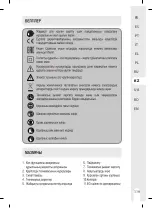
Pour réduire le risque de blessures, l’utilisateur doit lire le manuel
d’utilisation.
la terre.
Symbole de la circulation du produit sur le marché de l’union douanière des
États membres.
Risque de choc électrique.
Portez une protection oculaire.
En conformité avec les normes réglementaires de sécurité des directives
européennes
Indique un risque de blessures corporelles ou de détérioration de l’outil si
les consignes de cette notice d’utilisation ne sont pas respectées.
Les appareils électriques ou électroniques défectueux et/ou usagés doivent
être déposés dans des centres de recyclage appropriés.
d'alimentation est endommagé et débranchez-la pendant l’entretien.
SYMBOLES
FR
ES
PT
IT
EL
PL
RU
KZ
UA
RO
EN
110
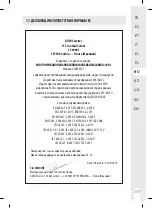
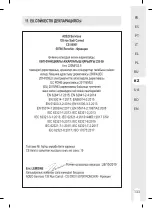
11. ДЕКЛАРАЦИЯ СООТВЕТСТВИЯ НОРМАМ ЕС
ADEO Services
135 rue Sadi Carnot
CS 00001
59790 Ronchin — France (Франция)
Заявляем, что данное изделие:
ДЕЛЬТАШЛИФОВАЛЬНАЯ МАШИНА 300 Вт
Модель 300DS2.5
удовлетворяет требованиям следующих директив, норм и стандартов:
Директива по машинному оборудованию 2006/42/EC
Директива по электромагнитной совместимости 2014/30/EU
Директива EC об ограничении использования некоторых вредных веществ в
электрическом и электронном оборудовании 2011/65/EU
с изменениями, внесенными Директивой (EU) 2015/863
а также следующим нормам:
EN 62841-1:2015
EN 62841-2-4:2014
EN 55014:2017
EN55014-2:2015
EN 61000-3-2:2014
EN 61000-3-3:2013
EN 50581 :2012
Номер партии: см. на задней странице обложки.
Две последние цифры года присвоения маркировки CE: 19
Eric LEMOINE
Международный Проект Качества Лидер
ADEO Services 135 Rue Carnot — CS 00001 59790 RONCHIN — France (Франция)
Done in Ronchin : xx/xx/xxxx
FR
ES
PT
IT
EL
PL
RU
KZ
UA
RO
EN
126
FR
ES
PT
IT
EL
PL
RU
KZ
UA
RO
EN
110
11. ДЕКЛАРАЦИЯ СООТВЕТСТВИЯ НОРМАМ ЕС
ADEO Services
135 rue Sadi Carnot
CS 00001
59790 Ronchin — France (Франция)
Заявляем, что данное изделие:
ДЕЛЬТАШЛИФОВАЛЬНАЯ МАШИНА 300 Вт
Модель 300DS2.5
удовлетворяет требованиям следующих директив, норм и стандартов:
Директива по машинному оборудованию 2006/42/EC
Директива по электромагнитной совместимости 2014/30/EU
Директива EC об ограничении использования некоторых вредных веществ в
электрическом и электронном оборудовании 2011/65/EU
с изменениями, внесенными Директивой (EU) 2015/863
а также следующим нормам:
EN 62841-1:2015
EN 62841-2-4:2014
EN 55014:2017
EN55014-2:2015
EN 61000-3-2:2014
EN 61000-3-3:2013
EN 50581 :2012
Номер партии: см. на задней странице обложки.
Две последние цифры года присвоения маркировки CE: 19
Eric LEMOINE
Международный Проект Качества Лидер
ADEO Services 135 Rue Carnot — CS 00001 59790 RONCHIN — France (Франция)
Done in Ronchin : xx/xx/xxxx
Содержание 220MFS2.5
Страница 2: ......
Страница 4: ...4 A x1 B D x1 x1 C x1 ...
Страница 20: ...FR ES PT IT EL PL RU KZ UA RO EN 20 VUE ÉCLATÉE ...
Страница 36: ...FR ES PT IT EL PL RU KZ UA RO EN 36 PLANO DE DESPIECE ...
Страница 52: ...FR ES PT IT EL PL RU KZ UA RO EN 52 VISTA PORMENORIZADA ...
Страница 67: ...FR ES PT IT EL PL RU KZ UA RO EN 67 VISTA DETTAGLIATA ...
Страница 68: ......
Страница 84: ...FR ES PT IT EL PL RU KZ UA RO EN 84 ΛΕΠΤΟΜΕΡΗΣ ΠΡΟΒΟΛΗ ...
Страница 100: ...FR ES PT IT EL PL RU KZ UA RO EN 100 WIDOK SZCZEGÓŁOWY ...
Страница 102: ......
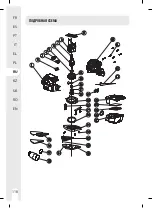
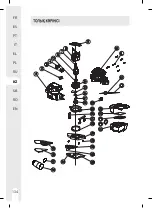
Страница 118: ...FR ES PT IT EL PL RU KZ UA RO EN 118 ПОДРОБНАЯ СХЕМА ...
Страница 150: ...FR ES PT IT EL PL RU KZ UA RO EN 150 ЗОБРАЖЕННЯ В РОЗІБРАНОМУ ВИГЛЯДІ ...
Страница 165: ...FR ES PT IT EL PL RU KZ UA RO EN 165 VEDERE DETALIATĂ ...
Страница 166: ......
Страница 180: ...FR ES PT IT EL PL RU KZ UA RO EN DETAILED VIEW 180 ...
Страница 181: ...1 2 Clic 181 ...
Страница 182: ...3 4 182 ...
Страница 183: ...5 6 1 2 3 4 5 183 ...
Страница 184: ...8 7 184 ...
Страница 185: ...9 10 185 ...
Страница 186: ...11 12 186 ...
Страница 187: ......

