Dexon DIMAX404 Скачать руководство пользователя страница 21

DIMAX404 User’s Manual


DEXON Systems 

15


4.1 

Change input 


This message changes the active input. This command contains two parts. First part is the input 
change command; second part the new input name. 
 
The command:


INPUT


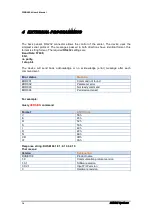
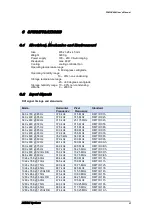
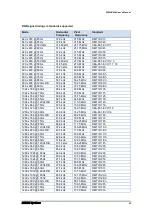
The input can be selected by the following input names: 
 
Input name 

Input name in command 

Composite 

CVBS 

S-Video 

SV 

YUV 

YUV 

RGB 

RBG 

DVI / HDMI 1 

DVI1 

DVI / HDMI 2 

DVI2 

DVI / HDMI 3 

DVI3 

DVI / HDMI 4 

DVI4 

DVI / HDMI (DUSE104L) 

DVI 

DisplayPort 

DP 

SDI (optional) 

SDI 


Return status 
If  there  is  no  error  in  the  command  format,  the  command  sent  to  the  scaler  is  returned  as  an 
acknowledgement from the scaler. 
When there is an error in the command, an error status will be returned. 
 
Sample: 

INPUT DVI1

 – change input to DVI/HDMI 1 


4.2 

Input Parameter Settings 

 
These messages set the input’s parameters. This command contains two parts. First part is the 
command selection; second part is the new value of this parameter. 
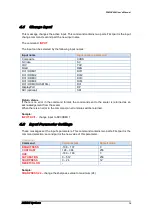
 

Command

:  

Command 

Valid interval 

Default value 

BRIGHTNESS


-108 – 107 

CONTRAST


128 – 384 

256 

HUE


-180 – 180 

SATURATION


0 – 512 

256 

SHARPNESS


0 – 24 

12 

RESETCOLOR


Sample: 

SHARPNESS 24

 – change the sharpness value to maximum (24) 

Содержание DIMAX404

Страница 1: ...ua a al l l D D DE E EX X XO O ON N N D D DI I IM M MA A AX X X4 4 40 0 04 4 4 4 4 4x x x4 4 4 8 8 8x x x4 4 4 M M Ma a at t tr r ri i ix x x S S Sw w wi i it t tc c ch h he e er r r D D DE E EX X XO...

Страница 2: ...ke any changes to this product and to revise the information about the products contained in this guide without an obligation to notify any persons about such revisions or changes DEXON and DXWall are...

Страница 3: ......

Страница 4: ......

Страница 5: ...r Presets 11 3 2 Setup through Web Browser 11 3 2 1 Advanced Panel 13 4 EXTERNAL PROGRAMMING 14 4 1 Change input 15 4 2 Input Parameter Settings 15 4 3 Auto Adjust 16 4 4 ADC Calibration for All Analo...

Страница 6: ...r s Manual ii DEXON Systems FIGURES Figure 2 1 Front Panel 3 Figure 2 2 Interfaces and Connections 3 Figure 3 1 DXWebControl of DIMAX404 application overview 12 Figure 3 2 DXWebControl DIMAX404 Advanc...

Страница 7: ...s DIMAX804H 8 input 4 output handles only DVI HDMI input sources 1 2 Main characteristics The DIMAX404 intelligent matrix is an all in one solution provided by a standalone box with the following feat...

Страница 8: ...CAM Component video YPbPr DIMAX404U 576i 576p 480i 480p 720p 1080i 1080p RGB VSYNC HSYNC DIMAX404U from 640x480 up to 1920x1200 DisplayPort DIMAX404U DisplayPort 1 1 from 640x480 up to 1920x1200 Outpu...

Страница 9: ...DIMAX404 User s Manual DEXON Systems 3 2 2 Front Panel Figure 2 1 Front Panel 2 3 Back Panels and Interfaces Figure 2 2 Interfaces and Connections...

Страница 10: ...DIMAX404 User s Manual 4 DEXON Systems 2 4 Typical Application Figure 2 3 Application Remote Outputs Local Outputs Inputs...

Страница 11: ...ia web browser RS 232 interface 3 1 Push Button and LCD panel The DIMAX404 devices can be configured easily by push buttons and LCD panel After powering up the device displays a default cycle of input...

Страница 12: ...parameters for each input types It contains o Composite Video on DIMAX404U Image Control Brightness Contrast Hue Saturation Sharpness Reset all OverScan None Medium Full o S Video on DIMAX404U Image C...

Страница 13: ...ge while large values produce a brighter image Contrast determines the dynamic range of information present in the video image Small values result in an image of constant colour and intensity while la...

Страница 14: ...l HDMI EQ In case of HDMI DVI input HDMI Equalizer settings can be modified This feature can stabilize the HDMI connection with our product and can be set between two values Low High 3 1 2 Output Sett...

Страница 15: ...0Hz Reduce Blanking There is a special function Recommended The device checks the native resolution of the screen and sets the most suitable output resolution for the screen Output Mode In HDMI mode a...

Страница 16: ...type Method Used Signal Source Pattern Composite One CVBS input none YUV Component Pixel grab Colour 8 bar 100 Colour 8 bar 75 RGB Pixel grab Colour 8 bar 100 Auto Adjust This function is available on...

Страница 17: ...e the current and recall previous input and output settings of the device You may save 4 sets of parameters You can use the push buttons P1 P8 to select from the Presets only if you are not navigating...

Страница 18: ...inputs with the outputs Set audio and PIP assignment similarly The Close All button deletes every assignment Tick Auto Start and each action the user performs will take effect immediately otherwise pu...

Страница 19: ...y identifies the module The default IP address is 192 168 1 105 Extra Tab The desired transition effect can be chosen Cut Fade and Wipe You can export the current configuration to a file through this...

Страница 20: ...stop bit The device will send back acknowledge or no acknowledge error message after each command sent Error status Meaning ERR001 Command not found ERR002 Parameter error ERR003 Not ready command ER...

Страница 21: ...l SDI Return status If there is no error in the command format the command sent to the scaler is returned as an acknowledgement from the scaler When there is an error in the command an error status wi...

Страница 22: ...nput This message changes the source of the audio input This command contains two parts First part is the command selection last part is the audio input id Command AUDIOINPUT change source of audio in...

Страница 23: ...user preset that was saved earlier or saves settings This command contains two parts First part is the recall or save command selection second part is the preset number selection Command RECALLPRESET...

Страница 24: ...d selection is the first part while method is the last part Command AUDIOMUTE mute or unmute the audio outputs Parameter must between 0 1 0 unmute 1 mute Sample AUDIOMUTE 0 unmute the audio outputs 4...

Страница 25: ...r Desktop or folder of your choice Step 3 Plug the USB cable into the product s USB port and PC Cable should be USB 2 0 cable Type A to Mini B 5 Pin cable Step 4 Turn off the product and turn on the s...

Страница 26: ...atch Firmware version check The scaler automatically checks the input firmware version during each loading process If there is a version mismatch you should start the F W update by pushing the SET but...

Страница 27: ...31 5 MHz DMT ID 06h 640 x 480 85Hz 43 3 kHz 36 0 MHz DMT ID 07h 720 x 400 85Hz 37 9 kHz 35 5 MHz DMT ID 03h 800 x 600 56Hz 35 23 kHz 36 0 MHz DMT ID 08h 800 x 600 60Hz 37 9 kHz 40 0 MHz DMT ID 09h 800...

Страница 28: ...DMT ID 33h 1680 x 1050 60Hz RB 64 7 kHz 119 0 MHz DMT ID 39h 1680 x 1050 60Hz 65 3 kHz 146 25 MHz DMT ID 3Ah 1920 x 1200 60Hz RB 74 0 kHz 154 0 MHz DMT ID 44h 1920 x 1080 60Hz 67 5 kHz 148 5 MHz DMT...

Страница 29: ...75Hz 67 5 kHz 108 0 MHz DMT ID 15h 1280 x 720 50Hz 37 5 kHz 74 25 MHz CEA 861 E VIC 19 1280 x 720 60Hz 45 0 kHz 74 25 MHz CEA 861 E VIC 4 1280 x 768 60Hz RB 47 4 kHz 68 25 MHz DMT ID 16h 1280 x 768 60...

Страница 30: ...2 576i 50 Hz Interlaced ITU R BT 656 4 54 576p 50 Hz Progressive ITU R BT 1358 56 720p 50 Hz Progressive SMPTE 296M 40 1080i 50 Hz Interlaced SMPTE 274M 2 1080p 50 Hz Progressive SMPTE 274M 2 Support...

Страница 31: ...0x540 60Hz 960x600 60Hz 1024x768 60Hz 1280x720 60Hz 1280x768 60Hz 1280x800 60Hz Reduce Blanking 1280x800 60Hz 1280x960 60Hz 1280x1024 60Hz 1360x768 60Hz 1366x768 60Hz Reduce Blanking 1366x768 60Hz 140...

Отзывы: