background image

18 

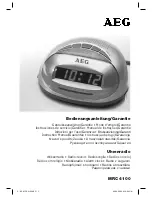
Operating elements 


1. 

TEMP 

display (temperature) 

10. 

Alarm icon 

2. 

Hour display 

11. 

Minute display 

3. 

DATE 

display  

12. 

DAY 

display (weekday, abbreviated) 

4. 

MONTH 

display  

13. 

Î

 button 

5. 

Ï

 button


14. 

WAVE

 button 

6. 

SET

 button 

15. 

RESET

 button 

7. 

ALARM

 button 

16. 

Battery compartment 

8. 

SNOOZE/LIGHT

 button 

17. 

Sensor opening 

9. Second 

display 

18.  Base 


Automatic time synchronisation


The transmitter for the DCF radio signal in Germany is near Frankfurt and also reaches other European 

countries. Further information on the DCF radio signal is available in Internet. 


After inserting the battery, the device automatically scans for the DCF radio signal to complete 

synchronisation of the time. The radio signal icon   flashes, thus indicating that scanning for the signal 

has started. When the radio signal icon is displayed continually, the DCF radio signal has been received. 


To ensure that time deviations are kept as small as possible, a daily time synchronisation occurs at night 

at 2:00 a.m. If this synchronisation is unsuccessful (the radio signal icon disappears from the LC 

display), 4 further attempts are made at the top of the next hours. A time synchronisation once a day 

normally suffices to keep the time accurate to the second. 


Press the 

WAVE 

button (14) to start the time synchronisation manually. Press the 

WAVE 

button again to 

interrupt time synchronisation. If no signal is received within 7 minutes, signal scanning stops (the radio 

signal icon   disappears) and restarts at the top of the next hour. 


Since there is less atmospheric disturbance at night, signal reception should be possible during the 

night.  


Signal reception is weaker in buildings with cement walls, e.g. office buildings or basements. If no signal 

is received in such cases, position the device in the vicinity of a window.  


Inserting the battery


Open the battery compartment 

(16) 

on the rear side of the device and insert a 1.5 V battery, type AAA/LR03 

(not supplied with the device). Pay attention to correct polarity (+ / -) as indicated in the battery compartment. 

After inserting the battery, an acoustic signal is issued and the radio signal icon   appears in the LC display 

above the Alarm icon 

(10)

 at the top right. Close the battery compartment. The device then automatically 

attempts to receive the DCF radio signal in order to display the time. If no signal is received, set the time 

manually. 


Содержание RCT200

Страница 1: ...mit Thermometer R veil radio pilot avec thermom tre Orologio sveglia radiocontrollato con termometro Radio Controlled Alarm Clock with Thermometer Bedienungsanleitung Mode d emploi Istruzioni per l us...

Страница 2: ...nen Flammen wie z B Kerzen in unmittelbarer N he des Ger tes stellen 15 Keine mit Fl ssigkeit gef llten Gegenst nde wie z B Vasen im Bereich oberhalb des Ger tes stellen 16 Batterien nicht extremer Hi...

Страница 3: ...chsten vollen Stunde Eine einmalige Zeitabgleichung pro Tag reicht normalerweise aus um die Zeit auf eine Sekunde genau zu halten Dr cken Sie die Taste WAVE 14 um den Zeitabgleich manuell zu starten...

Страница 4: ...lle vorherigen Einstellungen gehen dadurch verloren Das Ger t sucht dann erneut nach dem DCF Funksignal Zeitzone einstellen Wenn Sie sich nicht in Deutschland aufhalten oder die Zeit aus einem anderen...

Страница 5: ...5 Minuten Dr cken Sie eine beliebige Taste um die Schlummerfunktion abzuschalten Beleuchtung Dr cken Sie die Taste SNOOZE LIGHT 8 um die Anzeigebeleuchtung einzuschalten Die Anzeigebeleuchtung erlisc...

Страница 6: ...rgen f r einwandfreie Funktion und lange Lebensdauer Die Garantie gilt nicht f r die in den Produkten verwendeten Batterien Akkus oder Akkupacks Die Garantiezeit betr gt 24 Monate gerechnet vom Tage d...

Страница 7: ...a chaleur tels que po les ou cuisini res 14 Ne pas placer d objets avec des flammes nues pr s de l appareil bougies par exemple 15 Ne pas placer d objets remplis d eau des vases par exemple dans une z...

Страница 8: ...ns l affichage 4 nouvelles tentatives suivent chaque prochaines heure pile G n ralement une comparaison horaire unique par jour suffit pour que l heure soit indiqu e la seconde pr s Appuyez sur la tou...

Страница 9: ...er le fuseau horaire Si vous ne s journez pas en Allemagne ou si vous souhaitez voir s afficher l heure d un autre pays vous pouvez r gler la diff rence par rapport au signal radio mis par l Allemagne...

Страница 10: ...our d sactiver la fonction Snooze clairage Appuyez sur la touche SNOOZE LIGHT 8 pour activer l clairage de l affichage Celui ci s teint au bout de 5 secondes environ Thermom tre Le thermom tre affiche...

Страница 11: ...es de pointe Les mat riaux s lectionn s et des technologies de haut niveau garantissent un fonctionnement irr prochable et une longue dur e de vie La garantie ne s applique pas aux piles piles recharg...

Страница 12: ...erta come ad esempio candele nelle immediate vicinanze dell apparecchio 15 Non mettere recipienti pieni di liquido come ad esempio vasi sull apparecchio o nelle sue immediate vicinanze 16 Non esporre...

Страница 13: ...i notte alle ore 02 00 In caso non risultasse necessario effettuare una sincronizzazione il simbolo radio sul display LCD si spegne seguono 4 ulteriori tentativi uno per ogni ora piena successiva In l...

Страница 14: ...oni effettuate sono quindi annullate Se si tengono premuto in modalit d impostazione i tasti o le voci di menu sono visualizzate in modalit di scorrimento rapido Per resettare l apparecchio premere il...

Страница 15: ...alla modalit di visualizzazione Funzione snooze Non appena si inserisce il segnale acustico di sveglia premere il tasto SNOOZE LIGHT 8 Il segnale di sveglia si spegne per riprendere quindi di nuovo do...

Страница 16: ...i L impiego di materiali selezionati e tecnologie altamente sviluppate sono garanti di una perfetta funzionalit e lunga durata in vita La garanzia non si estende a pile batterie ricaricabili o accumul...

Страница 17: ...ects with an open flame e g candles in the direct vicinity of the device 15 Do not place objects filled with water e g vases in the direct vicinity of the device 16 Do not expose batteries to extreme...

Страница 18: ...further attempts are made at the top of the next hours A time synchronisation once a day normally suffices to keep the time accurate to the second Press the WAVE button 14 to start the time synchronis...

Страница 19: ...ou can use this function to set the time difference from the DCF radio signal transmitted in Germany German time 1 Press and hold the SET button until the year flashes 2 Press the SET button 5 times u...

Страница 20: ...lighting goes out after approx 5 seconds Thermometer The thermometer indicates the temperature in C Celsius or F Fahrenheit Press the button 13 to switch between C and F Summer time When the device is...

Страница 21: ...ighly developed technologies ensure trouble free functioning and a long service life The terms of guarantee do not apply to the batteries or power packs used in the products The period of guarantee is...

Отзывы: