background image

English

20

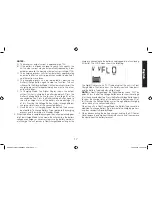
  3.  If the unit detects that the alternator is good, the LCD Screen shows 

the following:

    The Alternator Icon, “ALT GOOD” and the (full) Battery Icon will light 

solid.

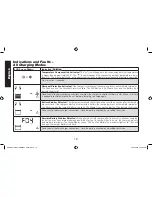
  4.  If the unit detects that the  alternator is out of typical voltage range, 

the LCD Screen shows the following:

    The Fault Icon will flash. The Alternator Icon, “ALT” and the (empty) 

Battery Status Icon will light solid.

  5. Press the Alternator Check Button again to stop the check.

PART 2
Under Load (accessories ON):  

Next, load the alternator by turning 

on as many accessories as possible (except for the A/C and Defrost).
 1. Refer to the “Charging the Battery” section of this Instruction 

Manual. Set up the battery charger and connect to the battery 

following steps 1 and 2. The unit will be in Standby Mode.

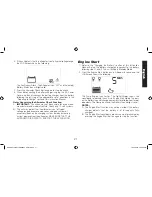
  2. Press the Alternator Check Button to start the check. The Digital 

Display shows the following to indicate the unit is analyzing the 

alternator:

    The Alternator Icon will flash and the Battery icon with two bars will 

light solid.

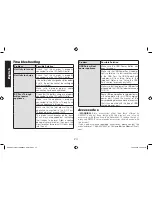
 3. If the unit detects that the  alternator is good, the LCD Screen 

shows the following:

    The Alternator Icon, “ALT GOOD” and the (full) Battery Icon will light 

solid.

DXAEC210_ManualENFRSP_092116.indd   20

10/19/2016   3:58:54 PM

Содержание DXAEC210

Страница 1: ... a Baccus Global LLC One City Centre 1 North Federal Highway Suite 200 Boca Raton FL 33432 Baccus Global LLC número de teléfono gratuito 1 888 394 3392 www dewalt12volt com Especificaciones Entrada 120V CA 60Hz 1180W Salida 12V CC 70A 210A arranque del motor 5 segundos activado 5 minutos apagado Salida USB 5V CC 3 1A max Salida CA 120V CA 60Hz 700W Importados por Baccus Global LLC One City Centre ...

Страница 2: ...r Cargador de batería 70A profesional de ruedas con 210A arranque del motor INSTRUCTION MANUAL GUIDE D UTILISATION MANUAL DE INSTRUCCIONES If you have questions or comments contact us Pour toute question ou tout commentaire nous contacter Si tiene dudas o comentarios contáctenos 1 888 394 3392 BC RD092116 DXAEC210_ManualENFRSP_092116 indd 1 10 19 2016 3 58 52 PM ...

Страница 3: ...English 2 DXAEC210_ManualENFRSP_092116 indd 2 10 19 2016 3 58 52 PM ...

Страница 4: ...e State of California to cause cancer and birth defect or other reproductive harm Wash hands after handling Important Safety Instructions 1 Keep these instructions 2 Heed all warnings 3 Follow all instructions 4 Avoid dangerous environments Don t use battery chargers in damp or wet locations Do not use the charger in the rain or snow 5 Clean only with a dry cloth 6 Keep children away from the char...

Страница 5: ... to operate this equipment READ ALL INSTRUCTIONS Specific Safety Instructions for Power Cords Don t abuse the cord Protect the power cord from being walked on or pinched particularly at plugs convenience receptacles and the point where they exit from the apparatus Don t abuse the power cord Never carry the apparatus by cord or yank it to disconnect from receptacle Keep the cord from heat oil and s...

Страница 6: ...nding from adapter must be connected to a properly grounded outlet make certain it is grounded If necessary replace the original outlet cover plate screw with a longer screw that will secure the adapter ear or lug to outlet cover plate and make ground connection to a grounded outlet Specific Safety Instructions for Battery Chargers WARNING BURST HAZARD Do not use the unit for charging dry cell bat...

Страница 7: ...act with battery acid may cause blindness and or severe burns Be aware of first aid procedures in case of accidental contact with battery acid Have plenty of fresh water and soap nearby in case battery acid contacts skin If battery acid contacts skin or clothing wash immediately with soap and water for at least 10 minutes and get medical attention immediately Never smoke or allow a spark or flame ...

Страница 8: ...mediate medical attention Eyes If battery acid comes in contact with eyes flush eyes immediately for a minimum of 15 minutes and seek immediate medical attention LCD liquid crystal display If liquid crystal comes in contact with your skin Wash area off completely with plenty of water Remove contaminated clothing If liquid crystal gets into your eye Flush the affected eye with clean water and then ...

Страница 9: ...mp Battery Charger 210 Amp Engine Start 70A Chargeur de Batterie 210A Démarrage du Moteur Engine Start Démarrage du Moteur 120V AC 6A MAX 3 1A Recondition Rénover Alternator Test Alternateur Vérifier Battery Type Batterie Catégorie Reverse Polarity Polarité inversée SEC VA GOOD ALT A RECOND Engine Start Recond Battery Type Battery Voltage Alt Test USB 70A Cargador de Batería 210A Arranque del Moto...

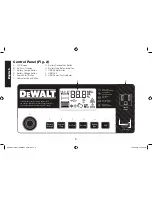
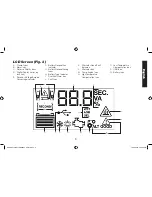
Страница 10: ...econdition Indicator G Battery Reconditioning Icons H Battery Type Indicator I Overheat Alarm Icon J Fault Icon I K C B A F G Q D E J P O N M L H K Alternator Good Fault Indicators L Alternator Icon M Pump Engine Icon N High Temperature Compensation Icon O Low Temperature Compensation Icon P USB Icon Q Battery Icon DXAEC210_ManualENFRSP_092116 indd 9 10 19 2016 3 58 53 PM ...

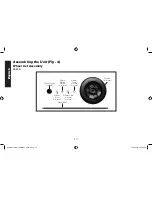
Страница 11: ...el Set Assembly PARTS Wheel Shaft Wheel Cover 2 in total Wheel Nut 2 in total Ø6mm Spring Washer 2 in total Ø6mm Plain washer 2 in total Ø8mm Plain washer 2 in total Wheels 2 in total DXAEC210_ManualENFRSP_092116 indd 10 10 19 2016 3 58 53 PM ...

Страница 12: ...l Covers 1 Align one Wheel Set Ø8mm Plain Washer Wheel Ø6mm Plain Washer Ø6mm Spring Washer and Wheel Nut assembled in the sequence shown in the illustration and attach to each end of the Wheel Shaft 2 Screw the Wheel Nuts for each end of the Wheel Shaft 3 Snap the Wheel Covers into the centre slot of each Wheel DXAEC210_ManualENFRSP_092116 indd 11 10 19 2016 3 58 53 PM ...

Страница 13: ...pring Washers and Ø4mm Plain Washers with the Base Stand Screw Holes through the apertures on the Base Stand in the sequence shown in the illustration 3 Screw the four Base Stand Screws into the Base Stand Screw Holes Do not over tighten 4 Position the Wheel Set Assembly as shown in the illustration 5 Align the Wheel Set Lock with the three Wheel Set Screw Holes It should be centered over the Whee...

Страница 14: ...e Stand Wheel Shaft Slot Wheel Set Lock Screw Holes 4mm Spring Washers Wheel Set Lock Screws Ø4mm Plain Washers Base Stand Screws Base Stand Screw Holes Ø4mm Spring Washers DXAEC210_ManualENFRSP_092116 indd 13 10 19 2016 3 58 54 PM ...

Страница 15: ...low battery acid to drip on the charger when reading gravity or filling the battery Never operate the charger in a closed in area or restrict ventilation in any way A marine boat battery must be removed and charged on shore Do not set a battery on top of the charger CONNECTING THE CHARGER CONNECTION PRECAUTIONS Connect and disconnect output clamps only after removing AC Power Cord from electric ou...

Страница 16: ...ct the positive red clamp to the positive battery post red or marked POS P 4 Stand as far back from the battery as possible and do not face the battery when making final connection 5 Carefully connect the negative black clamp to the free end of the battery cable connected to the negative terminal 6 When disconnecting the charger always do so in reverse sequence of connecting procedure and break fi...

Страница 17: ...not be selected once charging has begun In Standby Mode the Digital Display shows the voltage V of the connected battery by default Press the Battery Voltage Button once to show the charge status of the battery as a percentage of full Pressing the Voltage Button cycles through different standby status views of the connected battery IMPORTANT If the battery clamps are connected incorrectly with reg...

Страница 18: ...rminate the charging process and then reselect in Standby Mode 4 When the battery is completely charged the unit automatically goes into Float Charge Mode In this mode the unit monitors the battery voltage and charges as necessary to assure the battery maintains a full charge The unit remains in Float Charge Mode as long as the charger is connected to the battery and plugged into a functioning AC ...

Страница 19: ...ation around the unit before attempting to charge again Battery Problem Detected The charger automatically checks the battery condition 3 minutes after the charging process starts If the charger detects a problem with a battery the charging process automatically terminates The Fault Icon and the empty Battery Icon flash The Clamp Icons and the Battery Type Indicator light solid Disconnect all batt...

Страница 20: ...e than 24 hours may be needed to restore performance on some batteries If so repeat the process 3 When disconnecting the battery charger unplug the AC Power Cord and then disconnect the battery charger from the battery following the last step of the appropriate set of directions in the Preparing to Charge section of this Instruction Manual IMPORTANT If 5 cycles of reconditioning does not improve b...

Страница 21: ... turning on as many accessories as possible except for the A C and Defrost 1 Refer to the Charging the Battery section of this Instruction Manual Set up the battery charger and connect to the battery following steps 1 and 2 The unit will be in Standby Mode 2 Press the Alternator Check Button to start the check The Digital Display shows the following to indicate the unit is analyzing the alternator...

Страница 22: ...essory loads on the charging system thereby increasing current demand from the alternator MAKE SURE THAT THE ALTERNATOR IS RATED TO SUPPORT THE APPLICATION Engine Start 1 Refer to the Charging the Battery section of this Instruction Manual Set up the battery charger and connect to the battery following steps 1 and 2 The unit will be in Standby Mode 2 Press the Engine Start Button once A beep will ...

Страница 23: ...nual USB Port The USB Power Button and the USB Port are located on the front of unit The USB Power Fault Indicator is a translucent ring around the USB Port Refer to Fig 2 to locate Important Notes Concerning the USB Port 1 This unit s USB Port does not support data communication It only provides power to an external USB powered device The USB Port provides up to 3 1A 5V 2 When the USB Port is in ...

Страница 24: ...he AC Pass Through in the front of this Instruction Manual NOTE The 120V AC Pass Through is protected by a circuit breaker located on the back of the unit see Fig 1 If the 120V AC Pass Through shuts down when it is in use this circuit break may need to be reset Do this by pushing it back into the unit until it locks in place Refer to the Troubleshooting sections for more information Care and Maint...

Страница 25: ... it locks back into the unit Problem Possible Solution USB Port will not power appliance Make sure the USB Power Button has been turned on Make sure the USB Power Fault Indicator lights solid blue If a fault condition exists in the USB Port the USB Power Fault Indicator will flash blue Refer to the Important Notes in the Using the USB Port section to remedy any faults Make sure that the draw of th...

Страница 26: ...ng from normal wear and tear accidents damages sustained during shipping alterations unauthorized use or repair neglect misuse abuse and failure to follow instructions for care and maintenance for the product This warranty gives you the original retail purchaser specific legal rights and you may have other rights which vary in certain states or provinces This product is not intended for commercial...

Страница 27: ...arrage du moteur Le DXAEC210 DXAEC210CA banc chargeur de batterie avec 80A démarrage moteur est un chargeur de batterie de DeWALT 30A qui comporte le démarrage du moteur 210A les fonctions vérification de l alternateur et reconditionnement de la batterie un port USB et une prise CA AVERTISSEMENT Cet appareil ou son cordon contient du plomb un élément chimique reconnu par l État de la Californie co...

Страница 28: ...ons radio En fonction des installations réalisées il n est cependant pas garanti que toute interférence soit exclue Si cet équipement cause des interférences nuisibles à toute réception radio ou télévision ce qui peut être déterminé en allumant et éteignant l équipement l utilisateur est encouragé à tenter de corriger ces interférences en prenant l une ou plusieurs des mesures suivantes Réorienter...

Страница 29: ...on sur un nominal de 120 volts circuit et comporte une fiche de mise à la terre qui ressemble à celle illustrée dans la figure A Si aucune prise électrique correctement mise à la terre n est disponible il est possible d utiliser un adaptateur temporaire qui ressemble à la fiche illustrée dans les figures B et C pour brancher cette fiche dans une prise bipolaire comme le montre la figure B L adapta...

Страница 30: ...T Pour réduire le risque d incendie N utilisez pas à proximité de matières vapeurs poussières ou gaz inflammables Protégez l unité de la chaleur extrême ou des flammes ATTENTION Pour réduire le risque de blessures ou de dommages matériels NE JAMAIS ESSAYER DE CHARGER UNE BATTERIE GELÉE Ne pas charger la batterie lorsque le moteur est en marche Rester loin de pales de ventilateur courroies poulies ...

Страница 31: ...étrangers dans le port USB Ne pas attacher les concentrateurs USB ou plus d un appareil électronique personnel à chaque port USB Ne pas utiliser cette unité pour l exploitation d appareils nécessitant plus de 3 1A de le port USB Consignes de sécurité spécifiques pour la prise secteur CA passent à travers Ne pas insérer d objets étrangers dans la prise Ne fixez pas prise CA robinets ou rallonge cor...

Страница 32: ... Pince positif rouge D Panneau de commande se reporter à Fig 2 E Bobine de stockage pour le câble de pinces F Câble 120V CA et fiche sur bobine de stockage G Support de base H Roues 2 au total I Disjoncteurréinitialisable arrière de l appareil B C H A F G E D DXAEC210_ManualENFRSP_092116 indd 31 10 19 2016 3 58 55 PM ...

Страница 33: ... Start 70A Chargeur de Batterie 210A Démarrage du Moteur Engine Start Démarrage du Moteur 120V AC 6A MAX 3 1A Recondition Rénover Alternator Test Alternateur Vérifier Battery Type Batterie Catégorie Reverse Polarity Polarité inversée SEC VA GOOD ALT A RECOND Engine Start Recond Battery Type Battery Voltage Alt Test USB 70A Cargador de Batería 210A Arranque del Motor A C E G I D F H K J B I Bouton ...

Страница 34: ...e reconditionnement de la batterie H Indicateur du type de batterie I K C B A F G Q D E J P O N M L H I Icône d alarme de surchauffe J Icône d erreur K Indicateurs de alternateur est bon défaillance L Icône d alternateur M Icône de pompez le moteur N Icône de compensation de température élevée O Icône de compensation de température basse P Icône de USB Q Icône d état de la batterie DXAEC210_Manual...

Страница 35: ... roues PIÈCES ARBRE DE ROUE COUVERTURE DE ROUE 2 au total ÉCROU DE ROUE 2 au total Ø6mm RONDELLE ÉLASTIQUE 2 au total Ø6mm RONDELLE ORDINAIRE 2 au total Ø8mm RONDELLE ORDINAIRE 2 au total ROUES 2 au total DXAEC210_ManualENFRSP_092116 indd 34 10 19 2016 3 58 56 PM ...

Страница 36: ... roue 1 Alignez le jeu de roues Ø8mm rondelle ordinaire roue Ø6mm rondelle ordinaire Ø6mm rondelle élastique et l écrou de roue assemblés dans l ordre indiqué sur l illustration et le fixer à chaque extrémité de l arbre de roue 2 Visser les écrous de roue à chaque extrémité de l arbre de roue 3 Enclenchez les couvercles de roue dans la fente centrale de chaque roue DXAEC210_ManualENFRSP_092116 ind...

Страница 37: ... Ø4mm rondelles plates avec les trous de vis du support de base à travers les ouvertures sur la base de stand dans l ordre indiqué dans l illustration 3 Visser les 4 vis du support de base dans les trous de vis du support de base Ne pas trop serrer 4 Positionner l ensemble de roue comme indiqué sur l illustration 5 Aligner le verrouillage de la roue ensemble avec les trois trous de vis de l ensemb...

Страница 38: ...e Trous de l ensemble de la serrure de roue Ø4mm rondelles élastiques Vis de la serrure de la roue ensemble Ø4mm Rondelles plates Vis du support de base Trous de vis de la serrure du support de base Ø4mm Rondelles élastiques DXAEC210_ManualENFRSP_092116 indd 37 10 19 2016 3 58 56 PM ...

Страница 39: ...e plane pour éviter tout mouvement pendant le fonctionnement Prendre les précautions adéquates pour fixer les roues pour éviter de déplacer ou de mouvement avant de l utiliser Placez le chargeur aussi loin de la batterie que le permettent les câbles Ne placez jamais le chargeur directement au dessus de la batterie Les vapeurs émises par la batterie pourraient corroder et endommager le chargeur Ne ...

Страница 40: ...s du corps tôle Connectez vous à un épais de partie métallique du châssis ou du bloc moteur 8 Consultez l instructions d utilisation du véhicule ou le manuel de la batterie pour des informations sur la combien de temps pour charger 9 Lorsque vous débranchez le chargeur débranchez le cordon d alimentation retirez la pince de châssis du véhicule puis retirez la pince de la borne de la batterie SUIVE...

Страница 41: ...est en mode veille L affichage numérique indique la tension de la batterie branchée Les barres de l icône de batterie représentent le niveau de charge de la batterie branchée Les icônes des pinces et l icône de la batterie s allument solide REMARQUES Le chargeur vous permet de sélectionner le type de batterie approprié WET AGM ou gel pour chargement efficace et sûr La sélection par défaut est humi...

Страница 42: ...cran LCD affichera ce qui suit L affichage numérique indique le courant qui est charge de la batterie par défaut L icônes des pinces s allument en continu et les barres de l icône de la batterie passe de vide à solide du bas vers le haut pour indiquer l unité est en mode de charge REMARQUES A Le courant de sortie maximal est d environ 30A B Si la batterie est déjà chargée à pleine capacité le cour...

Страница 43: ...e secteur qui fonctionne L écran LCD affiche les suivantes L affichage numérique indique FLO indiquant que l unité est en mode de charge flottante L icônes des pinces et l icône de la batterie avec trois barres s allument solid REMARQUE En mode de charge flottante l affichage numérique indique le courant qui est charge de la batterie par défaut Appuyez sur le bouton de tension de la batterie une f...

Страница 44: ...eau Problème de batterie détecté Le chargeur vérifie automatiquement l état de la batterie 3 minutes après le processus de charge commence Si le chargeur détecte un problème avec la batterie le processus de charge pour la banque de charge correspondante prend fin automatiquement et l écran LCD passe directement à l indicateur de banque de charge correspondante L indicateur de banque de charge corr...

Страница 45: ...ndante revenir en mode veille Dans le cas de certaines batteries il faut plus de 24 heures pour les remettre en état Si nécessaire répétez le processus 3 Lors du débranchement de la batterie chargeur débranchez le cordon d alimentation puis débranchez le chargeur de la batterie ou les piles suivant la dernière étape de l ensemble approprié d instructions de la section Préparation de l accusation d...

Страница 46: ...reux accessoires que possible à l exception de la climatisation et du dégivrage 1 Reportez vous à la section Recharge de la batterie de ce manuel d instructions Configurer le chargeur de batterie et vous connecter à la batterie en suivant les étapes 1 et 2 L unité sera en mode de veille 2 Appuyez sur le bouton de contrôle d alternateur pour commencer le contrôle L écran ACL affiche les suivantes p...

Страница 47: ... charge augmentant ainsi la demande actuelle de l alternateur ASSUREZ VOUS QUE L ALTERNATEUR EST ÉVALUÉ POUR APPUYER LA DEMANDE Démarrage du moteur 1 Reportez vous à la section Recharge de la batterie de ce manuel d instructions Configurer le chargeur de batterie et vous connecter à la batterie en suivant les étapes 1 et 2 L unité sera en mode de veille 2 Appuyez sur le bouton de démarrage du mote...

Страница 48: ...ou les piles suivant la dernière étape de l ensemble approprié d instructions de la section Préparation de l accusation de ce manuel d instructions Port USB Le bouton d alimentation USB et port USB sont situés sur le côté droit de l unité L indicateur de alimentation de défaillance de USB est un anneau translucide autour de le port USB Se reporter à la Fig 2 pour localiser Remarques importantes co...

Страница 49: ...ateur de alimentation de défaillance de USB autour le port USB s allume en bleu et l écran LCD rétroéclairé affiche continuellement les suivantes L icône USB s allume en bleu solide indiquant le port USB est prêts à utiliser 3 Branchez le périphérique USB alimenté dans le port USB et fonctionne normalement 4 Appuyez sur le bouton USB pour désactiver le port USB Prise secteur passent à travers CA C...

Страница 50: ...us les deux volts il est impossible pour recharger avec ce chargeur Assurez vous qu une connexion par câble à la polarité correcte a été établie Problème Solution Possible Passent à travers CA ne sera pas alimenter l appliance Vérifiez que le chargeur est correctement connectéàuneprise120VCAfonctionnant Assurez vous que l appliance est correctement connecté au passent à travers CA et que l applian...

Страница 51: ...à la discrétion du manufacturier Une preuve d achat peut être requise par le fabricant 2 Retournez le produit chez le marchand où il a été acheté afin de procéder à un échange à condition que le marchand soit un détaillant participant Les retours devraient s effectuer au cours de la période de temps spécifiée par le détaillant dans sa politique d échange généralement de 30 à 90 jours après la vent...

Страница 52: ...City Centre 1 North Federal Highway Suite 200 Boca Raton FL 33432 www dewalt12volt com 1 888 394 3392 Copyright 2016 DeWALT DeWALT et le logo DeWALT sont des marques de DeWALT Industrial Tool Co ou une filiale de celle ci et sont utilisés sous licence Le schéma de couleurs jaune et noir est une marque commerciale pour DeWALT outils électriques et accessoires DXAEC210_ManualENFRSP_092116 indd 51 10...

Страница 53: ...10A comprobación del alternador y las funciones de reacondicionamiento de la batería un puerto USB y una salida de corriente alterna ADVERTENCIA Este producto o su cable de alimentación contiene plomo una sustancia química reconocida por el Estado de California como causante de cáncer defectos de nacimiento u otros problemas reproductivos Lávese las manos después de utilizarlo Instrucciones import...

Страница 54: ...ntena receptora Aumente el espacio que separa al equipo del receptor Conecte el equipo a una toma de corriente que esté en un circuito diferente al circuito al que está conectado el receptor Consulte con el concesionario o con un técnico de radio y televisión experimentado que pueda ayudarle AVISO De acuerdo con la FCC Parte 15 los cambios o modificaciones a este equipo que no sean expresamente ap...

Страница 55: ... dibujo B si un tomacorriente a tierra adecuado no está disponible El adaptador temporal debe utilizarse solamente hasta que un tomacorriente a tierra pueda ser instalado por un electricista calificado PELIGRO Antes de usar el adaptador como ilustrado asegúrese de que el tornillo del centro de la placa del tomacorriente está conectado a tierra La oreja rígida de color verde o terminal que se extie...

Страница 56: ... mientras el motor está en marcha Manténgase alejado de las paletas de ventilador correas poleas y otras partes que pueden provocar lesiones a las personas Los vehículos que tienen sistemas computarizados incorporados pueden resultar dañados si la batería del vehículo se arranca mediante puente Antes de arrancar mediante puente lea el manual del cliente del vehículo para confirmar que la ayuda ext...

Страница 57: ...r los aparatos que requieren más de 3 1 amperios en total para operar desde los puertos de alimentación USB Instrucciones de seguridad específicas para el CA pase través No introduzca objetos extraños dentro ya sea el CA pase través No conecte grifos de salida de CA ni los cables de extensión multi salida o adjuntar más de un aparato eléctrico al CA pase través Observe todas las instrucciones de s...

Страница 58: ...D Panel de control consulte la Fig 2 E Carrete de almacenamiento de la cable de la pinza F Cable de 120V CA y enchufe sobre el carrete de almacenamiento G Soporte de base H Ruedas 2 en total I Disyuntor de circuito reajustable parte posterior de la unidad B C H A F G E D DXAEC210_ManualENFRSP_092116 indd 57 10 19 2016 3 58 58 PM ...

Страница 59: ...age du Moteur Engine Start Démarrage du Moteur 120V AC 6A MAX 3 1A Recondition Rénover Alternator Test Alternateur Vérifier Battery Type Batterie Catégorie Reverse Polarity Polarité inversée SEC VA GOOD ALT A RECOND Engine Start Recond Battery Type Battery Voltage Alt Test USB 70A Cargador de Batería 210A Arranque del Motor A C E G I D F H K J B H Botón para seleccionarde tipo de la batería I Botó...

Страница 60: ...nos de reacondicionamiento de la batería H Indicador de tipo de la batería I K C B A F G Q D E J P O N M L H I Icono de alarma de sobrecalentamiento J Icono del falla K Indicadores alternador de bueno fallo L Icono del alternador M Icono de arrancar el motor N Icono de compensación de temperatura alta O Icono de compensación de temperatura baja P Icono de USB Q Icono de la batería DXAEC210_ManualE...

Страница 61: ...uedas PARTES ÁRBOL DE LA RUEDA CUBIERTA DE LA RUEDA 2 en total TUERCA DE LA RUEDA 2 en total Ø6mm ARANDELA DE MUELLE 2 en total Ø6mm ARANDELA PLANA 2 en total Ø8mm ARANDELA PLANA 2 en total WHEELS 2 in total DXAEC210_ManualENFRSP_092116 indd 60 10 19 2016 3 58 58 PM ...

Страница 62: ...eda 1 Alinear uno conjunto de ruedas Ø8mm arandela plana rueda Ø6mm arandela plana Ø6mm arandela de muelle and tuerca de la rueda ensamblado en la secuencia mostrada en la ilustración y adjuntar a cada extremo del árbol de rueda 2 Atornille las tuercas de la rueda para cada extremo del árbol de la rueda 3 Encajar la cubiertas de la rueda en la ranura central de cada rueda DXAEC210_ManualENFRSP_092...

Страница 63: ...arandelas básicas con la base del soporte con orificios para tornillos a través de las aberturas en la base del soporte en la secuencia que se muestra en la ilustración 3 Atornillar los 4 tornillos del soporte de base enlos orificios de los tornillos del soporte de base No apretar en exceso 4 Colocar el conjunto de la rueda como se muestra en la ilustración 5 Alinear el bloqueo del conjunto de las...

Страница 64: ... los tornillos del conjunto de bloqueo de ruedas Ø4mm arandelas de resorte Tornillos del bloqueo del conjunto de ruedas Ø4mm Arandelas básica Tornillos del soporte de la base Orificios de los tornillos del soporte de la base Ø4mm Arandelas de resorte DXAEC210_ManualENFRSP_092116 indd 63 10 19 2016 3 58 59 PM ...

Страница 65: ...jos de la batería como lo permitan los cables Nunca ubique el cargador directamente sobre la batería que se está cargando los gases de la batería producirán corrosión y daños al cargador Nunca permita que el ácido de la batería gotee sobre el cargador cuando lee la gravedad o llena la batería Nunca opere el cargador en un área cerrada ni restrinja la ventilación de manera alguna Las baterías marin...

Страница 66: ...sitivo POS P de la batería generalmente tiene mayor diámetro que el borne negativo NEG N 2 Conecte un cable de 60 cm 24 pulgadas longitud mínima Nº 6 AWG aislado para batería al borne negativo de la batería marcado NEG N 3 Conecte la pinza positiva roja de la batería al borne positivo de la batería rojo o marcado POS P 4 Párese lo más lejos posible de la batería y no se enfrentan a la batería al r...

Страница 67: ...l siguiente paso como no se puede seleccionar el tipo de batería una vez que la carga ha comenzado En modo de espera la pantalla digital muestra la tensión V de la batería conectada de forma predeterminada Pulse el botón de tensión de la batería una vez para mostrar el estado de carga de la batería como un porcentaje de lleno Al pulsar el botón de tensión gira a través de diferentes vistas de esta...

Страница 68: ... Para cambiar el tipo de batería interrumpir el proceso de carga y a continuación vuelva a seleccionar en el modo de espera 4 Cuando la batería está completamente cargada la unidad pasará automáticamente al modo de carga flotante De este modo la unidad monitorea la tensión de la batería y los cargos según sea necesario para asegurar la batería mantiene una carga completa La unidad está en modo de ...

Страница 69: ...nidad antes de intentar cargarla de nuevo Problema con la batería detecta El cargador comprueba automáticamente el estado de la batería 3 minutos después de inicia el proceso de carga Si el cargador detecta un problema con la batería el proceso de carga para el banco correspondiente termina automáticamente y la pantalla LCD va directamente al indicador de banco de carga correspondiente El indicado...

Страница 70: ...era Se pueden necesitar más de 24 horas para restaurar el rendimiento en algunas baterías Si es así repita el proceso 3 Al desconectar el cargador de batería pulse el interruptor de alimentación principal para apagar la unidad desenchufe el cable de alimentación CA y luego desconecte el cargador de batería s siguiente el último paso del conjunto apropiado de direcciones en la sección Preparación d...

Страница 71: ...idos Después cargar el alternador girando tantos accesorios como sea posible a excepción del aire acondicionado y desempañador de ventanas 1 Consulte la sección carga de la batería de este manual de instrucciones Configurar el cargador de la batería y conecte la batería siguiendo los pasos 1 y 2 La unidad estará en modo de espera 2 Pulse el botón de comprobación del alternador para iniciar la comp...

Страница 72: ... fuera de rango típico de voltaje porque alguien ha agregado un número de cargas del accesorio en el sistema de carga de tal modo aumentando demanda actual del alternador CERCIÓRESE DE QUE EL ALTERNADOR ESTÉ CLASIFICADO PARA APOYAR EL USO Arranque del motor 1 Consulte la sección carga de la batería de este manual de instrucciones Configurar el cargador de la batería y conecte la batería siguiendo ...

Страница 73: ...or de batería siguiente el último paso del conjunto apropiado de direcciones en la sección Preparación de la carga en la parte delantera de este manual Puerto USB El botón de alimentación USB y los cuatro puertos USB están situados en la parte frontal de la unidad El indicador de potencia fallo de USB consiste en un translúcido anillo alrededor el puerto USB Consulte la Fig 2 para localizar Notas ...

Страница 74: ... USB Sonará un pitido el indicador de potencia fallo de USB alrededor del puerto USB se ilumina en azul y la pantalla LCD se mostrará continuamente lo siguiento El icono USB se iluminará sólido lo que indica que el puerto USB está listo para usar 3 Conecte el dispositivo USB en el puerto los puertos USB y funciona normalmente 4 Pulse el botón de alimentación USB de nuevo para desactivar el puerto ...

Страница 75: ...a Solución posible La unidad no enciende Compruebe que el cargador está conectado correctamente a una toma de 120V CA Problema Solución posible Unidad falla al cargar Compruebe que el cargador está conectado a una toma de 120V CA accionada Si la batería que se cargará ha caído debajo de 2 voltios la batería no se puede recargar con este cargador Asegúrese de que un cable de conexión con correcta p...

Страница 76: ...del fabricante póngase en contacto con el fabricante al 1 888 394 3392 o CustomerService dewalt12volt com Limitada de Un Año El fabricante garantiza este producto contra defectos de materiales y mano de obra durante un período de UN 1 AÑO a partir de la fecha de compra del producto por el comprador usuario final Período de Garantía Si hay un defecto y una reclamación válida se recibe dentro del pe...

Отзывы: