DeWalt DW7350 Скачать руководство пользователя страница 5

3

English

To Move Planer Stand

  1. Step on the foot pedal to unlock and lift stand.
  2. Firmly grasp the handles on your planer. Move to a new location. 
  3. Push the foot pedal up, dropping the base into a locked position before you resume planing.

CAUTION: 

Use caution when moving the planer stand. Tipping can occur if wheels are stopped 

abruptly by encountering debris on the floor or other irregularities in travel path.

MAINTENANCE

 WARNING: To reduce the risk of injury, turn unit off and disconnect it from power source 

before installing and removing accessories, before adjusting or when making repairs.

 An 

accidental start-up can cause injury.

Cleaning

 WARNING:

 Never use solvents or other harsh chemicals for cleaning the non-metallic parts of the 

tool. These chemicals may weaken the plastic materials used in these parts. Use a cloth dampened 
only with water and mild soap. Never let any liquid get inside the tool; never immerse any part of the 
tool into a liquid.

Accessories

 WARNING: 

Since accessories, other than those offered by D

E

WALT, have not been tested with 

this product, use of such accessories with this tool could be hazardous. To reduce the risk of injury, 
only D

E

WALT recommended accessories should be used with this product. 

Recommended accessories for use with your tool are available at extra cost from your local dealer or 
authorized service center. If you need assistance in locating any accessory, please contact D

E

WALT 

Industrial Tool Co., 701 East Joppa Road, Baltimore, MD 21286, call 1-800-4-D

E

WALT (1-800-433-

9258) or visit our website: www.dewalt.com.

Repairs

To assure product SAFETY and RELIABILITY, repairs, maintenance and adjustment (including brush 
inspection and replacement) should be performed by a D

E

WALT factory service center, a D

E

WALT 

authorized service center or other qualified service personnel. Always use identical replacement 
parts.

Register Online

Thank you for your purchase. Register your product now for:
 • 

WARRANTY SERVICE:

 Registering your product will help you obtain more efficient warranty 

service in case there is a problem with your product.

 • 

CONFIRMATION OF OWNERSHIP:

 In case of an insurance loss, such as fire, flood or theft, 

your registration of ownership will serve as your proof of purchase.

 • 

FOR YOUR SAFETY: 

Registering your product will allow us to contact you in the unlikely event 

a safety notification is required under the Federal Consumer Safety Act.

Register online at www.dewalt.com/register.

Three Year Limited Warranty

D

E

WALT will repair, without charge, any defects due to faulty materials or workmanship for three 

years from the date of purchase. This warranty does not cover part failure due to normal wear or tool 
abuse. For further detail of warranty coverage and warranty repair information, visit www.dewalt.com 
or call 1-800-4-D

E

WALT (1-800-433-9258). This warranty does not apply to accessories or damage 

caused where repairs have been made or attempted by others. This warranty is the only warranty 
offered by D

E

WALT, and any implied warranties shall not apply. D

E

WALT will not be responsible for 

any incidental or consequential damages. This warranty gives you specific legal rights and you may 
have other rights which vary in certain states or provinces. Some states do not allow the exclusion 
or limitation of incidental or consequential damages, or limitations on how long an implied warranty 
lasts, so the above limitations or exclusions may not apply to you.

 WARNING:


To reduce the risk of injury, turn planer off, disconnect the tool from the 

power source before assembling the planer to the stand.

 An accidental start-up can cause 

injury.

WARNING: 

For your own safety, it is recommended that two people carry this machine or serious 

injury could result.

Your planer stand is set up to accept the DW733, DW734 or DW735 D

E

WALT thickness planers. 

  1. Carefully lift and place the planer on the MDF top (L).
  2. Align the holes in the planer base with corresponding holes on the MDF top.
  3. Insert four 75 mm hex head bolts (N) through the planer and base and secure them with the flat 

washers (S) and nuts (T) provided.

IF YOU DO NOT HAVE A D

E

WALT PLANER, BUT WISH TO USE 

THE DW7350 MOBILE PLANER STAND:

 WARNING:

 Center your planer on the stand. Failure to center the 

planer could lead to an unstable assembly. Serious injury could result.

  1. Mark the placement of the holes on the MDF top (L).
  2. Drill marked holes in the MDF top.
  3. Attach your planer to the MDF top with the hex head bolts (N), flat 

washers (S), and nuts (T) provided.

NOTE:

 Do not drill more than 4 holes. One bolt per corner is sufficient. 

Properly sized hardware (obtained locally) may be required to securely 
attach the planer (if not D

E

WALT) to the MDF top.

 WARNING:

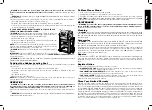
 Planers MUST be mounted in the orientation shown in 

Figure 3.

IMPORTANT:

 The planer MUST be positioned so the tool is bolted 

squarely to the MDF top. If this is not possible, please call 

1-800-4-D

E

WALT (1-800-433-9258)

 for 

technical assistance.

 WARNING:

 Any tool used with this stand must be properly positioned and secured to ensure 

stability and to prevent inadvertent tipping.

To Adjust the Rubber Leveling Feet

The two rubber feet (F) of the mobile planer stand are installed for additional support on slightly 
uneven floors.
  1. Loosen the 2 nuts that hold one of the rubber feet of the mobile base. 
  2. Grasp the nuts with a wrench and turn the foot until it is extended or retracted to the level 

required. 

  3. Re-tighten the bolts.
  4. Repeat for the other rubber foot.

NOTE:


Once assembly is complete and before first use, check each bolt and nut to ensure it is 

properly tightened, and that all mechanisms operate properly.

OPERATION

 WARNING:


To reduce the risk of serious personal injury, turn tool off and disconnect 

tool from power source before installing and removing accessories, before adjusting or 
changing set-ups or when making repairs

. An accidental start-up can cause injury.

Make sure the planer stand is firmly on the floor, the foot pedal down and the wheel raised before 
use.

WARNING: 

Do not attempt to move the planer on the stand if the planer is not bolted down. 

Serious personal injury may result.

FIG. 3

Содержание DW7350

Страница 1: ...MANUAL DE INSTRUCCIONES INSTRUCTIVO DE OPERACIÓN CENTROS DE SERVICIO Y PÓLIZA DE GARANTÍA ADVERTENCIA LÉASE ESTE INSTRUCTIVO ANTES DE USAR EL PRODUCTO If you have questions or comments contact us Pour toute question ou tout commentaire nous contacter Si tiene dudas o comentarios contáctenos 1 800 4 DEWALT www dewalt com ...

Страница 2: ......

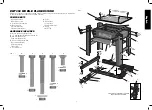
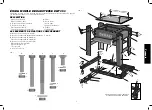
Страница 3: ...brackets F Rubber leveling feet G Legs H Short sides I Long sides J Support brackets K Shelf L MDF Top HARDWARE INCLUDED M Cross head shoulder bolts 4 N 75 mm partially threaded hex bolts 4 O 60 mm hex bolts 4 P 50 mm hex bolts 4 Q Short carriage bolts 30 R Lock washers 46 S Flat washers 4 T Nuts 48 U Lock nuts 2 PIVOT WHEEL ASSEMBLY SHOWN IN OUTBOARD POSITION A U B F D E D K B G G L I J H Q Q P Q...

Страница 4: ...he side support brackets 3 Secure the shelf with lock washers R and nuts T Use 13 mm socket or wrench to tighten Attach the Planer to the Stand Fig 1 3 WARNING STABILITY HAZARD Refer to your tool manufacturer s instructions regarding the securing of your planer to a stand or supporting surface Secure the tool according to both the instructions in this manual and those in your tool manufacturer s m...

Страница 5: ... is the only warranty offered by DEWALT and any implied warranties shall not apply DEWALT will not be responsible for any incidental or consequential damages This warranty gives you specific legal rights and you may have other rights which vary in certain states or provinces Some states do not allow the exclusion or limitation of incidental or consequential damages or limitations on how long an im...

Страница 6: ... Laser or Nailer for any reason you can return it within 90 days from the date of purchase with a receipt for a full refund no questions asked LATIN AMERICA This warranty does not apply to products sold in Latin America For products sold in Latin America see country specific warranty information contained in the packaging call the local company or see website for warranty information FREE WARNING ...

Страница 7: ...uc G Pieds H Côtés courts I Côtés longs J Supports de fixation K Étagère L Tablette MDF LES ÉLÉMENTS DE FIXATIONS COMPRENNENT M Boulons à épaulement en croix 4 N Boulons hexagonaux partiellement taraudés de 75 mm 4 O Boulons hexagonaux de 60 mm 4 P Boulons hexagonaux de 50 mm 4 Q Boulons courts à tête bombée 30 R Rondelles de blocage 46 S Rondelles plates 4 T Écrous 48 U Contre écrous 2 DISPOSITIF...

Страница 8: ... FIG 1 2 AVERTISSEMENT pour votre sécurité lire le manuel de l utilisateur respectif à l outil avant l utilisation de tout accessoire Tout manquement à ces recommandations augmente les risques de dommages corporels et les risques d endommager la raboteuse et ses accessoires Lors de la maintenance de cet outil n utiliser que des pièces de rechange identiques Outils Recommandés pour L assemblage Clé...

Страница 9: ...0 4 DEWALT ou visiter notre site Web www dewalt com 3 Rattachez les côtés longs I sur l intérieur des pieds G en dépassant des côtés courts à l aide de 8 boulons à tête bombée Q 8 rondelles de blocage R et 8 écrous T Utilisez la douille ou la clé pour les resserrer Assurez vous que les trous sur les côtés s encastrent bien sur les protubérances prévues à cet effet 4 Fixez les supports de fixation ...

Страница 10: ...rture de la garantie et aux réparations prises en charge par celle ci visitez le site www dewalt com ou appelez le 1 800 4 DEWALT 1 800 433 9258 Cette garantie ne s applique pas aux accessoires ou à tout dommage causé par des réparations effectuées ou tentées par un tiers Cette garantie est la seule garantie offerte par DEWALT et toute garantie implicite ne sera pas prise en compte DEWALT ne pourr...

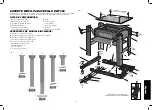
Страница 11: ...ladores de goma G Patas H Lados cortos I Lados largos J Soportes laterales K Estante L Pieza superior de MDF ACCESORIOS DE MONTAJE INCLUIDOS M Pernos con resalto de cruz 4 N Pernos hexagonales parcialmente roscados de 75 mm 4 O Pernos hexagonales de 60 mm 4 P Pernos hexagonales de 50 mm 4 Q Tornillos de carruaje cortos 30 R Arandelas de fijación 46 S Arandelas planas 4 T Tuercas 48 U Tuercas de fi...

Страница 12: ...uir estas advertencias podrían producirse lesiones corporales y graves daños al cepillo y al accesorio Cuando realice el mantenimiento de esta herramienta utilice únicamente repuestos originales Herramientas Recomendadas para el Ensamblaje Llave fija de 13 mm Destornillador de cruz Llave de tubo y trinquete de 13 mm Ensamblar la Base del Marco y Fijar las Ruedas 1 Deslice los rieles cortos de la b...

Страница 13: ...estro sitio Web www dewalt com llave inglesa para apretar Asegúrese de que los orificios de los lados estén alineados con las hendiduras de referencia suministradas 4 Fije los soportes laterales J a la parte intermedia interior de las patas G con 4 tornillos de carruaje Q 4 arandelas de fijación R y 4 tuercas T Use una llave de tubo o llave inglesa de 13 mm para apretar 5 Fije la pieza superior de...

Страница 14: ...DEWALT y no se aplicará ninguna garantía implícita DEWALT no será responsable de ningún daño incidental o consecuente Esta garantía le otorga derechos legales específicos además de los cuales puede tener otros dependiendo del estado o la provincia en que se encuentre Algunos estados no permiten la exclusión o limitación de los daños incidentales o consecuentes ni las limitaciones sobre cuánto tiem...

Страница 15: ... consultar la información de la garantía específica del país que viene en el empaque llamar a la compañía local o visitar el sitio Web a fin de obtener esa información REEMPLAZO GRATUITO DE LAS ETIQUETAS DE ADVERTENCIAS Si sus etiquetas de advertencia se vuelven ilegibles o faltan llame al 1 800 4 DEWALT 1 800 433 9258 para que se le reemplacen gratuitamente SOLAMENTE PARA PROPÓSITO DE MÉXICO IMPO...

Страница 16: ...1 DW7350 Copyright 2013 DEWALT The following are trademarks for one or more DEWALT power tools the yellow and black color scheme the D shaped air intake grill the array of pyramids on the handgrip the kit box configuration and the array of lozenge shaped humps on the surface of the tool ...

Отзывы: