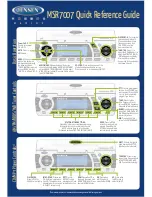


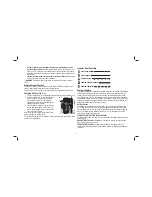

6
D
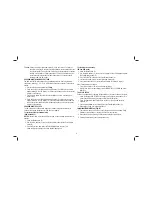
MENU
POWER
MODE
ENT/DIS
FIG. 3
FM
MEM
FM
MEM
POWER
5-6
7-8
9-10
3-4
1-2
MENU
MODE
ENT/DIS
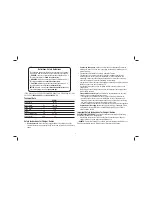
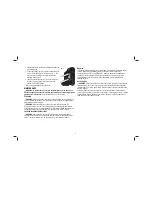
F
A
H
I
C
G
E
B
ASSEMBLY AND ADJUSTMENTS
WARNING: To reduce the risk of serious personal injury, turn the tool off and
disconnect the battery pack before making any adjustments or removing/installing
attachments or accessories.
An accidental start-up can cause injury.
To Install the Coin Cell Battery (Fig. 4)
WARNING:
When replacing battery, replace it with the same brand and type.
Observe correct polarity (+ and –) when replacing batteries. Do not store or carry
batteries so that metal objects can contact exposed battery terminals.
Your radio is equipped with memory capacity
M
FIG. 3
K
L
in order to store the time and your selected
memory channels. When the radio is OFF,
this memory capacity is powered by one
coin cell battery that is included with the
radio.
1. Turn the charger/radio off and unplug
from the power source.
2. Open the battery compartment by lifting
the battery compartment latch.
3. Unscrew the screw (K) on the battery door (L).
4. Press down on the battery door latch and pull to open.
5. Install the coin cell battery (M) according to the diagram inside the coin cell
battery area.
6. Replace the battery door, insert screw and tighten.
7. Securely close the battery compartment.
NOTE:
To reset the LCD display, clock and presets, remove the coin cell battery and
re-install it. Follow this procedure if the screen seems to lock in place.
OPERATION
WARNING:
Always observe the safety instructions and applicable regulations.
WARNING:
Do not place the charger/radio in locations where it may be exposed to
dripping or splashing.
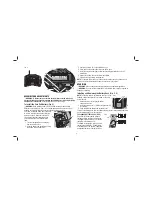
Installing and Removing the Battery Pack (Fig. 2, 5)
NOTE:
To ensure maximum performance and life of Li-Ion
N
FIG. 5
batteries, charge the battery for a minimum of 10 hours
before first use.
1. Release the latch (N) to open the battery
compartment cover.
2. Insert the battery pack (J) into the receptacle until it
is
fully seated.
3. Close and latch the battery compartment cover.
To remove the battery pack from the charger/radio, press the release button and firmly
pull the battery pack out of the receptacle.
FUEL GAUGE BATTERY PACKS (FIG. 5)
Q
FIG. 5
Some D
E
WALT battery packs include a
fuel gauge which consists of three green
LED lights that indicate the level of charge
remaining in the battery pack.
To actuate the fuel gauge, press and hold
the fuel gauge button (Q). A combination
of the three green LED lights will illuminate
designating the level of charge left. When
Содержание DCR017-XE
Страница 1: ...DCR017 XE CHARGER RADIO INSTRUCTION MANUAL ...
Страница 2: ......