background image

37

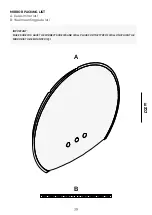
TOOLS REQUIRED (NOT SUPPLIED BY DEVON&DEVON) TO ASSEMBLE THE MIRROR
A: Pencil
B: Tape measure
C: Cutter
D: Drill + Drill bit for walls
E: Long arm Allen key (4mm)
F: Spirit level

IMPORTANT:
MAKE SURE YOU HAVE THE CORRECT SCREWS AND WALL PLUGS FOR THE TYPE OF WALL ON WHICH THE 
MIRROR IS TO BE MOUNTED (X3)

E

A

B

C

D

F

E

N

G

Содержание Kalos

Страница 1: ...Kalos Basin ASSEMBLY INSTRUCTIONS ISTRUZIONI DI MONTAGGIO MONTAGEANLEITUNGEN INSTRUCTIONS DE MONTAGE INSTRUCCIONES DE MONTAJE ИНСТРУКЦИИ К МОНТАЖУ ...

Страница 2: ......

Страница 3: ...on Vi preghiamo cortesemente di leggere questo manuale prima di installare il prodotto INDICE Devon Devon si riserva ildiritto di modificare ilprodotto perragioni tecnico produttive Non ci riterremo in ogni caso responsabili di inconvenienti causati dalle sudette modifiche Composizione B Pag 20 Prima di iniziare Pag 21 Attrezzi necessari non forniti da Devon Devon per montaggio specchio Pag 22 Att...

Страница 4: ...rticoli siano presenti nell imballo Assicurarsi che i componenti non presentino difetti visibili Se rilevate dei difetti contattate immediatamente Devon Devon Per il montaggio di questo prodotto è richiesta la presenza di almeno tre operatori Le istruzioni di montaggio presuppongono che le pareti siano in bolla e abbiano una struttura idonea a sostenere il prodotto I T A ...

Страница 5: ...N PER MONTAGGIO SPECCHIO A Matita B Metro C Cutter D Trapano Punta a muro E Chiave a brugola braccio lungo 4mm F Livella IMPORTANTE ASSICURARSI DI AVERE VITI E TASSELLI IDONEI AL TIPO DI PARETE SU CUI ANDRÀ MONTATO LO SPECCHIO X3 E A B C D F I T A ...

Страница 6: ...VON DEVON PER MONTAGGIO LAVABO E COLONNA A Carta Alcool B Silicone acetico antimuffa C Chiave regolabile a rullino D Livella E Trapano Punta a muro F Matita G Metro H Chiave inglese I Nastro Teflon J Cutter A B C E F D ALCOOL G H I J I T A ...

Страница 7: ...7 IMPORTANTE ASSICURARSI DI AVERE VITI E TASSELLI IDONEI AL TIPO DI PARETE SU CUI ANDRÀ MONTATO LO SPECCHIO X3 PACKING LIST SPECCHIO A Specchio Kalos x1 B Piastra di fissaggio a muro x1 A B I T A ...

Страница 8: ...8 PACKING LIST LAVABO E COLONNA A Lavabo Kalos x1 B Colonna Kalos x1 C Piletta x1 D Piastra fissaggio a terra x1 E Kit viti e tasselli per fissaggio lavabo a muro x1 A B C E D I T A ...

Страница 9: ...perpendicolarità di parete e pavimento 2 Dopo aver vericato la perpendicolarità del muro e del pavimento e aver rimosso i componenti dalla struttura dell imballo appoggiare lo specchio Kalos capovolto su un piano di lavoro facendo attenzione a non graffiare lo specchio I T A ...

Страница 10: ...attacchi del rubinetto curve gomiti e flessibili non in dotazione lunghezza flessibili consigliata 40 cm 4 Per evitare di danneggiare lo specchio assicurarsi di serrare delicatamente dadi e rondelle in dotazione con il rubinetto I T A ...

Страница 11: ...effettuato correttamente 6 Tracciare sul muro con una matita l altezza e la distanza prestabilite e segnare i punti sui cui verranno praticati i fori per il fissaggio della staffa Forare il muro con il trapano e verificare con una livella che i fori siano allineati I T A ...

Страница 12: ...con una livella fissare la piastra di aggancio al muro 8 Si raccomanda di far sostenere lo specchio a due persone e di avere a disposizione un altra persona che si occuperà dei collegamenti idraulici ed elettrici I T A ...

Страница 13: ...rova di tenuta idrica e di funzionamento delle luci 10 Agganciare lo specchio alla piastra a muro Il dispositivo sul retro regolabile con una chiave a brugola consente di fissare lo specchio perfettamente a livello I T A ...

Страница 14: ...to integro Procedere con il montaggio della piletta in dotazione 2 Tracciare sulla parete con una matita l altezza e la distanza prestabilite e segnare i punti in cui verranno praticati i fori che dovranno corrispondere con quelli presenti sul retro del lavabo Dopo essersi assicurati con una livella che le tracce siano perfettamente allineate forare il muro Ripetere l operazione di verifica dei fo...

Страница 15: ...li nei due fori appena creati Appoggiare il lavabo sulle viti sporgenti e bloccarlo provvisoriamente con i dadi in dotazione 4 Verificare nuovamente il corretto posizionamento orizzontale del lavabo usando una livella I T A ...

Страница 16: ... e assicurarsi della sua perfetta tenuta 6 Verificare che la colonna entri perfettamente nella sede assegnata facendola combaciare con il lavabo Dopo aver controllato il corretto posizionamento togliere la colonna e serrare i dadi di fissaggio a muro I T A ...

Страница 17: ...17 7 Fissare la piastra di bloccaggio della colonna al pavimento con del silicone 8 Appoggiare la colonna al muro facendola combaciare con il lavabo e la piastra a terra I T A ...

Страница 18: ...i consiglia di applicare il silicone lungo l intero perimetro del lavabo e della colonna Rimuovere l eccesso di silicone utilizzando della carta e dell alcool 10 Lavabo e specchio montati correttamente I T A ...

Страница 19: ...19 ...

Страница 20: ...articoli siano presenti nell imballo Assicurarsi che i componenti non presentino difetti visibili Se rilevate dei difetti contattate immediatamente Devon Devon Per il montaggio di questo prodotto è richiesta la presenza di almeno tre operatori Le istruzioni di montaggio presuppongono che le pareti siano in bolla e abbiano una struttura idonea a sostenere il prodotto I T A ...

Страница 21: ...ON PER MONTAGGIO SPECCHIO A Matita B Metro C Cutter D Trapano Punta a muro E Chiave a brugola braccio lungo 4mm F Livella IMPORTANTE ASSICURARSI DI AVERE VITI E TASSELLI IDONEI AL TIPO DI PARETE SU CUI ANDRÀ MONTATO LO SPECCHIO X3 E A B C D F I T A ...

Страница 22: ...EVON DEVON PER MONTAGGIO LAVABO E COLONNA A Carta Alcool B Silicone acetico antimuffa C Chiave regolabile a rullino D Livella E Trapano Punta a muro F Matita G Metro H Chiave inglese I Nastro Teflon J Cutter A B C E F D ALCOOL G H I J I T A ...

Страница 23: ...23 IMPORTANTE ASSICURARSI DI AVERE VITI E TASSELLI IDONEI AL TIPO DI PARETE SU CUI ANDRÀ MONTATO LO SPECCHIO X3 PACKING LIST SPECCHIO A Specchio Kalos x1 B Piastra di fissaggio a muro x1 A B I T A ...

Страница 24: ...24 PACKING LIST LAVABO E COLONNA A Lavabo Kalos x1 B Colonna Kalos x1 C Piletta x1 D Piastra fissaggio a terra x1 E Kit viti e tasselli per fissaggio lavabo a muro x1 A B C E D I T A ...

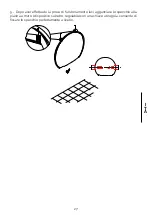
Страница 25: ...ndicolarità di parete e pavimento 2 Tracciare sul muro con una matita l altezza e la distanza prestabilite e segnare i punti sui cui verranno praticati i fori per il fissaggio della staffa Forare il muro con il trapano e verificare con una livella che i fori siano allineati I T A ...

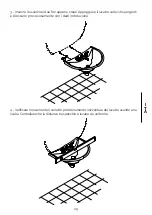
Страница 26: ...ndosi con una livella fissare la piastra di aggancio al muro 4 Si raccomanda di far sostenere lo specchio a due persone e di avere a disposizione un altra persona che si occuperà dei collegamenti elettrici I T A ...

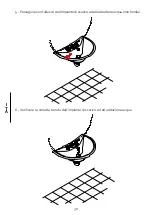
Страница 27: ...aver effettuato la prova di funzionamento luci agganciare lo specchio alla piastra a muro l dispositivo sul retro regolabile con una chiave a brugola consente di fissare lo specchio perfettamente a livello I T A ...

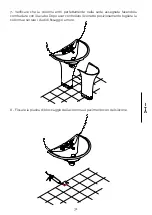
Страница 28: ...ro Procedere con il montaggio della piletta in dotazione e del rubinetto 2 Tracciare sulla parete con una matita l altezza e la distanza prestabilite e segnare i punti in cui verranno praticati i fori che dovranno corrispondere con quelli presenti sul retro del lavabo Dopo essersi assicurati con una livella che le tracce siano perfettamente allineate forare il muro Ripetere l operazione di verific...

Страница 29: ...ppoggiare il lavabo sulle viti sporgenti e bloccarlo provvisoriamente con i dadi in dotazione 4 Verificare nuovamente il corretto posizionamento orizzontale del lavabo usando una livella Controllare che la distanza tra specchio e lavabo sia uniforme I T A ...

Страница 30: ...30 5 Proseguire con l attacco dell impianto di scarico e dell adduzione acqua non fornita 6 Verificare la corretta tenuta dell impianto di scarico e dell adduzione acqua I T A ...

Страница 31: ...te nella sede assegnata facendola combaciare con il lavabo Dopo aver controllato il corretto posizionamento togliere la colonna e serrare i dadi di fissaggio a muro 8 Fissare la piastra di bloccaggio della colonna al pavimento con del silicone I T A ...

Страница 32: ... muro facendola combaciare con il lavabo e la piastra a terra 10 Si consiglia di applicare il silicone lungo l intero perimetro del lavabo e della colonna Rimuovere l eccesso di silicone utilizzando della carta e dell alcool I T A ...

Страница 33: ...33 11 Lavabo e specchio montati correttamente I T A ...

Страница 34: ......

Страница 35: ...on Devon product Please read this manual before assembling the product TABLE OF CONTENTS Devon Devonreservestherighttomodifytheproductfortechnicalandmanufacturing reasons We are not responsible for any issues arising from the aforementioned modifications Composition B p 52 Before you start p 53 Tools required not supplied by Devon Devon to assemble the mirror p 54 Tools required not supplied by De...

Страница 36: ...ll items are included in the packing Make sure the components have no visible faults If any faults are found contact Devon Devon immediately This product requires at least three fitters to assemble These assembly instructions assume that the walls are plumb and that their structure is able to support the product E N G ...

Страница 37: ...LE THE MIRROR A Pencil B Tape measure C Cutter D Drill Drill bit for walls E Long arm Allen key 4mm F Spirit level IMPORTANT MAKE SURE YOU HAVE THE CORRECT SCREWS AND WALL PLUGS FOR THE TYPE OF WALL ON WHICH THE MIRROR IS TO BE MOUNTED X3 E A B C D F E N G ...

Страница 38: ...ON TO ASSEMBLE THE BASIN AND PEDESTAL A Paper Alcohol B Anti mould acetoxy silicone sealant C Adjustable wrench D Spirit level E Drill Drill bit for walls F Pencil G Tape measure H Spanner I Teflon tape J Cutter A B C E F D ALCOOL G H I J E N G ...

Страница 39: ...39 IMPORTANT MAKE SURE YOU HAVE THE CORRECT SCREWS AND WALL PLUGS FOR THE TYPE OF WALL ON WHICH THE MIRROR IS TO BE MOUNTED X3 MIRROR PACKING LIST A Kalos mirror x1 B Wall mounting plate x1 A B E N G ...

Страница 40: ...40 BASIN AND PEDESTAL PACKING LIST A Kalos basin x1 B Kalos pedestal x1 C Drain fitting x1 D Floor mounting plate x1 E Screw and plug kit for mounting the basin to the wall x1 A B C E D E N G ...

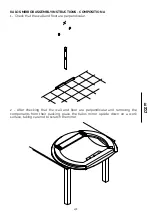
Страница 41: ... 1 Check that the wall and floor are perpendicular 2 After checking that the wall and floor are perpendicular and removing the components from their packing place the Kalos mirror upside down on a work surface taking care not to scratch the mirror E N G ...

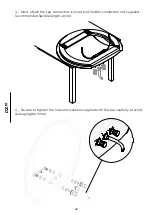
Страница 42: ...attach the tap connectors curved and flexible connectors not supplied recommended flexible length 40 cm 4 Be sure to tighten the nuts and washers supplied with the tap carefully to avoid damaging the mirror E N G ...

Страница 43: ...e assembly has been carried out correctly 6 Use the pencil to mark the set height and distance on the wall and mark where to make the holes for attaching the bracket Drill into the wall and use a spirit level to check that the holes align E N G ...

Страница 44: ...44 7 Using a spirit level attach the mounting plate to the wall 8 We recommend that two people support the mirror while a third deals with the water and electrical connections E N G ...

Страница 45: ...for watertightness and the correct functioning of the lights 10 Hook the mirror to the wall plate The device at the back can be adjusted with an Allen key and allows the mirror to be attached perfectly level E N G ...

Страница 46: ...ll keep the product intact Proceed with assembling the supplied drain fitting 2 Use a pencil to mark the set height and distance on the wall and mark where to make the holes which should correspond to those on the back of the basin After using a spirit level to check that the marks are perfectly aligned drill into the wall Check the holes again with the spirit level E N G ...

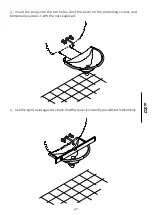
Страница 47: ...the plugs into the two holes Rest the basin on the protruding screws and temporarily secure it with the nuts supplied 4 Use the spirit level again to check that the basin is correctly positioned horizontally E N G ...

Страница 48: ...he drain fitting and check that it is tightly sealed 6 Check that the pedestal fits neatly within its housing matching it up with the basin After checking the correct position remove the pedestal and screw in the wall fastening nuts E N G ...

Страница 49: ...49 7 Attach the pedestal mounting plate to the floor with silicone 8 Rest the pedestal against the wall making sure it fits together with the basin and the floor plate E N G ...

Страница 50: ...mmend applying silicone sealant all around the edges of the basin and the pedestal where they meet the wall and floor Remove any excess silicone with paper and alcohol 10 Correctly assembled basin and mirror E N G ...

Страница 51: ...51 ...

Страница 52: ...ll items are included in the packing Make sure the components have no visible faults If any faults are found contact Devon Devon immediately This product requires at least three fitters to assemble These assembly instructions assume that the walls are plumb and that their structure is able to support the product E N G ...

Страница 53: ...LE THE MIRROR A Pencil B Tape measure C Cutter D Drill Drill bit for walls E Long arm Allen key 4mm F Spirit level IMPORTANT MAKE SURE YOU HAVE THE CORRECT SCREWS AND WALL PLUGS FOR THE TYPE OF WALL ON WHICH THE MIRROR IS TO BE MOUNTED X3 E A B C D F E N G ...

Страница 54: ...ON TO ASSEMBLE THE BASIN AND PEDESTAL A Paper Alcohol B Anti mould acetoxy silicone sealant C Adjustable wrench D Spirit level E Drill Drill bit for walls F Pencil G Tape measure H Spanner I Teflon tape J Cutter A B C E F D ALCOOL G H I J E N G ...

Страница 55: ...55 IMPORTANT MAKE SURE YOU HAVE THE CORRECT SCREWS AND WALL PLUGS FOR THE TYPE OF WALL ON WHICH THE MIRROR IS TO BE MOUNTED X3 MIRROR PACKING LIST A Kalos mirror x1 B Wall mounting plate x1 A B E N G ...

Страница 56: ...56 BASIN AND PEDESTAL PACKING LIST A Kalos basin x1 B Kalos pedestal x1 C Drain fitting x1 D Floor mounting plate x1 E Screw and plug kit for mounting the basin to the wall x1 A B C E D E N G ...

Страница 57: ... 1 Check that the wall and floor are perpendicular 2 Use the pencil to mark the set height and distance on the wall and mark where to make the holes for attaching the bracket Drill into the wall and use a spirit level to check that the holes align E N G ...

Страница 58: ...58 3 Using a spirit level attach the mounting plate to the wall 4 We recommend that two people support the mirror while a third deals with the electrical connections E N G ...

Страница 59: ...59 5 After testing the lights hook the mirror to the wall plate The device on the back is adjustable with an Allen key and allows the mirror to be positioned perfectly level E N G ...

Страница 60: ...p the product intact Proceed with assembling the supplied drain fitting and the tap 2 Use a pencil to mark the set height and distance on the wall and mark where to make the holes which should correspond to those on the back of the basin After using a spirit level to check that the marks are perfectly aligned drill into the wall Check the holes again with the spirit level E N G ...

Страница 61: ... Rest the basin on the protruding screws and temporarily secure it with the nuts supplied 4 Use the spirit level again to check that the basin is correctly positioned horizontally Check that the distance between mirror and basin is even E N G ...

Страница 62: ...62 5 Proceed with the attachment of the drain fitting and the water pipes not supplied 6 Check for any leaks in the drain fitting and water pipes E N G ...

Страница 63: ...tal fits neatly within its housing matching it up with the basin After checking the correct position remove the pedestal and screw in the wall fastening nuts 8 Attach the pedestal mounting plate to the floor with silicone E N G ...

Страница 64: ...ing sure it fits together with the basin and the floor plate 10 We recommend applying silicone sealant all around the edges of the basin and the pedestal where they meet the wall and floor Remove any excess silicone with paper and alcohol E N G ...

Страница 65: ...65 11 Correctly assembled basin and mirror E N G ...

Страница 66: ...66 ...

Страница 67: ... entschieden haben Bitte lesen Sie dieses Handbuch bevor Sie das Produkt installieren INHALT Devon Devon behält sich das Recht vor das Produkt aus technisch produktiven Gründen zu ändern Wir übernehmen keine Verantwortung für Unannehmlichkeiten die durch diese Änderungen entstehen Aufbau B S 84 Bevor Sie beginnen S 85 Notwendige Werkzeuge nicht von Devon Devon mitgeliefert für die Montage des Spie...

Страница 68: ... vorhanden sind Stellen Sie sicher dass die Bauteile keine sichtbaren Mängel aufweisen Wenn Sie einen Mangel feststellen wenden Sie sich bitte sofort an Devon Devon Für die Montage dieses Produkts sind mindestens drei Monteure erforderlich Die Montageanleitung basiert auf der Annahme dass die Wände eben sind und eine geeignete Struktur aufweisen um das Produkt zu tragen D E U ...

Страница 69: ...VON MITGELIEFERT A Bleistift B Metermaß C Cutter D Bohrmaschine Wandbohrer E Langarm Inbusschlüssel 4 mm F Wasserwaage WICHTIG STELLEN SIE SICHER DASS SIE DIE RICHTIGEN SCHRAUBEN UND DÜBEL FÜR DIE ART DER WAND HABEN AN DER DER SPIEGEL MONTIERT WERDEN SOLL X3 E A B C D F D E U ...

Страница 70: ...LE NICHT VON DEVON DEVON MITGELIEFERT A Papier Alkohol B Schimmelhemmendes essigvernetzendes Silikon C Verstellbarer Einmaulschlüssel D Wasserwaage E Bohrmaschine Wandbohrer F Bleistift G Metermaß H Schraubenschlüssel I Teflonband J Cutter A B C E F D ALCOOL G H I J D E U ...

Страница 71: ...IG STELLEN SIE SICHER DASS SIE DIE RICHTIGEN SCHRAUBEN UND DÜBEL FÜR DIE ART DER WAND HABEN AN DER DER SPIEGEL MONTIERT WERDEN SOLL X3 STÜCKLISTE SPIEGEL A Spiegel Kalos x1 B Wandbefestigungsplatte x1 A B D E U ...

Страница 72: ... STÜCKLISTE WASCHBECKEN UND SÄULE A Waschbecken Kalos x1 B Säule Kalos x1 C Ablaufgarnitur x1 D Bodenbefestigungsplatte x1 E Schrauben und Dübelset für die Wandmontage des Waschbeckens x1 A B C E D D E U ...

Страница 73: ... und Boden rechtwinklig zueinander stehen 2 Nachdem Sie die Rechtwinkligkeit vonWand und Boden überprüft und die Bauteile aus der Verpackung genommen haben legen Sie den Spiegel Kalos kopfüber auf eine Arbeitsfläche und achten Sie darauf dass er nicht zerkratzt wird D E U ...

Страница 74: ...her Rohrbögen Winkelstücke und Schläuche sind nicht im Lieferumfang enthalten empfohlene Schlauchlänge ist 40 cm 4 Um eine Beschädigung des Spiegels zu vermeiden sollten Sie die mitgelieferten Muttern und Unterlegscheiben vorsichtig anziehen D E U ...

Страница 75: ...n Sie mit einem Bleistift die vorher festgelegte Höhe und den Abstand an der Wand an und markieren Sie die Punkte an denen die Löcher für die Befestigung der Halterung gebohrt werden sollen Bohren Sie Löcher in die Wand und prüfen Sie mit einer Wasserwaage ob sie richtig ausgerichtet sind D E U ...

Страница 76: ...n Sie die Montageplatte unter Zuhilfenahme einer Wasserwaage an der Wand 8 Es wird empfohlen dass zwei Personen den Spiegel halten während sich eine weitere Person um die Sanitär und Elektroanschlüsse kümmert D E U ...

Страница 77: ...igkeit und die Funktionsfähigkeit der Leuchten 10 Befestigen Sie den Spiegel an der Wandhalterung Durch die mit einem Inbusschlüssel verstellbare Vorrichtung auf der Rückseite kann der Spiegel perfekt waagerecht fixiert werden D E U ...

Страница 78: ...ntage der mitgelieferten Ablaufgarnitur fort 2 Zeichnen Sie mit einem Bleistift die vorgegebene Höhe und den Abstand von der Wand an und markieren Sie die Punkte an denen die Löchergebohrtwerden sollen die mit denen auf der Rückseite des Waschbeckens übereinstimmen müssen Nachdem Sie mit einer Wasserwaage überprüft haben dass die Markierungen perfekt ausgerichtet sind bohren Sie die Löcher in dieW...

Страница 79: ...ebohrten Löcher ein Setzen Sie das Waschbecken auf die hervorstehenden Schrauben und sichern Sie es provisorisch mit den mitgelieferten Muttern 4 Überprüfen Sie nochmals die korrekte horizontale Ausrichtung des Waschtischs mit einer Wasserwaage D E U ...

Страница 80: ...ss es perfekt abgedichtet ist 6 Überprüfen Sie dass die Säule perfekt auf den vorgesehenen Platz passt indem Sie sie mit dem Waschbecken zusammenführen Nachdem Sie die korrekte Positionierung überprüft haben entfernen Sie die Säule und ziehen Sie die Wandbefestigungsmuttern fest D E U ...

Страница 81: ...81 7 Befestigen Sie die Befestigungsplatte der Säule mit Silikon am Boden 8 Platzieren Sie die Säule an der Wand und passen Sie sie an das Waschbecken und die Bodenplatte an D E U ...

Страница 82: ...Es wird empfohlen den gesamten Rand des Waschbeckens und der Säule mit Silikon zu versiegeln Entfernen Sie überschüssiges Silikon mit Papier und Alkohol 10 Waschbecken und Spiegel sind korrekt montiert D E U ...

Страница 83: ...83 ...

Страница 84: ... vorhanden sind Stellen Sie sicher dass die Bauteile keine sichtbaren Mängel aufweisen Wenn Sie einen Mangel feststellen wenden Sie sich bitte sofort an Devon Devon Für die Montage dieses Produkts sind mindestens drei Monteure erforderlich Die Montageanleitung basiert auf der Annahme dass die Wände eben sind und eine geeignete Struktur aufweisen um das Produkt zu tragen D E U ...

Страница 85: ... DES SPIEGELS A Bleistift B Metermaß C Cuttermesser D Bohrmaschine Wandbohrer E Langarm Inbusschlüssel 4 mm F Wasserwaage WICHTIG STELLEN SIE SICHER DASS SIE DIE RICHTIGEN SCHRAUBEN UND DÜBEL FÜR DIE ART DER WAND HABEN AN DER DER SPIEGEL MONTIERT WERDEN SOLL X3 E A B C D F D E U ...

Страница 86: ...LE NICHT VON DEVON DEVON MITGELIEFERT A Papier Alkohol B Schimmelhemmendes essigvernetzendes Silikon C Verstellbarer Einmaulschlüssel D Wasserwaage E Bohrmaschine Wandbohrer F Bleistift G Metermaß H Schraubenschlüssel I Teflonband J Cutter A B C E F D ALCOOL G H I J D E U ...

Страница 87: ...IG STELLEN SIE SICHER DASS SIE DIE RICHTIGEN SCHRAUBEN UND DÜBEL FÜR DIE ART DER WAND HABEN AN DER DER SPIEGEL MONTIERT WERDEN SOLL X3 STÜCKLISTE SPIEGEL A Spiegel Kalos x1 B Wandbefestigungsplatte x1 A B D E U ...

Страница 88: ... STÜCKLISTE WASCHBECKEN UND SÄULE A Waschbecken Kalos x1 B Säule Kalos x1 C Ablaufgarnitur x1 D Bodenbefestigungsplatte x1 E Schrauben und Dübelset für die Wandmontage des Waschbeckens x1 A B C E D D E U ...

Страница 89: ...ehen 2 Zeichnen Sie mit einem Bleistift die vorher festgelegte Höhe und den Abstand an der Wand an und markieren Sie die Punkte an denen die Löcher für die Befestigung der Halterung gebohrt werden sollen Bohren Sie Löcher in die Wand und prüfen Sie mit einer Wasserwaage ob sie richtig ausgerichtet sind D E U ...

Страница 90: ...ntieren Sie die Montageplatte unter Zuhilfenahme einer Wasserwaage an der Wand 4 Es wird empfohlen dass zwei Personen den Spiegel halten während sich eine weitere Person um die Elektroanschlüsse kümmert D E U ...

Страница 91: ...haben dass das Licht funktioniert befestigen Sie den Spiegel an der Wandhalterung Mit der Vorrichtung auf der Rückseite die mit einem Inbusschlüssel eingestellt werden kann können Sie den Spiegel perfekt waagerecht fixieren D E U ...

Страница 92: ...r mitgelieferten Ablaufgarnitur und der Armatur fort 2 Zeichnen Sie mit einem Bleistift die vorgegebene Höhe und den Abstand von der Wand an und markieren Sie die Punkte an denen die Löchergebohrtwerden sollen die mit denen auf der Rückseite des Waschbeckens übereinstimmen müssen Nachdem Sie mit einer Wasserwaage überprüft haben dass die Markierungen perfekt ausgerichtet sind bohren Sie die Löcher...

Страница 93: ...en auf die hervorstehenden Schrauben und sichern Sie es provisorisch mit den mitgelieferten Muttern 4 Überprüfen Sie nochmals die korrekte horizontale Ausrichtung des Waschtischs mit einer Wasserwaage Überprüfen Sie ob der Abstand zwischen dem Spiegel und dem Waschbecken gleichmäßig ist D E U ...

Страница 94: ...94 5 Fahren Sie mit dem Anschluss des Abflusssystems und der Wasserzuleitung nicht im Lieferumfang enthalten fort 6 Prüfen Sie dass das Abfluss und Wasserzuleitungssystem richtig dicht ist D E U ...

Страница 95: ...latzpasst indemSiesiemit dem Waschbecken zusammenführen Nachdem Sie die korrekte Positionierung überprüft haben entfernen Sie die Säule und ziehen Sie dieWandbefestigungsmuttern fest 8 Befestigen Sie die Befestigungsplatte der Säule mit Silikon am Boden D E U ...

Страница 96: ...n der Wand und passen Sie sie an das Waschbecken und die Bodenplatte an 10 Es wird empfohlen den gesamten Rand des Waschbeckens und der Säule mit Silikon zu versiegeln Entfernen Sie überschüssiges Silikon mit Papier und Alkohol D E U ...

Страница 97: ...97 11 Waschbecken und Spiegel sind korrekt montiert D E U ...

Страница 98: ......

Страница 99: ...n Nous vous prions de bien vouloir lire ce manuel avant d installer le produit INDEX Devon Devon se réserve le droit de modifier le produit pour des raisons techniques et productives Nous ne pourrons en aucun cas être tenus pour responsables des inconvénients causés par ces changements Composition B Page 116 Avant de commencer Page 117 Outils nécessaires non fournis par Devon Devon pour le montage...

Страница 100: ...cles sont présents dans l emballage S assurer que les composants ne présentent pas de défauts visibles Si des défauts sont constatés contacter immédiatement Devon Devon Le montage de ce produit nécessite la présence d au moins trois opérateurs Les instructions de montage partent du principe que les murs sont nivelés et ont une structure appropriée pour supporter le produit F R A ...

Страница 101: ...UR LE MONTAGE DU MIROIR A Crayon B Mètre C Cutter D Perceuse Mèche à mur E Clé hexagonale à bras long 4 mm F Niveau IMPORTANT S ASSURER D AVOIR LES BONNES VIS ET LES BONNES CHEVILLES POUR LE TYPE DE MUR SUR LEQUEL LE MIROIR SERA MONTÉ X3 E A B C D F F R A ...

Страница 102: ...DEVON POUR LE MONTAGE DU LAVABO ET DE LA COLONNE A Papier Alcool B Silicone acétique anti moisissure C Clé réglable à cliquet D Niveau E Perceuse Mèche à mur F Crayon G Mètre H Clé anglaise I Ruban Teflon J Cutter A B C E F D ALCOOL G H I J F R A ...

Страница 103: ...IMPORTANT S ASSURER D AVOIR LES BONNES VIS ET LES BONNES CHEVILLES POUR LE TYPE DE MUR SUR LEQUEL LE MIROIR SERA MONTÉ X3 LISTE D EMBALLAGE MIROIR A Miroir Kalos x1 B Plaque de fixation murale x1 A B F R A ...

Страница 104: ...104 LISTE D EMBALLAGE LAVABO ET COLONNE A Lavabo Kalos x1 B Colonne Kalos x1 C Bonde x1 D Plaque de fixation au sol x1 E Kit de vis et de chevilles de fixation pour lavabo mural x1 A B C E D F R A ...

Страница 105: ...fier la perpendicularité du mur et du sol 2 Après avoir vérifié la perpendicularité du mur et du sol et retiré les éléments de la structure de leur emballage placer le miroir Kalos à l envers sur une surface de travail en prenant soin de ne pas rayer le miroir F R A ...

Страница 106: ...accordements du robinet les coudes et les tuyaux ne sont pas fournis longueur de tuyau recommandée 40 cm 4 Pour éviter d endommager le miroir prendre soin de serrer doucement les écrous et les rondelles fournis avec le robinet F R A ...

Страница 107: ...ctement monté 6 Tracer au crayon sur le mur la hauteur et la distance prédéterminées et marquer les points où seront percés les trous pour la fixation du support Percer des trous dans le mur et vérifier avec un niveau que les trous sont bien alignés F R A ...

Страница 108: ...ide d un niveau fixer la plaque d accrochage au mur 8 Il est recommandé de prévoir deux personnes pour soutenir le miroir et une autre personne pour s occuper des raccordements de plomberie et d électricité F R A ...

Страница 109: ...anchéité à l eau et contrôler le bon fonctionnement des lumières 10 Accrocher le miroir à la plaque murale Le dispositif à l arrière qui peut être réglé avec une clé hexagonale permet de fixer le miroir parfaitement à niveau F R A ...

Страница 110: ... rester intact Procéder à l installation de la bonde fournie 2 Tracer au crayon sur le mur la hauteur et la distance prédéterminées et marquer les points où seront percés les trous qui devront correspondre à ceux du dos du lavabo Après s être assuré à l aide d un niveau que les traces sont parfaitement alignées percer des trous dans le mur Répéter l opération pour vérifier les trous avec le niveau...

Страница 111: ...es dans les deux trous qui viennent d être créés Placer le lavabo sur les vis saillantes et le fixer provisoirement avec les écrous fournis 4 Vérifier à nouveau le bon positionnement horizontal du lavabo à l aide d un niveau F R A ...

Страница 112: ...ion et s assurer qu il est parfaitement étanche 6 Vérifier que la colonne s adapte parfaitement dans son siège en la faisant correspondre avec le lavabo Après avoir vérifié le bon positionnement retirer la colonne et serrer les écrous de fixation au mur F R A ...

Страница 113: ...113 7 Fixer la plaque de blocage de la colonne au sol avec du silicone 8 Placer la colonne au mur en la faisant correspondre au lavabo et à la plaque au sol F R A ...

Страница 114: ...114 9 Il est conseillé d appliquer du silicone sur tout le périmètre du lavabo et de la colonne Enlever l excès de silicone à l aide de papier et d alcool 10 Lavabo et miroir correctement montés F R A ...

Страница 115: ...115 ...

Страница 116: ...cles sont présents dans l emballage S assurer que les composants ne présentent pas de défauts visibles Si des défauts sont constatés contacter immédiatement Devon Devon Le montage de ce produit nécessite la présence d au moins trois opérateurs Les instructions de montage partent du principe que les murs sont nivelés et ont une structure appropriée pour supporter le produit F R A ...

Страница 117: ...UR LE MONTAGE DU MIROIR A Crayon B Mètre C Cutter D Perceuse Mèche à mur E Clé hexagonale à bras long 4 mm F Niveau IMPORTANT S ASSURER D AVOIR LES BONNES VIS ET LES BONNES CHEVILLES POUR LE TYPE DE MUR SUR LEQUEL LE MIROIR SERA MONTÉ X3 E A B C D F F R A ...

Страница 118: ...DEVON POUR LE MONTAGE DU LAVABO ET DE LA COLONNE A Papier Alcool B Silicone acétique anti moisissure C Clé réglable à cliquet D Niveau E Perceuse Mèche à mur F Crayon G Mètre H Clé anglaise I Ruban Teflon J Cutter A B C E F D ALCOOL G H I J F R A ...

Страница 119: ...IMPORTANT S ASSURER D AVOIR LES BONNES VIS ET LES BONNES CHEVILLES POUR LE TYPE DE MUR SUR LEQUEL LE MIROIR SERA MONTÉ X3 LISTE D EMBALLAGE MIROIR A Miroir Kalos x1 B Plaque de fixation murale x1 A B F R A ...

Страница 120: ...120 LISTE D EMBALLAGE LAVABO ET COLONNE A Lavabo Kalos x1 B Colonne Kalos x1 C Bonde x1 D Plaque de fixation au sol x1 E Kit de vis et de chevilles de fixation pour lavabo mural x1 A B C E D F R A ...

Страница 121: ...erpendicularité du mur et du sol 2 Tracer au crayon sur le mur la hauteur et la distance prédéterminées et marquer les points où seront percés les trous pour la fixation du support Percer des trous dans le mur et vérifier avec un niveau que les trous sont bien alignés F R A ...

Страница 122: ...2 3 À l aide d un niveau fixer la plaque d accrochage au mur 4 Il est recommandé de prévoir deux personnes pour soutenir le miroir et une autre personne pour s occuper des raccordements électriques F R A ...

Страница 123: ...oir effectué l essai de fonctionnement des lumières accrocher le miroir à la plaque murale Le dispositif au dos qui peut être réglé à l aide d une clé hexagonale permet de fixer le miroir parfaitement à niveau F R A ...

Страница 124: ... intact Procéder à l installation de la bonde fournie et du robinet 2 Tracer au crayon sur le mur la hauteur et la distance prédéterminées et marquer les points où seront percés les trous qui devront correspondre à ceux du dos du lavabo Après s être assuré à l aide d un niveau que les traces sont parfaitement alignées percer des trous dans le mur Répéter l opération pour vérifier les trous avec le...

Страница 125: ...t d être créés Placer le lavabo sur les vis saillantes et le fixer provisoirement avec les écrous fournis 4 Vérifier à nouveau le bon positionnement horizontal du lavabo à l aide d un niveau Vérifier que la distance entre le miroir et le lavabo est uniforme F R A ...

Страница 126: ...126 5 Poursuivre le raccordement du système d évacuation et d alimentation en eau non fournie 6 Vérifier que les systèmes d évacuation et d alimentation en eau sont bien étanches F R A ...

Страница 127: ...arfaitement dans son siège en la faisant correspondre avec le lavabo Après avoir vérifié le bon positionnement retirer la colonne et serrer les écrous de fixation au mur 8 Fixer la plaque de blocage de la colonne au sol avec du silicone F R A ...

Страница 128: ... au mur en la faisant correspondre au lavabo et à la plaque au sol 10 Il est conseillé d appliquer du silicone sur tout le périmètre du lavabo et de la colonne Enlever l excès de silicone à l aide de papier et d alcool F R A ...

Страница 129: ...129 11 Lavabo et miroir correctement montés F R A ...

Страница 130: ......

Страница 131: ...on Devon Antes de instalar el producto le rogamos que lea atentamente este manual ÍNDICE Devon Devon se reserva el derecho a modificar el producto por razones técnico productivas En todo caso no seremos responsables de los inconvenientes que se deriven de dichas modificaciones Ensamblaje B Pág 148 Antes de empezar Pág 149 Equipos necesarios no suministrados por Devon Devon para montar el espejo Pá...

Страница 132: ...n presentes en el embalaje Asegúrese de que los componentes no presenten defectos visibles Si detecta algún defecto póngase en contacto con Devon Devon de inmediato Para el montaje de este producto se requiere la presencia de como mínimo tres operadores Las instrucciones de montaje presuponen que las paredes estén niveladas y posean una estructura adecuada para soportar el producto E S P ...

Страница 133: ...PARA MONTAR EL ESPEJO A Lápiz B Metro C Cúter D Taladradora Broca de pared E Llave Allen de brazo largo 4 mm F Nivel IMPORTANTE ASEGÚRESE DE DISPONER DE TORNILLOS Y TACOS ADECUADOS PARA EL TIPO DE PARED EN LA QUE VAYA A MONTAR EL ESPEJO X3 E A B C D F E S P ...

Страница 134: ...DEVON DEVON PARA MONTAR EL LAVABO Y EL PEDESTAL A Papel Alcohol B Silicona ácida antimoho C Llave ajustable con moleta D Nivel E Taladradora Broca de pared F Lápiz G Metro H Llave inglesa I Cinta de teflón J Cúter A B C E F D ALCOOL G H I J E S P ...

Страница 135: ...RTANTE ASEGÚRESE DE DISPONER DE TORNILLOS Y TACOS ADECUADOS PARA EL TIPO DE PARED EN LA QUE VAYA A MONTAR EL ESPEJO X3 LISTA DE CONTENIDO DEL ESPEJO A Espejo Kalos x1 B Placa de fijación a la pared x1 A B E S P ...

Страница 136: ... DE CONTENIDO DEL LAVABO Y EL PEDESTAL A Lavabo Kalos x1 B Pedestal Kalos x1 C Pileta de desagüe x1 D Placa de fijación al suelo x1 E Juego de tornillos y tacos para fijar el lavabo a la pared x1 A B C E D E S P ...

Страница 137: ...perpendicularidad entre la pared y el pavimento 2 Una vez comprobada la perpendicularidad entre la pared y el pavimento y retirados los componentes de la estructura del embalaje apoye el espejo Kalos del revés sobre una superficie de trabajo y procure no rayar el espejo E S P ...

Страница 138: ... grifo las curvas codos y tuberías flexibles no van incluidos de serie longitud recomendada para las tuberías flexibles 40 cm 4 Para no dañar el espejo asegúrese de apretar con suavidad las tuercas y arandelas incluidas de serie con el grifo E S P ...

Страница 139: ...ontaje correctamente 6 Señale en la pared con un lápiz la altura y la distancia preestablecidas y marque los puntos donde se harán los orificios para fijar el estribo Taladre la pared con la taladradora y compruebe con un nivel que los orificios estén alineados E S P ...

Страница 140: ...140 7 Con ayuda del nivel fije la placa de conexión a la pared 8 Recomendamos sujetar el espejo entre dos personas y contar con una tercera que se ocupe de las conexiones hidráulicas y eléctricas E S P ...

Страница 141: ...estanqueidad al agua y el funcionamiento de las luces 10 Enganche el espejo a la placa de pared El dispositivo situado en la parte trasera regulable con una llave Allen permite fijar el espejo perfectamente a nivel E S P ...

Страница 142: ...buen estado Proceda con el montaje de la pileta de desagüe incluida de serie 2 Señale en la pared con un lápiz la altura y la distancia preestablecidas y marque los puntos donde se harán los orificios que deberán coincidir con los que están presentes en la parte trasera del lavabo Después de comprobar con un nivel que las marcas estén perfectamente alineadas taladre la pared Vuelva a comprobar los...

Страница 143: ...ficios que acaba de hacer Apoye el lavabo sobre los tornillos que sobresalen y bloquéelo de forma temporal con las tuercas incluidas de serie 4 Vuelva a comprobar que el lavabo esté bien posicionado en el plano horizontal usando un nivel E S P ...

Страница 144: ...sagüe y asegúrese de que la estanqueidad sea óptima 6 Compruebe que el pedestal quede encajado en su sitio acoplándolo al lavabo Tras comprobar que la posición sea correcta quite el pedestal y apriete las tuercas de fijación a la pared E S P ...

Страница 145: ...145 7 Fije la placa de bloqueo del pedestal al suelo con silicona 8 Apoye el pedestal en la pared encajándolo en el lavabo y en la placa del suelo E S P ...

Страница 146: ...146 9 Recomendamos aplicar silicona en todo el contorno del lavabo y del pedestal Retire el exceso de silicona con papel y alcohol 10 Lavabo y espejo montados correctamente E S P ...

Страница 147: ...147 ...

Страница 148: ...n presentes en el embalaje Asegúrese de que los componentes no presenten defectos visibles Si detecta algún defecto póngase en contacto con Devon Devon de inmediato Para el montaje de este producto se requiere la presencia de como mínimo tres operadores Las instrucciones de montaje presuponen que las paredes estén niveladas y posean una estructura adecuada para soportar el producto E S P ...

Страница 149: ...PARA MONTAR EL ESPEJO A Lápiz B Metro C Cúter D Taladradora Broca de pared E Llave Allen de brazo largo 4 mm F Nivel IMPORTANTE ASEGÚRESE DE DISPONER DE TORNILLOS Y TACOS ADECUADOS PARA EL TIPO DE PARED EN LA QUE VAYA A MONTAR EL ESPEJO X3 E A B C D F E S P ...

Страница 150: ...DEVON DEVON PARA MONTAR EL LAVABO Y EL PEDESTAL A Papel Alcohol B Silicona ácida antimoho C Llave ajustable con moleta D Nivel E Taladradora Broca de pared F Lápiz G Metro H Llave inglesa I Cinta de teflón J Cúter A B C E F D ALCOOL G H I J E S P ...

Страница 151: ...RTANTE ASEGÚRESE DE DISPONER DE TORNILLOS Y TACOS ADECUADOS PARA EL TIPO DE PARED EN LA QUE VAYA A MONTAR EL ESPEJO X3 LISTA DE CONTENIDO DEL ESPEJO A Espejo Kalos x1 B Placa de fijación a la pared x1 A B E S P ...

Страница 152: ...STA DE CONTENIDO DEL LAVABO Y EL PEDESTAL A Lavabo Kalos x1 B Pedestal Kalos x1 C Pileta de desagüe x1 D Placa de fijación al suelo x1 E Juego de tornillos y tacos para fijar el lavabo a la pared x1 A B C E D ...

Страница 153: ...dicularidad entre la pared y el pavimento 2 Señale en la pared con un lápiz la altura y la distancia preestablecidas y marque los puntos donde se harán los orificios para fijar el estribo Taladre la pared con la taladradora y compruebe con un nivel que los orificios estén alineados ...

Страница 154: ...154 3 Con ayuda del nivel fije la placa de conexión a la pared 4 Recomendamos sujetar el espejo entre dos personas y contar con una tercera que se ocupe de las conexiones eléctricas E S P ...

Страница 155: ...vez realizada la prueba de funcionamiento de las luces conecte el espejo con la placa de pared El dispositivo de la parte trasera regulable con una llave Allen permite fijar el espejo perfectamente a nivel E S P ...

Страница 156: ...stado Proceda con el montaje de la pileta de desagüe incluida de serie y del grifo 2 Señale en la pared con un lápiz la altura y la distancia preestablecidas y marque los puntos donde se harán los orificios que deberán coincidir con los que están presentes en la parte trasera del lavabo Después de comprobar con un nivel que las marcas estén perfectamente alineadas taladre la pared Vuelva a comprob...

Страница 157: ... lavabo sobre los tornillos que sobresalen y bloquéelo de forma temporal con las tuercas incluidas de serie 4 Vuelva a comprobar que el lavabo esté bien posicionado en el plano horizontal usando un nivel Compruebe que la distancia entre el espejo y el lavabo sea uniforme E S P ...

Страница 158: ...158 5 Continúe con la instalación del desagüe y de la entrada de agua no va incluida de serie 6 Compruebe la estanqueidad del desagüe y de la entrada de agua E S P ...

Страница 159: ...stal quede encajado en su sitio acoplándolo al lavabo Tras comprobar que la posición sea correcta quite el pedestal y apriete las tuercas de fijación a la pared 8 Fije la placa de bloqueo del pedestal al suelo con silicona E S P ...

Страница 160: ...oye el pedestal en la pared encajándolo en el lavabo y en la placa del suelo 10 Recomendamos aplicar silicona en todo el contorno del lavabo y del pedestal Retire el exceso de silicona con papel y alcohol E S P ...

Страница 161: ...161 11 Lavabo y espejo montados correctamente E S P ...

Страница 162: ......

Страница 163: ...on Просим вас прочитать инструкцию перед монтажом изделия ОГЛАВЛЕНИЕ Devon Devon оставляет за собой право вносить в изделие технические и производственные улучшения В любом случае наша компания не будет нести ответственности за неудобства вызванные данными изменениями Конфигурация В Стр 180 Подготовка Стр 181 Необходимый инструмент не входит в поставку Devon Devon для монтажа зеркала Стр 182 Необх...

Страница 164: ... странице проверьте наличие всех элементов в упаковке Убедитесь что комплектующие не имеют заметных дефектов В случае обнаружения дефектов немедленно свяжитесь с Devon Devon Монтаж данного изделия следует выполнять как минимум втроем В инструкции по монтажу подразумевается что стены выровнены и выдерживают вес изделия P Y C ...

Страница 165: ...DEVON ДЛЯ МОНТАЖА ЗЕРКАЛА A Карандаш B Сантиметр C Канцелярский нож D Дрель Сверло для стен E Ключ шестигранный длинный 4 мм F Уровень ВАЖНО УБЕДИТЕСЬ ЧТО У ВАС ЕСТЬ ВИНТЫ И ДЮБЕЛИ ДЛЯ ТИПА СТЕНЫ НА КОТОРОЙ БУДЕТ УСТАНОВЛЕНО ЗЕРКАЛО 3 ШТ E A B C D F P Y C ...

Страница 166: ...ОНТАЖА РАКОВИНЫ И ПЬЕДЕСТАЛА A Бумага Спирт B Противоплесневый ацетатный силиконовый герметик C Регулируемый разводной ключ D Уровень E Дрель Сверло для стен F Карандаш G Сантиметр H Гаечный ключ I Тефлоновая лента J Канцелярский нож A B C E F D ALCOOL G H I J P Y C ...

Страница 167: ...7 ВАЖНО УБЕДИТЕСЬ ЧТО У ВАС ЕСТЬ ВИНТЫ И ДЮБЕЛИ ДЛЯ ТИПА СТЕНЫ НА КОТОРОЙ БУДЕТ УСТАНОВЛЕНО ЗЕРКАЛО 3 ШТ СПИСОК КОМПЛЕКТУЮЩИХ ЗЕРКАЛА A Зеркало Kalos 1 шт B Пластина для настенного монтажа 1 шт A B P Y C ...

Страница 168: ...МПЛЕКТУЮЩИХ РАКОВИНЫ И ПЬЕДЕСТАЛА A Раковина Kalos 1 шт B Пьедестал Kalos 1 шт C Сифон 1 шт D Пластина для напольного крепления 1 шт E Комплект винтов и дюбелей для прикрепления раковины к стене 1 шт A B C E D P Y C ...

Страница 169: ...верьте перпендикулярность стены относительно пола 2 После проверки перпендикулярности стены относительно пола и извлечения комплектующих конструкции из упаковки осторожно положите перевернутое зеркало Kalos на рабочую поверхность стараясь не поцарапать его P Y C ...

Страница 170: ...выполните подсоединение крана изгибы колена и шланги не входят в комплектацию рекомендуемая длина шлангов 40 см 4 Во избежание повреждения зеркала аккуратно затяните гайки и шайбы входящие в комплектацию крана P Y C ...

Страница 171: ...ении монтажа 6 Отметьте карандашом на стене заранее определенную высоту и расстояние и отметьте точки в которых будут просверлены отверстия для крепления кронштейна Дрелью просверлите отверстия в стене и проверьте их ровное расположение с помощью уровня P Y C ...

Страница 172: ...172 7 С помощью уровня прикрепите крепежную пластину к стене 8 Желательно чтобы зеркало держали два человека а третий человек занимался водопроводными и электрическими соединениями P Y C ...

Страница 173: ...етичность соединений и исправную работу подсветки 10 Прикрепите зеркало к пластине для настенного монтажа Приспособление с задней стороны регулируемое с помощью шестигранного ключа позволяет установить зеркало ровно P Y C ...

Страница 174: ...вреждения Затем установите сифон входящий в комплектацию 2 Отметьте карандашом на стене заранее определенную высоту и расстояние и отметьте точки в которых будут просверлены отверстия которые должны совпадать с отверстиями в задней части раковины После того как вы с помощью уровня проверите что отверстия в точности совпадают просверлите стену Еще раз проверьте правильное расположение отверстий с п...

Страница 175: ...ели в два только что выполненных отверстия Установите чашу на выступающиевинтыивременнозакрепитееегайками входящимивкомплектацию 4 Еще раз проверьте правильное горизонтальное расположение раковины с помощью уровня P Y C ...

Страница 176: ...убедитесь в герметичности соединений 6 Убедитесь что пьедестал идеально входит в специальное углубление и плотно прилегает к чаше После проверки правильности расположения удалите пьедестал и затяните гайки настенного крепления P Y C ...

Страница 177: ...177 7 Прикрепите пластину напольного крепления пьедестала с использованием силиконового герметика 8 Прислоните пьедестал к стене так чтобы он прилегал к чаше и к пластине напольного крепления P Y C ...

Страница 178: ...178 9 Рекомендуется нанести силиконовый герметик по всему периметру раковины и пьедестала Удалите излишки герметика бумагой смоченной спиртом 10 Правильный монтаж раковины и зеркала P Y C ...

Страница 179: ...179 ...

Страница 180: ... странице проверьте наличие всех элементов в упаковке Убедитесь что комплектующие не имеют заметных дефектов В случае обнаружения дефектов немедленно свяжитесь с Devon Devon Монтаж данного изделия следует выполнять как минимум втроем В инструкции по монтажу подразумевается что стены выровнены и выдерживают вес изделия P Y C ...

Страница 181: ...DEVON ДЛЯ МОНТАЖА ЗЕРКАЛА A Карандаш B Сантиметр C Канцелярский нож D Дрель Сверло для стен E Ключ шестигранный длинный 4 мм F Уровень ВАЖНО УБЕДИТЕСЬ ЧТО У ВАС ЕСТЬ ВИНТЫ И ДЮБЕЛИ ДЛЯ ТИПА СТЕНЫ НА КОТОРОЙ БУДЕТ УСТАНОВЛЕНО ЗЕРКАЛО 3 ШТ E A B C D F P Y C ...

Страница 182: ...ОНТАЖА РАКОВИНЫ И ПЬЕДЕСТАЛА A Бумага Спирт B Противоплесневый ацетатный силиконовый герметик C Регулируемый разводной ключ D Уровень E Дрель Сверло для стен F Карандаш G Сантиметр H Гаечный ключ I Тефлоновая лента J Канцелярский нож A B C E F D ALCOOL G H I J P Y C ...

Страница 183: ...3 ВАЖНО УБЕДИТЕСЬ ЧТО У ВАС ЕСТЬ ВИНТЫ И ДЮБЕЛИ ДЛЯ ТИПА СТЕНЫ НА КОТОРОЙ БУДЕТ УСТАНОВЛЕНО ЗЕРКАЛО 3 ШТ СПИСОК КОМПЛЕКТУЮЩИХ ЗЕРКАЛА A Зеркало Kalos 1 шт B Пластина для настенного монтажа 1 шт A B P Y C ...

Страница 184: ... КОМПЛЕКТУЮЩИХ РАКОВИНЫ И ПЬЕДЕСТАЛА A Раковина Kalos 1 шт B Пьедестал Kalos 1 шт C Сифон 1 шт D Пластина напольного монтажа 1 шт E Комплект винтов и дюбелей для прикрепления раковины к стене 1 шт A B C E D P Y C ...

Страница 185: ...лярность стены относительно пола 2 Отметьте карандашом на стене заранее определенную высоту и расстояние и отметьте точки в которых будут просверлены отверстия для крепления кронштейна Дрелью просверлите отверстия в стене и проверьте их ровное расположение с помощью уровня P Y C ...

Страница 186: ...186 3 С помощью уровня прикрепите крепежную пластину к стене 4 Желательно чтобы зеркало держали два человека а третий человек занимался электрическими соединениями P Y C ...

Страница 187: ...осле проверки исправной работы подсветки прикрепите зеркало к пластине для настенного монтажа Приспособление с задней стороны регулируемое с помощью шестигранного ключа позволяет установить зеркало ровно P Y C ...

Страница 188: ...ждения Затем установите сифон входящий в комплектацию и кран 2 Отметьте карандашом на стене заранее определенную высоту и расстояние и отметьте точки в которых будут просверлены отверстия которые должны совпадать с отверстиями в задней части раковины После того как вы с помощью уровня проверите что отверстия в точности совпадают просверлите стену Еще раз проверьте правильное расположение отверстий...

Страница 189: ...стия Установите чашу на выступающиевинтыивременнозакрепитееегайками входящимивкомплектацию 4 Еще раз проверьте правильное горизонтальное расположение раковины с помощью уровня Убедитесь что расстояние между зеркалом и раковиной одинаковое по всей длине P Y C ...

Страница 190: ...190 5 Затем установите слив и подвод воды не входит в комплектацию 6 Убедитесь в герметичности слива и подвода воды P Y C ...

Страница 191: ...в специальное углубление и плотно прилегает к чаше После проверки правильности расположения удалите пьедестал и затяните гайки настенного крепления 8 Прикрепите пластину напольного крепления пьедестала с использованием силиконового герметика P Y C ...

Страница 192: ...дестал к стене так чтобы он прилегал к чаше и к пластине напольного крепления 10 Рекомендуется нанести силиконовый герметик по всему периметру раковины и пьедестала Удалите излишки герметика бумагой смоченной спиртом P Y C ...

Страница 193: ...193 11 Правильный монтаж раковины и зеркала P Y C ...

Страница 194: ...Via di Casellina 61D 50018 Scandicci FI Italy Tel 39 055 308350 Fax 39 055 375549 email info devon devon com DEVON DEVON COM ...

Отзывы: