background image

GetStartedGuide.md

6/3/2021

11 / 12

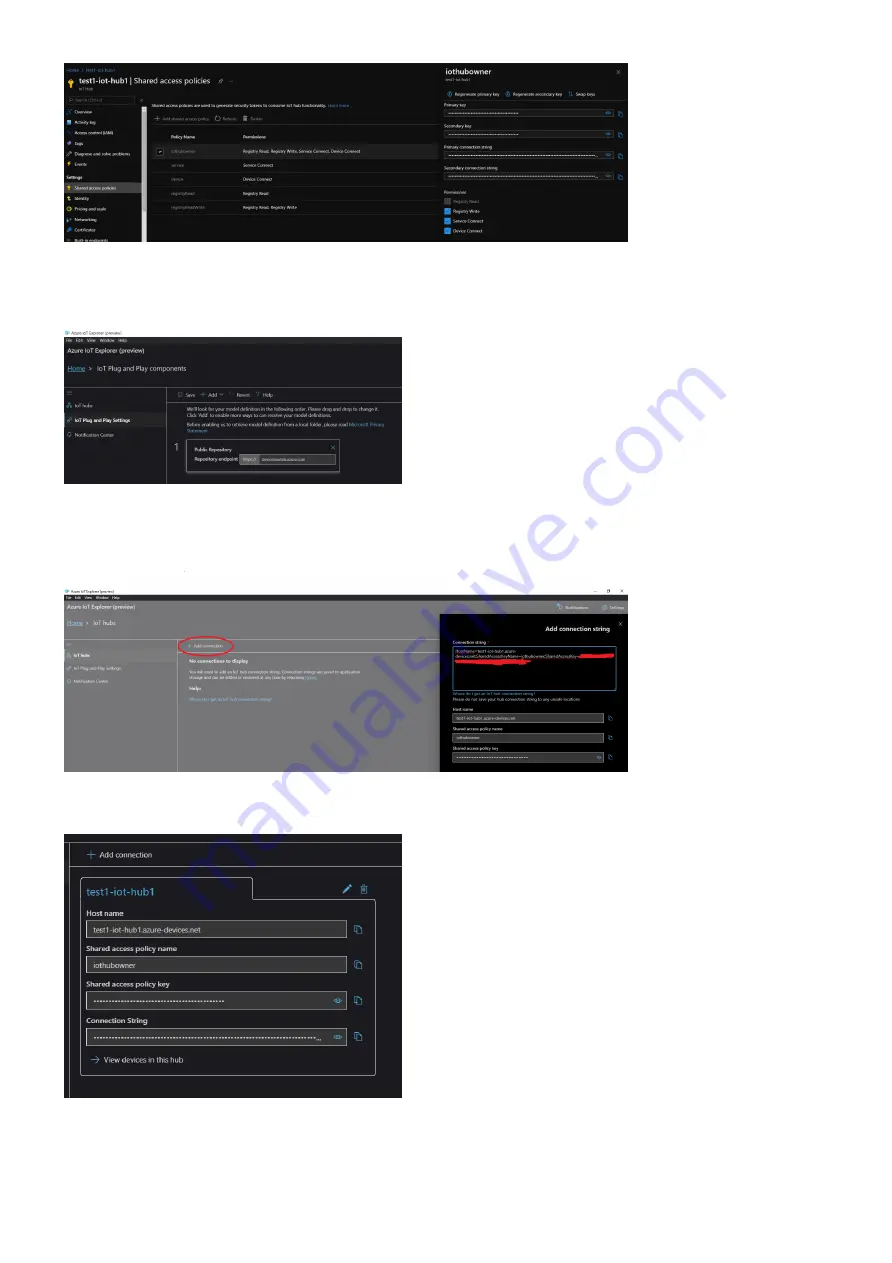
Opening the Explorer, in the HomePage, clicking on the tab "IoT Plug and Play settings", you will be able to
configure the repository containing the public model. Click on "Add", select "Public Repository" and then save.

Next, clicking on the tab "IoT Hubs" you will be able to add a connection. Just paste into the window that will
pop up the Connection string you retrieved from the Hub.

You will find your IoTHub in the HomePage. Just click on it to access it.

Accessing it, you will be able to see your device. Click on it.

Содержание Squid.link 2X

Страница 1: ...ut custom device code Using Solution builders can integrated quickly using the certified IoT Plug and Play enabled device based on Azure IoT Central as well as third party solutions This getting started guide provides step by step instruction on getting the device provisioned to Azure IoT Hub using Device Provisioning Service DPS and using Azure IoT Explorer to interact with device s capabilities ...

Страница 2: ...plement even very complex local intelligence The memory options leave room for data storage and logging You are no longer dependent on one vendor but can combine your Home Area network exactly the way you prefer The code is pre installed on the device In the following steps you will find instructions on how to configure your device How to setup the device and connect it to the Internet Ways to get...

Страница 3: ...ncluded on the product label of the gateway as shown below If issues occur you can download and install Bonjour Print Services on your PC as an alternative Via WLAN Apply power to the Squid link gateway Once the gateway has booted it will start an access point named squid link xxxx where xxxx is the serial number of the gateway Connect your PC to the access point through your PC s network and Wi F...

Страница 4: ...ess point does not provide internet access To browse the internet you will need to connect to a different wireless network or use an ethernet port Adding devices Click on in the bottom right corner to add devices A dialog box opens and shows the available devices You can add devices in two ways 1 Automatically Select a device from the list and click Add 2 Manually Type in the serial number and ins...

Страница 5: ...ly from the browser The API can be accessed over HTTP or by connecting to a WebSocket or a raw socket When using HTTP the message pattern is request response The WebSocket and raw socket wrap the REST API and adds support for push messages Messages are pushed when a resource is added removed or updated The raw socket can be access on port 10000 and only from localhost The WebSocket and HTTP interf...

Страница 6: ...ey deviceKey Primary key from key pair registrationId Registration id for the gateway if gateway EUI s are used on the cloud side this parameter can be set to production gateway eui globalEndpoint Global device endpoint associated with targeted Azure Device Provisioning Service scopeId ID scope associated with targeted Azure Device Provisioning Service modelId ID of targeted DTDL template to match...

Страница 7: ...u need the following ID scope In your IoT Central application navigate to Administration Device Connection Make a note of the ID scope value Group primary key In your IoT Central application navigate to Administration Device Connection SAS IoT Devices Make a note of the shared access signature Primary key value Use the Cloud Shell to generate a device specific key from the group SAS key you just r...

Страница 8: ...ute device key device id sample device 01 pk Make a note of the generated device key and the ID scope for this application and flash it on the device 4 Another way in which you can retrieve the key is by creating a device please note that you can use the Gateway Serial Number as the deviceId ...

Страница 9: ...ing the PUT call with this information you will be able to see the raw data within the page after a few minutes via the API please note that the deviceKey in the PUT request is the while the registrationId is the deviceId yuo provided Integration with Azure IoT Explorer Open your Device Provisioning Services go to Tab Manage Enrollments and then Add individual enrollment ...

Страница 10: ...the registrationId will be the serial number of the gateway and the deviceKey will be the individual enrollment primary key open the individual enrollment to be able to copy it In order to connect your Gateway to the IoTHub Explorer you have to retrieve the Connection string To do so go to your IotHub Tab Shared access policies and then click iothubowner From the window that will pop up copy the P...

Страница 11: ...ning the public model Click on Add select Public Repository and then save Next clicking on the tab IoT Hubs you will be able to add a connection Just paste into the window that will pop up the Connection string you retrieved from the Hub You will find your IoTHub in the HomePage Just click on it to access it Accessing it you will be able to see your device Click on it ...

Страница 12: ...rect method you will be able to send commands to your device Clicking on the tab Telemetry you will be able to check the teletry sent from your device Clicking on the tab IoT Plug and Play components you will be able to check the Plug and Play model retrieved from the public repository Additional Links Import the Plug and Play model Configure to connect to IoT Hub Squid link 2X Technical Specifica...

Отзывы: