PART 3
MAINTENANCE
This furnace should never be operated without an air filter.
Disposable filters should be replaced at least once a year. If
the furnace is equipped to provide cooling as well, filters
should be replaced a minimum of twice a year.
16
WARNING
Before performing any service functions, make
sure that all utilities are turned “OFF” upstream
from the appliance, unless operations specifically
require the power to be on. Failure to comply with
this warning will cause a fire hazard and/or bodily
harm.
For optimal performance, the oil burner nozzle should be
replaced at least once a year. Contact a qualified service
technician for the installation.
The procedure for nozzle installation and/or replacement is
outlined in the oil burner Instruction Manual that was
supplied with the furnace.
After replacement of the nozzle, the burner should be
adjusted in accordance with the “COMBUSTION CHECK”
outlined in Section 2.2 of this manual.
3.1)
HEAT EXCHANGER CLEANING
Ordinarily, it is not necessary to clean the heat exchanger or
flue pipe every year, but it is advisable to have a qualified
service technician check the unit before each heating season
to determine whether cleaning or replacement of parts is
necessary.
If cleaning is necessary, the following steps should be taken:
1. Turn “OFF” all utilities upstream from the furnace;
2. Disconnect the flue pipe;
3. Remove the radiator baffle;
4. Disconnect the oil line and remove the oil burner from
the furnace;
5. Open the two cleanout doors located in the upper part of
the front panel of the furnace;
6. Clean the secondary tubes and the primary cylinder with
a stiff brush and a vacuum cleaner;
7. Before reassembly, the heat exchanger and combustion
chamber should be inspected to determine if
replacement is required;
8. After cleaning, replace the radiator baffle, flue collar
plate, oil burner and close the two clean out access
doors. Reconnect the flue pipe and oil line;
9. Readjust burner for proper operation.
3.2) BLOWER
REMOVAL
To remove the blower from the furnace:
1. Turn “OFF” all utilities upstream from the furnace;
2. Remove the burner access door and blower door;
3. Remove the blower retaining screw (on the blower
partition panel);
4. Remove the control box cover and disconnect the
thermostat and power wires from the board;
5. Slide the blower on the rails toward the front of the unit;
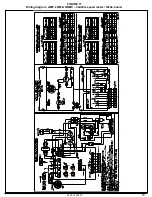
6. Reverse the above steps to reinstall the blower. Refer to
the wiring diagram Figure 11, p. 23 in this manual, or the
diagram located on the inside of the blower door to
properly rewire the unit.
CAUTION
Be sure that the blower is adequately supported
when sliding it off the mounting rails, especially in
the horizontal or counterflow positions, in order to
prevent dropping it and injuring yourself or
damaging the blower!
3.3)
BLOCKED VENT SHUT OFF (BVSO)
CLEANING
For continued safe operation, the Blocked Vent Shut-Off
System (BVSO) is required to be inspected and maintained
annually by a qualified agency.
1. Disconnect the power to the appliance;
2. Remove the two screws holding on the BVSO assembly
cover;
3. Remove the cover;
4. Remove the two screws holding the thermal switch to the
assembly base;
5. Without removing the electrical wires, remove the thermal
switch and remove any build-up from the thermal switch
surface;
CAUTION
Do not dent or scratch the surface of the thermal
switch. If the thermal switch is damaged, replacement
is required.
6. Clear and remove any build-up or obstruction inside the
heat transfer tube;
7. Re-mount the thermal switch to the assembly base;
8. Re-attach the assembly cover with the screws removed in
step 2;
9. Re-establish power to the appliance.
445 01 4036 02


