background image


SGX VIBRATOR MOTOR


15 Jun 12 

7-9 

HyperPoolShaker 

ELECTRICAL CONNECTIONS 

The following instructions describe the connections at both ends of the power cord. To ensure that 
new connections are made correctly, always tag leads for identification before disconnecting from 
the terminals. 

The Derrick vibrator motor must be operated at the required voltage and frequency. Refer to the 
data plate on the motor case for the motor’s voltage and frequency requirements. Prior to 
installing  a new  vibrator motor, verify that the electrical power configuration corresponds to the 
electrical requirements specified on the motor. 

Safety 

Electrical connections should be performed only by trained, qualified personnel familiar with high-
voltage applications and knowledgeable of National Electrical Code (NEC) standards and any 
other state or local codes that may apply to installation of industrial equipment. 


WARNING! MOTOR MAY BE DAMAGED BY INCORRECT SUPPLY POWER. 
BE SURE THAT VOLTAGE AND FREQUENCY ARE WITHIN ±10% OF MOTOR 
DATA PLATE SPECIFICATIONS. 


WARNING! ELECTRICAL CONNECTIONS MUST BE MADE IN ACCORDANCE 
WITH THE NATIONAL ELECTRICAL CODE (NEC) AND ALL APPLICABLE 
LOCAL CODES. FAILURE TO COMPLY MAY RESULT IN AN UNSAFE 
CONDITION THAT COULD INJURE PERSONNEL OR DAMAGE EQUIPMENT. 
ENSURE THAT ALL ELECTRICAL AND CONDUIT CONNECTIONS ARE 
SECURE. 


WARNING! EITHER REMOVE SCREEN PANELS OR PROTECT FROM 
DAMAGE DURING MOTOR REMOVAL OR INSTALLATION.SCREEN PANELS 
WILL BE DAMAGED IF STRUCK BY HARDWARE OR TOOLS. 


WARNING! HIGH VOLTAGE MAY BE PRESENT. ALWAYS OPEN FUSED 
DISCONNECT SUPPLYING ELECTRIC POWER TO THE EQUIPMENT, AND 
LOCK OUT AND TAG OUT POWER SUPPLY BEFORE PERFORMING ANY 
MAINTENANCE AND/OR ADJUSTMENTS OF EQUIPMENT. 


WARNING! MOTOR MAY BE DAMAGED IF STORED IN A HIGH-HUMIDITY 
ENVIRONMENT (GREATER THAN 50% RH). BE SURE THAT MOTOR WAS 
STORED IN A LOW-HUMIDITY ENVIRONMENT. 


WARNING! BE SURE THAT MOTOR IS PROPERLY GROUNDED. 


WARNING! MOTOR HOUSING BECOMES HOT DURING OPERATION AND 
MAY CAUSE SEVERE BURNS. DO NOT TOUCH MOTOR HOUSING DURING 
OR IMMEDIATELY AFTER MOTOR HAS BEEN OPERATING. 

Содержание HYPERPOOL SHAKER

Страница 1: ... that the operation repair and maintenance of equipment complies with all applicable national and local regulations including safety regulations THIS MANUAL IS PROVIDED BY DERRICK CORPORATION ON AN AS IS BASIS AND DERRICK CORPORATION EXPRESSLY DISCLAIMS ANY AND ALL WARRANTIES EXPRESS OR IMPLIED INCLUDING WITHOUT LIMITATION WARRANTIES OF MERCHANTABILITY AND FITNESS FOR A PARTICULAR PURPOSE IN NO EV...

Страница 2: ......

Страница 3: ...d a series of numeric characters that signify the sequence of the machine s manufacture For example unit number MA000001 would be the first screening machine manufactured by Derrick Alphabetic prefixes currently in use are MA Screening Machine AD Desilter and Desander DG Degasser AG Mud Agitator CF Centrifuge SF Screen Frame To ensure that it will remain intact over many years of rigorous service ...

Страница 4: ...cate a different item repeat steps 1 and 2 5 Blank pages are included to facilitate accurate two sided printing on a standard copier To print any individual section simply enter the PDF page number range at the top of the screen not the page number at the bottom of each page This document contains proprietary information of Derrick Corporation It is intended solely for the information and use of p...

Страница 5: ...1 Warnings 2 1 Material Safety Data Sheets MSDSs 2 3 3 Installation 3 1 15 Jun 12 General 3 1 Safety 3 1 Installation Sequence 3 2 Storage 3 2 Site Preparation and Clearance Requirements 3 2 Moving Positioning the Equipment 3 3 Desilter and Desander Installation 3 5 Equipment Leveling 3 7 Mounting and Securing Equipment 3 7 Shipping Brackets 3 8 Feed and Discharge Connections 3 8 Electric Power Co...

Страница 6: ...ce 5 1 15 Jun 12 General 5 1 Routine Maintenance 5 1 Screen Frame 5 2 Screen Panel Replacement 5 4 Vibrator Motors 5 5 AWD Jack Maintenance 5 5 Screen Bed Material Replacement 5 6 Hydrocyclone Removal and Installation 5 7 Recommended Spare Parts 5 10 6 Screen Retention System 6 1 15 Jun 12 General 6 1 Description 6 1 Operation 6 2 Screen Panel Replacement 6 2 Inspection and Repair 6 2 7 Vibrator M...

Страница 7: ...lShaker Section Page Date 7 Vibrator Motor Cont d Electrical Connections 7 9 Preventive Maintenance 7 15 Bearing Replacement 7 15 Troubleshooting 7 24 8 Reference Drawings 8 1 15 Jun 12 9 Installation and Maintenance Log 9 1 15 Jun 12 ...

Страница 8: ......

Страница 9: ...ided in this manual One copy of this manual should be available and accessible at the equipment location For maximum safety and performance no additions and or changes may be made to the equipment without the explicit written permission of Derrick Corporation Genuine Derrick repair replacement parts are required Figure 1 1 HyperPool Shaker SAFETY Section 2 of this manual contains relevant safety i...

Страница 10: ...a choice of motors and the manually operated Adjustable While Drilling AWD feature Box weir and weir bypass feeders are available as well as desanders and desilters Feed slurry may be introduced into the HyperPool shaker through the feeder if so equipped The feeder evenly distributes slurry across the entire width of the screen frame The hopper attached to the underside of the unit captures liquid...

Страница 11: ...e pins are extended and retracted by manually operated torque tubes A removable handle inserted into a socket on each torque tube permits the operator to extend and retract the screen retention pins to alternately retain and release each screen panel Retention pins on the right side of the screen frame retain the screen panels by forcing the outer edges of the panels inward causing them to conform...

Страница 12: ...ator to extend the time that the feed slurry remains on the screening medium by elevating the discharge end of the screen frame This additional time improves the separation of solids from the liquid By elevating the discharge end of the screen frame slightly the AWD causes the slurry to pool toward the feed end of the screen frame This pooling allows the slurry to remain on the screen panels longe...

Страница 13: ...hopper Figure 1 6 Box and Weir Bypass Feeders Desilter and Desander The 4 hydrocyclone desilter removes 10 to 74 micron solids from drilling fluid mud and the 10 hydrocyclone desander is used to separate solids in the 40 to 100 micron range The body is the main component of the 4 hydrocyclone Figure 1 7 A cone tip is threaded into the bottom of the body The soft apex is positioned in the tapered h...

Страница 14: ...INTRODUCTION 1 6 15 Jun 12 HyperPoolShaker Desilter and Desander Cont d Figure 1 7 4 Hydrocyclone Desilter Components Figure 1 8 10 Hydrocyclone Desander Components ...

Страница 15: ...rvice center nearest you PARTS SALES SERVICE LOCATIONS Colorado Grand Junction 970 241 2417 Louisiana Broussard 877 635 3354 New York Corporate Headquarters Buffalo 716 683 9010 Oklahoma Oklahoma City 405 208 4070 Texas Houston Oilfield Headquarters 866 DERRICK 337 7425 281 590 3003 North Texas Bridgeport 405 208 4070 South Texas Corpus Christi 361 299 6080 West Texas Midland 405 397 4089 East Tex...

Страница 16: ......

Страница 17: ...WORN AT ALL TIMES WHEN WORKING ON OR NEAR DERRICK MACHINES Electrical Hazards WARNING TO AVOID SERIOUS PERSONAL INJURY BE SURE THAT EQUIPMENT IS DE ENERGIZED LOCKED OUT AND TAGGED OUT PRIOR TO PERFORMING MAINTENANCE AND OR ADJUSTMENTS WARNING MOTOR MUST BE OPERATED AT THE DESIGNATED SUPPLY VOLTAGE WARNING HIGH VOLTAGE MAY BE PRESENT BE SURE THAT FUSED DISCONNECT SUPPLYING ELECTRIC POWER TO THIS EQ...

Страница 18: ...AUSE SEVERE BURNS DO NOT TOUCH MOTOR HOUSING DURING OPERATION OR IMMEDIATELY AFTER MOTOR HAS BEEN OPERATING WARNING ALL OPERATING AND MAINTENANCE PERSONNEL MUST READ AND UNDERSTAND ALL SAFETY INFORMATION IN THIS MANUAL BEFORE WORKING WITH THE EQUIPMENT WARNING BE SURE THAT ALL PERSONNEL ARE CLEAR OF MACHINE BEFORE ADJUSTING ANGLE OF SCREEN BED HANDS AND FEET CAN BE CRUSHED BY THE MOVING SCREEN FRA...

Страница 19: ... for accuracy of the information The MSDSs listed below apply to products used in the manufacture of the Derrick equipment Where shown dates are current as of the publication date of this manual The latest MSDSs may be obtained from the product manufacturer MATERIAL DESCRIPTION WHERE USED MSDS No Date Paints and Coatings PPG Dimetcote 302H Green 302F0250 Resin Top Coat 1302H 5A 04 11 10 PPG Dimetc...

Страница 20: ......

Страница 21: ...ion review the Equipment Handling Procedures in this section In particular note the information concerning lift points and the use of spreader bars when lifting or moving the equipment Failure to observe proper equipment handling procedures may result in serious personal injury and or damage to the equipment WARNING USE SPREADER BARS TO PREVENT DAMAGE WHEN LIFTING THE EQUIPMENT WARNING TO ENSURE P...

Страница 22: ...with a tarpaulin tarp If unit is stored outdoors use a UV resistant tarp or UV resistant shrink wrap Install vents when using shrink wrap SITE PREPARATION AND CLEARANCE REQUIREMENTS Prior to placement of equipment verify that electricity and water are available at the installation site and that feed and discharge lines are provided Also ensure that clearances around the equipment are adequate Prep...

Страница 23: ...ENT TO ANY OTHER LOCATION WARNING BE SURE THAT HANDLING DEVICES HAVE SUFFICIENT LIFTING CAPACITY TO SAFELY HANDLE THE WEIGHT OF THE EQUIPMENT WARNING DO NOT REMOVE SHIPPING BRACKETS UNTIL EQUIPMENT HAS BEEN POSITIONED AT FINAL INSTALLATION SITE WARNING WHEN USING AN OVERHEAD LIFTING DEVICE USE ALL FOUR LIFTING LUGS PROVIDED The shaker and desilter and desander if included are separately skidded fo...

Страница 24: ...gure 3 2 are attached to the lower outside corners of the machine to allow attachment of an overhead lifting device Lifting points are labeled LIFT HERE ONLY DO NOT attempt lifting equipment by attaching slings or similar lifting aids to the vibrator motors or other non designated portions of the unit Use of spreader bars is recommended WARNING MOTOR CORD MAY BE DAMAGED DURING HOISTING IF PINCHED ...

Страница 25: ...damage If unit appears to be damage free proceed as follows WARNING TO ENSURE PROPER BALANCE AND ORIENTATION WHEN UNIT IS RAISED AND PREVENT DAMAGE TO COMPONENTS ATTACH LIFTING SLING ONLY AT DESIGNATED LIFT POINTS WARNING BE SURE THAT HANDLING DEVICES HAVE SUFFICIENT LIFTING CAPACITY TO SAFELY HANDLE THE WEIGHT OF THE EQUIPMENT 1 Note location of facility discharge pipe to be connected to desilter...

Страница 26: ...acility pipe 5 Carefully guide desilter downward into notches of collection pan mounting brackets Figures 3 4 and 3 5 and align with bracket mounting holes 6 Using hardware retained in step 3 install but do not tighten hardware on one desilter mounting bracket with hardware arrangement as shown 7 Install hardware on opposite side of desilter and then tighten all hardware on both desilter mounting ...

Страница 27: ...n of feed slurry across the screen panels the HyperPool shaker must be properly leveled Leveling along the length and width of the unit is shown for a typical machine in Figure 3 6 A 4 foot level is recommended to check level Non compressible shims should be used as required to level the machine Figure 3 6 Equipment Leveling ...

Страница 28: ...nstalled whenever the machine is moved to prevent movement of the screen frame during transit Following final positioning and leveling of the shaker remove the shipping brackets Figure 3 7 that were installed to stabilize the screen frame and motors during transit Two shipping brackets and four PVC plugs secure the movable screen frame to the stationary hopper The shipping brackets and plugs must ...

Страница 29: ...sander Connections The 10 desander has horizontal inlet and discharge pipes which are also designed for Victaulic couplers The inlet connection lower pipe is 8 and discharge upper pipe is 10 Customer piping may be connected to either desander inlet pipe However the discharge pipe may be connected only to the left side of the discharge manifold as viewed from the feed end of the machine and looking...

Страница 30: ...losed with a removable panel bolted to the hopper The panel should be installed on the unneeded drainage cutout and sealed with an appropriate waterproof sealant to prevent leakage Connect a discharge duct to fit the cutout on the opposite side of the hopper using the four bolts provided to secure the duct flange to the hopper Figure 3 10 Hopper Discharge Cutout ELECTRIC POWER CONNECTIONS Remove t...

Страница 31: ...T COULD INJURE PERSONNEL OR DAMAGE EQUIPMENT ENSURE THAT ALL ELECTRICAL AND CONDUIT CONNECTIONS ARE SECURE Figure 3 11 Electric Power Supply Connections to Input Power Strip A fused disconnect primary power supply is required for this equipment The fused disconnect and interconnecting wiring to the equipment must be suitably sized and in accordance with National Electrical Code NEC standards and a...

Страница 32: ...oceed as follows 1 Remove compression handle from holder and insert into compression assembly handle tube 2 Press handle downward to release pawl from positioning gear tooth and lift pawl from positioning gear 3 Raise handle upward to retract compression pins 4 Lower screen panel onto screen bed at discharge end with outside edge against wall of screen frame engaging notch with panel locator and i...

Страница 33: ... Fully installed panel Note downward curve into intimate contact with screen bed 6 Repeat procedure for three remaining screen panels MACHINE STARTUP Refer to Section 4 for initial startup and operating procedures for the HP 704 shaker WARNING DO NOT ATTEMPT TO OPERATE MACHINE WITH SHIPPING BRACKETS INSTALLED ...

Страница 34: ......

Страница 35: ...WITH SHIPPING BRACKETS INSTALLED WARNING BEFORE STARTING UP MACHINE BE SURE THAT ALL PERSONNEL ARE CLEAR OF EQUIPMENT INITIAL STARTUP Perform the Initial Startup procedure when the HyperPool shaker is being started for the first time following parts replacement or when equipment has been removed from service for an extended period Refer to the following table for initial startup instructions Step ...

Страница 36: ...TDOWN The normal shutdown procedure is to be used for controlled stopping of operation Normal shutdown is performed for routine activities such as cleaning lubrication inspection adjustment or screen panel replacement Step Procedure 1 Divert or discontinue flow of material to shaker 2 Allow all oversize and undersize material and liquid to discharge from screen frame 3 Using a water hose wash rema...

Страница 37: ...ich all variables are correctly balanced The second scenario shows a condition referred to as roping which results from an improper balance of the variables Normal Operation In normal operation feed slurry is introduced tangentially into the interior of the hydrocyclone Figure 4 1 at high velocity causing a whirlpool effect to occur inside the cone The swirling motion of the slurry drives the larg...

Страница 38: ...ottom of the cone If permitted to continue for a lengthy period of time the blockage becomes difficult to clear and the risk of internal damage to the cone increases Roping discharge results in reduced solids removal capability increased probability of wear to hydrocyclone components and potential damage to the feed pump Figure 4 2 Abnormal Hydrocyclone Operation Roping Discharge Spray Patterns Th...

Страница 39: ... cone Correct this condition by tightening triangular nut turning clockwise until desired spray profile is achieved CORRECT Spray angle in the range of 20 to 30 with a hollow center In normal operation this pattern is desirable No adjustment is required TOO NARROW Spray angle less than 20 with a hollow center In normal operation this pattern is undesirable This spray pattern indicates exit diamete...

Страница 40: ...ing loaded plunger and reversible pawl provides a ratcheting action during movement of the operating handle A full 180 degrees of movement is possible in both directions Depending on pawl setting moving the handle in one direction turns the jack screw to raise or lower the screen frame while in the other direction the jack screw remains stationary during handle movement The spring loaded pawl perm...

Страница 41: ...RE THAT ALL PERSONNEL ARE CLEAR OF MACHINE BEFORE ADJUSTING ANGLE OF SCREEN BED 1 Pivot operating handle Figure 4 5 downward until horizontal and set jack screw ratchet detent to either raise or lower discharge end of screen frame 2 Using the operating handle rotate jack screw left to raise or right to lower screen frame end to the desired angle Use stamped markings on the upright shafts to assist...

Страница 42: ...ges to an existing screen angle are shown in Figure 4 6 Note that the dark pattern at the left represents the area of the screen panels covered by the pool The ideal coverage is for the pool to cover about two thirds of the screen surface If coverage retreats to halfway across screen surface the screen frame angle may be reduced and or flow increased Finally if the pool covers nearly all of the sc...

Страница 43: ...ure retention and full contact with the screen bed Be sure that each screen panel is secure by verifying that all screen panels compressed into conformance with the concave screen bed Refer to Section 5 for screen replacement and maintenance procedures and to Section 6 for detailed description operation and repair of the system ...

Страница 44: ......

Страница 45: ...nd cleaning Following are the recommended routine maintenance procedures ROUTINE MAINTENANCE Action Frequency Inspect feed connection to feeder desander or desilter for leaks and tighten connection as required Each shift Inspect discharge duct connection on side of hopper for leaks Tighten connection and or add silicone sealant to prevent leakage Each shift Inspect cover on unused hopper discharge...

Страница 46: ...the vertical legs of the hopper the screen frame provides the mounting surface for the screen panels and also includes mounting provisions for the vibrator motors and screen compression system During normal operation the screen frame and compression system components accumulate residual mud that should be removed periodically In addition the eight float mounts should be inspected and replaced when...

Страница 47: ...nction is compromised Monthly Check compression and condition of screen panels Panels should be in complete contact with the screen frame bed and should not have holes or other damage that would allow solids to pass through Replace damaged screen panel s Each shift Inspect side supports cross supports and single and double bulkhead protectors for deterioration or damage Defective components may pe...

Страница 48: ...der Installation Screen panel replacement is done with the installer on the compression side of the screen frame Removal 1 Stop the flow of feed slurry to the feeder and desander desilter 2 Wash screen panel to remove residue from panel surfaces 3 De energize vibrator motors and lock out and tag out electric power HP 704 screen bed Note compression pins and panel locators 4 Remove compression hand...

Страница 49: ...n 1 Lower screen panel onto screen bed at discharge end with outside edge against wall of screen frame engaging notch with panel locator and inside edge against compression pins Retracting compression pins Lowering screen panel into screen frame and engaging notch with locator 2 With compression handle inserted in compression assembly tube press handle down until compression pins are fully extende...

Страница 50: ... deterioration To replace any of the bed materials proceed as follows 1 Stop feed 2 Wash off process material from screen bed 3 Shut down electric power and lock out and tag out machine 4 Retract all screen compression pins to release all screen panels 5 Lift and remove screen panels and remove and discard defective bed materials 6 To facilitate installation apply mild soap solution to new bed mat...

Страница 51: ...ted as follows 1 Turn adjusting screw clockwise to increase spring tension on plunger 2 Move operating handle in both directions to confirm proper ratcheting action and pawl engagement during jack screw rotation 3 If pawl does not engage jack screw properly or ratchet action is insufficient repeat steps 1 and 2 HYDROCYCLONE REMOVAL AND INSTALLATION If desilter does not have a dedicated shutoff val...

Страница 52: ...SSURIZED DESILTER 1 If shutoff valves are installed close valve of cone to be removed by moving handle to the CLOSED vertical position perpendicular to the line of flow If shutoff valves are not installed shut down feed to desilter 2 Release cone feed and elbow discharge snap couplings to remove hydrocyclone and discharge elbow as a single unit or release cone feed and cone discharge snap coupling...

Страница 53: ...E ON AN OPERATING DESILTER BE SURE THAT SHUTOFF VALVE IS CLOSED BEFORE RELEASING SNAP COUPLINGS SECURING VICTAULIC CAPS TO PRESSURIZED MANIFOLD WARNING ALWAYS WEAR SAFETY GLASSES WHEN INSTALLING HYDROCYCLONES IN A PRESSURIZED DESILTER 1 If Victaulic caps Derrick part number VIC 2 60 were installed on manifold ports release snap couplings and remove caps 2 Slide snap coupling gasket on end of manif...

Страница 54: ... based on the user s experience with similar equipment RECOMMENDED SPARE PARTS HYPERPOOL SHAKER Part No Description Consumable Qty 1129 00 Float Mount Assembly Incl 500 13 x 875 Bolts Yes 8 G0012647 Discharge Curtain Yes 1 18021 01 Panel Hold Down No 4 18022 01 Panel Locator No 3 17617 02 Bushing Housing Assembly No 2 17617 03 Actuator Assembly No 1 17617 04 Tension Handle Assembly No 1 17617 05 P...

Страница 55: ...G0001973 Bolt Assembly SGX Vibrator 3 4 16 x 4 W Washer Yes 4 G00012323 Pushbutton Assembly Start Green No 1 G0004136 Pushbutton Assembly Stop Red No 1 SQD 2510 MC03 Starter Manual No 1 SQD B7 70 Thermal Element 4 69A 5 18A 380 400V 460 480V 50 60Hz No 3 SQD B6 25 Thermal Element 3 77A 4 00A 575 600V 60Hz No 3 SQD B15 5 Thermal Element 9 22A 10 1A 230 240V 60Hz No 3 ...

Страница 56: ......

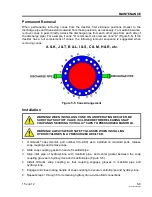
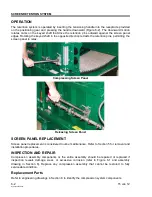
Страница 57: ... which designates the screen compression side of the machine This arrangement allows an operator to work from one side of the machine to install and remove screen panels DESCRIPTION The screen compression system Figure 6 1 consists of four manually operated compression assemblies that extend retention pins outward to press against the edges of the screen panel When fully extended the pins cause th...

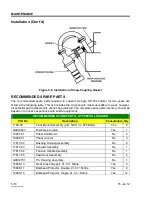
Страница 58: ...tting the screen panel to relax Compressing Screen Panel Releasing Screen Panel SCREEN PANEL REPLACEMENT Screen panel replacement is considered routine maintenance Refer to Section 5 for removal and installation procedures INSPECTION AND REPAIR Compression assembly components or the entire assembly should be repaired or replaced if inspection reveals damage wear or excessive corrosion refer to Fig...

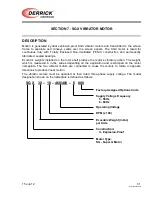
Страница 59: ...ce the motor s vibratory action The weight which is measured in in lbs varies depending on the application and is stamped on the motor nameplate The two vibrator motors are connected to cause the motors to rotate in opposite directions to produce linear motion The vibrator motors must be operated at their rated three phase supply voltage The model designation shown on the nameplate is defined as f...

Страница 60: ...r motors requires proper handling installation operation and maintenance Failure to follow installation and maintenance requirements may result in personal injury equipment failure or property damage Only trained qualified personnel should be involved in the installation operation and maintenance procedures All plant safety procedures must be observed Qualified personnel must be familiar with the ...

Страница 61: ...ck out and tag out rules when removing the motor While motor is in storage periodically check the integrity of the winding insulation using a megohmmeter Maintain a continuous record of megohmmeter readings and immediately investigate any significant decrease in insulation resistance OPERATING ENVIRONMENT Derrick vibrator motors are designed to operate in ambient temperatures slightly higher than ...

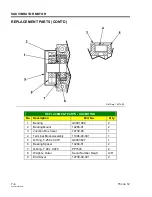
Страница 62: ... MOTOR No Description Part No Qty 1 Bearing G0001960 2 2 Bearing Mount 14266 01 2 3 Junction Box Cover 12739 00 1 4 Terminal Block Assembly 11006 00 001 1 5 O Ring 5 250 x 0 070 G0003627 1 6 Bearing Spacer 14269 01 2 7 O Ring 7 90 x 0 070 PP1503 2 8 Weights Outer Serial Number Req d A R 9 End Cover 12736 00 001 2 ...

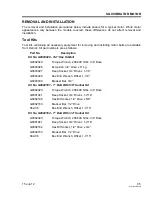
Страница 63: ... Hd Bolt G0002020 Torque Wrench 200 600 ft lbs 3 4 Drive G0003026 Extension 3 4 Drive x 8 Lg G0003027 Deep Socket 3 4 Drive x 1 1 8 G0003028 Box End Wrench Offset 1 1 8 G0003030 Breaker Bar 3 4 Kit No G0002161 1 Bolt With 5 8 Socket Hd G0002020 Torque Wrench 200 600 ft lbs 3 4 Drive G0001941 Deep Socket 3 4 Drive x 1 7 16 G0002160 Hex Bit Socket 1 2 Drive x 5 8 G0002163 Breaker Bar 1 2 Drive 842 0...

Страница 64: ...ED DISCONNECT SUPPLYING ELECTRIC POWER TO THE EQUIPMENT AND LOCK OUT AND TAG OUT POWER SUPPLY BEFORE PERFORMING ANY MAINTENANCE AND OR ADJUSTMENTS OF EQUIPMENT WARNING MOTOR MAY BE DAMAGED BY STORING IN A HIGH HUMIDITY ENVIRONMENT GREATER THAN 50 RH OUT OF SERVICE MOTOR S MUST BE STORED IN A LOW HUMIDITY ENVIRONMENT Motor Handling When lifting motor position lifting sling at the center of the moto...

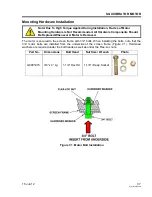
Страница 65: ...d Whenever A Motor Is Removed The motor is secured to the screen frame with 3 4 bolts When installing the bolts note that the 3 4 motor bolts are installed from the underside of the screen frame Figure 7 1 Hardened washers are required under the bolt heads as well as under the Flex Loc nuts Part No Dimensions Bolt Head Nut Size Wrench Photo G0001973 3 4 x 4 Lg 1 1 8 Hex Hd 1 1 8 Deep Socket Figure...

Страница 66: ...ition vibrator motor over screen frame 2 Position motor on screen frame and align mounting holes with screen frame Insert bolts without anti seize compound applied with hardened washers through motor holes from underside of screen frame Install hardened washers and Flex Loc nuts on top 3 Tighten bolts to 300 ft lbs ...

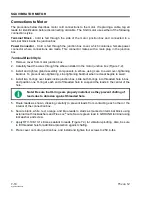
Страница 67: ... INCORRECT SUPPLY POWER BE SURE THAT VOLTAGE AND FREQUENCY ARE WITHIN 10 OF MOTOR DATA PLATE SPECIFICATIONS WARNING ELECTRICAL CONNECTIONS MUST BE MADE IN ACCORDANCE WITH THE NATIONAL ELECTRICAL CODE NEC AND ALL APPLICABLE LOCAL CODES FAILURE TO COMPLY MAY RESULT IN AN UNSAFE CONDITION THAT COULD INJURE PERSONNEL OR DAMAGE EQUIPMENT ENSURE THAT ALL ELECTRICAL AND CONDUIT CONNECTIONS ARE SECURE WAR...

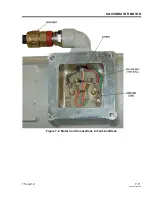
Страница 68: ...ing care to avoid over tightening backnut To prevent over tightening stop tightening backnut when red seal begins to swell 4 Install two O rings over leads inside junction box slide both O rings into threaded hole in box and position one O ring at each end of threaded hole to suspend the leads in the center of the hole Note Be sure that O rings are properly installed as they prevent chafing of lea...

Страница 69: ...SGX VIBRATOR MOTOR 15 Jun 12 7 11 HyperPoolShaker Figure 7 2 Motor Cord Connections to Terminal Block ...

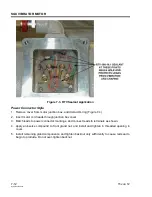
Страница 70: ... 2 Insert motor cord leads through junction box cover 3 Match leads to power connector markings and connect leads to terminals as shown 4 Apply anti seize compound to front gland nut and install and tighten in threaded opening in cover 5 Install remaining gland components and tighten backnut only sufficiently to cause red seal to begin to protrude Do not over tighten backnut ...

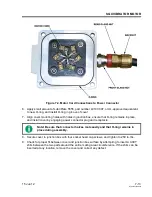
Страница 71: ... remains in place and install cover by engaging power connector plug and receptacle Note Be sure that connector halves mate easily and that O ring remains in place during assembly 8 Secure cover to junction box with four socket head cap screws and tighten to 250 in lbs 9 Check for proper fit between cover and junction box surface by attempting to insert a 0 001 shim between the two parts around th...

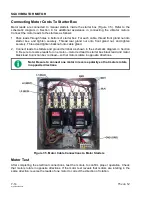
Страница 72: ...n backnut onto cable gland 2 Connect leads to starters and ground terminal as shown in the schematic diagram in Section 8 Be sure to reverse leads for one motor motor red lead to starter box black lead and motor black lead to junction box red lead so that motors rotate in opposite directions Note Be sure to connect one motor in reverse polarity so that motors rotate in opposite directions Figure 7...

Страница 73: ...s of deterioration or damage Each shift or as required Using a torque wrench verify that motor mounting bolt torque is in accordance with torque listed in Motor Removal and Installation After first 40 hours of operation once each year The vibrator motor is designed to dissipate heat through the motor case Buildup of process material on the motor case exterior prevents proper heat dissipation and m...

Страница 74: ...ase Vibrator SHC 100 10 Oz Tube 1 Bearing Replacement Kit With Tools G0003905 G0001696 Bolt Jack Hex Skt Hd M8 1 25 x 70mm Aly Stl 2 G0001960 Bearing Vibrator 2 PP1503 O Ring 7 90 ID x 070 Cross Section Viton 2 14266 01 Mount Bearing Vibrator A4140 Stl 2 G0001698 Torque Wrench 3 8 Drive 150 to 750 In Lb 1 G0008935 Driver Hex 6mm Male 6 063 L X 3 8 Drive 1 G0001700 Wrench Hex T Handle 5mm Alloy Stl...

Страница 75: ...ENANCE PERSONNEL MUST READ AND UNDERSTAND ALL SAFETY INFORMATION IN THIS MANUAL BEFORE WORKING WITH THE EQUIPMENT WARNING HIGH VOLTAGE MAY BE PRESENT BE SURE FUSED DISCONNECT SUPPLYING ELECTRIC POWER TO THIS EQUIPMENT IS OPEN LOCK OUT AND TAG OUT POWER SUPPLY TO PREVENT ACCIDENTAL APPLICATION OF POWER WHILE MAINTENANCE AND OR ADJUSTMENTS ARE IN PROGRESS WARNING TO PREVENT SERIOUS EYE INJURY OR PER...

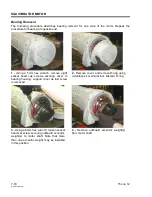
Страница 76: ...e eight socket head cap screws securing cover to bearing housing support cover as last screw is removed 2 Remove cover and remove O ring using a dental pick or similar tool Discard O ring 3 Using a 6mm hex wrench loosen socket head set screw securing outboard eccentric weight s to motor shaft Note that more than one eccentric weight may be installed in this position 4 Remove outboard eccentric wei...

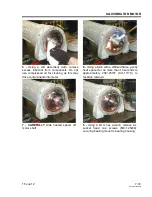
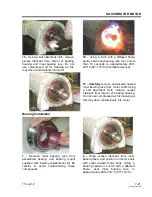
Страница 77: ...cleaning as this may drive contaminants into motor 6 Using a torch with a diffused flame gently heat spacer for no more than 10 seconds to approximately 200 230 F 93 110 C to facilitate removal 7 CAREFULLY slide heated spacer off motor shaft 8 Using a 6mm hex wrench remove six socket head cap screws M8 1 25x60 securing bearing mount to bearing housing ...

Страница 78: ... apart 10 Carefully thread jack screws into threaded holes in bearing mount being sure to avoid cross threading 11 Using a 6mm hex wrench alternately and equally advance each jack screw a few turns at a time 12 As jack screws contact bearing housing bearing mount is drawn from bearing housing as shown while inner bearing race remains on shaft Remove and discard bearing and bearing mount ...

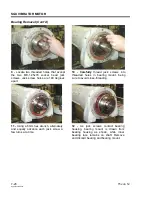
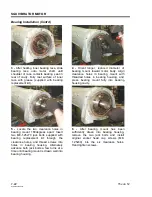
Страница 79: ...nd discard heated inner bearing race from motor shaft Using a soft absorbent cloth remove excess lubricant from interior of bearing housing Do not use compressed air for cleaning as this may drive contaminants into motor Bearing Installation 1 Remove inner bearing race from assembled bearing and bearing mount supplied with bearing replacement kit Be careful to avoid contaminating these components ...

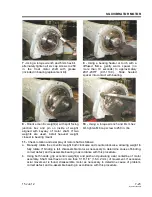
Страница 80: ...ded holes in bearing housing and press bearing mount fully into bearing housing cavity 5 Locate the two clearance holes in bearing mount 180degrees apart Insert two M8 1 25x70 jack bolts supplied with bearing replacement kit through the clearance holes and thread screws into holes in bearing housing Alternately advance both jack bolts a few turns at a time until bearing mount is drawn well into be...

Страница 81: ...ght closest to bearing mount 10 Using a torque wrench and 6mm hex bit tighten M8 cap screw to 250 in lbs 11 Check rotation and axial play of motor shaft as follows a Manually rotate the eccentric weight both clockwise and counterclockwise allowing weight to fully rotate If binding is felt disassemble motor as necessary to determine cause of binding correct defect and reassemble bearing in accordan...

Страница 82: ...ck for correct supply power to all three phases at starter s Using a voltmeter verify that motor starter is functioning properly and terminals T 1 T 2 and T 3 are energized Check for damage to power cable connected to motor junction box Correct all defects Incorrect power supply connections Check electrical connections and correct any defects Starter circuit overloads and trips Incorrect supply vo...

Страница 83: ...h Excessive buildup of process material on motor case Wash off buildup from motor case Excessive noise Loose hardware Check security of all external and internal hardware Tighten as required Defective bearing Replace both bearings in accordance with Bearing Replacement Motor turns too slowly Incorrect supply voltage or line frequency Check that supply voltage and line frequency agree with motor da...

Страница 84: ......

Страница 85: ... General Arrangement HyperPool 17618 00 Parts List HyperPool 4 Panel 17291 00 Electrical Parts List 17292 00 Wiring Schematic 9764 00 002 Parts List AWD 13289 00 Parts List Box Feeder 13245 00 002 Parts List Desilter 12945 00 007 Parts List Desander Front Mount 13244 00 013 Parts List Collection Pan RH Discharge 13244 00 015 Parts List Collection Pan LH Discharge 11234 00 4 Cone Assembly 6066 51 1...

Страница 86: ......

Страница 87: ......

Страница 88: ......

Страница 89: ...TAINED ON THIS DRAWING OR COPIES REMAIN THE EXCLUSIVE PROPERTY OF DERRICK CORPORATION BUFFALO NEW YORK U S A AND ARE NOT TO BE REPRODUCED WITHOUT THE WRITTEN PERMISSION OF DERRICK CORPORATION THE INFORMATION CONTAINED ON THIS DRAWING SHALL ONLY BE USED BY CUSTOMERS OR PROSPECTS OR THEIR AGENCIES IN THE ARRANGEMENT OR INSTALLATION OF DERRICK EQUIPMENT OR BY VENDORS IN QUOTING ON OR IN THE SUPPLY OF...

Страница 90: ......

Страница 91: ...DERRICK ...

Страница 92: ......

Страница 93: ......

Страница 94: ......

Страница 95: ......

Страница 96: ......

Страница 97: ......

Страница 98: ......

Страница 99: ......

Страница 100: ......

Страница 101: ......

Страница 102: ......

Страница 103: ......

Страница 104: ......

Страница 105: ......

Страница 106: ......

Страница 107: ......

Страница 108: ......

Страница 109: ......

Страница 110: ......

Страница 111: ...3 0HP SQD B6 90 or FUR H25 460V A C 60Hz 3 0HP SQD B9 10 or FUR H27 R RX 230V A C 60Hz 3 0HP SQD B19 5 or FUR H33 MOTORS 215V A C 60Hz 3 0HP SQD B19 5 or FUR H34 440V A C 50Hz 3 0HP SQD B7 70 or FUR H26 380V A C 50Hz 3 0HP SQD B9 10 or FUR H27 220V A C 50Hz 3 0HP SQD B17 5 or FUR H32 575V A C 60Hz 5 0HP SQD B11 5 or FUR H29 460V A C 60Hz 5 0HP SQD B15 5 or FUR H32 A C N 230V A C 60Hz 5 0HP SQD B36...

Страница 112: ......

Страница 113: ... of the Derrick equipment If properly kept the log will be useful for altering maintenance intervals and intercepting trends that may indicate the need for changing operating procedures Each entry in the log should be dated for future reference and tracking If required additional pages may be added to the log by copying a blank page or simply inserting ruled paper at the rear of the section INSTAL...

Страница 114: ...INSTALLATION MAINTENANCE LOG 9 2 15 Jun 12 HyperPoolShaker ...

Страница 115: ...INSTALLATION AND MAINTENANCE LOG 15 Jun 12 9 3 HyperPoolShaker ...

Страница 116: ...INSTALLATION MAINTENANCE LOG 9 4 15 Jun 12 HyperPoolShaker ...

Страница 117: ...INSTALLATION AND MAINTENANCE LOG 15 Jun 12 9 5 HyperPoolShaker ...

Страница 118: ...INSTALLATION MAINTENANCE LOG 9 6 15 Jun 12 HyperPoolShaker ...

Отзывы: