background image

©2021 by 3Gen Inc.  |   04 May 2021  |  DLFX-1701B 

(English)

Instructions

Intended Use
This device is intended for medical purposes to illuminate body surfaces. 
It is used for non-invasive visual examination of intact skin.

This battery-operated product is designed for external examination only 
within professional healthcare facilities by medical professionals.
Check the correct operation of the device before use! Do not use the 
device if there are visible signs of damage.
CAUTION: Do not look directly into the LED light. Patients must close 
their eyes during examinations.
In case of a serious incident with the use of this device, notify 3Gen 
immediately and, if required by local regulations, your national health 
authority.

CAUTION: Do not use the device in fire or explosive risk area (e.g. 

oxygen-rich environment).
WARNING: This product can expose you to chemicals including methy-
lene chloride and hexavalent chromium, which are known to the State of 
California to cause cancer or reproductive toxicity. For more information 
go to www.P65Warnings.ca.gov.
Electromagnetic Compatibility
This device complies with the EMC Emissions and Immunity level re-
quirements of the standard IEC 60601-1-2:2014. The emission character-
istics of this equipment make it suitable for use in professional healthcare 
environment as well as residential environment (CISPR 11 Class B). This 

equipment offers adequate protection to radio communication service. 

In the rare event of interference to the radio communication service, 
the user might need to take mitigation measures, such as relocating or 
re-orienting equipment. 
WARNING: Use of this equipment adjacent to or stacked with other 
equipment should be avoided because it could result in improper oper-
ation. If such use is necessary, this equipment and the other equipment 
should be observed to verify that they are operating normally.
WARNING: Use of accessories other than those provided by the man-
ufacturer of this equipment could result in increased electromagnetic 
emissions or decreased electromagnetic immunity of this equipment and 
result in improper operation.
WARNING: Portable RF transmitters should be used no closer than 30 
cm (12 inches) to any part of the device. Otherwise, degradation of the 
performance of this equipment could result.

IMPORTANT: Before initial use, please charge the internal lithium ion 
battery. See “Battery and Charging” for details. 

DermLite Foto X is a polarized and non-polarized dermatoscope de-
signed for use with a wide range of cameras and mobile devices.

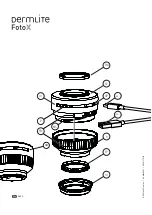
IceCap®
To support your infection control measures, snap one of the included 
disposable IceCaps (IC) over the installed faceplate (FP). To remove and 

dispose, simply pull it off.

Foto X may be attached to many cameras or smartphones via either a 
magnetic or purely threaded connection. For use with MagnetiConnect® 
adapters (sold separately), screw the Ring Adapter (RA) onto the 37 mm 
thread (37). To create a threaded connection with your camera, remove 
the Ring Adapter (RA) and thread the Foto X onto a compatible camera 
or threaded camera adapter*. 
Place the unit onto the skin, then push the Power button (P) to activate 
the light. Tapping the power button toggles between polarized and 
non-polarized light. Move between four brightness levels via the Bright-
ness Buttons (BB). To adjust focus, turn the Spacer (S) as needed; 
aligning the Focus Marks (FM) creates the ideal focal distance for most 
photography. 

To turn off your DermLite, push and hold the Power button (P) for about 
one second; the unit turns off automatically after 3 minutes.

*Note that many cameras require the use of an additional adapter made 

by the camera manufacturer or a photography supply company. 

Removing the Spacer 
The Spacer (S) may be removed by turning it counter-clockwise past a 
slight resistance. When reattaching, make sure its three small protrusions 
match up with the Bayonet Slot (BS).

Removing the Faceplate 

The Faceplate (FP) may simply be pulled off the Spacer (S) by grabbing 
it at the fingernail notches.

Battery and Charging 
CAUTION: This device uses a special 3.7V 360mAh (2pcs) lithium ion 
battery, which can only be purchased from 3Gen or from an authorized 
3Gen dealer. Do not under any circumstances use another battery other 
than the one designed for this unit.
This device is equipped with a four-level Charge Indicator (CI). When 
the unit is turned on and fully charged, all four LEDs light up. When less 
than 75% of battery life remains, three LEDs are illuminated. If more than 
half the battery is drained, two LEDs are on, while a single LED indicates 
that less than 25% of battery capacity remains. To charge your device, 
connect the supplied USB-C to USB cable to the Charging Port (CP) and 
any IEC 60950-1 compliant (5V) USB port. The Charge Indicator (CI) 
pulses to indicate charging, with the number of pulsing LEDs correspond-
ing with charge level. When charging is complete, all four indicator LEDs 
illuminate. After years of use, you may wish to re-place the battery, which 
is only available directly from 3Gen or an authorized 3Gen dealer. To 
change the battery, contact 3Gen or your local 3Gen dealer.

Troubleshooting
Please check www.dermlite.com for the most current troubleshooting 
information. If your device requires servicing, visit www.dermlite.com/
service or contact your local 3Gen dealer.

Care and Maintenance

CAUTION: No modification of this equipment is allowed.

Your device is designed for trouble-free operation. Repairs shall be made 

only by qualified service personnel.

Cleaning
The exterior of your device, except the optical parts, may be wiped clean 
with isopropyl alcohol (70% vol.) prior to use on a patient. The lens 
should be treated as high-quality photographic equipment and should be 
cleaned with standard lens cleaning equipment and protected from harm-
ful chemicals. Do not use abrasive material on any part of the equipment 
or immerse the device in liquid. Do not autoclave.

Warranty: 2 years for parts and labor. The battery is warranted for 1 year. 

Disposal
This device contains electronics and a lithium-ion battery that must be 
separated for disposal and may not be disposed of with general house-
hold waste. Please observe local disposal regulations.

The DermLite Foto X set includes:
Foto X scope (24 polarized & 8 non-polarized LEDs, 30mm 8x lens), 
USB-A to USB-C charging cable, 5 IceCaps.

Technical Description
Visit www.dermlite.com/technical or contact your local 3Gen dealer.

ENGLISH

Содержание Foto X

Страница 1: ...lge 11 Hrvatski 12 Italiano 13 Latvietis 14 Lietuvis 15 Magyar 16 Nederlands 17 Polskie 18 Português 19 Română 20 Slovenščina 21 Slovenský 22 Suomi 23 Svenska 24 Türk 25 Ελληνικά 26 български 27 русский 28 Український 29 한국어 30 日本語 31 简体中文 32 DLFX 2021 by 3Gen Inc 04 May 2021 DLFX 1701B ...

Страница 2: ...BB RA S BS FP IC CP USB C P FM CI 37 USB A 2021 by 3Gen Inc 04 May 2021 DLFX 1701B DLFX ...

Страница 3: ...push the Power button P to activate the light Tapping the power button toggles between polarized and non polarized light Move between four brightness levels via the Bright ness Buttons BB To adjust focus turn the Spacer S as needed aligning the Focus Marks FM creates the ideal focal distance for most photography To turn off your DermLite push and hold the Power button P for about one second the un...

Страница 4: ...se između polarizirane i nepolarizirane svjetlosti Prelazite između četiri razine svjetline pomoću gumba za svjetlinu BB Da biste prilagodili fokus okrenite odstojnik S po potrebi poravnavanje oznaka fokusa FM stvara idealnu fokusnu udaljenost za većinu fotografija Da biste isključili uređaj pritisnite i držite tipku za uključivanje P približ no jednu sekundu jedinica se automatski isključuje nako...

Страница 5: ...lepnutím na tlačítko napájení přepínáte mezi polarizovaným a nepolárovaným světlem Pomocí tlačítek jasu BB se můžete pohybovat mezi čtyřmi úrovněmi jasu Chcete li upravit zaostření otočte vymezovač S podle potřeby zarovnání zaostřovacích značek FM vytváří ideální ohniskovou vzdálenost pro většinu fotografií Chcete li zařízení vypnout stiskněte a podržte tlačítko napájení P po dobu asi jedné sekund...

Страница 6: ...ikke polariseret lys Gå mellem fire lysstyrkeniveauer via lysstyrkeknapperne BB For at justere fokus skal du dreje Spacer S efter behov justering af fokusmærker FM skaber den ideelle fokusafstand til de fleste fotografier For at slukke for enheden skal du trykke på tænd sluk knappen P i ca et sekund enheden slukkes automatisk efter 3 minutter Bemærk at mange kameraer kræver brug af en ekstra adapt...

Страница 7: ...t umgeschaltet Wechseln Sie über die Helligkeitsschalt flächen BB zwischen vier Helligkeitsstufen Drehen Sie den Abstandhalter S nach Bedarf um den Fokus anzupassen Durch Ausrichten der Fokusmarkierun gen FM wird die ideale Brennweite für die meisten Fotos geschaffen Halten Sie zum Ausschalten des Geräts die Ein Aus Taste P etwa eine Sekunde lang gedrückt Das Gerät schaltet sich nach 3 Minuten aut...

Страница 8: ...terile Asetage seade nahale seejärel vajutage valguse aktiveerimiseks toitenuppu P Toitenuppu puudutades lülitub polariseeritud ja mittepolariseeritud valguse vahel Heledusnuppu de BB abil saate liikuda nelja heledustasandi vahel Fookuse reguleeri miseks keerake vahetükki S vastavalt vajadusele Fookusmärkide FM joondamine loob enamiku fotograafia jaoks ideaalse fookuskauguse Seadme väljalülitamise...

Страница 9: ...ea necesario Al alinear las marcas de enfoque FM se crea la distancia focal ideal para la mayoría de las fotografías Para apagar el dispositivo mantenga presionado el botón de Encendido P durante aproximadamente un segundo la unidad se apaga automáticamente después de 3 minutos Tenga en cuenta que muchas cámaras requieren el uso de un adaptador adicional fabricado por el fabricante de la cámara o ...

Страница 10: ...uatre niveaux de luminosité via les boutons de luminosité BB Pour régler la mise au point tournez l entretoise S au besoin l alignement des marques de mise au point FM crée la distance focale idéale pour la plupart des photographies Pour éteindre l appareil maintenez enfoncé le bouton d alimentation P pendant environ une seconde l appareil s éteint automatiquement après 3 minutes Notez que de nomb...

Страница 11: ...n an cnaipe cumhachta chun barróg idir solas polaraithe agus solas neamhpholaraithe Bog idir ceithre leibhéal gile tríd an Botún Gile BB Chun fócas a choigeartú cas an Spacer S de réir mar is gá cruthaíonn ailíniú na Focus Marks FM an t achar fócasach idéalach don chuid is mó grianghrafadóireachta Chun an gléas a mhúchadh brúigh agus coinnigh an cnaipe Cum hachta P ar feadh thart ar an dara ceann ...

Страница 12: ...vanje prelazi se između polarizirane i nepolarizirane svjetlosti Prelazite između četiri razine svjetline pomoću gumba za svjetlinu BB Za podešavanje fokusa okrenite uložak S po potrebi poravnavan je oznaka fokusa FM stvara idealnu fokusnu udaljenost za većinu fotografija Da biste isključili uređaj pritisnite i držite tipku za uključivanje P približ no jednu sekundu jedinica se automatski isključu...

Страница 13: ...i di luminosità BB Per regolare la messa a fuoco ruotare il Distanziatore S secondo necessità l allineamento dei crocini di messa a fuoco FM crea la distanza focale ideale per la maggior parte delle fotografie Per spegnere il dispositivo tenere premuto il pulsante di accensione P per circa un secondo l unità si spegne automaticamente dopo 3 minuti Si noti che molte fotocamere richiedono l uso di u...

Страница 14: ...arošanas pogai tiek pārslēgta polarizētā un nepolarizētā gaisma Izmantojot spilgtuma pogas BB pārvietojieties starp četriem spilgtuma līmeņiem Lai pielāgotu fokusu pēc vajadzības pagrieziet starpliku S Fokusa marķējumu FM izlīdzināšana rada ideālu fokusa attālumu lielākajai daļai fotogrāfiju Lai izslēgtu ierīci aptuveni vienu sekundi turiet nospiestu barošanas pogu P iekārta automātiski izslēdzas ...

Страница 15: ...rizuota ir nepoliarizuota šviesa Perjunkite vieną iš keturių ryškumo lygių naudoda mi ryškumo mygtukus BB Norėdami sureguliuoti fokusavimą pasukite tarpiklį S pagal poreikį Fokusavimo ženklų FM suderinimas sukuria idealų židinio nuotolį daugumai fotografijų Norėdami išjungti įrenginį maždaug vieną sekundę palaikykite paspaudę maitinimo mygtuką P prietaisas automatiškai išsijungia po 3 minučių Atmi...

Страница 16: ...lógomb megérintésével válthat a polarizált és a nem polarizált fény között A Brightness Buttons BB gombbal mozoghat négy fényerőszint között A fókusz beállításához fordítsa el a távtartót S szükség szerint A fókuszjelek FM igazítása ideális fókusztávolságot biztosít a legtöbb fotózáshoz Az eszköz kikapcsolásához tartsa nyomva a Bekapcsoló gombot P körülbelül egy másodpercig a készülék 3 perc eltel...

Страница 17: ...via de Brightness Buttons BB Draai de Spacer S indien nodig om de focus aan te passen het uitlijnen van de Focus Marks FM creëert de ideale focusafstand voor de meeste fotografie Om het apparaat uit te schakelen houdt u de aan uit knop P ongeveer een seconde ingedrukt het apparaat wordt na 3 minuten automatisch uitgeschakeld Merk op dat veel camera s het gebruik van een extra adapter vereisen die ...

Страница 18: ...ędzy światłem spolaryzowanym i niespolaryzowanym Poruszaj się między czterema poziomami jasności za pomocą przycisków jasności BB Aby wyreg ulować ostrość w razie potrzeby obróć element dystansowy S wyrównanie znaczników ostrości FM zapewnia idealną odległość ogniskową dla większości fotografii Aby wyłączyć urządzenie naciśnij i przytrzymaj przycisk zasilania P przez około jedną sekundę urządzenie...

Страница 19: ...do o botão Liga Desliga P por aproximadamente um segundo a unidade desliga automaticamente após 3 minutos Observe que muitas câmeras exigem o uso de um adaptador adicional fabrica do pelo fabricante ou pelo fabricante do equipamento fotográfico Remoção do espaçador O espaçador S pode ser removido girando o no sentido anti horário após uma leve resistência Ao recolocar verifique se as três pequenas...

Страница 20: ...ntare comută între lumina polarizată şi cea nepolarizată Deplasaţi vă între patru niveluri de luminozitate prin butoanele Brightness BB Pentru a ajusta focalizarea rotiţi distanţierul distanţele după cum este necesar alinierea marcajelor de focalizare FM creează distanţa focală ideală pentru majoritatea fotografiilor Pentru a opri dispozitivul apăsaţi şi menţineţi apăsat butonul de pornire P pentr...

Страница 21: ...ite se med štirimi stopnjami svetlosti prek gumba za svetlost BB Če želite prilagoditi fokus zasu kajte distančnik S po potrebi poravnava fokusa FM ustvari idealno goriščno razdaljo za večino fotografij Če želite izklopiti napravo približno eno sekundo pridržite gumb za vklop izklop P enota se samodejno izklopi po 3 minutah Upoštevajte da številne kamere zahtevajo uporabo dodatnega adapter ja proi...

Страница 22: ... napájania prepínate medzi polarizovaným a nepolárovaným svetlom Pomocou tlačidiel jasu BB sa môžete pohybovať medzi štyrmi úrovňami jasu Ak chcete upraviť zaostrenie podľa potreby otočte medzerník S zarovnanie značiek zaostrenia FM vytvára ideálnu ohniskovú vzdialenosť pre väčšinu fotografií Ak chcete prístroj vypnúť stlačte a asi na jednu sekundu podržte tlačidlo napájania P jednotka sa automati...

Страница 23: ... polarisoidun ja polarisoimattoman valon välillä Siirry neljän kirkkaustason välillä kirkkauspainikkeiden BB avulla Säädä tarkennus kääntämällä välikappaletta S tarpeen mukaan Tarkennusmerkkien FM kohdistaminen luo ihanteellisen polttoetäisyyden useimpiin valoku viin Sammuta laite sammuttamalla virtapainiketta P noin sekunnin ajan yksikkö sammuu automaattisesti 3 minuutin kuluttua Huomaa että mone...

Страница 24: ...at ljus Flytta mellan fyra ljusstyrkenivåer via ljusstyrka knapparna BB För att justera fokus vrid Spacer S efter behov justering av fokusmarkeringarna FM skapar det perfekta fokalavståndet för de flesta fotografier För att stänga av enheten trycker du på strömbrytaren P i ungefär en sekund enheten stängs av automatiskt efter 3 minuter Observera att många kameror kräver användning av en extra adap...

Страница 25: ...rin Üniteyi cildinize yerleştirin ardından ışığı etkinleştirmek için Güç düğme sine P basın Güç düğmesine dokunmak polarize ve polarize olmayan ışık arasında geçiş yapar Parlaklık Düğmeleri BB ile dört parlaklık sevi yesi arasında geçiş yapın Odağı ayarlamak için Ara Parçayı S gerektiği gibi çevirin Odak İşaretlerini FM hizalamak çoğu fotoğraf için ideal odak mesafesini oluşturur Cihazı kapatmak i...

Страница 26: ...B Για να προσαρμόσετε την εστίαση γυρίστε το Spacer S όπως απαιτείται η ευθυγράμμιση των σημείων εστίασης FM δημιουργεί την ιδανική εστιακή απόσταση για τις περισσότερες φωτογραφίες Για να απενεργοποιήσετε τη συσκευή πιέστε και κρατήστε πατημένο το κουμπί λειτουργίας P για περίπου ένα δευτερόλεπτο η μονάδα απενεργοποιείται αυτόματα μετά από 3 λεπτά Σημειώστε ότι πολλές φωτογραφικές μηχανές απαιτού...

Страница 27: ... между поляризирана и неполяризирана светлина Придвижете се между четири нива на яркост чрез бутоните за яркост BB За да регулирате фокуса завъртете дистанционера S според нуждите подравняването на знаците за фокусиране FM създава идеалното фокусно разстояние за повечето фотографии За да изключите устройството натиснете и задръжте бутона за захранване P за около една секунда уредът се изключва авт...

Страница 28: ...те устройство на кожу затем нажмите кнопку питания P чтобы включить свет Нажатие на кнопку питания переключает между поляризованным и неполяризованным светом Перемещайтесь между четырьмя уровнями яркости с помощью кнопок яркости BB Чтобы отрегулировать фокус поверните проставку S по мере необходимости выравнивание меток фокусировки FM создает идеальное фокусное расстояние для большинства фотографи...

Страница 29: ...ітло Натисканням кнопки живлення перемикається між поляризованим та неполяризованим світлом Перемикайтеся між чотирма рівнями яскравості за допомогою кнопок яскравості BB Щоб відрегулювати фокус поверніть проставку S за необхідності вирівнювання позначок фокусування FM створює ідеальну фокусну відстань для більшості фотографій Щоб вимкнути DermLite натисніть і утримуйте кнопку живлення P приблизно...

Страница 30: ... 전원 버튼 P 을 눌러 조명을 활성화합 니다 전원 버튼을 누르면 편광과 비 편광 사이에서 전환됩니다 밝 기 버튼 BB 을 통해 네 가지 밝기 수준 사이를 이동하십시오 초점 을 조정하려면 필요에 따라 스페이서 S 를 돌리십시오 초점 마크 FM 를 정렬하면 대부분의 사진에 이상적인 초점 거리를 만듭니다 장치를 끄려면 전원 버튼 P 을 약 1 초 동안 누르십시오 기기는 3 분 후에 자동으로 꺼집니다 대부분의 카메라에는 카메라 제조업체 나 사진 장비 제조업체에서 만든 추가 어댑터를 사용해야합니다 스페이서 제거 스페이서 S 는 약간의 저항을지나 시계 반대 방향으로 돌려서 제거 할 수 있습니다 다시 연결할 때는 3 개의 작은 돌출부가 대검 슬롯 BS 과 일치하는지 확인하십시오 페이스 플레이트 제거 페이스 플레이트 F...

Страница 31: ...わります 輝度ボタン BB を使用して 4つの輝度レベル間を移動します フォーカスを調整するには 必要に 応じてスペーサー S を回します フォーカスマーク FM の位置合 わせにより ほとんどの写真撮影に理想的な焦点距離が作成されます デバイスの電源を切るには 電源ボタン P を約1秒間押し続けます ユニットは3分後に自動的にオフになります 多くのカメラでは カメラのメーカーまたは撮影機器メーカーが作成し た追加のアダプターを使用する必要があります スペーサー の取り外し スペーサー S は わずかな抵抗を越えて反時計回りに回 すことで取り外すことができます 再接続するときは 3つの小さな突 起がバヨネットスロット BS と一致することを確認してください フェイスプレートの取り外し フェースプレート FP は 指の爪の切り込みでつかむことで スペー サー S から簡単に取り外すことができ...

Страница 32: ...螺纹连接 请卸下环形适配器 RA 并将Foto X拧入兼容的相机或螺纹相机适配器 将本机放置在皮肤 上 然后按电源按钮 P 激活灯 轻按电源按钮可在偏振 光和非偏振光之间切换 通过亮度按钮 BB 在四个亮度 级别之间移动 要调整焦点 请根据需要转动垫片 S 对准聚焦标记 FM 可以为大多数摄影创造理想的焦距 要关闭设备 请按住电源按钮 P 约一秒钟 然后按一 下 3分钟后本机将自动关闭 请注意 许多相机需要使用相机制造商或摄影器材制造商 制造的附加适配器 卸下垫片 可以通过逆时针旋转垫片 S 使其略微移开阻力 重新安 装时 请确保其三个小突起与卡口插槽 BS 匹配 卸下面板 只需将面板 FP 抓住指甲槽口 即可将其从垫片 S 上拉下 电池和充电 注意 此设备使用特殊的3 7V 360mAh 2pcs 锂离子电 池 该电池只能从3Gen或3Gen授权经销商处购买 在任 何情况下都不要使用非本...

Страница 33: ...번호 カタログ番号 目录编号 Serial Number Serijski broj Sériové číslo Serienummer Seriennummer Seerianumber Número de serie Numéro de série Uimhir Sraithuimhir Serijski broj Numero di serie Sērijas numurs Serijos numeris Sorozatszám Serienummer Numer seryjny Número de série Număr de serie Serijska številka Sériové číslo Sarjanumero Serienummer Seri numarası Σειριακός αριθμός Сериен номер Серийный номер Серійни...

Страница 34: ...ни битови отпадъци Не выбрасывать в качестве несортированных бытовых отходов Не викидайте як несортовані побутові відходи 분류되지 않은 도시 폐기물로 처리하지 마십시오 分別されていない一般廃棄物として処分しないでください 请勿作为未分类的城市垃圾处理 Product complies with European Medical Device Regulation 2017 745 Proizvod je u skladu s Europskom uredbom o medicinskim proizvodima 2017 745 Produkt vyhovuje evropským předpisům o zdravotnických prostředcích 2...

Страница 35: ...rte Limitation de l humidité pour le stockage et le transport Teorainn taise le haghaidh stórála agus iompair Ograničenje vlage za skladištenje i transport Limitazione dell umidità per lo stoccaggio e il trasporto Mitruma ierobežojums uzglabāšanai un pārvadāšanai Laikymo ir gabenimo drėgmės apribojimas Páratartalom korlátozása tárolás és szállítás esetén Vochtigheidsbeperking voor opslag en transp...

Страница 36: ...mas JAV draudžia šį prietaisą pardavinėti licencijuotam sveikatos priežiūros specialistui arba jo užsakymu Vigyázat Az USA szövetségi törvénye korlátozza ezt a készüléket engedéllyel rendelkező egészségügyi szakember által vagy megrendelésére Let op de federale wet VS beperkt dit apparaat tot verkoop door of in opdracht van een erkende zorgverlener Przestroga prawo federalne USA ogranicza sprzedaż...

Отзывы: