7
ROTARY HAMMER
EN
ATTENTION!
Before plugging in make sure the switch is in the "off" position. With long-term storage of the tool
the switch must be in the “off” position.
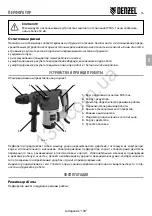
Power connection indicator 7 turns on when there is a supply voltage on the motor switches and indicates
that the machine is ready for operation. When the indicator is on, be careful; avoid pressing the switch key
unintentionally.
Before using the electrical rotary hammer you must:
•
inspect and verify its completeness and no external damage;
•
after transportation in winter conditions before turning on, leave at room temperature until complete drying
of water condensate;
•
after a long break (especially when operating at low temperatures), it is necessary to warm up the electrical
rotary hammer by idling during 1-2 minutes.
Before getting started you must:
•
check the service ability of the used working tool;
•
install the working tool, previously the shank of the working tool should be lubricated with special grease;
•
if it is necessary use the dust collector supplied in the set. The dust collector is put on the tool shank before
installing it into the box of the electrical rotary hammer and prevents dust from getting into the box and its
premature wear off;
•
when using a chisel establish a comfortable position of the working edge relative to the electrical rotary hammer
housing. To do this switch the operation mode switch 4 to
, turn the chisel by hand to a comfortable position
(the chisel should turn with the barrel without much effort). After adjusting the chisel position set the operation
mode switch 4 to
, at the same time the barrel will be blocked from turning.
ATTENTION!
When setting the chisel position do not turn on the electrical rotary hammer motor, unplug the
power cord from the power outlet to avoid injury and damage to the mechanism.
•
install the side handle in a comfortable work position;
•
set and fix depth gauge;
•
check the correctness and clarity of operation of the switch;
•
using switch 4 set the required mode of work;
•
try the Electrical Rotary Hammer by idling during 5-10 seconds (also after tool change).
While working:
•
periodically remove the drill from the hole to remove sludge from the drilling zone;
•
watch the condition of the tool and the working tool, their heating;
•
provide the efficient cooling of Electrical Rotary Hammer and the disposal of processing products from the
treatment area, do not block the ventilation holes on the housing;
•
protect the Electrical Rotary Hammer from exposure of intense heat sources and chemically active substances,
as well as from the ingress of liquids and solid objects inside the housing;
•
avoid mechanical damage to the Electrical Rotary Hammer (shocks, falls, etc.);
•
do not overload the Electrical Rotary Hammer putting too much effort into it. For effective operation of the
impact mechanism just press the working tool to the treated surface with an effort of order 20-30 Н;
•
choosing the feed force when drilling or chiseling, focus on reducing engine speed under load: decrease the
rotation more than 20% compared to idle leads to a significant deterioration in engine cooling and indicates
overload;
•
do not overheat external Electrical Rotary Hammer parts during long work. If there is an excessive heat, stop
working, let the Electrical Rotary Hammer work without load for 1-2 minutes for engine cooling, turn off the
engine and take a break until the gear housing become cool;
Autogoods “130”
130.com.ua
Содержание 26620
Страница 13: ...11 RU 12 12 12 13 13 16 16 19 19 21 21 21 21 21 21 Autogoods 130 1 3 0 c o m u a...
Страница 15: ...13 RU a a Autogoods 130 1 3 0 c o m u a...
Страница 16: ...14 RU a a Autogoods 130 1 3 0 c o m u a...
Страница 17: ...15 RU Autogoods 130 1 3 0 c o m u a...
Страница 18: ...16 RU 30 1 1 2 4 3 5 7 6 8 9 1 SDS max 2 3 4 5 6 7 8 9 1 7 Autogoods 130 1 3 0 c o m u a...
Страница 19: ...17 RU SDS plus SDS plus 4 4 3 4 6 SDS plus 1 5 10 SDS plus 1 2 1 9 Autogoods 130 1 3 0 c o m u a...
Страница 20: ...18 RU II 7 1 2 4 4 4 5 10 Autogoods 130 1 3 0 c o m u a...
Страница 21: ...19 RU 20 30 2 3 20 1 2 1 2 3 4 1 2 Autogoods 130 1 3 0 c o m u a...
Страница 22: ...20 RU 6 Y Autogoods 130 1 3 0 c o m u a...
Страница 23: ...21 RU 0 40 20 40 5 142703 3 8 1 2 7 495 234 41 30 010 2011 020 2011 004 2011 Autogoods 130 1 3 0 c o m u a...
Страница 24: ...NOTES Autogoods 130 1 3 0 c o m u a...
Страница 25: ...NOTES Autogoods 130 1 3 0 c o m u a...
Страница 26: ...12 12 12 36 36 Autogoods 130 1 3 0 c o m u a...
Страница 28: ...Autogoods 130 1 3 0 c o m u a...
Страница 29: ...Autogoods 130 1 3 0 c o m u a...


