Opera on Instruc ons
Turn ON/OFF Device
1. Press the power key for 1 second to switch ON and hold for 3 seconds to switch OFF device manually.
2. Connect the device with car charger in the car. When car engine starts up, device will be switched ON automa cally. When
car engine shuts off or car charger been disconnected, device switches OFF with 10 seconds delay (as per se ng).
How to Enter System Setup
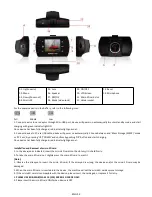
In Video or Photo mode, press the Menu key-UP/DOWN key-REC/OK key to enter the System Setup:
- Date/Time: You may set date/ me.
- Auto Power off: off/1 minute/3 minutes. To power off DVR automa cally if DVR is not recording.
- Beep sound: on/off. To turn on/off the sound of pressing bu ons.
- Language: You may set the desired OSD language menu.
- Backlight (Power save): Off/3 min. /5 min. /10 min. To shut off the LCD screen automa cally during video recording.
- TV Mode: PAL/NTSC
- Power Frequency: 50Hz/60Hz
- Format: Format the memory card.
- Default se ngs: Cancel/OK
- Version: Firmware version number.
Take Video and Set Video Menu
1. Take video
A er powered ON, device enters Video Mode as default, with icon
displaying at the upper-le corner of screen. Press
the ‘REC/OK’ key to start video recording a er proper Micro SD card been inserted. During recording, the red icon
flashes.
[Note]
- When the device is mounted on the windshield with car charger connected, it will power ON and start recording
automa cally once car engine starts up.
- During charging with car charger connected, it supports simultaneous recording.
- During recording, press ‘MODE’ bu on to lock and protect the current video from recycling (it’s called ‘SOS’ func on).
2. Set Video Menu
Press the Menu key to enter the setup of video op ons
- Resolu on:
Default
- Loop recording: Off/1 min. /2 min. /3 min. To record, store and recycle the video file by 1/2/3 minutes per sec on.
- Exposure: -2.0 -5/3 -4/3 -1.0 -2/3 -1/3 +0.0 +1/3 +2/3 +1.0 +4/3 +5/3 +2.0
- Mo on detec on: On/Off. When car is parked and mo on detec on turned On, DVR will detect moving objects in front of car
and trigger recording automa cally, or stay at standby state if there’s no object moving.
- Record Audio: On/Off. Choose to record the video with audio, or record video without any sound.
- Date Stamp: On/Off.
- G-Sensor: Off/1G/2G. Once G-sensor turned ON to 1G or 2G and triggered, there’s an icon of ‘lock’ appearing on LCD screen
and current video file will be locked as important file. Such locked files won’t be recycled by loop recording func on.
Take Photo and Set Photo Menu
1. Take Photos
Press the power key to enter the video mode as default; press the Mode key to enter the Photo mode with icon
displaying on the upper-le corner of the screen. Then, hold the device firmly, then press REC/OK key to take photos. Photos
will be stored into memory card automa cally.
2. Set Photo Menu
During photo mode, press MENU and REC/OK key to enter photo menu se ngs.
- Capture Mode: Single/2S Timer /5S Timer /10S Timer
-ENG 03-


