ACT-8030W Quick Start Guide
ENG 3
APP (for Android and iOS System)
I. How to Obtain the APP Installation Program
1. For the Android System, you can search “DENVER ACTION CAM 2” in the Play Store to
obtain corresponding installation programs, and then you can install them according to the
indicated steps .
2. For the IOS System, you can search “DENVER ACTION CAM 2” in the APP Store to obtain
corresponding installation programs, and then you can install them according to the indicated steps.
II. Camera WIFI and System Applications
Android Applications
1. Please install the DENVER ACTION CAM 2 application program (provided by the Supplier or
the Internet) for the Android mobile phone or tablet PC, and then the Display Screen will show the
Icon
;
2. Insert a Storage Card into the Camera and then power it on. Press the WIFI key to conduct WIFI
connection, and the Screen of the Camera will show the WIFI signal Icon with the external screen
revealing WIFI Connecting.
3. Enable the WIFI function of the Android mobile phone or tablet PC, and try to find the AP Name
ACT-8030W; please conduct connection between them till the system reveals a successful
connection;
if you are conducting WIFI connection for the first time, please input the password: 1234567890.
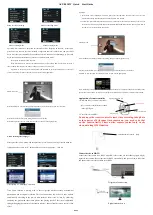
4. Tap and enable the Application Program Icon
on the Android mobile phone or tablet PC;
you can directly view the preview picture transmitted by the Camera (see the following picture),
and then conduct relevant operations.
IOS Applications
1. Please install the DENVER ACTION CAM 2 application program (provided by the Supplier or
the Internet) for the IOS mobile phone or tablet PC, and then the Display Screen will show the Icon
;
2. Insert a Storage Card into the Camera and then power it on. Press the WIFI key to conduct WIFI
connection, and the Screen of the Camera will show the WIFI signal Icon with the external screen
revealing WIFI Connecting.
3. Enable the WIFI function of the IOS mobile phone or tablet PC, and try to find the AP Name
DENVER ACT-8030W; please conduct connection between them till the system reveals a
successful connection;
if you are conducting WIFI connection for the first time, please input the password: 1234567890.
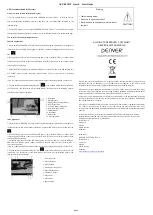
4. Tap and enable the Application Program Icon
on the IOS mobile phone or tablet PC; you
can directly view the preview picture transmitted by the Camera (see the following picture), and
then conduct relevant operations.
Warning
• Lithium battery inside!
• Do not try to open the product!
• Do not expose to heat, water, moisture, direct
sunlight!
CAUTION!
ALL RIGHTS RESERVED, COPYRIGHT
DENVER ELECTRONICS A/S
Electric and electronic equipment and included batteries contains materials, components and
substances that can be hazardous to your health and the environment, if the waste material
(discarded electric and electronic equipment and batteries) is not handled correctly.
Electric and electronic equipment and batteries is marked with the crossed out trash can symbol,
seen below. This symbol signifies that electric and electronic equipment and batteries should not be
disposed of with other household waste, but should be disposed of separately.
As the end user it is important that you submit your used batteries to the approriate and designated
facility. In this manner you make sure that the batteries are recycled in accordance with legislature
and will not harm the environment.
All cities have established collection points, where electric and electronic equipment and batteries
can either be submitted free of charge at recycling stations and other collection sites, or be
collected from the households. Additional information is available at the technical department of
your city.
Hereby, Inter Sales A/S, declares that this product (ACT-8030W) is in compliance with the
essential requirements and other relevant provisions of Directive 2014/53/EU. A copy of the
Declaration of conformity may be obtained at:
Inter Sales A/S
Omega 5A
Soeften
8382 Hinnerup
Denmark
Imported by:
DENVER ELECTRONICS A/S
Inter Sales A/S
Omega 5A
Soeften
8382 Hinnerup
Denmark
www.facebook.com/denverelectronics
1. Resolution
2. White Balance
3. Settings (Enter Settings Menu)
4. Wi-Fi Signal Icon
5. Camera’s Battery Status Icon
6. Enter the Playback Mode
7. Shutter Button
8.Video Mode
9. Photo Mode
10. Timelapse Mode
1. DV battery icon
2. Video resolution
3. White balance
4. Setup (enter setup menu)
5. Enter Playback mode
6. Timelapse Mode
7. Photo mode
8. Video mode
9. Shutter button


