Denso BHT-805B Скачать руководство пользователя страница 96


Barcode Handy Terminal

“2: OPTION”: Setting the FTP options 

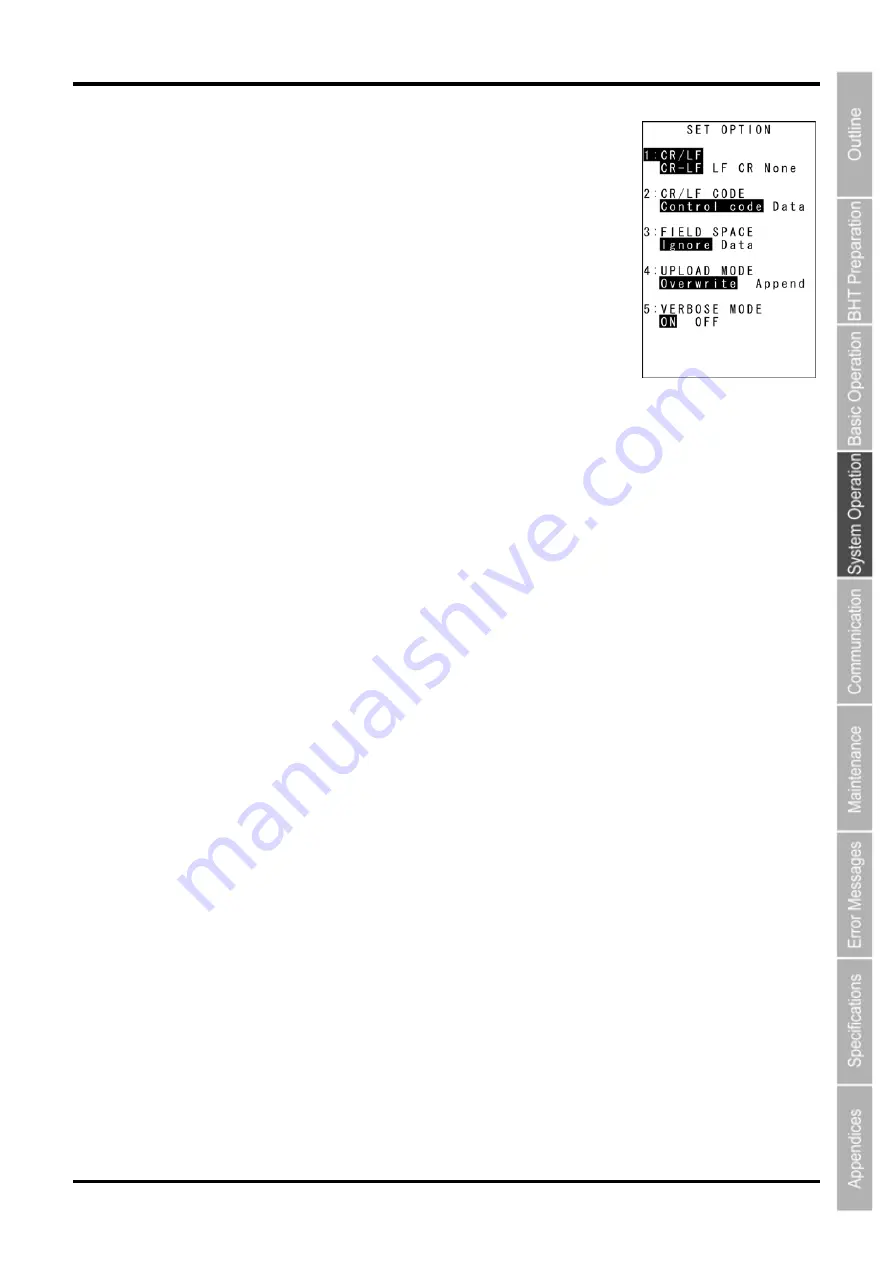
Select “2: OPTION” at the SET FTP menu to display the screen on the right 
where the current settings are displayed. 
 
“1: CR/LF”: 

Specifies line delimiters that should match ones used in the server OS. 

“2: CR/LF CODE”: 

Specifies the treatment of line delimiters in records when data files are 
downloaded. 

“Control code”: 

Does not handle line-break codes as data. 
(Handles as record delimiters.) 

“Data”: 


Handles line-break codes as data. 

“3: FIELD SPACE”: 

Specifies the treatment of trailing spaces in fields. 

“Ignore”: 

Trims trailing spaces in fields. 

“Data”: 

Retains trailing spaces as data. 

“4: UPLOAD MODE”: 

Specifies handling for trailing spaces in fields. 

”Overwrite”: Uploaded files will be written over the existing files 
“Append”:  Uploaded files will be appended to the existing files. 

“5: VERBOSE MODE”: 

Specifies the command response display when using FTP. 

“ON”: 

Displays a message to the response (number) from the FTP server when the BHT (FTP 
client) outputs a message. 

“OFF”: 

Displays only messages output by the BHT (FTP client). 

 
Refer to “FTP Download/Upload Messages” at section “4.5.9 Downloading/Uploading Files by FTP (FTP 
MENU)” for messages output by the BHT (FTP client). 
Refer to “Response Messages from the FTP Server” at section “4.5.9 Downloading/Uploading Files by 
FTP (FTP MENU)” for messages to responses (numbers) from the FTP server. 
 
To change the setting: 

(1)  Use the cursor keys ([

] [

]) or numerical keys ([1] [2] [3] [4] [5]) to   

highlight the item to be set and press the 

ENT

 key. 

(2)  Use the cursor keys ([

] [

]) to highlight each setting value. 

(3) Press the 

ENT

 key. 

 
Press the 

BS/C 

key to return to the SET FTP menu. 

83 

Содержание BHT-805B

Страница 1: ...Barcode Handy Terminal BHT 805B User s Manual...

Страница 2: ...autions to ensure its products do not infringe upon any patents or other intellectual property rights of other s However DENSO WAVE cannot be responsible for any patent or other intellectual property...

Страница 3: ...led information on each product Download service The latest OS systems for the BHT series repair software and sample programs can be downloaded E mail inquiries Product related queries can be sent in...

Страница 4: ...ust be performed prior to commencing operation Chapter 3 Basic Operation Describes basic operations performed by the operator and how to make basic changes to settings such as the volume Chapter 4 Sys...

Страница 5: ...he PDF Bookmark function can be used to jump to the Contents page Procedure 1 Click the Bookmark tab 2 Click to search for the desired item 3 Click the item to be read 1 Click the Bookmarks tab 2 Clic...

Страница 6: ...entering words or characters related to the item being searched 1 Click the Search icon Or select Edit Search 2 Enter the word s or character s to be searched for 3 Click Search Search Results Exampl...

Страница 7: ...This is an instruction manual used to create handy terminal programs with BHT BASIC BHT BASIC 4 0 Transfer Utility User s Guide This is an instruction manual for software relating to data transfer bet...

Страница 8: ...conditions that could cause serious bodily injury or death if the instructions are not followed correctly Alerts you to those conditions that could cause minor bodily injury or substantial property d...

Страница 9: ...pressure container Doing so could cause the batteries to break generate heat rupture or burn Avoid dropping the battery cartridge or letting it undergo any shock or impact Doing so could cause the bat...

Страница 10: ...arest dealer Failure to do so could cause fire or electrical shock Never use the CU for charging anything other than the specified battery cartridges Doing so could cause heat battery rupture or fire...

Страница 11: ...ting them caught in other objects or entangled in rotating machinery Failure to do so could result in accident or injury Never dis assemble Never disassemble or modify the BHT doing so could result in...

Страница 12: ...stored in a hot 50 C to 60 C 122 F to 140 F and humid place allow it to sit at room temperature and humidity for at least one day before use Using the BHT with its inside being hot will result in a r...

Страница 13: ...orming its housing resulting in a fire Always use the CU and AC adapter in a well ventilated area Do not place the CU anyplace where it may be subjected to oily smoke or steam e g near a cooking range...

Страница 14: ...ibes the BHT system and provides an overall outline of the BHT 1 1 System Configuration 2 1 1 1 Hardware Configuration 2 1 1 2 Software Configuration 4 1 2 Component Names and Functions 6 1 2 1 BHT Fr...

Страница 15: ...Please note that certain components of the required hardware will differ depending on the type of communication used Host computer CU 800 Series option Communication unit Software BHT BASIC 4 0 Develo...

Страница 16: ...the BHT is performed by IrDA communication and communication with the host computer is performed with an RS 232C Ethernet or USB interface The following three types of CU are available depending on th...

Страница 17: ...is an instruction manual used to create handy terminal programs with BHT BASIC BHT BASIC 4 0 Development Pack Option This is a package containing four software products required for BHT Series applica...

Страница 18: ...re via drivers System Mode This program is used to operate files make system environment settings and perform various types of tests Refer to Chapter 4 System Operation 4 4 System Mode for further det...

Страница 19: ...ings at the SYSTEM MENU Character strings can be assigned at user programs Refer to Chapter 4 System Operation for details on how to operate the SYSTEM MENU 5 Speaker Emits sound 6 IrDA interface port...

Страница 20: ...he cursor and select menus 2 Magic key M1 3 Magic key M2 4 Magic key M3 5 Magic key M4 Each of the M3 and M4 keys is assigned a trigger switch by default The SF ENT Backlight MENU or C key functions c...

Страница 21: ...assigned at user programs Refer to the BHT BASIC Programmer s Manual For BHT 800 Series 9 Power key Turns ON or OFF 10 Backspace clear key Deletes the last entered character backspace When pressed an...

Страница 22: ...n the SF key is pressed and the keys are in the shift status When the SF key is pressed while set to alphabet entry mode at the user program the entry mode changes from numeric entry to alphabet entry...

Страница 23: ...BHT 805B 10...

Страница 24: ...erting and Charging the Battery Cartridge 12 2 2 1 Battery Power Level Indicator 18 2 3 Wearing the Hand Strap 19 2 3 1 Attaching the Hand Strap 19 2 3 2 Holding the BHT 19 2 4 Initial Setup 20 2 5 Tu...

Страница 25: ...arge the battery cartridge on its own while the CH 851 and CH 854 are stationary model same type as CU communication unit for directly charging the battery cartridge placed in the BHT The charging tim...

Страница 26: ...dge in the direction indicated by the arrow Make sure that the battery cartridge is in the right orientation 13 Point Do not use battery cartridges other than those specified by DENSO WAVE 3 Insert th...

Страница 27: ...eriods of time do not remove from the charger for approximately 10 minutes When the BHT is set on the charger the LCD screen will momentarily turn gray Note The BHT is equipped with a back up battery...

Страница 28: ...harging is commenced lete c 2 Connect the power cable to the CH 201A and connect the plug to a 3 The LED will turn OFF when charging is comp Point Charging takes approximately 3 hours An only slightly...

Страница 29: ...battery cover tab 1 and then close the battery cover 2 The battery cover is now locked in osition d to back up the internal memory and calendar when charging is co ced Do not remove the BHT from the c...

Страница 30: ...eration blowout or combustion Please read the following item prior to use Terminate charging if not completed even after the specified time has elapsed Note The BHT is equipped with a back up battery...

Страница 31: ...is recommended The battery power is almost depleted Charge the battery immediately The battery power is totally depleted Charge immediately or replace with a fully charged battery ca ming at the Batte...

Страница 32: ...tach the hand strap to the BHT as shown below 2 3 2 Holding the BHT Wear the hand strap at your wrist and hold the BHT as shown below or the hand strap around your wrist to prevent the BHT from being...

Страница 33: ...keys Ex April 5 2009 14 20 Point Enter the last two digits for the year and enter the time in 24 hour clock format 3 The screen to the right displays when the date and time are set 4 Press numeric key...

Страница 34: ...turns OFF after the message on the screen g message on the right is displayed Otherwise a message reques 2 ata Back up 1 old down the Power key 5 2 Turning the Power OFF after D H for at least 3 secon...

Страница 35: ...y shut down refers to 2 5 Turning OFF the Power message will appear when cartridge and turn the BHT on 2 Next the tes right In some instan y take up to 20 to 30 seconds When complete the system starts...

Страница 36: ...cally runs the execution program from the beginning Point The resume function is used to return the display to the status screen where the power was last turned OFF when the power is next turned ON Re...

Страница 37: ...0 to 1200 is lost x T 00250 00275 AMPLE3 DAT 00100 00150 2 5 5 If Broken Files Are Found ven broken files can be uploaded so upload them to the host computer according to your needs fter uploading Del...

Страница 38: ...ading numerical data entry and item selection using the BHT basic changes to settings and BHT data transmission 3 1 Reading Barcodes 26 3 2 Numeric Data Entry 28 3 3 Task Selection 28 3 4 Changing the...

Страница 39: ...uccessfully the indicator LED will illuminate in blue Point The barcode reading method may differ depending on the application Select the most appropriate option in accordance with the User s Manual N...

Страница 40: ...t lamp ITF conforming to the UPC Shipping Container Code PCS value 0 9 or more Minimum narrow bar width 1 2 mm min Barcode surface curvature The barcode may not be read if its surface is extremely cur...

Страница 41: ...eys 1 2 and 0 followed by the Enter key 3 3 Task Selection If a selection item such as 1 XXX 2 XXX with numeric values displays enter the values with the numeric entry keys and then press the Enter ke...

Страница 42: ...he vibrator that notifies the user when barcode reading is complete ON OFF BRIGHTNESS Used to set the backlight brightness of the LCD display The brightness can be adjusted in 5 levels Levels 1 to 5 B...

Страница 43: ...he item to be changed The selected item is highlighted 3 Use the and cursor keys to select the setting 4 Press any of the following keys to exit the settings screen M1 key long press Backspace clear k...

Страница 44: ...method and BHT setting method will differ depending on the system used and therefore the system administrator should be contacted for details of operation Request Data gathered by the BHT should be pr...

Страница 45: ...nication failure Perform communication in locations where the BHT units will not be exposed to light interference from sources such as intense ambient lighting inverter driven fluorescent lighting in...

Страница 46: ...0 4 3 4 Executing by Wake up 42 4 3 5 Executing by Remote Wake up 42 4 4 System Mode 43 4 4 1 Starting Up System Mode 43 4 4 2 System Mode Basic Operation 44 4 4 3 SYSTEM MENU Configuration 46 4 5 SYS...

Страница 47: ...ge displays on the screen when the BHT is turned on Point By initializing the system all files in the user area are deleted and therefore all files that need to be backed up should be uploaded to the...

Страница 48: ...ory Area Selected for Initialization 2 To delete font files Press the 2 key while holding down the SF key The screen displays as shown on the right Next press the 2 key select 2 WHOLE USER AREA and pr...

Страница 49: ...iles from deletion When the screen displays as shown on the right select the item and press the ENT key Press the BS C key to return to the screen to select the area for initialization 1 Yes The syste...

Страница 50: ...ministrator Note the error number XXXX message displays even although initialization has been completed initialize the BHT again Following initialization all programs and data files stored in the targ...

Страница 51: ...www denso wave com en BHT System Update Refer to section 4 5 16 Updating the System MODIFY MENU and update the BHT system Important In order to prevent the battery running low during the system update...

Страница 52: ...wing Web site http www denso wave com en CU 811 System Update Refer to section 4 5 16 Updating the System MODIFY MENU and update the CU 811 system The CU 811 LED flashes during CU 811 system update Im...

Страница 53: ...no program has been selected at the SYSTEM MENU EXECUTE PROGRAM menu and the BHT power is turned ON control will switch to the directory management program and the first of the programs PD4 registere...

Страница 54: ...ion In the above case the registration order does not change and therefore MAIN PD4 starts up by pressing the Power key MAIN PD4 Upgrade ver SUBMAIN PD4 Upgrade ver Download AAAAAAAA DAT BBBBBBBB DAT...

Страница 55: ...executed If an auto start execution program has been selected at the System Mode 4 5 6 1 Setting the auto start execution program the selected program will be executed If no auto start execution prog...

Страница 56: ...oad Remote wake up setting System message file download upload System update Refer to each item at the 4 5 SYSTEM MENU for details of the above operations 4 4 1 Starting Up System Mode Use the followi...

Страница 57: ...ghted SETUP will be highlighted when System Mode is started up 2 Press the ENT key The selected item is set and the next screen displays Press the BS C key to return to the previous screen The selecte...

Страница 58: ...corresponding to the item to be selected Alternatively press the cursor keys to select the item The selected item will be highlighted 2 Select the setting value with the cursor keys 3 Press the ENT ke...

Страница 59: ...Select the item with the numerical keys or cursor keys and press the ENT key SYSTEM MENU 2 and ENT keys 1 and ENT keys 0 and ENT keys Setup Menu Refer to section 4 5 1 Setup BS C key Executing Progra...

Страница 60: ...T keys System Environment Setting Refer to section 4 5 6 System Environment Setting BS C key Testing Refer to section 4 5 7 BHT Operation Test System Information Display Refer to section 4 5 8 System...

Страница 61: ...M MENU 0 with SF held down 2 with SF held down 3 with SF held down Deleting Program Data Files Refer to section 4 5 11 Deleting Program Data Files BS C key Deleting Font Files Refer to section 4 5 12...

Страница 62: ...F held down Setting Remote Wake up Refer to section 4 5 14 Setting Remote Wake up BS C key Downloading Uploading the System Message File Refer to section 4 5 15 Downloading Uploading System the Messag...

Страница 63: ...Available File Copy Clone Files in both the receiving and transmitting devices are identical Default Available Not Available General system setting values excluding the items below Available Availabl...

Страница 64: ...equential numbers but date settings can be performed as well Ex The function differentiates between 1 and 000001 2 SOFTWAVE TO CLONE OS YES There are also OS settings and additional files but the afor...

Страница 65: ...ENT on the transmitting device Data 15 cm or less Slave Side Test Use Master Side The data transmission progress status is shown as per the screens below Data transmission complete When flashing data...

Страница 66: ...ill not be copied N Suspend processing OS update not possible when HT HT copy mode esignations and initialization are required d OS cannot be updated Cloning will be stopped Number of files exceeded T...

Страница 67: ...n to the SYSTEM MENU 2 Use the cursor keys to select the target program The selected program will be highlighted Use the key to scroll down when more than 18 programs have been downloaded to the user...

Страница 68: ...download order Refer to 4 3 Executing User Programs for details Use the following procedure to download files 1 Select 2 DOWNLOAD at the SYSTEM MENU and then press the ENT key The screen displays as...

Страница 69: ...e BHT BASIC 4 0 Transfer Utility or similar program the screen displays as shown on the right and file downloading is commenced Refer to the BHT BASIC 4 0 Transfer Utility User s Guide 4 The screen di...

Страница 70: ...eived file size equals the total file size Press the BS C key to return to the DOWNLOAD menu With this screen displayed on the BHT downloading another new file from the host computer allows the BHT to...

Страница 71: ...mmunication protocol type Communication protocol type Ymodem BHT Ir BHTp Ymodem protocol BHT Ir protocol BHT protocol Interface used Opt IrDA interface Transmit speed 9600 to 460800 Transmission speed...

Страница 72: ...screen displays as shown on the right if no files that can be uploaded exist in the user area Press the BS C key to return to the UPLOAD menu 3 The screen displays as shown on the right indicating tha...

Страница 73: ...sent file size the total file size units KB displays Press the BS C key to abort the download process and return to the UPLOAD menu 6 When uploading is complete the speaker sounds once and the screen...

Страница 74: ...are facing one another 4 Select 2 DOWNLOAD 2 HT HT COPY at the SYSTEM MENU of the BHT that is downloading to await downloading Refer to 4 5 3 Downloading Files DOWNLOAD Menu for details When copying...

Страница 75: ...ts to be read for ITF Minimum number of digits to be read for STF Minimum number of digits to be read for Codabar NW 7 Interface port to be used in user programs Interface port to be used in System Mo...

Страница 76: ...f echo request Echo request intervals Timeout period for echo request No of echo requests to be sent Echo request send timing TCP IP operation device TCP IP link layer Transmission speed between BHT a...

Страница 77: ...ditions black white inverted label reading function and decode label and minimum number of read digits for read codes ITF STF Codabar 5 COMMUNICATION Sets the communication environment interface port...

Страница 78: ...n on the right displays The highlighted program will be the program currently set as the auto start execution program 2 Use the cursor keys to highlight the target program 3 Press the ENT key The sele...

Страница 79: ...ating to the LCD contrast Speaker volume Switching between speaker and vibrator Battery voltage level screens 2 STATUS Sets whether to display or hide the system status displayed at the bottom of the...

Страница 80: ...screen display OFF Prohibits menu screen display 2 COMPATIBLE MODE Sets compatible mode for screen display with the BHT 100 BHT 300 or BHT 7500 This allows BHT 100 Series BHT 300 Series or BHT 7500 Se...

Страница 81: ...ots 26 x 26 char 9 x 12 dots 20 x 26 char 12 x 12 dots 20 x 20 char 12 x 16 dots Standard font 8 x 8 char 28 x 40 dots 10 x 13 char 24 x 24 dots 15 x 20 char 16 x 16 dots 8 x 10 char 30 x 30 dots Smal...

Страница 82: ...meric entry mode to alphabet entry mode Displays when a communication link is established with the CU 811 Flashes when the BHT tries to communicate with a CU 811 that has not been linked with the BHT...

Страница 83: ...ON Enables black white inverted label reading OFF Disables black white inverted label reading Point By enabling black white inverted label reading it will also be possible to read black white inverted...

Страница 84: ...digits when reading or incorrectly reading depending on how barcodes are read or the quality of barcodes On the other hand setting a large number will decrease the possibility of such errors 5 Setting...

Страница 85: ...key to return to the SYSTEM MENU 1 OPTICAL IrDA communication parameters 1 Select 1 OPTICAL at the SET COMMUNICATION menu and then press the ENT key The SET OPTICAL menu screen on the right displays 2...

Страница 86: ...imeout length in seconds to be applied when a link is to be established 4 FIELD SPACE Specifies handling for trailing spaces in fields To trim trailing spaces in fields select Ignore and to retain the...

Страница 87: ...ment in BHT BASIC 2 BHT Protocol Selects the BHT protocol when uploading downloading in System Mode or for the execution of the XFILE statement in BHT BASIC 3 BHT Ir Protocol Selects the BHT Ir protoc...

Страница 88: ...nsfer None should normally be selected To add the BHT ID number to the transfer tool select Add This setting is not supported Changing this setting has no result 4 INTERVAL Specifies the retry interva...

Страница 89: ...eed to edit the current setting press the ENT key only Point ID numbers should consist of a five digit decimal character string The entry range is from 00001 to 65534 If the entry value is less than f...

Страница 90: ...h key definition screen 6 BS C KEY Displays the BS C key definition screen 7 MENU KEY Displays the M1 M4 key menu definition screen Refer to the following section for details of the above items Press...

Страница 91: ...rn to the SET KEY menu Magic keys M1 to M4 Magic keys M1 to M4 can be set to function as the trigger switch SF key ENT key backlight function ON OFF key MENU key or BS C key If the M1 key is defined a...

Страница 92: ...ttings 4 Enter the desired numeric values Numeric values can be entered between 1 and 255 x 100 ms 5 Press the ENT key Defining the MENU key setting The M1 to M4 keys can be set as menu keys When M1 t...

Страница 93: ...he above items Press the BS C key to return to the SET SYSTEM menu 1 SET TCP IP Setting the TCP IP 1 Select 1 SET TCP IP at the SET TCP IP menu and then press the ENT key The SET TCP IP menu screen on...

Страница 94: ...key If the IP address subnet mask and default gateway are all set to 0 0 0 0 DHCP is enabled Press the BS C key to return to the SET TCP IP menu 3 TIMEOUT Setting the timeout only when COM1 selected S...

Страница 95: ...AULT DIR Specifies an initial directory through which the FTP server will search for files for transfer first when the FTP client establishes a connection to the server To change the setting 1 Use the...

Страница 96: ...iles will be written over the existing files Append Uploaded files will be appended to the existing files 5 VERBOSE MODE Specifies the command response display when using FTP ON Displays a message to...

Страница 97: ...0 0 0 the DHCP does not display on the screen shown on the right BS C key SF key key 1 TIMEOUT Sets the timeout for acquiring the IP configuration from the DHCP server The entry range is from 00001 to...

Страница 98: ...unction Point When the power is turned ON the resume function starts the BHT from the position in the program screen where the BHT power was last turned OFF 9 defragging the drive Use the following pr...

Страница 99: ...ghlighted setting will be the current setting 1 TRANSPORT Selects the communication path for communicating with the BHT Manager 2 REMOTE WAKEUP Sets the PRC remote wakeup 3 SCHEDULED WAKEUP Sets the s...

Страница 100: ...ng explains only the operation of this menu and an outline of the settings 1 Select 3 OPERATION LOG from the SET SYSTEM Menu 2 2 and then press the ENT key The OPERATION LOG settings menu will display...

Страница 101: ...t 3 BEEPER Selects the speaker scale test 4 AGING Selects the aging test 5 LCD Selects the LCD and indicator LED tests 6 FILE Checks the file information 7 COMMUNICATION Selects the communication test...

Страница 102: ...e Barcode type 3 The read barcode type number of digits and data display at the screen Ensure that the barcode data and screen display match Press the BS C key to return to the TEST menu Barcode Type...

Страница 103: ...eading test options to be set Details of option settings are as follows 1 Add on ON OFF The highlighted settings will be the current settings 1 Add on Enables disables add ons 1 Enabling disabling Add...

Страница 104: ...RAM capacity unit kilobytes YYYYY Total RAM capacity unit kilobytes If any error is detected the BHT speaker beeps three times displays a message similar to that shown on the right and aborts the mem...

Страница 105: ...e Frequency Hz do 523 1046 2093 4186 re 587 1174 2349 mi 659 1318 2637 fa 698 1396 2793 sol 783 1567 3135 la 880 1760 3520 ti 987 1975 3951 4 Aging test Use the following procedure to perform an aging...

Страница 106: ...to return to the TEST menu 2 Press the ENT key The entire screen turns black and the indicator LED illuminates in green Press the BS C key to return to the previous screen Press and hold the BS C key...

Страница 107: ...Press the ENT key The entire screen turns an even lighter shade of gray Press the BS C key to return to the previous screen Press and hold the BS C key or press the SF key and BS C key simultaneously...

Страница 108: ...The entire screen turns green and at the same time the indicator LED turns green Press the BS C key to return to the previous screen Press and hold the BS C key or press the SF key and BS C key simul...

Страница 109: ...round the screen Press the BS C key to return to the previous screen Press and hold the BS C key or press the SF key and BS C key simultaneously to return to the TEST menu 11 Press the ENT key The spe...

Страница 110: ...rted each time the M1 key is pressed TYPE Sorts files by type BROKEN Displays broken files in descending order BASIC Displays files in the following order B BASIC files C C data files None Shared file...

Страница 111: ...the right will appear displaying the file size and creation date 2 Press the F1 key to play the file Press the F1 key while the file is playing to stop the file and return to the previous screen Use t...

Страница 112: ...tion date and a preview image 2 Press the F1 key to display the image in full screen If the actual image is larger than the screen the image will be displayed at the actual size centered on the top le...

Страница 113: ...ENT key Press the BS C key to return to the previous screen BASIC User Program PD3 PD4 1 Use the cursor keys to select a PD3 PD4 file and then press the ENT key Press the BS C key to return to the pr...

Страница 114: ...e F1 key to display the next screen To return to the previous screen press the F1 key again or press the BS C key In addition when there are four or more fields MORE FIELD LEN and a If field informati...

Страница 115: ...ess the BS C key to return to the TEST menu IrDA Communication Test 1 Arrange two BHTs one as a master station and the other as a slave station to be tested with their IrDA interface ports facing each...

Страница 116: ...are as follows X X 1 The received data is different from the sent data 2 A timeout has occurred during standby for data reception 1 9600 bps 2 115200 bps 3 460800 bps Press the BS C key to return to t...

Страница 117: ...ndividual keys displays the identifier letters in the positions pre assigned to those keys on the LCD as well as sounding the speaker or activating the vibrator As long as the individual key is held d...

Страница 118: ...key to return to the TEST menu 1 RUN PING PING Test Screen 1 Select 1 RUN PING at the TEST PING menu and then press the ENT key The current setting values display and the BHT waits for the transmissi...

Страница 119: ...BHT IP address during the PING test only Messages displayed during PING test displayed in center of screen Waiting Setting up the PING test Opening device Opening devices Routing TCP IP Connecting to...

Страница 120: ...o be set and then press the ENT key The mode changes to entry mode and the cursor displays Use the cursor keys to highlight the 6 SEND TYPE setting 3 Enter the setting values with the numerical keys a...

Страница 121: ...erval Timeout period Receives an echo reply Sends an echo request TYPE2 After sending an echo request PING waits for an echo reply to be received or for a timeout to occur Following that PING waits fo...

Страница 122: ...VICE PING Device Setting Screen 1 Select 3 SET DEVICE at the TEST PING menu and then press the ENT key The TCP IP communication device link layer and transmission speed display Press the BS C key to r...

Страница 123: ...and version Press the BS C key to return to the SYSTEM MENU License List Press the F1 key at the LICENCE INFORMATION screen to display a license list as shown on the right The license list displays th...

Страница 124: ...red 1 Use the cursor keys to highlight the name of a function that has not been registered and then press the ENT key to display the license registration screen shown on the right PRODUCT ID Product I...

Страница 125: ...ey The SYSTEM INFORMATION screen on the right displays 3 Press the M2 key The CU 811 INFORMATION screen displays SYSTEM Ver System program information MAC ADDRESS MAC address Press the M1 key to retur...

Страница 126: ...ails of the above items Press the BS C key to return to the SYSTEM MENU 1 Downloading by FTP 1 Select 1 DOWNLOAD at the FTP MENU and then press the ENT key The screen displays as shown on the right 1...

Страница 127: ...the FTP MENU screen DIR FILE entry box The FTP client will interpret a character string entered into this box as a directory name at first and will therefore send a Change Directory request to the FT...

Страница 128: ...ous screen 2 Use the cursor keys to highlight the item to be set and then press the ENT key When 1 DIR FILE is Selected The mode changes to entry mode and the cursor displays allowing directory and fi...

Страница 129: ...ied in the DIR FILE entry box the FTP client will upload with the file name specified in the DIR FILE entry box If the ENT key is pressed without entering a character string in the DIR FILE entry box...

Страница 130: ...during execution of an FTP command FTP opened Connection has been established by FTP Illegal text format The format of the received text is illegal Opening device Opening a device Out of memory The m...

Страница 131: ...connection 227 Entering Passive Mode 230 User logged in Proceed 250 Requested file process completed normally 257 PATHNAME created 331 User name okay Password required 332 Login account required 350...

Страница 132: ...light the program to be deleted 3 Press the ENT key The screen displays as shown on the right To delete files Use the cursor keys or numerical key 1 to highlight 1 Yes and then press the ENT key The s...

Страница 133: ...that are not used can be deleted When deleting font files upload the font files to the host computer and so on to ensure that they are backed up Refer to section 4 5 4 Uploading Files UPLOAD Menu for...

Страница 134: ...eted and the screen displays as shown on the right Press the BS C key to return to the DELETE FILE menu To cancel Use the cursor keys or numerical key 2 to highlight 2 No and then press the ENT key Th...

Страница 135: ...ter file based on the current setting values and upload it to the host computer and so on After uploading delete the created system parameter file Downloading the System Parameter File Receive the sys...

Страница 136: ...s as shown on the right indicating the file name and the number of received records the total number of records Press the BS C key to abort the download and return to the SYSTEM PARAMETER menu 3 Upon...

Страница 137: ...hown on the right indicating the file name and the number of sent records the total number of records Press the BS C key to abort the upload and return to the SYSTEM PARAMETER menu 3 Upon completion o...

Страница 138: ...SET REMOTE WAKEUP menu displays as shown on the right 1 REMOTE WAKEUP Enables or disables remote wake up 2 TRANSMIT SPEED Sets the transmission speed for remote wake up Press the BS C key to return t...

Страница 139: ...essage file from the host computer and so on to which it was backed up and after setting the stored system messages delete the received system message file The communication parameters communication p...

Страница 140: ...eturn to the SYSTEM MESSAGE menu 3 Upon completion of downloading the BHT displays the screen shown on the right and the speaker beeps once Press the BS C key to return to the SYSTEM PARAMETER menu Th...

Страница 141: ...he SYSTEM MESSAGE menu 3 Upon completion of uploading the BHT displays the screen shown on the right and the sepaker beeps once Press the BS C key to return to the SYSTEM PARAMETER menu The speaker so...

Страница 142: ...section 4 2 1 Updating the BHT System for details 1 Use the cursor keys or numerical key 1 to highlight 1 SYSTEM MODIFY and then press the ENT key The screen displays as shown on the right If the down...

Страница 143: ...enter the correct file name Press the SF key to change the entry mode numerical entry no guidance display and alphabet entry To delete a single character press the BS C key To delete the entire entry...

Страница 144: ...he right upon completion of the update Press the BS C key to return to the CU F W MODIFY menu When the Displayed File Name Differs from the CU 811 System Update File If the name of the file displayed...

Страница 145: ...u If the BHT Has not been Set on the CU 811 when Updating the CU 811 System The screen displays as shown on the right if the BHT has not been set on the CU 811 when updating the CU 811 system Set the...

Страница 146: ...cation functions with which the BHT is equipped 5 1 IrDA Communication 134 5 1 1 IrDA Communication Port Transmission Speed 135 5 1 2 BHT Hardware Physical Layer and Communication Protocols 135 5 2 Ba...

Страница 147: ...speed Freedom from regulations and licenses that differ from country to country when using wireless devices Communication is performed by arranging the BHT and other IrDA compliant devices with their...

Страница 148: ...HT Hardware Physical Layer and Communication Protocols BHT Hardware Physical Layer Exclude Transmission Speed 460 8 kbps The BHT complies with IrDA Ver1 3 Low Power physical layer compliant by IrDA In...

Страница 149: ...on is an asynchronous system that synchronizes each character as a unit that is it externally adds start and stop bits to the leading and trailing bit positions of the character to be transmitted resp...

Страница 150: ...or the start and stop bits Vertical Parity A vertical parity bit is a redundant bit that is added to every character transmitted in order to check that data has been transmitted accurately The parity...

Страница 151: ...ible when communicating from one BHT 805B unit to another or with the CU 821 Note2 4 Mbps is only possible for communication with the dedicated CU 811 unit System Mode Refer to Chapter 4 System Operat...

Страница 152: ...taking care of the BHT and CU CH 6 1 Replacing the Battery Cartridge 140 6 1 1 Battery Cartridge Service Life 140 6 1 2 Battery Cartridge Replacement Method 140 6 2 Using the BHT after Long Periods 1...

Страница 153: ...h a new one 6 1 2 Battery Cartridge Replacement Method 1 Press the power key to turn OFF the BHT The screen displays as shown on the right Point Do not remove the battery cartridge until the power tur...

Страница 154: ...read the following items prior to use Never charge the battery cartridge in the vicinity of fire or under a scorching sun Always use a dedicated charger to charge the battery cartridge Mishandling ma...

Страница 155: ...efore should not be removed from the BHT for at least 10 minutes Does the normal screen display The Set the current date and time screen displays The Contact your administrator screen displays The BHT...

Страница 156: ...water always use neutral detergent and wrung out thoroughly Any dirt or dust adhering to the red clear plate of the barcode reading window will adversely affect reading performance When using in dusty...

Страница 157: ...BHT 805B 144...

Страница 158: ...BHT 805B Chapter 7 Error Messages This chapter describes causes and countermeasures for error messages that display during BHT use 7 1 System Errors 146 7 2 System Mode Errors 150...

Страница 159: ...as occurred Contact your system administrator If low battery is detected the warning tone beeps three times After that it will resume previous regular operation The battery output level has dropped be...

Страница 160: ...function set and therefore resume info has been lost The application restarts from the beginning If this error occurs frequently contact your system administrator The message continues to display Afte...

Страница 161: ...1 Yes runs the code scanning demo Press the trigger switch to start the code scanning demo Selecting 2 No turns the power off If this error occurs the warning tone beeps five times and then turns itse...

Страница 162: ...ogram loaded Your settings made in System Mode contain an error Contact your system administrator If this error occurs the System Mode settings revert to the factory defaults If this error occurs the...

Страница 163: ...y is insufficient for storing files to be downloaded Press the 2 key to return to the SYSTEM MENU then delete unnecessary files in the memory or decrease the size of the file to be downloaded In the S...

Страница 164: ...failed Uploading has failed To retry downloading uploading press the 1 key To return to the SYSTEM MENU press the 2 key Check the interface port communications parameters and communications protocol...

Страница 165: ...e or system message file to be uploaded Press the BS C key to return to the SYSTEM MENU and delete unnecessary files The memory already contains 420 files so the BHT system parameter file or system me...

Страница 166: ...fications This chapter describes the BHT 805B specifications 8 1 BHT 805B Specifications 154 8 1 1 Hardware Specifications 154 8 1 2 Barcode Specifications 155 8 1 3 Reading Performance 156 8 1 4 Inte...

Страница 167: ...s 4 Function keys 11 Numerical keys etc 12 Display Type Dot matrix TFT liquid crystal display LCD with backlight Formation 240 dots wide by 320 dots high Font size Chars x Lines Dots W x H Full width...

Страница 168: ...white bar reflection intensity difference 0 8 Min 0 19 mm PCS value 0 45 RSS GS1DataBar RSS 14 GS1 DataBar Omnidirectional RSS 14 Truncated GS1 DataBar Truncated RSS 14 Stacked GS1 DataBar Stacked RS...

Страница 169: ...m 600mm 660mm 0 100 200 300 400 500 600 700 mm 1 0mm 1 2mm Reading distance Minimum Narrow Bar Width Depth of Field 0 125 mm 0 15 mm 0 33 mm 1 0 mm 1 2 mm 0 H 75 mm 1 0 H 110 mm 2 0 H 240 mm 3 H 570 m...

Страница 170: ...0 Lx Xenon arc lamp ITF conforming to the UPC Shipping Container Code Reflection intensity of white bars 85 min Reflection intensity of black bars 5 max 1 0 magnifications PCS value 0 9 min 4 Under th...

Страница 171: ...Input signals RD Output signals SD Transmission speed 9 600 19 200 38 400 57 600 115 200 460 800 4M bps Note 460 800 bps is only possible when communicating from one BHT 805B unit to another or with...

Страница 172: ...ns and describes causes and countermeasures when unable to transfer files 9 1 CU 800 Specifications 160 9 1 1 Hardware Specifications 160 9 1 2 Charging Requirements CU 801 811 821 160 9 1 3 Interface...

Страница 173: ...VA 7 VA 5V 500 mA Dimensions W x L x H 110 x 134 x 81 7 mm Weight 105 g 110 g 100 g Ambient operating temperature 0 to 40 C Ambient operating humidity 20 to 80 with no dew condensation The CU 821 can...

Страница 174: ...9P Pin No Sign e CU 801 E rnal Device r uses Ds al Nam Function Signal Direction xte 2 RD Receipt data 3 SD Transmission data 4 ER Data terminal ready t 8 CS Transmission ready 5 SG Signal ground 6 DR...

Страница 175: ...ce Port RJ45 jack on the CU 811 Pin No Signal Functions 1 TD Send data 2 TD Send data 3 RD Receive data 4 N C No connection 5 N C No connection 6 RD Receive data 7 N C No connection 8 N C No connectio...

Страница 176: ...ion speed with the DIP switch on the reverse side of the CU Defect or abnormality with the USB cable between the PC and CU Use a properly functioning USB cable Unstable signal wire due to such reasons...

Страница 177: ...ble to download a file with the same name but different field width from the file already existing in the BHT Either delete the existing data file in the BHT or specify the same field format as the ex...

Страница 178: ...tomer Registration is required to use QBdirect free of charge When using for the first time complete Customer Registration and then refer to the following procedure to use QBdirect Refer to Customer R...

Страница 179: ...Barcode Handy Terminal BHT 805B User s Manual First Edition August 2009 DENSO WAVE INCORPORATED...

Отзывы: