background image

11

GUI Menu Map

Set
up

Inf
or

mation

Tr

oubleshooting

ENGLISH

1


Press and hold 

[SEARCH]

 to set the Remote mode.

 “Remote  iPod”  is  displayed  on  the  AVR-4308  /  AVR-3808’s 
display.

2


Watching  the  iPod’s  screen,  use 

ui

  to  select 

“Photos” or “Videos”.

3


Press 

ENTER

  until  the  image  you  want  to  view  is 

displayed.

• “TV  Out”  at  the  iPod’s  “Slideshow  Settings”  or  “Video  Settings” 

must be set to “On” in order to display the iPod’s photo data or videos 
on the monitor. For details, see the iPod’s operating instructions.

•  When  unable  to  operate  by  the  remote  control  unit,  use  the  iPod 

unit. 

Viewing Still Pictures or Videos  

(Remote mode)

Photo and video data on the iPod can be viewed on the monitor. 
(Only for iPod equipped with slideshow or video functions.)

Playback

Other Operations and Functions

3

-

065

015*$"-

065

"6%*0

"6%*0

R

L

R

L

065

)%.*

*/

)%.*

Convenient Functions

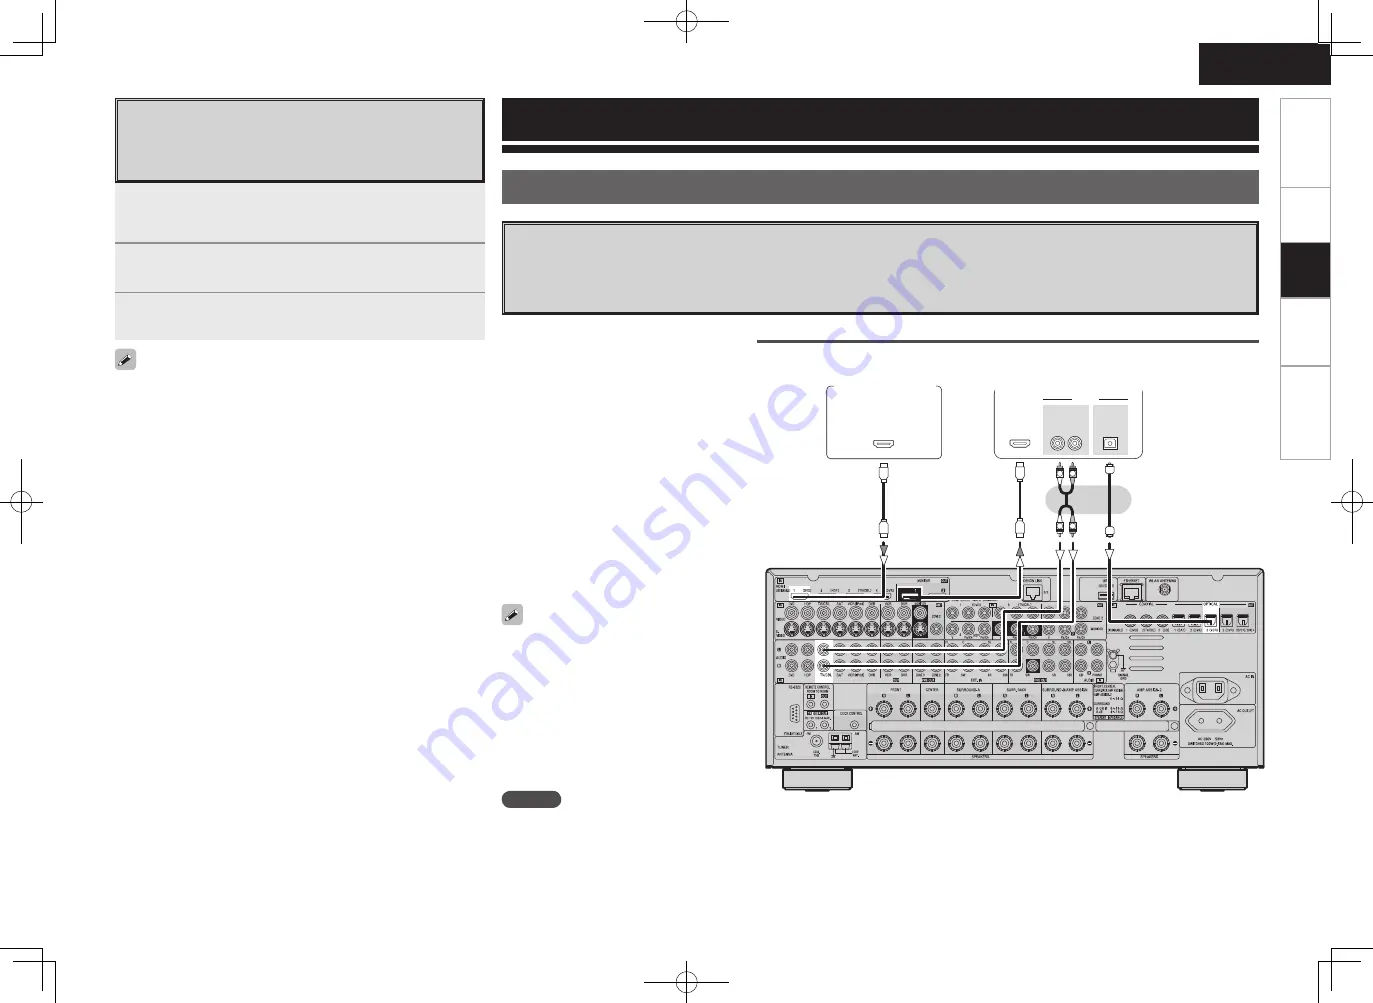
HDMI Control Function

When  AVR-4308  /  AVR-3808  is  connected  to  a  TV  and  player  compatible  with  HDMI  control  function,  you  can  perform  the  following 
operations.
Settings other than AVR-4308 / AVR-3808 settings must be made on the respective devices. (Check the operating instructions of each 
device for details.)

NOTE

• When using the HDMI control function, you can not assign HDMI input to “TV/CBL” by setting “Source Select” – “(input source)” – “Assign” 

– “HDMI” in the GUI menu.

 If you set “Control” to "ON", the “HDMI” and “Digital” assignment in “Source Select” – “Assign” (

v

page 6, 7) under the GUI menu 

changes. 

 When “HDMI Control” is set to “ON”, the digital input connector assigned to ”TV/CBL” changes to “Optical3”.

•  When you want to listen to TV audio by AVR-

4308  /  AVR-3808,  connect  optical  digital  or 
analog. 

   If the TV you are using has both connection 

jacks, use the optical digital connection. 

•  When using these functions set as follows: 

GUI menu “Manual Setup” – “HDMI Setup” 
– “HDMI Control” – “Control” set to “ON“ 
(

v

page 5).

• 

AVR-4308 / AVR-3808 power off can be linked 
to the TV power off step.


When you set “Output audio from amp” in 
the TV audio output setup operation, you can 
switch the amp power on.

• 

You can switch audio output devices with a 
TV operation.


(When  outputting  from  the  TV  speakers, 
output switches from speakers connected to 
AVR-4308 / AVR-3808.)

• 

You can adjust AVR-4308 / AVR-3808 volume 
in the TV volume adjustment operation.

• 

You  can  switch  AVR-4308  /  AVR-3808 
functions through linkage to TV input function 
switching.

• 

When playing the player, the AVR-4308 / AVR-
3808 input function switches to the function 
of that player.

Connections

Player compatible 

with HDMI 

control function

Television compatible with 

HDMI control function

<Illustration : AVR-4308>

AVR4308ACI-3808ACI_E2A_2nd.indd   11

2008/08/25   10:13:41

Содержание AVR-3808

Страница 1: ...ed functions only The additional and changed functions are items indicated by in the GUI Menu Map GUI Menu Map AVR 4308 vpage 3 AVR 3808 vpage 4 NOTE Where the GAdditional functions editionH and GThe...

Страница 2: ...he unit comply with local rules or regulations Batteries should never be thrown away or incinerated but disposed of in accordance with the local regulations concerning battery disposal This product an...

Страница 3: ...Crossover Check EQ Check Restore n Network Setup Network Setup Other Power Saving Character PC Language Network Information n Zone Setup ZONE2 ZONE3 Bass Treble HPF Lch Level Rch Level Channel Volume...

Страница 4: ...EQ Check Restore n Network Setup Network Setup Other Power Saving Character PC Language Network Information n Zone Setup ZONE2 ZONE3 Bass Treble HPF Lch Level Rch Level Channel Volume Level Volume Lim...

Страница 5: ...ach connected device to check the settings NOTE When the Control setting has been changed always turn off the power to the connecting devices afterwards and then turn back on The HDMI control function...

Страница 6: ...VD HDP TV CBL SAT VCR DVR V AUX Default setting HDMI1 HDMI2 HDMI3 None None HDMI4 None Input source DVD HDP TV CBL SAT VCR DVR V AUX Default setting HDMI1 HDMI2 None HDMI3 None HDMI4 None When HDMI Co...

Страница 7: ...MTRX z3 ES DSCRT z4 DSCRT ON OFF z1 This can be selected when Surround Back is set to 2spkrs at the GUI menu Manual Setup Speaker Setup Speaker Con guration setting z2 This can be selected when Surro...

Страница 8: ...uto Setup and after running Auto Setup if the number of speakers has increased or you pressed PARA Run Audyssey is displayed In this case either perform Auto Setup or return to the setting after runni...

Страница 9: ...pyright legislation 1Make the necessary preparations qSet the iPod in the DENON Control Dock for iPod vSee the Control Dock for iPod s operating instructions wAssign the Control Dock for iPod s input...

Страница 10: ...nning of a track During playback either press u to cue to the previous track or i to cue to the next track or press 8 or 9 n To stop During playback either press and hold ENTER or press 2 n Playing re...

Страница 11: ...MI input to TV CBL by setting Source Select input source Assign HDMI in the GUI menu If you set Control to ON the HDMI and Digital assignment in Source Select Assign vpage 6 7 under the GUI menu chang...

Страница 12: ...R 4308 AVR 3808 5Switch the AVR 4308 AVR 3808 input to the HDMI input source and check if the picture from the player is ok 6Put the television power on standby and check if the AVR 4308 AVR 3808 goes...

Страница 13: ...response tonal balance surround impression and dialog clarity remain the same Manufactured under license from Audyssey Laboratories U S and foreign patents pending Audyssey MultEQ XT is a registered...

Страница 14: ...AVR4308ACI 3808ACI_E2A_2nd indd 14 2008 08 25 10 13 43...

Страница 15: ...AVR4308ACI 3808ACI_E2A_2nd indd 15 2008 08 25 10 13 43...

Страница 16: ...Denon Brand Company D M Holdings Inc Printed in Japan 5411 10157 007D www denon com AVR4308ACI 3808ACI_E2A_2nd indd 16 2008 08 25 10 13 44...

Отзывы: