background image

41

Chapter 6    Installation and Wiring

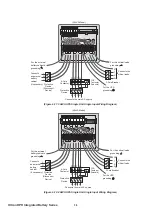
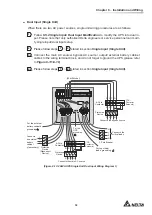
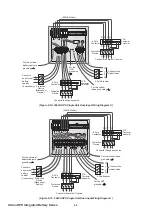
(Figure 6-16: 30kVA UPS Single Unit Dual Input Wiring Diagram II )

240V DC

240V DC

+

N

-

R

 AC  INPUT

S

T

N

UPS 

OUTPUT

R

S

T

N

BATTERY INPUT

BYPASS  BREAKER

 INPUT BREAKER

R

S

T

N

R

S

T

N

I

O

ON

OFF

I

O

ON

OFF

I

O

ON

OFF

I

O

ON

OFF

I

O

ON

OFF

I

O

ON

OFF

I

O

ON

OFF

I

O

ON

OFF

(30kVA Model)

Connects the main AC source

Protective

Device

4-Pole 

Contactor

R S T N

R S T N

R S T N

CS

(*CS: 
Contactor
Solenoid)

For the critical loads’
grounding

For the external 
battery cabinet’s
grounding

Connects the
critical loads

N

T
S

R

For the UPS
grounding

R S T N

Connects the bypass source

Protective

Device

4-Pole 

Contactor

R S T N

R S T N

CS

(*CS: 
Contactor
Solenoid)

3-Pole Breaker

+

N

-

Protective

Device

(Disconnect

Device)

Connects
an external 
battery 
cabinet
(if necessary)

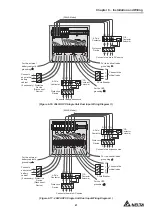
(Figure 6-17: 40kVA UPS Single Unit Dual Input Wiring Diagram I )

I

O

ON

OFF

I

O

ON

OFF

I

O

ON

OFF

I

O

ON

OFF

I

O

ON

OFF

I

O

ON

OFF

I

O

ON

OFF

I

O

ON

OFF

240V DC

240V DC

+

N

-

R

 AC  INPUT

S

T

N

UPS 

OUTPUT

R

S

T

N

INPUT BREAKER

S  

T  

N  

BYPASS  BREAKER

R S 

 T 

 N  

BATTERY INPUT

(40kVA Model)

Connects the bypass source

Protective

Device

4-Pole 

Contactor

R S T N

R S T N

R S T N

CS

(*CS: 
Contactor
Solenoid)

For the critical loads’
grounding

For the external 
battery cabinet’s
grounding

Connects the
critical loads

N

T
S

R

For the UPS
grounding

R S T N

Connects the main AC source

Protective

Device

4-Pole 

Contactor

R S T N

R S T N

CS

(*CS: 
Contactor
Solenoid)

3-Pole Breaker

+

N

-

Protective

Device

(Disconnect

Device)

Connects
an external 
battery 
cabinet
(if necessary)

Содержание Ultron GES203HH33A035

Страница 1: ...Delta UPS Ultron Family The power behind competitiveness www deltapowersolutions com HPH Integrated Battery Series Three Phase 20 30 40 kVA User Manual NORM AL BATT ERY BYPA SS FAULT ON OF F ES C...

Страница 2: ...uously improve and develop the product changes may be made to the information in this Manual at any time without obligation to notify any person of such revision or changes Delta will make all possibl...

Страница 3: ...ction 5 2 3 Functions and Features 7 Chapter 3 Appearance and Mechanism 9 3 1 Appearance and Dimensions 9 3 2 Front View 9 3 3 Front View with Door Open 10 3 4 Control Panel 12 3 5 Rear Panel 13 Chapt...

Страница 4: ...ter 7 Operation 49 7 1 Connecting the UPS with the Utility AC Power 49 7 2 Turn on 49 7 3 Turn off 49 Chapter 8 LCD Display and Settings 51 8 1 LCD Display Hierarchy 51 8 3 Parallel Screen 53 8 4 Main...

Страница 5: ...environment this product may cause radio interfer ence in which case the user is required to take adequate measures y The UPS can be used to power computers and associated peripheral devices such as...

Страница 6: ...olyte is harmful to the skin and eyes and may be toxic y y The batteries contain chemical substances that may jeopardize or pollute our environment Please contact the supplier shown on the batteries t...

Страница 7: ...t View with Door Open remove all equipment from the UPS and store the UPS in a dry and well ventilated area at a temperature between 15 C and 40 C Idle batteries must be recharged fully approximately...

Страница 8: ...ng 17 For critical load grounding For external battery cabinet grounding 18 Positive battery terminal 19 Negative battery terminal 1 6 Standard Compliance This product meets the following safety stand...

Страница 9: ...er to your sensitive electronic equipment at all times but also produces greater electric power Q Q X power levels 20kVA 30kVA and 40kVA for your selection 2 2 Package Inspection y External During UP...

Страница 10: ...r Manual 1 PC 1 PC 3 Test Card 1 PC 1 PC 4 Software CD UPSentry 2012 1 PC 1 PC 5 Battery Fuse 3 PCS 6 PCS 6 RS232 Cable 1 PC 1 PC 7 Parallel Cable 1 PC 1 PC 8 Mini card Flat Cable 1 1 PC 1 PC NOTE 1 T...

Страница 11: ...put frequency detection enables operation at 50Hz or 60Hz y You can parallel at maximum four UPS units for N X parallel redundancy capacity expan sion and reliability enhancement y It is convenient to...

Страница 12: ...itions the UPS will transfer to online mode automatically y Automatically detects and shows whether fans are operating normally y The fans have automatic speed regulation function With multi stage con...

Страница 13: ...ce and Dimensions Figure 3 1 20 30 40 kVA UPS Appearance and Dimensions 1400 mm 830 mm 490 mm EPO NORMAL BATTER Y BYPASS FAULT ON OFF ESC 3 2 Front View Figure 3 2 Front View 1 LCD Display Control Pan...

Страница 14: ...gs for more information 2 3 Front Door s Screws Hidden Door Handle To open the UPS s front door please remove the two screws shown in Figure 3 2 A hid den door handle is at the lateral side 3 3 Front...

Страница 15: ...Tray 20 PCS 3 Battery Cable Long Black 20 PCS 4 Battery Cable Short Black 60 PCS 5 Battery Cable Red 20 PCS 2 The internal batteries battery trays and battery cables shown in the table above have for...

Страница 16: ...ating in battery mode and the external batteries are discharging 3 BYPASS This indicates that the UPS is operating in bypass mode 4 FAULT This indicates that the UPS has abnormalities 5 LCD Display Th...

Страница 17: ...N T S R BATTERY INPUT R S T N R S T N I O ON OFF I O ON OFF I O ON OFF I O ON OFF I O ON OFF I O ON OFF I O ON OFF I O ON OFF 1 2 3 4 5 6 7 8 9 10 11 12 13 14 15 16 17 18 19 20 21 Figure 3 7 30kVA Mo...

Страница 18: ...6 7 8 9 10 11 12 13 14 15 16 17 18 19 20 21 2 No Item Description 1 SMART Slot Connects SNMP Relay I O ModBus card For detailed informa tion please refer to Chapter 5 Communication Interfaces 2 MINI...

Страница 19: ...e charger status Please refer to Chapter 5 Communication Interfaces 12 Input Breaker Controls the UPS s main input switch and for safety protection 13 Bypass Breaker Controls the UPS s bypass power sw...

Страница 20: ...mode the NORMAL LED indicator NORMAL illuminates green BYPA MAIN LOAD Batteries Rectifier Inverter Figure 4 1 Path of Electrical Power through the UPS in Online Mode y Standby Mode When the input vol...

Страница 21: ...erter and the NORMAL LED indicator NORMAL illuminates green Figure 4 3 Path of Electrical Power through the UPS in ECO Mode BYPA MAIN LOAD Batteries Rectifier Inverter y Battery Mode When the UPS is o...

Страница 22: ...he alarm beeps once every 0 5 second ON for 0 1 second and OFF for 0 4 second BATTERY CAPACITY 00V 000 Under Long beep SHUT DOWN DUE TO DEPLETED BATTERY y Bypass Mode The critical load is directly sup...

Страница 23: ...the output frequency is set up the system will automatically disable the bypass func tion Please note that once the inverter shuts down there is no bypass output During converter mode the NORMAL LED i...

Страница 24: ...FF I O ON OFF I O ON OFF I O ON OFF I O ON OFF WARNING OPENING THIS COVER PLATE WILL CAUSE INVERTER SHUTDOWN ONLY AUTHORIZED SERVICE PERSONNEL CAN OPEN AND OPERATE IT 1 2 ON WARNING OPENING THIS COVER...

Страница 25: ...munication UPSs at maximum four with the same capacity voltage and frequency can be coupled via the provided parallel cable to run in par allel mode 4 Parallel Switch When you parallel UPSs you need t...

Страница 26: ...1 bit 4 Parity None NOTE Other pins are reserved and cannot be used 6 Output Dry Contacts Figure 5 4 UPS 1 4 2 3 1 4 2 3 1 4 2 3 1 4 2 3 1 4 2 3 1 4 2 3 DRY F_NO DRY E_NO DRY D_NO DRY C_NO DRY B_NO D...

Страница 27: ...2 Default Pin 7 8 5 Bypass input NOK 1 The bypass voltage frequency or phase sequence is ab normal 2 Default Pin 9 10 6 Battery test fail or battery missing 1 In the process of battery test battery vo...

Страница 28: ...s The HPH UPS provides two sets of input dry contacts and they are normally open The default set ting for Pin 1 2 is ROO and the default setting for Pin 3 4 is Generator Power Supply Signal There are...

Страница 29: ...n dis connect the UPS power supply rapidly and shut down the UPS immediately The configuration is shown as follows and it requires external power with a voltage range between 6 12Vdc Figure 5 8 REPO P...

Страница 30: ...l be installed nearby and forklifts For the weight of the UPS please refer to y The installation place must be kept clean and tidy at all times y Ensure that the installation area is big enough for ma...

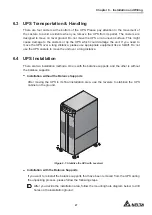
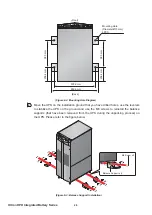
Страница 31: ...t like a forklift Do not use the UPS casters to move the unit over a long distance 6 4 UPS Installation There are two installation methods One is with the balance supports and the other is without the...

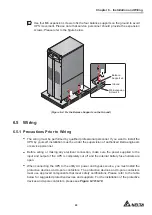
Страница 32: ...m 2 Move the UPS on the installation ground that you have drilled holes use the levelers to stabilize the UPS on the ground and use the M6 screws to reinstall the balance supports that have been remov...

Страница 33: ...on of authorized Delta engineers or service personnel y Before wiring or making any electrical connection make sure the power supplied to the input and output of the UPS is completely cut off and the...

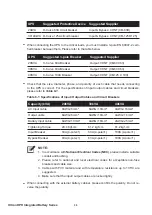
Страница 34: ...each cable that needs connecting please refer to Table 6 1 Capacity kVA 20kVA 30kVA 40kVA AC Input cable 8AWG 6mm 6AWG 10mm 4AWG 16mm Output cable 8AWG 6mm 6AWG 10mm 4AWG 16mm Battery Input cable 6AWG...

Страница 35: ...N and the ground and you require that the VNG of the UPS should be zero we suggest that you install an isolation transformer in front of the input side of the UPS and connect the UPS neutral N with th...

Страница 36: ...HORIZED SERVICE PERSONNEL CAN OPEN AND OPERATE IT MANUAL BYPASS SWITCH P1 P2 P3 P4 P5 P6 P1 P2 SMART SLOT MINI SLOT PARALLEL PARALLEL SWITCH PARALLEL REPO CHARGER DETECTION INPUT DRY CONTACT OUTPUT DR...

Страница 37: ...FF I O ON OFF 20kVA Model Remove the four cables 240V DC 240V DC N R AC INPUT S T N UPS OUTPUT R S T N BATTERY INPUT BYPASS BREAKER INPUT BREAKER R S T N R S T N I O ON OFF I O ON OFF I O ON OFF I O O...

Страница 38: ...OFF I O ON OFF 20kVA Model Remove the four cables 240V DC 240V DC N R AC INPUT S T N UPS OUTPUT R S T N BATTERY INPUT BYPASS BREAKER INPUT BREAKER R S T N R S T N I O ON OFF I O ON OFF I O ON OFF I O...

Страница 39: ...ONLY AUTHORIZED SERVICE PERSONNEL CAN OPEN AND OPERATE IT MANUAL BYPASS SWITCH P1 P2 P3 P4 P5 P6 P1 P2 SMART SLOT MINI SLOT PARALLEL PARALLEL SWITCH PARALLEL REPO CHARGER DETECTION INPUT DRY CONTACT O...

Страница 40: ...tage is 240Vdc 4 J OFF position For the posi tion of each breaker please refer to 3 5 Rear Panel 5 According to the capacity and the model of your UPS select proper input and output cables please refe...

Страница 41: ...O ON OFF I O ON OFF I O ON OFF I O ON OFF I O ON OFF I O ON OFF I O ON OFF I O ON OFF N Protective Device Disconnect Device Connects an external battery cabinet if necessary For the external battery...

Страница 42: ...ntactor Solenoid 3 Pole Breaker N Protective Device Disconnect Device Connects an external battery cabinet if necessary Figure 6 12 40kVA UPS Single Unit Single Input Wiring Diagram I O ON OFF I O ON...

Страница 43: ...tated in section Single Input Single Unit Figure 6 13 20kVA UPS Single Unit Dual Input Wiring Diagram I BYPASS BREAKER INPUT BREAKER UPS OUTPUT N T S R N 240V DC 240V DC AC INPUT N T S R BATTERY INPUT...

Страница 44: ...tive Device 4 Pole Contactor R S T N R S T N CS CS Contactor Solenoid Connects the critical loads N T S R 3 Pole Breaker Figure 6 15 30kVA UPS Single Unit Dual Input Wiring Diagram I 240V DC 240V DC N...

Страница 45: ...tactor Solenoid 3 Pole Breaker N Protective Device Disconnect Device Connects an external battery cabinet if necessary Figure 6 17 40kVA UPS Single Unit Dual Input Wiring Diagram I I O ON OFF I O ON O...

Страница 46: ...3 Pole Breaker N Protective Device Disconnect Device Connects an external battery cabinet if necessary 6 5 4 Parallel Units Wiring NOTE Prior to wiring please read 6 5 1 Precautions Prior to Wiring y...

Страница 47: ...Output Parallel Port Parallel Port Parallel Port Parallel Port Parallel Cable 3 4W 3 4W Parallel Cable Figure 6 19 Parallel Units Single Input Wiring Diagram y Dual Input Parallel Units When there ar...

Страница 48: ...es output ca bles must be equal This ensures that the parallel UPSs can equally share the equipment loads in bypass mode 2 Only UPSs with the same capacity voltage and frequency can be paralleled othe...

Страница 49: ...n adjust the charge current from 1A to the maximum Each adjustment level is 0 5A 2 If you need to modify the charge current default setting and low battery shut down default setting please contact you...

Страница 50: ...a 4 pole non fuse DC breaker with characteristics of 1 pole 250Vdc 2 pole 500Vdc and 3 pole 750Vdc Please follow Figure 6 21 or Figure 6 22 to install a 4 pole non fuse DC breaker and fast acting fus...

Страница 51: ...fuse DC breaker and fast acting fuses Do not use an AC breaker The closer the breaker and the fuses are to the batteries the better Please refer to the Figure 6 23 Non Delta External Battery Cabinet C...

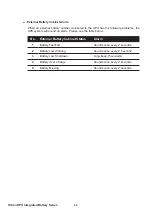
Страница 52: ...oblems the UPS system will sound an alarm Please see the table below No External Battery Cabinet Status Alarm 1 Battery Test Fail Sounds once every 2 seconds 2 Battery Low Warning Sounds once every 0...

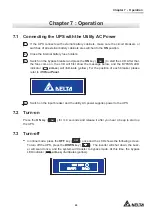
Страница 53: ...BYPASS will illuminate yellow For the position of each breaker please refer to 3 5 Rear Panel 4 Switch on the input breaker and the utility AC power supplies power to the UPS 7 2 Turn on Press the ON...

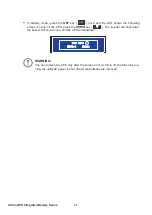
Страница 54: ...following screen To turn off the UPS press the DOWN key The inverter will shut down the buzzer will sound once and the UPS will shutdown 6 87 2 1 6 12 WARNING You can remove the UPS only after the scr...

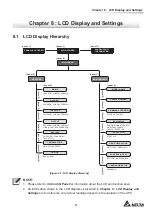
Страница 55: ...Level 5 AMB PFC INVERTER DC BUS Level 5 BUS BUS MAINTENANCE Level 4 SERIAL NUMBER MODEL NAME EVENT LOG FIRMWARE VERSION STATISTICS Level 5 Level 5 Level 5 Level 5 Level 5 PFC INV SYSTEM ON BYPASS COU...

Страница 56: ...f the UPS shown in the LCD display are as follows 1 When the screen above appears it means that no power is supplied to the critical loads con nected 2 When the screen above appears it means the bypas...

Страница 57: ...bypass mode and cut off the main AC source and batteries During this mode if the bypass AC source fails the critical loads won t be protected 8 3 Parallel Screen When UPSs are paralleled press either...

Страница 58: ...n press the function key to enter into the Main Menu shown below 0 685 0 17 1 1 y MEASURE Check the UPS s mains bypass inverter output battery temperature and DC BUS read ings y MAINTENANCE J time clo...

Страница 59: ...UPS s mains bypass inverter output battery temperature and DC BUS readings Please refer to the charts below 0 16 93 6 9 9 1 9 5 4 5 6 7 3 66 93 6 9 9 1 9 5 4 5 6 7 19 57 5 93 6 9 9 1 9 5 4 5 6 7 28738...

Страница 60: ...Please see below for detailed information y Model Name Route Main Screen Main Menu Maintenance 2 1 Model Name 02 1 0 The screen above shows the UPS s model name y Serial Number Route Main Screen Main...

Страница 61: ...he UPS s total number of event log y Event Log Route Main Screen Main Menu Maintenance 2 5 Event Log 9 17 2 9 17 2 The screen above shows event No event date time and event descriptions Use the functi...

Страница 62: ...752 7 67 77 7 67 3 1 6 21 1 BATT TEST Enable or disable battery test Three are three choices ABORT DEEP or 10 SEC 2 BEEP ENABLE Enable or disable buzzer y Language Setup Route Main Screen Main Menu Ma...

Страница 63: ...VSS Card Lets the UPS have surge protection function 7 Mini USB Card Lets the UPS have USB communication function 8 Mini SNMP Card Monitors and controls the status of the UPS via a network sys tem 9 M...

Страница 64: ...cid batteries The battery life depends on the tempera ture the usage and the charging discharging frequency High temperature environments and high charging discharging frequency will quickly shorten t...

Страница 65: ...normally J 5 INVERTER SCR OPEN Inverter SCR driver is abnormal Contact service personnel 6 BYPASS SCR OPEN Bypass SCR driver is abnormal Contact service personnel 7 OVERLOAD The UPS is overloaded Remo...

Страница 66: ...service personnel 20 DC BUS LOW SHUTDOWN 1 Output has abnormalities 2 The UPS has internal faults Contact service personnel 21 INPUT FUSE FAIL Input fuse is broken Contact service personnel 22 INVERT...

Страница 67: ...age 220 380 Vac 230 400 Vac 240 415 Vac Power Factor Unity Voltage Regulation 1 Voltage Harmonic Distortion 1 5 linear load Overload Capability _ _ _ _ _ _ _ _ _ Output Frequency 50 60 Hz 0 05 Hz Cres...

Страница 68: ...tact x 2 Output Dry Contact x 6 Manual Bypass Switch Yes Physical Dimensions W x D x H 490 x 830 x 1400 mm Weight with batt 351 Kg 371 Kg 371 Kg Weight without batt 128 Kg 148 Kg 148 Kg Environ ment O...

Страница 69: ...oes not apply to normal wear or to damage resulting from improper installation opera also expressly excludes all incidental and consequential damages Maintenance service for a fee is provided for any...

Страница 70: ...5013206100...
Отзывы: