Delta DVP-FEN01 Скачать руководство пользователя страница 63

C h a p t e r   6   E x a m p l e s  

6.9


Application of ETHRW 

Function 

PLC A sends a Modbus command, and requests the timer value stored in D10 (H’100A) 
in PLC B. The reply that PLC B makes is stored in D100 in PLC A. 

Network 
environment 

(1)  Using a static IP address 
(2)  IP address of PLC A: 192.168.1.5 
(3)  IP address of PLC B: 192.168.1.6 
(4)  Using ETHRW to write a Modbus TCP command 
(5)  PLC A requests the timer value stored in D10 (H’100A) in PLC B every second, and 

the reply that PLC B makes is stored in D100 in PLC A. 


1. 

Please refer to Chapter 5 for more information about setting communication. 
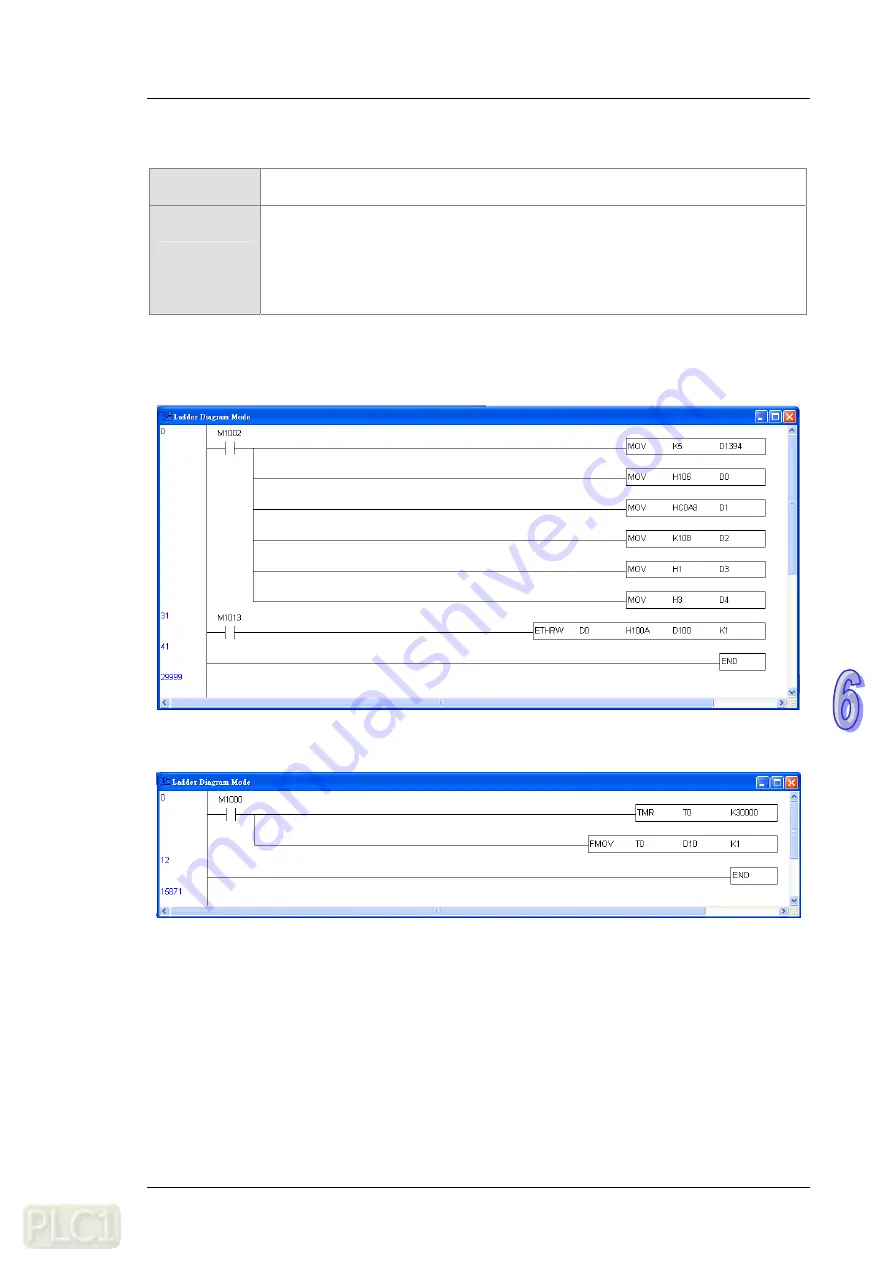
2. 

Users have to write the program shown below, and download the program to PLC A. 
Using ETHRW: ETHRW D0 H100A D10 K1 


3. 

The users have to write the program shown below, and download the program to PLC B. 


4. 

When PLC A and PLC B run,   
(1)  T0 in PLC B begins to count, and the value in T0 is moved to D10 (H’100A) in PLC B. 
(2)  PLC A sends the data set by M1002 by means of the Modbus TCP command sent by M1013 every 

second to request the timer value stored in D10 (H’100A) in PLC B. 

(3)  the replay that PLC B makes is stored in D100 in PLC A. 
(4)  the value in D100 in PLC A is the value in D10 in PLC B which is updated every second. 


6 - 2 3  

Содержание DVP-FEN01

Страница 1: ...rea Inc 1511 Byucksan Digital Valley 6 cha Gasan dong Geumcheon gu Seoul Korea 153 704 TEL 82 2 515 5303 FAX 82 2 515 5302 Delta Electronics Int l S Pte Ltd 4 Kaki Bukit Ave 1 05 05 Singapore 417939 TEL 65 6747 5155 FAX 65 6744 9228 Delta Electronics India Pvt Ltd Plot No 43 Sector 35 HSIIDC Gurgaon PIN 122001 Haryana India TEL 91 124 4874900 FAX 91 124 4874945 Americas Delta Products Corporation ...

Страница 2: ...er 3 Installation and Wiring 3 1 Installation 3 2 3 2 Connecting a Network 3 3 Chapter 4 Control Registers 4 1 Table of Control Registers in DVP FEN01 4 2 4 2 Specifications and Functions 4 3 4 3 Communication Card Number 4 4 4 4 Introduction of ETHRW 4 5 Chapter 5 Setting DVP FEN01 by Means of Software 5 1 Setting Communication and Searching for Modules 5 2 5 2 Basic Settings 5 10 5 3 Data Exchan...

Страница 3: ...e RS 232 Port on DVP FEN01 6 5 6 3 Setting Removing a Password 6 8 6 4 Lost Password Restoring DVP FEN01 to Its Factory Settings by Means of RS 232 6 12 6 5 Setting an IP Filter 6 15 6 6 Always Enabling Data Exchange 6 17 6 7 Enabling Data Exchange by Means of a Program 6 19 6 8 Enabling Data Exchange by Means of the RUN STOP switch on a PLC 6 21 6 9 Application of ETHRW 6 23 ...

Страница 4: ...iii ...

Страница 5: ...Chapter 1 Introduction Contents 1 1 Functions 1 2 1 2 Functional Specifications 1 2 1 1 ...

Страница 6: ...ed or prevent staff from being hurt users need to read the operation manual carefully and follow the instructions in the manual 1 1 Functions It provides DVP EH3 series PLCs with an Ethernet communication function It is equipped with an Ethernet port and an RS 232 port The Ethernet port automatically detects the transmission speed of 10 100 Mbps The Ethernet protocols it supports are ARP IP TCP UD...

Страница 7: ...2 IEC 61000 4 4 communication I O 2 kV CS IEC 61131 2 IEC 61000 4 6 0 15 80 MHz 3 Vrms Operation Storage Operation 0 C 55 C Temperature 50 95 Humidity pollution degree 2 Storage 25 C 70 C Temperature 5 95 Humidity Vibration Shock resistance International standards IEC 61131 2 IEC 68 2 6 TEST Fc IEC 61131 2 IEC 68 2 27 TEST Ea 1 3 ...

Страница 8: ...DVP FEN01 Ethernet Communication Card Operation Manual 1 4 MEMO ...

Страница 9: ...Chapter 2 Dimensions and Profile Contents 2 1 Dimensions 2 2 2 2 Profile 2 2 2 3 Indicators 2 2 2 4 RJ45 Connector 2 3 2 5 RS 232 Connector 2 3 2 6 Troubleshooting 2 3 2 1 ...

Страница 10: ...ar for removing a communication card 1 2 3 4 7 6 5 8 Back Side Front Firmware update switch Please make sure that the switch is turned OFF before DVP FEN01 is used 2 3 Indicators Indicator State Indication ON An Ethernet connection is successful Link LED indicator Green OFF An Ethernet connection fails Blinking Data is being sent received through Ethernet Activity LED indicator Oragne OFF No data ...

Страница 11: ...x 8 GND 2 6 Troubleshooting Problem Reason Solution The PLC used is not powered Please check whether the PLC is powered and check whether the power supplied to the PLC is normal DVP FEN01 is not connected to the PLC used Please check whether DVP FEN01 is connected to the PLC Link LED indicator is OFF Ethernet connection failure Please check whether the network cable used is connected correctly 2 3...

Страница 12: ...DVP FEN01 Ethernet Communication Card Operation Manual 2 4 MEMO ...

Страница 13: ...Chapter 3 Installation and Wiring Contents 3 1 Installation 3 2 3 2 Connecting a Network 3 3 3 1 ...

Страница 14: ...n after installation Users have to power a PLC and connect a network cable to the RJ45 port on DVP FEN01 correctly If the Link LED indicator is ON the PLC and DVP FEN01 are connected correctly and powered normally Then the users have to open DCISoft In DCISoft the users have to select the communication port the RS 232 port or the Ethernet port which is connected to the communication card and relat...

Страница 15: ...Network The users have to connect DVP FEN01 to an Ethernet hub by means of a cat 5e cable DVP FEN01 is equipped with an auto MDI MDIX function and therefore a cat 5e cable is used and no jump wire is needed The maximum length of a cable is 100 meter 3 3 ...

Страница 16: ...DVP FEN01 Ethernet Communication Card Operation Manual 3 4 MEMO ...

Страница 17: ...Chapter 4 Control Registers Contents 4 1 Table of Control Registers in DVP FEN01 4 2 4 2 Descriptions of Control Registers 4 3 4 3 Communication Card Number 4 4 4 4 Introduction of ETHRW 4 5 4 1 ...

Страница 18: ...erver 89 88 R W IP address If an IP address is 192 168 1 5 the value in CR 89 is 192 168 and the value in CR 88 is 1 5 91 90 R W Mask address If a mask address is 255 255 255 0 the value in CR 91 is 255 255 and the value in CR 90 is 255 0 93 92 R W Gateway IP address If a gateway IP address is 192 168 1 1 the value in CR 89 is 192 168 and the value in CR 88 is 1 1 94 R W Enabling the setting of an...

Страница 19: ...ed no matter what value is in CR 13 CR 17 Cycle of executing data exchange Description Users can set or view the time which passes before the next cycle of data exchange is executed A millisecond is a unit The default value in CR 17 is 0 that is the next cycle of data exchange will be executed immediately after the last data is received If the value in CR 17 is 10 10 milliseconds pass before the n...

Страница 20: ...plete yet 1 The setting of an IP address is being executed 2 The setting of an IP address is complete Error state CR 251 Error state Description CR 251 indicates an error state If an error occurs the bit corresponding to the error is 1 Bit 0 A network has not been connected Bit 3 CR 13 is used to enable the sending of data but data exchange has not been enabled Bit 8 A DHCP server has not gotten c...

Страница 21: ...rt number The number assigned to DVP FEN01 is K108 It occupies S1 2 D2 Station address The station address of a slave occupies S1 3 D3 Read Write mode The definition of a read write mode is the same as that of Modbus The function codes supported are H 03 H 04 H 06 and H 10 The device occupied is S1 4 D4 S2 It is the communication address of the device which is read to which data is written The def...

Страница 22: ...DVP FEN01 Ethernet Communication Card Operation Manual 4 6 MEMO ...

Страница 23: ...Means of Software Contents 5 1 Setting Communication and Searching for Modules 5 2 5 2 Basic Settings 5 10 5 3 Data Exchange 5 14 5 4 IP Filter 5 15 5 5 Setting a Password 5 16 5 6 Restoring DVP FEN01 to Its Factory Settings 5 17 5 1 ...

Страница 24: ...munication Type drop down list box in the Communication Setting window After Ethernet is selected the users can click Search IP Search Alternatively the users can open the setting page for DVP FENON by means of RS 232 DVP FEN01 is set by means of UDP port 20006 The users have to notice the setting of a firewall 5 1 Setting Communication and Searching for Modules Setting communication 1 Open DCISof...

Страница 25: ...munication Setting window Searching for devices by means of broadcasting 1 After users click Search on the toolbar they can find all Delta Ethernet products in a domain The models found are listed on the left side of the Delta DCISoft window the devices found are displayed on the right side of the Delta DCISoft window 5 3 ...

Страница 26: ...DVP FEN01 Ethernet Communication Card Operation Manual 2 After the users click a device which is found they will enter a setting page 3 The setting page which the users enter is as shown below 5 4 ...

Страница 27: ...ight click Ethernet on the left side of the Delta DCISoft window and then click Configure 2 The users have to select the model DVP FEN01 for which they want to search in the Configure window After they click OK the DVP FEN01 Ethernet communication card which is on a network will be searched for 5 5 ...

Страница 28: ...d on the right side of the Delta DCISoft window Searching for a specific IP address 1 In the Communication Setting window users have to select Ethernet in the Communication Type drop down list box type an IP address in the IP box and click OK The default IP address 255 255 255 255 is for a search by means of broadcasting 5 6 ...

Страница 29: ...IP Search on the toolbar the IP address set will be searched for 3 The DVP FEN01 Ethernet communication card to which the IP address set is assigned is displayed on the right side of the Delta DCISoft window After the users click DVP FEN01 they will enter a setting page 5 7 ...

Страница 30: ... select RS232 in the Communication Type drop down list box they have to select a communication port in the COM Port drop down list box If the users want to search for DVP FEN01 by means of RS 232 they do not need to set communication parameters a data length a parity bit the number of stop bits and a transmission speed 5 8 ...

Страница 31: ...r 5 Setting DVP FEN01 by Means of Software 2 After the users click Search on the toolbar they can search for DVP FEN01 by means of RS 232 Other settings are the same as searching for a specific IP address 5 9 ...

Страница 32: ...tic IP address Users assign an IP address a subnet mask and a default gateway DHCP A DHCP server is automatically requested to assign an IP address a subnet mask and a default gateway 2 IP address An IP address is the address of a device on a network Every device connected to a network needs an IP address If a wrong IP address is used the device can not connect to a network and even other devices ...

Страница 33: ...oint that acts as an entrance to another network For example in order to connect a local area network and a wide area network a gateway is needed The IP address that a gateway uses and the IP address of DVP FEN01 must be in the same subnet The default gateway of DVP FEN01 is 192 168 1 1 3 Setting keepalive time Keepalive time is a TCP keepalive period A second is a unit The default keepalive time ...

Страница 34: ... 2 The users have to click Properties in the Local Area Connection Status window 3 In the Local Area Connection Properties window the users have to click Internet Protocol TCP IP under This connection uses the following items and then click Properties 5 12 ...

Страница 35: ...Chapter 5 Setting DVP FEN01 by Means of Software 4 The users have to type 192 168 1 6 in the IP address box in the Internet Protocol TCP IP Properties window and then click OK 5 13 ...

Страница 36: ...ange will stop If PLC Run is selected DVP FEN01 will continuously execute data exchange after the RUN STOP switch on a PLC is moved out of the STOP position and into the RUN position and the execution of the data exchange will not stop until the RUN STOP switch is moved out of the RUN position and into the STOP position If Always Enable is selected DVP FEN01 will continuously execute data exchange...

Страница 37: ...roper modifications made by unidentified users from resulting in errors Setting an IP filter 1 Enabling an IP filter Users can select or unselect the Enable IP Filter checkbox If the Enable IP Filter checkbox is selected the IP addresses which is not in the IP address ranges set will be filtered out 2 Start IP address and end IP address Users can set four IP address ranges at most They can set the...

Страница 38: ...he password which has been set 2 New password Users can set a personal password A password is composed of 4 characters at most If the Password checkbox in the Password Setup section is left blank DVP FEN01 will not be protected by a password 3 Confirming the password set Users have to type the password set again in the Confirm Password box 4 Please refer to section 6 3 and section 6 4 for more inf...

Страница 39: ...lect the Factory Setting checkbox and click Yes in the window which appears DVP FEN01 will be restored to its factory settings Note The RS 232 on DVP FEN01 is used to restore DVP FEN01 to its factory setting Whether DVP FEN01 is protected by a password or not DVP FEN01 can be restored to its factory settings It takes about 10 seconds to restore DVP FEN01 to its factory settings and therefore users...

Страница 40: ...DVP FEN01 Ethernet Communication Card Operation Manual 5 18 MEMO ...

Страница 41: ...he RS 232 Port on DVP FEN01 6 5 6 3 Setting Removing a Password 6 8 6 4 Lost Password Restoring DVP FEN01 to Its Factory Settings by Means of RS 232 6 12 6 5 Setting an IP Filter 6 15 6 6 Always Enabling Data Exchange 6 17 6 7 Enabling Data Exchange by Means of a Program 6 19 6 8 Enabling Data Exchange by Means of the RUN STOP switch on a PLC 6 21 6 9 Application of ETHRW 6 23 6 1 ...

Страница 42: ...nitoring the program in a PLC by means of the Ethernet port on DVP FEN01 Network environment 1 The IP address of the computer on which WPLSoft runs is 192 168 1 33 2 Subnet mask 255 255 255 0 Gateway 192 168 1 1 3 The IP address of DVP FEN01 is 192 168 1 5 4 Using a cat 5e cable or a hub to connect the computer on which WPLSoft runs and DVP FEN01 1 Users have to click Communication Setting on the ...

Страница 43: ...s 2 The users have to select Ethernet in the Type drop down list box and then click OK 3 After Auto Search Ethernet Module is clicked all the DVP FEN01 Ethernet communication cards on a network will be searched for 6 3 ...

Страница 44: ...indow and its IP address is 192 168 1 5 The users can download a program to the DVP EH3 series PLC which is connected to WPLSoft upload the program in the PLC or monitor the PLC by means of the DVP FEN01 Ethernet communication card 5 After the users click DCISoft they can set DVP FEN01 further in DCISoft Please refer to Chapter 5 for more information 6 4 ...

Страница 45: ...Downloading the program in WPLSoft uploading the program in a PLC or monitoring the program in a PLC by means of the RS 232 port on DVP FEN01 Network environment Using DVPACAB2A30 to connect the computer on which WPLSoft runs and DVP FEN01 1 Users have to click Communication Setting on the Options menu in WPLSoft 6 5 ...

Страница 46: ...e COM Port box select 8 in the Data Length drop down list box select None in the Parity drop down list box select 1 in the Stop Bits drop down list box select 19200 in the Baud Rate drop down list box select the ASCII option button and click OK DVP FEN01 only supports a baud rate of 19200 bps 8 bit data none of parity bits 1 stop bit and Modbus ASCII 6 6 ...

Страница 47: ...The users can download a program to the DVP EH3 series PLC which is connected to WPLSoft upload the program in the PLC or monitor the PLC by means of DVP FEN01 4 After the users click DCISoft they can set DVP FEN01 further in DCISoft Please refer to Chapter 5 for more information 6 7 ...

Страница 48: ... and remove the password of DVP FEN01 Network environment 1 Setting the password of DVP FEN01 2 Unlocking DVP FEN01 3 Removing the password of DVP FEN01 1 Please refer to Chapter 5 for more information about setting communication 2 The users have to open the setting window for DVP FEN01 and click the Security tab 6 8 ...

Страница 49: ...Chapter 6 Examples 3 The users have to select the Modify checkbox type 1234 in the Password box and the Confirm Password box and click OK 6 9 ...

Страница 50: ... is protected by the password set DVP FEN01 can not be set The users have to type the password set in the Password box and click OK 5 After the users type the password set DVP FEN01 will be unlocked temporarily and they can modify parameters If the users close the setting window for DVP FEN01 DVP FEN01 will be automatically locked again 6 10 ...

Страница 51: ...xamples 6 If the users want to remove the password set they have to leave the Password box in the Password Setup section blank and click OK 7 After the password set is removed the users can modify parameters 6 11 ...

Страница 52: ...g DVP FEN01 to Its Factory Settings by Means of RS 232 Network environment 1 Setting the password of DVP FEN01 2 If users forget the password of DVP FEN01 they can restore DVP FEN01 to its factory settings by means of RS 232 1 After users use DVPACAB2A30 to connect the computer on which DCISoft runs and DVP FEN01 they have to click the Security tab 6 12 ...

Страница 53: ...ar After the users click Yes in the window DVP FEN01 will be restored to its factory settings and the password set will be removed It takes about 5 10 seconds to restore DVP FEN01 to its factory settings 3 After DVP FEN01 is searched for again it will be restored to its factory settings 6 13 ...

Страница 54: ...DVP FEN01 Ethernet Communication Card Operation Manual 6 14 ...

Страница 55: ...ronment 1 The IP address of DVP FEN01 is 192 168 1 5 2 Only 192 168 1 33 and 172 16 1 1 172 16 1 255 are allowed to be connected 1 Please refer to Chapter 5 fore more information about setting communication 2 Users have to click the IP Filter tab in the setting window for DVP FEN01 6 15 ...

Страница 56: ...e the first start address 192 168 1 33 and type the first end address 192 168 1 33 4 The users have to type the second start address 172 16 1 1 type the second end address 172 16 1 255 and click Apply Only the equipment whose IP address is in the range of 172 16 1 1 to 172 16 1 255 can be connected to DVP FEN01 6 16 ...

Страница 57: ...in PLC A are written to D0 D99 in PLC B and the values in D0 D99 in PLC B are written to D200 D299 in PLC A Network environment 1 Using a static IP address 2 IP address of PLC A 192 168 1 5 3 IP address of PLC B 192 168 1 6 4 PLC A exchange data with PLC B 1 Please refer to Chapter 5 for more information about setting communication 2 Users have to open the setting window for PLC A and click the Da...

Страница 58: ...ct D0 as the start reception register in PLC B The number of values which will be sent by PLC B is 100 and the number of values which will be sent by PLC A is 100 After the users click Apply the data exchange set will be enabled 4 After PLC A is set the users have to write the program shown below and download the program to PLC A 1 When PLC A runs and M20 is turned ON the value in T0 is written to...

Страница 59: ... in D0 D99 in PLC A are written to D0 D99 in PLC B and the values in D0 D99 in PLC B are written to D200 D299 in PLC A Network environment 1 Using a static IP address 2 IP address of PLC A 192 168 1 5 3 IP address of PLC B 192 168 1 6 4 PLC A exchange data with PLC B 1 Please refer to Chapter 5 for more information about setting communication 2 Users have to open the setting window for PLC A and c...

Страница 60: ... PLC B is 100 and the number of values which will be sent by PLC A is 100 After the users click Apply and 2 is written to CR 13 the data exchange set will be enabled 4 After PLC A is set the users have to write the program shown below and download the program to PLC A 1 When PLC A runs and M20 is turned ON the value in T0 is written to D0 D99 in PLC A 2 Owing to the fact that the data exchange set...

Страница 61: ...in PLC A The values in D0 D99 in PLC A are written to D0 D99 in PLC B and the values in D0 D99 in PLC B are written to D200 D299 in PLC A Network environment 1 Using a static IP address 2 IP address of PLC A 192 168 1 5 3 IP address of PLC B 192 168 1 6 4 PLC A exchange data with PLC B 1 Please refer to Chapter 5 for more information about setting communication 2 Users have to open the setting win...

Страница 62: ... PLC B The number of values which will be sent by PLC B is 100 and the number of values which will be sent by PLC A is 100 After the users click Apply the data exchange set will not be executed if PLC A stops and the data exchange set will be executed if PLC A runs 4 After PLC A is set the users have to write the program shown below and download the program to PLC A 1 When PLC A runs and M20 is tu...

Страница 63: ... 1 Please refer to Chapter 5 for more information about setting communication 2 Users have to write the program shown below and download the program to PLC A Using ETHRW ETHRW D0 H100A D10 K1 3 The users have to write the program shown below and download the program to PLC B 4 When PLC A and PLC B run 1 T0 in PLC B begins to count and the value in T0 is moved to D10 H 100A in PLC B 2 PLC A sends t...

Страница 64: ...DVP FEN01 Ethernet Communication Card Operation Manual 6 24 MEMO ...

Отзывы: