background image

18-ENG

D26269

Air Filter - Inspection and Replacement

Hot surfaces.  Risk of burn.  Compressor heads are
exposed when filter cover is removed.  Allow compressor

to cool prior to servicing.

Keep the air filter clean at all times. Do not operate the air
compressor with the air filter removed.

A dirty air filter will not allow the compressor pump to operate at full capacity.
Before using the compressor pump, check the air filter to make sure it is clean
and in place.

If it is dirty, replace it with a new filter.

1.

Using a pair of needle nose pliers or a screwdriver pull or pry out the old
filter and carefully clean the filter area. 

2.

Push the new air filter in place. Refer to the "Repair Parts" for the correct
part number.

IMPORTANT

: Do not operate the compressor with the air filter removed.

3.

Place new air filter into filter cover. Refer to the "Repair Parts" for the
correct part number.

4.

Replace air filter cover and lock into place.

Motor Pulley/Flywheel Alignment

NOTE:

Once the motor pulley has been moved from its factory set location,

the grooves of the flywheel and pulley must be aligned to within 1/16" to
prevent excessive belt wear.

The air compressor flywheel and motor pulley must be in-line (in the same
plane) within 1/16" to assure belt retention within flywheel belt grooves.  To
check alignment, perform the following steps:

1.

Unplug air compressor from power source.

2.

Remove belt guard

3.

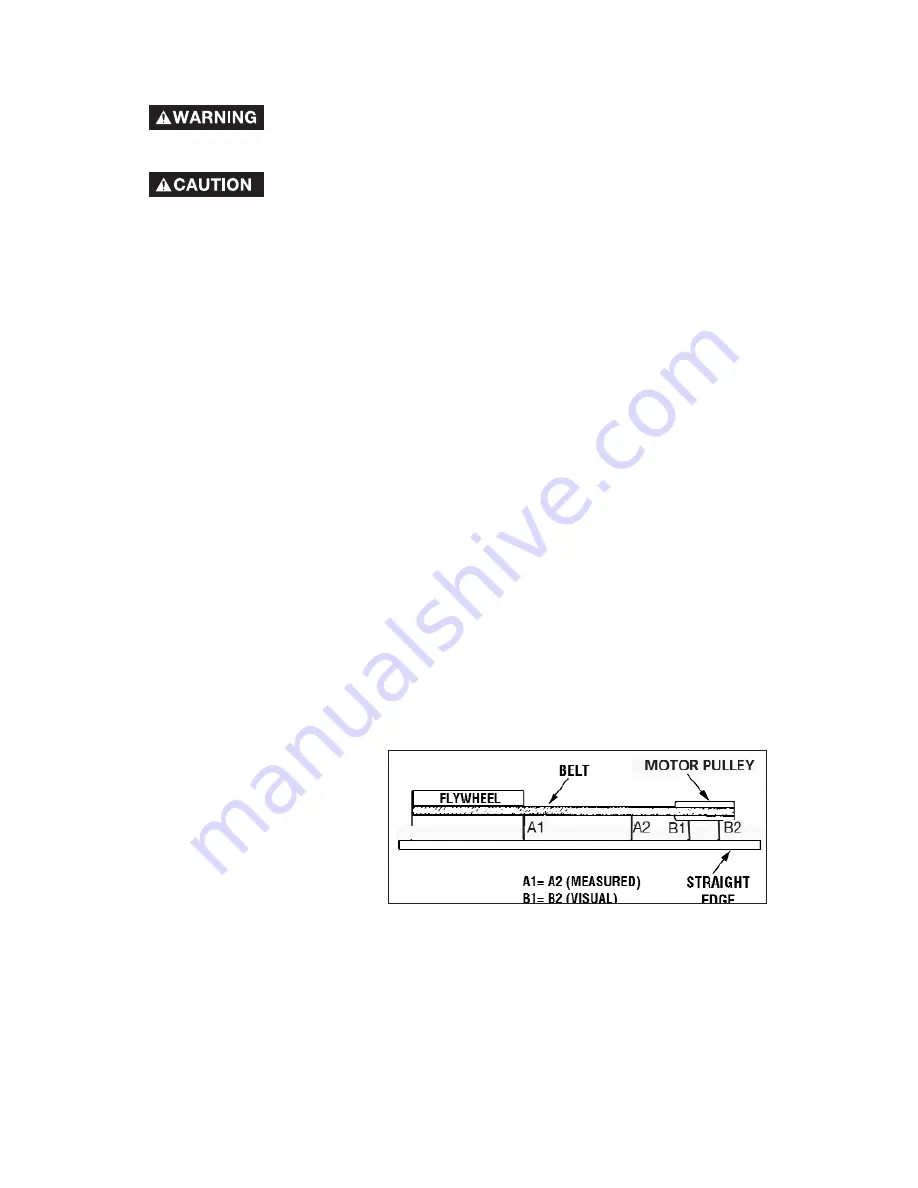
Place a straightedge
against the outside of the
flywheel and the motor
drive pulley.

4.  Measure the distance

between the edge of the
belt and the straightedge
at points A1 and A2 in
figure.  The difference between measurements should be no more than
1/16".

5.

If the difference is greater or less than 1/16" loosen the set screw holding
the motor drive pulley to the shaft and adjust the pulley’s position on the
shaft until the A1 and A2 measurements are within 1/16" of each other.

6.

Tighten the motor drive pulley set screw to 70-80 in.-lbs.

Содержание 66-750

Страница 1: ...elta Machinery To learn more about DELTA MACHINERY visit our website at www deltamachinery com For Parts Service Warranty or other Assistance please call 1 866 422 4286 Oillube Air Compressor with Sin...

Страница 2: ...symbols below Please read the manual and pay attention to these symbols IMPORTANT SAFETY INSTRUCTIONS Some dust created by power sanding sawing grinding drilling and other construction activities con...

Страница 3: ...roperty damage To reduce the risk of fire do not allow the compressor to operate unattended Always operate the compressor in a well ventilated area free of combustible materials gasoline or solvent va...

Страница 4: ...or 1 Failure to properly drain condensed water from tank causing rust and thinning of the steel tank 2 Modifications or attempted repairs to the tank 3 Unauthorized modifications to the unloader valve...

Страница 5: ...the compressor is connected provides proper electrical grounding correct voltage and adequate fuse protection The compressed air directly from your compressor is not safe for breathing The air stream...

Страница 6: ...can cause serious injury if they com into contact with you or your clothing HOW TO PREVENT IT WHAT CAN HAPPEN WARNING RISK OF FALLING A portable compressor can fall from a table workbench or roof cau...

Страница 7: ...unauthorized parts HOW TO PREVENT IT WHAT CAN HAPPEN WARNING RISK OF UNSAFE OPERATION Unsafe operation of your air compressor could lead to serious injury or death to you or others HAZARD HOW TO PREV...

Страница 8: ...is called cut in pressure Cut Out Pressure When an air compressor is turned on and begins to run air pressure in the air tank begins to build It builds to a certain high pressure before the motor aut...

Страница 9: ...broken in correctly Make sure to closely follow initial start up procedures Multi Viscosity motor oils like 10W 30 should not be used in an air compressor They leave carbon deposits on critical compon...

Страница 10: ...id shims may be placed between the washers and floor to evenly distribute weight on all four feet See next figure 6 Place the 4 3 8 lag screws through the air compressor feet washers shims and into th...

Страница 11: ...the motor nameplate voltage plus or minus 10 Refer to local codes for recommended wire sizes correct wire size and maximum wire run undersize wire causes high amp draw and overheating to the motor Ele...

Страница 12: ...LINES AIR COMPRESSOR Use pipe that is the same size as the air tank outlet Piping that is too small will restrict the flow of air If piping is over 100 feet long use the next larger size Bury undergr...

Страница 13: ...air discharge valve Turn knob counter clockwise to open and clockwise to close Drain Valve The drain valve is located at the base of the air tank and is used to drain condensation at the end of each u...

Страница 14: ...his filter is designed to clean air coming into the pump This filter must always be clean and ventilation openings free from obstructions See Maintenance Motor Overload Protector This motor has a manu...

Страница 15: ...pressure rating for air tools and accessories The regulator outlet pressure must never exceed the maximum pressure rating 2 Recheck all wiring Make sure wires are secure at all terminals connections...

Страница 16: ...e sources compressed air or moving parts Personal injuries can occur Before performing any maintenance or repair disconnect power source from the compressor and bleed off all air pressure To Check Saf...

Страница 17: ...ly fill crankcase to the top of the fill hole NOTE Crankcase oil capacity is approximately 16 fluid ouncs 473 2 ml Overfilling with oil will cause premature compressor failure Do not overfill 5 Replac...

Страница 18: ...ect part number 4 Replace air filter cover and lock into place Motor Pulley Flywheel Alignment NOTE Once the motor pulley has been moved from its factory set location the grooves of the flywheel and p...

Страница 19: ...atically when power is on When doing Maintenance you may be exposed to voltage sources compressed air or moving parts Personal injuries can occur Before performing any Maintenance or repair unplug the...

Страница 20: ...r carefully push the valve disc up and down NOTE The valve disc should move freely up and down on a spring which holds the valve disc in the closed position if not the check valve needs to be cleaned...

Страница 21: ...re The valve can then be removed cleaned then reinstalled 8 Protect the air hose from damage such as being stepped on or run over To Replace Belt Serious injury or damage may occur if parts of the bod...

Страница 22: ...fittings where air can be heard escaping Check fittings with soapy water solution DO NOT OVERTIGHTEN Air leaks at fittings Air leaks at pressure switch release valve if equipped Defective pressure swi...

Страница 23: ...filter removed Refer to the Air Filter paragraph in the Maintenance section Pressure reading on the regulated pressure gauge if equipped drops when an accessory is used It is normal for some pressure...

Страница 24: ...estart see Motor Overload Protector paragraph in the Operation section Tank pressure exceeds pressure switch cut in pressure Motor will start automatically when tank pressure drops below cut in pressu...

Страница 25: ...ained Service Technician Belt to tight Check belt tension see Adjusting Belt Tension in the Maintenance section Excessive belt wear Loose belt Tight belt Loose pulley Have checked by a Trained Service...

Страница 26: ...26269 AIR COMPRESSOR DIAGRAM 1 2 31 5 7 6 8 3 For customer wiring 31 32 4 19 23 18 22 21 25 26 20 35 34 28 33 13 37 14 9 11 12 36 15 17 16 30 29 41 Torque 50 60 in lbs Torque 10 15 ft lbs Torque 70 80...

Страница 27: ...0 16 x 7 16 2 used 18 AC 0217 Manifold 19 Z D22260 Pressure Switch 20 SSP 7811 Nut Sleeve Assembly 1 4 21 SS 2072 1 Nipple 375 NPT x 1 50 22 97503734 Safety Valve 23 GA 360 Gauge 300 PSI 25 SSV 812 Gl...

Страница 28: ...28 ENG D26269 PUMP DIAGRAM...

Страница 29: ...505 Plug 20 SSP 486 Pipe Plug 3 8 18 NPT 2 used 21 SSN 1018 Washer Wavy Spring 22 AC 0169 Oil Seal 23 SST 104 Ball Bearing 2 used 24 SSN 1014 ZN Washer 339 344 ID 1 1 2 25 SSF 3039 ZN Screw 5 16 18 x...

Страница 30: ...60 and 80 gallon tanks will be inspected at the site of installation Contact the nearest Authorized Warranty Service Center that provides on site service calls for service call arrangements If the pu...

Отзывы: