background image

32

33

Mounting your MyFi on the dash

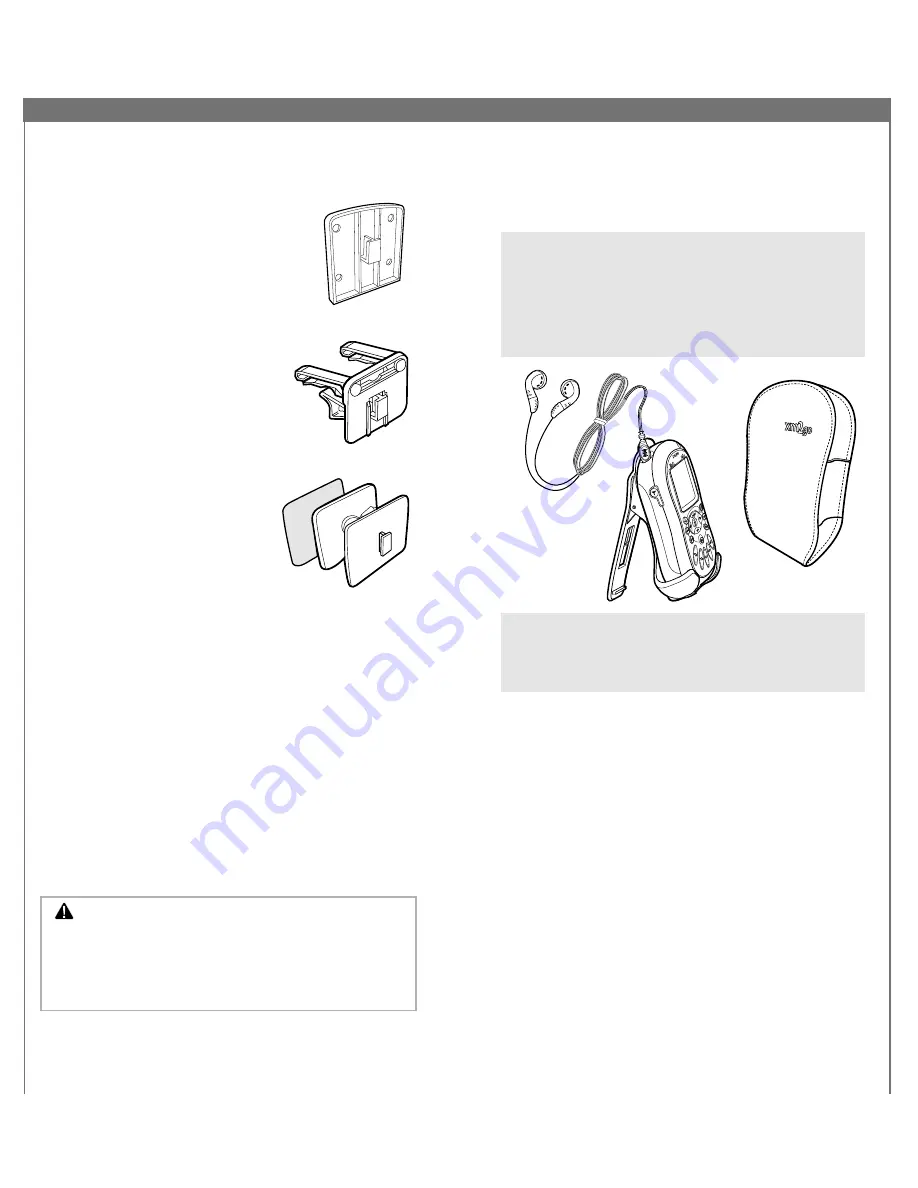
We’ve included three types of mounts to help you install
your MyFi in your vehicle’s interior.

FLUSH MOUNT: Attach the included
adhesive pad to the back of your
MyFi’s vehicle cradle. Stick the vehicle
cradle onto a flat surface in your
vehicle, preparing the surface as
described below. Do not install the
mount on a leather surface. Doing
so could permanently damage
the surface.

VENT MOUNT: Assemble the vent
mount as shown. Find a horizontal
air vent that is strong enough to
hold the weight of your MyFi and
its cradle. Clip the vent mount into
the vent.

SWIVEL MOUNT: Find a suitable
location; the mount uses a strong
adhesive and you’ll have difficulty
repositioning it after installation.
Do not install this mount on a
leather surface. Doing so could
permanently damage the surface.
Make sure the air temperature is at
least 60°F (15°C).

1. Clean the mounting surface with the enclosed surface

preparation kit. Allow to air-dry.

2. Clean the same surface with the alcohol prep pad.

Allow to air-dry.

3. You may warm the adhesive pad using a hair dryer

or the vehicle’s defroster. Place the swivel mount
accurately since it will bond on the first try.

4. For best results, do not touch or apply any pressure

to the vehicle mount for 72 hours.

To remove the swivel mount, first try lifting the adhesive
pad with your fingers or a spoon. You may warm it with
a hair dryer for 2-3 minutes to help soften the adhesive.
Remove any leftover adhesive from the dash surface by
rubbing with your finger, or you can use a mild cleaner
as recommended by your vehicle’s manufacturer.

Warning:

MyFi should be placed in your vehicle

where it will not interfere with the function of safety
features, e.g., deployment of airbags. Failure to correctly
place MyFi may result in injury to you or others if the
unit becomes detached during an accident and/or
obstructs the deployment of an airbag.

Using MyFi On The Go

Your MyFi contains a built-in antenna that works best
when your MyFi receiver is upright. Use the belt clip to
hold your MyFi in the proper position; laying your MyFi
down flat may weaken reception.

TIP:

If you carry your MyFi in a bag or use it while

exercising, you can lock the buttons and dial and
prevent something from accidentally pressing the
buttons. Press and hold the “

mute/pause/lock

” button

until you see the lock indicator in the display. To unlock
the controls, press and hold the “

mute/pause/lock

button until the lock indicator disappears.

TIP:

The belt clip doubles as a table stand; just pull out

the back leg.

TIP:

You can plug the AC or cigarette lighter adapter

directly into the bottom of your MyFi.

Содержание MyFi

Страница 1: ...ath and or damage to your MyFi receiver accessories and or to your vehicle or other property Delphi Corporation 1441 West Long Lake Road Troy Michigan 48098 5090 U S A Customer Service 1 877 GO DELPHI www delphi com Printed on Recycled Paper 2007 Delphi Corporation All rights reserved DPSS 06 E 062 MyFi is a registered trademark of Delphi Corporation The XM name XM2Go and related logos are registe...

Страница 2: ...he dealer or an experienced radio TV technician for help Important The FCC and FAA have not certified the Delphi XM MyFi Satellite Radio Receiver for use in any aircraft neither portable nor permanent installation Therefore Delphi cannot support this type of application or installation Table of Contents A Brief History 4 About Delphi 5 About XM 5 Let s Get Started 6 Controls 6 Main controls 6 Remo...

Страница 3: ...up includes more than 170 digital channels of choice from coast to coast the most commercial free music channels sports talk comedy children s and entertainment programming and the most advanced traffic and weather information XM the leader in satellite delivered entertainment and data services for the automobile market through part nerships with General Motors Honda Toyota Hyundai Nissan Subaru S...

Страница 4: ... begin take a moment to familiarize yourself with your MyFi s controls Most basic functions can be accessed using the front panel buttons and the dial More advanced features are accessed using the menu button and the dial MAIN CONTROLS IR lens aim your remote control here display backlit high resolution LCD display mode button switch between LIVE XM and MY XM Time shifting Memory Mode 2go button s...

Страница 5: ...p lock channel buttons preview channels LIVE preview songs MY XM menu button customize options and access advanced features display button change the appearance of the display including access to different modes that display stock quotes and Info Extras such as sports scores volume buttons raise or lower volume only when headphones are plugged in pause button pause MY XM playback mute button mute ...

Страница 6: ...dapter audio cable headphones vehicle antenna cassette adapter vehicle cradle vehicle power adapter swivel mount with extra adhesive pad flush mount vent mount cleaning kit rechargeable lithium ion battery What s in the box Your MyFi includes these components remote control XM SureConnect ...

Страница 7: ...low the illustration for optional setup and activation procedure information 12 13 Setting Up Assembly Insert the battery and assemble your MyFi and its home stand as shown plug the AC adapter into an outlet Let the battery charge for at least three hours 5V DC ANT LINE OUT Assemble home stand Connect to stereo Insert battery Important You will need to fully charge your MyFi battery for at least t...

Страница 8: ...t You should see an 8 character XM Radio ID in the display The XM Radio ID should also be on your MyFi s package and under the battery Write the ID here The XM Radio ID does not use the letters I O S and F Activate your XM Satellite Radio service by contacting XM at http activate xmradio com or by calling 1 800 XM RADIO 1 800 967 2346 You will need the XM Radio ID and a major credit card XM will s...

Страница 9: ...A SONG S INFORMATION FROM MEMORY Press and hold the mem button until your MyFi beeps and you see Memory Recall in the display If you have stored more than one song s information you can rotate the dial to view each entry Your MyFi can hold up to 20 entries after which any new entry replaces the oldest entry in memory TuneSelect Always find your favorite songs or artists If you can t get enough of ...

Страница 10: ... XM 2 Select Schedule MY XM 3 You can schedule up to two sessions Choose Session 1 or Session 2 4 Rotate the dial to change and press the dial in to fill in the How Often starting time ending time and channel fields The How Often option allows you to activate the session Once Every Day or Off postponing until another time TIP You can use the number buttons to enter the channel number You can also ...

Страница 11: ...high light either Bass or Treble Press the dial in to select 4 Rotate the dial to change the bass or treble level Press the dial in to confirm 5 When you re done press the menu button until you return to normal operation Caution Before putting on the headset always adjust the volume setting at the lowest level to avoid possible hearing damage TO CHANGE THE AUDIO LEVEL of the cassette adapter FM tr...

Страница 12: ...y headphone or audio cable from your MyFi s headphone jack and any audio cables connected to the vehicle cradle 2 You need to find an FM frequency that is not being used by any commercial FM station Tune your FM radio to the following frequencies 88 1 88 3 88 5 88 7 88 9 106 7 106 9 107 1 107 3 107 5 107 7 and 107 9 Note which frequency has no FM station or the least amount of interference 3 Turn ...

Страница 13: ...ow you view Info Extras by selecting the Change Display option in the menu Direct Tune Select channels faster Normally as you rotate the dial you can preview what s playing on other XM channels before you push the dial in to select a channel To automatically tune to the channel without pressing the dial you can set the following option 1 Use the menu button and dial to select Channel Access 2 Sele...

Страница 14: ...re at 1 800 XM RADIO 1 800 967 2346 Returning to factory defaults You can return your MyFi to its factory installed format Be careful This feature erases all settings including Stock Ticker display options audio options channel skip add Info Extras and anything stored in MY XM 1 Use the menu button and dial to select Set Factory Defaults 2 Select Yes to restore your MyFi to the factory settings Us...

Страница 15: ...our vehicle and location 2 Always do a trial run before installing anything permanently Temporarily connect all power audio and antenna lines Make sure that you receive the XM signal and that you hear XM programming through your vehicle s audio system You must have your vehicle antenna plugged in to the cradle or the XM SureConnect to receive the signal TIP Your MyFi battery will charge in the veh...

Страница 16: ... If the vehicle is a hard or soft top convertible you may mount the antenna on the metal trunk lid It should be at least 4 from the rear window Ensure that the antenna and cable don t interfere with the opening or closing of the convertible top and the trunk lid TIP If you route the antenna cable through the trunk seal use the lowest part of the weather seal This should minimize any water leaks TI...

Страница 17: ... apply any pressure to the vehicle mount for 72 hours To remove the swivel mount first try lifting the adhesive pad with your fingers or a spoon You may warm it with a hair dryer for 2 3 minutes to help soften the adhesive Remove any leftover adhesive from the dash surface by rubbing with your finger or you can use a mild cleaner as recommended by your vehicle s manufacturer Warning MyFi should be...

Страница 18: ...ging the battery you will see When the battery is exhausted you will see When you use your MyFi for the first time charge the battery until the meter indicates it s fully charged Then use your MyFi until the battery is exhausted This charge discharge cycle calibrates the battery level meter so that it accurately reports the state of the battery Your battery performs best when used and charged in a...

Страница 19: ...e upper left hand corner of the case If you see this on the display NO SIGNAL Cause The XM signal is being blocked ANTENNA Cause Possible problem with the built in or external XM antenna Cause When using home stand or vehicle cradle home or vehicle antenna is not plugged in OFF AIR Cause The channel is not currently broadcasting LOADING Cause Your MyFi is acquiring audio or program information fro...

Страница 20: ...io technology than the other XM channels If this happens There is no power or your MyFi shuts off quickly You do not receive all XM channels you have sub scribed to Audio sounds distorted when using the built in FM transmitter Audio is too soft when using the built in FM transmitter No audio when using the home stand that is con nected to a stereo system You cannot tune to a channel No song title ...

Страница 21: ...e with respect to any Product All implied warranties including warranties of merchantability and fitness for a particular purpose are limited to the warranty period set forth above This warranty is not transferable and applies only to the original consumer purchaser of the Product Delphi will as its sole obligation under this warranty replace or repair at its option any Product that does not confo...

Страница 22: ... additional information is required from Delphi you may call Delphi at 1 877 GO DELPHI 1 877 463 3574 If warranty service is needed at any time during the warranty period the purchaser will be required to furnish a sales receipt proof of purchase indicating the date of purchase amount paid and place of purchase Customers who fail to provide such proof of purchase will be charged for the repair rep...

Отзывы: