background image


9.

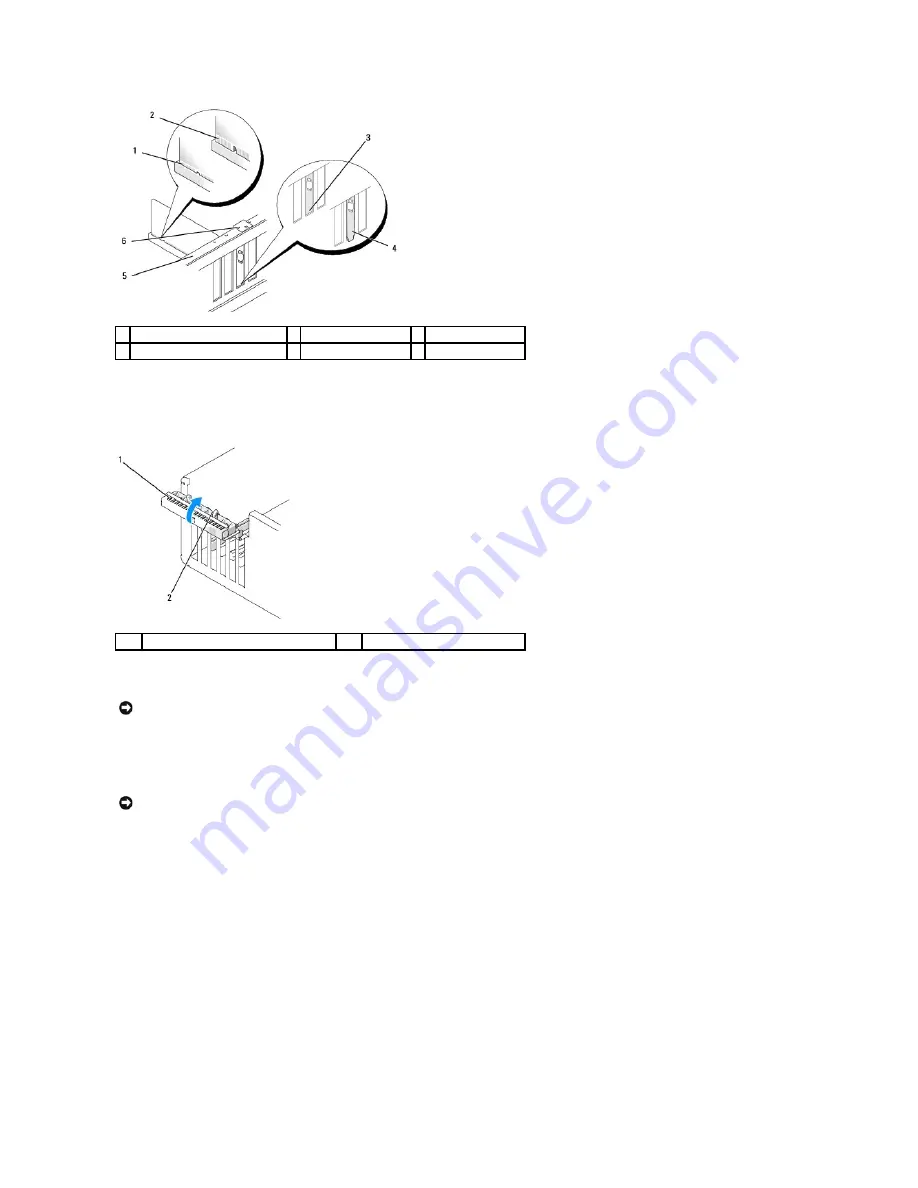
Before you close the card retention door, ensure that:  
 

l


The tops of all cards and filler brackets are flush with the alignment bar. 


l


The notch in the top of the card or filler bracket fits around the alignment guide. 


10.

Close the card retention door by snapping it into place to secure the cards.  


11.

Connect related cables to the card.  
 

See the documentation for the card for information about the card cable connections. 


12.

Before you pivot the card retention mechanism back in place, ensure that:  
 

l


The tops of all cards and filler brackets are flush with the alignment bar. 


l


The notch in the top of the card or filler bracket fits around the alignment guide. 


13.

Snap the card retention mechanism into place, securing the PCI card.  


14.

Replace the computer cover, reconnect the computer and devices to electrical outlets, and then turn them on.  


15.

If you installed a sound card:  
 

a.


Enter system setup, select 

Integrated Audio Controller

, and then change the setting to 

Off

.  


b.


Connect external audio devices to the sound card connectors. Do not connect external audio devices to the integrated microphone, 

speaker/headphone, or line-in connectors on the back panel.  


16.

If you installed an add-in network adapter and want to disable the integrated network adapter:  
 

a.


Enter system setup, select 

Integrated NIC Controller,

 and then change the setting to 

Off

.  


1  fully seated card 

2  not fully seated card 

3  bracket within slot 

4  bracket caught outside of slot 

5  alignment bar 

6  alignment guide 

card retention door 

release tabs (2) 


NOTICE: 

Do not route card cables over or behind the cards. Cables routed over the cards can prevent the computer cover from closing properly or 

cause damage to the equipment.


NOTICE: 

To connect a network cable, first plug the cable into the network device and then plug the cable into the computer.

Содержание XPS 410

Страница 1: ...imension are trademarks of Dell Inc Core is a trademark of Intel Corporation Intel Pentium and SpeedStep are registered trademarks of Intel Corporation Microsoft and Windows are registered trademarks of Microsoft Corporation Other trademarks and trade names may be used in this document to refer to either the entities claiming the marks and names or their products Dell Inc disclaims any proprietary...

Страница 2: ...d any object near the vents NOTICE Keep the vent area clean and dust free to ensure that the system is adequately ventilated Use only a dry cloth to clean the vent area to avoid water damage to the system 6 USB 2 0 connectors 2 Use the front USB connectors for devices that you connect occasionally such as flash memory keys cameras or bootable USB devices For more information on booting to a USB de...

Страница 3: ...ug USB network S PDIF and audio devices into the appropriate connectors see Back Panel Connectors 3 card slots 6 Access connectors for any installed PCI or PCI Express cards 1 link integrity light l Green A good connection exists between a 10 Mbps network and the computer l Orange A good connection exists between a 100 Mbps network and the computer l Yellow A good connection exists between a 1000 ...

Страница 4: ...ith a sound card use the connector on the card 7 line in connector Use the blue line in connector to attach a record playback device such as a cassette player CD player or VCR On computers with a sound card use the connector on the card 8 line out headphone connector Use the green line out connector to attach headphones and most speakers with integrated amplifiers On computers with a sound card us...

Страница 5: ...nking amber the computer is receiving electrical power but an internal power problem might exist Ensure that the voltage selection switch is set to match the AC power at your location if applicable l If the power light is steady amber a device might be malfunctioning or incorrectly installed Remove and then reinstall the memory modules see Installing Memory Remove and then reinstall any cards see ...

Страница 6: ...fied a faulty module or reinstalled all modules without error l If available install properly working memory of the same type into your computer see Installing Memory Memory modules are detected but a memory configuration or compatibility error has occurred l Ensure that no special requirements for memory module connector placement exist see Memory l Ensure that the memory you are using is support...

Страница 7: ...ontacting Dell in your Owner s Manual for instructions on obtaining technical assistance CH 2 Timer Error An error is occurring on the timer on the system board See Contacting Dell in your Owner s Manual for instructions on obtaining technical assistance CMOS Battery State Low CMOS Checksum Failure CMOS System Options Not Set CMOS Display Type Mismatch CMOS Memory Size Mismatch CMOS Time and Date ...

Страница 8: ... on the keyboard if a key appears to be stuck carefully pry it up If the problem persists you may need to replace the keyboard No ROM Basic The operating system cannot be located on drive A or drive C Enter the system setup program see Entering System Setup and confirm that drive A or drive C is properly identified CAUTION Before you begin any of the procedures in this section follow the safety in...

Страница 9: ...k to replace the driver with the previously installed version 1 Click the Start button and click Control Panel 2 Under Pick a Category click Performance and Maintenance 3 Click System 4 In the System Properties window click the Hardware tab 5 Click Device Manager 6 Right click the device for which the new driver was installed and click Properties 7 Click the Drivers tab 8 Click Roll Back Driver If...

Страница 10: ...nd restart your computer Resolving Software and Hardware Incompatibilities If a device is not detected during the operating system setup or is detected but incorrectly configured you can use the Hardware Troubleshooter to resolve the incompatibility To resolve incompatibilities using the Hardware Troubleshooter 1 Click Start then click Help and Support 2 Type hardware troubleshooter in the Search ...

Страница 11: ... down your operating system press and hold the power button for 4 seconds Before Working Inside Your Computer Use the following safety guidelines to help protect your computer from potential damage and to help ensure your own personal safety 1 Turn off your computer See Turning Off Your Computer NOTICE To avoid losing data save and close any open files and exit any open programs before you turn of...

Страница 12: ...ents Page NOTICE To disconnect a network cable first unplug the cable from your computer and then unplug it from the network port or device NOTICE Before touching anything inside your computer ground yourself by touching an unpainted metal surface such as the metal at the back of the computer While you work periodically touch an unpainted metal surface to dissipate any static electricity that coul...

Страница 13: ...be very hot during normal operation Be sure that it has had sufficient time to cool before you touch it Removing the Computer Cover 1 Follow the procedures in Before You Begin 2 If you have installed a security cable remove it from the security cable slot 3 Lay your computer on its side with the computer cover facing up 4 Pull back the cover release latch on the top panel CAUTION Before you perfor...

Страница 14: ...w of Your Computer System Board Components 1 cover release latch 2 computer cover 3 hinge tabs 3 CAUTION Before you perform any of the procedures in this section follow the safety instructions in the Product Information Guide 1 power supply 2 system board 3 hard drive 4 card fan 5 media card reader optional 6 floppy drive optional 7 CD or DVD drive 8 processor fan 9 processor shroud and processor ...

Страница 15: ...odule connectors 1 2 3 4 2 battery socket BATTERY 3 SATA Connectors SATA0 SATA1 4 front panel I O connector 5 main power connector 6 SATA connectors 4 SATA2 SATA3 SATA4 SATA5 7 FlexBay USB connector 8 clear CMOS jumper CLRCMOS 9 password jumper CLRPSWD 10 PCI Express x1 card connector 11 PCI Express x16 card connector 12 PCI Express x4 card connector 13 PCI card connectors 14 floppy drive connecto...

Страница 16: ...n Before You Begin 2 Remove the computer cover see Removing the Computer Cover 3 Lay the computer on its side so that the system board is on the bottom of the inside of the computer 4 Press out the securing clip at each end of the memory module connector 1 Channel A matched pair of memory modules in connectors DIMM_1 and DIMM_2 white securing clips 2 Channel B matched pair of memory modules in con...

Страница 17: ...onnect your computer and devices to electrical outlets and then turn them on 9 Right click the My Computer icon then click Properties 1 memory module connectors 4 2 securing clip 2 1 cutouts 2 2 memory module 3 notch 4 crossbar NOTICE To avoid damage to the memory module press the module straight down into the connector while you apply equal force to each end of the module 1 memory module 2 securi...

Страница 18: ...xpress Card Installing a PCI Card 1 Follow the procedures in Before You Begin 2 Remove the computer cover see Removing the Computer Cover 3 If your computer includes a card retention mechanism to secure the x16 card press the release tab downward gently and then pivot the mechanism upward to access the card slots CAUTION Before you perform any of the procedures in this section follow the safety in...

Страница 19: ...7 Prepare the card for installation See the documentation that came with the card for information on configuring the card making internal connections or otherwise customizing it for your computer 8 Place the card in the connector and press down firmly Ensure that the card is seated fully in the slot 1 release tab 2 card retention mechanism 3 card retention door 1 release tabs 2 2 filler bracket 3 ...

Страница 20: ...trical outlets and then turn them on 15 If you installed a sound card a Enter system setup select Integrated Audio Controller and then change the setting to Off b Connect external audio devices to the sound card connectors Do not connect external audio devices to the integrated microphone speaker headphone or line in connectors on the back panel 16 If you installed an add in network adapter and wa...

Страница 21: ...ed an add in network connector a Enter system setup select Integrated NIC Controller and then change the setting to On b Connect the network cable to the integrated connector on the back panel of the computer PCI Express Cards Your computer supports l One PCI Express x1 card l One PCI Express x16 card l One PCI Express x4 card If you are installing or replacing a PCI Express card follow the proced...

Страница 22: ...nected to the card If your card includes a retention mechanism remove the top of the retention mechanism by pressing the tab and pulling up on the top 6 Pull the securing tab grasp the card by its top corners and then ease it out of its connector 1 card retention door 2 release tabs 2 3 lever on chassis wall may not be present on all computers 4 filler bracket 5 alignment guide 6 alignment bar 1 r...

Страница 23: ...not connect external audio devices to the integrated microphone speaker headphone or line in connectors on the back panel 14 If you installed an add in network adapter and want to disable the integrated network adapter a Enter system setup select Integrated NIC Controller and then change the setting to Off 1 PCI Express x16 card slot 2 PCI Express x16 card 3 securing tab 4 PCI Express x1 card 5 PC...

Страница 24: ...r computer rotate the lever on the chassis wall upward 4 Push the two release tabs on the card retention door from the inside to pivot the door open the hinged door will remain in the open position 5 If your computer includes a card retention mechanism to secure the x16 card press the release tab downward gently and then pivot the mechanism upward to access the card slots 1 card retention door 2 r...

Страница 25: ...nels Removing the Drive Panel 1 Follow the procedures in Before You Begin 2 Remove the computer cover see Removing the Computer Cover 1 PCI Express x16 card slot 2 PCI Express x16 card 3 securing tab 4 PCI Express x1 card 5 PCI Express x1 card slot NOTICE Ensure that you release the securing tab to unseat the card If the card is not removed correctly the system board may be damaged NOTE Installing...

Страница 26: ...anel sideways and find the tip of the drive panel insert tab that latches over a tab on the right side of the drive panel 2 Pull the inner tip of the drive panel insert tab away from the drive panel 3 Pivot the drive panel insert out and away from the drive panel 4 Set the drive panel insert aside in a secure location Installing the Drive Panel Insert 1 sliding plate 2 sliding plate lever 3 drive ...

Страница 27: ...edures in Before You Begin 2 Align the drive panel tabs with the side door hinges 3 Rotate the drive panel toward the computer until the sliding plate lever clicks into place and the drive panel snaps into place on the front panel Drives Your computer supports l Two hard drives Serial ATA l Two CD or DVD drives l Two FlexBay drives can contain an optional floppy drive and optional Media Card Reade...

Страница 28: ...TA3 5 SATA4 6 SATA5 CAUTION Before you perform any of the procedures in this section follow the safety instructions in the Product Information Guide CAUTION To guard against electrical shock always unplug your computer from the electrical outlet before opening the cover NOTICE To avoid damage to the drive do not set it on a hard surface Instead set the drive on a surface such as a foam pad that wi...

Страница 29: ...entation for the drive to verify that the drive is configured for your computer 5 If your replacement hard drive does not have the hard drive bracket attached remove the bracket from the old hard drive by unsnapping it from the drive 6 Snap the hard drive bracket onto the replacement hard drive 7 Install the hard drive into the computer by sliding the drive into place until you feel it click into ...

Страница 30: ... Slide the new hard drive into empty bay until you feel a click 7 Connect the power and hard drive cables to the drive Refer to General Installation Guidelines to identify the hard drive cable connectors on the system board 1 power cable 2 hard drive cable NOTICE To connect a network cable first plug the cable in to the network wall jack and then plug the cable into the computer CAUTION Before you...

Страница 31: ...e 4 Unhook floppy drive cable from the clips on the processor shroud Disconnect the other end of the floppy drive cable from the system board Remove the floppy drive cable from the computer 1 power cable 2 hard drive cable NOTICE To connect a network cable first plug the cable into the network wall jack and then plug it into the computer CAUTION Before you perform any of the procedures in this sec...

Страница 32: ...able connections Fold the ribbon cable and place it across the top of the processor shroud inserting the sides under the clips Ensure that the cable does not block airflow for the fan and cooling vents 7 Replace the computer cover 8 Connect your computer and devices to their electrical outlets and then turn them on See the documentation that came with the floppy drive for instructions on installin...

Страница 33: ...system board see System Board Components Remove the cable from any clips and lift out of the computer 7 Pull the sliding plate to the right and hold in place Then slide the drive out the front of the computer CAUTION Before you perform any of the procedures in this section follow the safety instructions in the Product Information Guide NOTICE To prevent static damage to components inside your comp...

Страница 34: ...ttach the screws to the new drive 7 Gently slide the drive into place until you feel a click or feel the drive securely installed Ensure that the Media Card Reader is installed before the USB cable is connected 8 Connect the USB cable to the back of the Media Card Reader and to the USB connector on the system board see System Board Components CAUTION Before you perform any of the procedures in thi...

Страница 35: ...e shoulder screw and slide the drive out to remove it from the drive bay Installing a CD DVD Drive CAUTION Before you perform any of the procedures in this section follow the safety instructions in the Product Information Guide CAUTION To guard against electrical shock always unplug your computer from the electrical outlet before opening the cover NOTE If removing or installing the drive changes t...

Страница 36: ...ive and the CD DVD cable to the drive and system board 7 Check all cable connections and fold cables out of the way to provide airflow for the fan and cooling vents 8 Replace the computer cover see Replacing the Computer Cover 9 Connect your computer and devices to their electrical outlets and then turn them on See the documentation that came with the drive for instructions on installing any softw...

Страница 37: ...nap the battery into place 7 Replace the computer cover see Replacing the Computer Cover 8 Connect your computer and devices to electrical outlets and then turn them on 9 Enter system setup and restore the settings you recorded in step 1 see Entering System Setup 10 Properly dispose of the old battery Power Supply CAUTION A new battery can explode if it is incorrectly installed Replace the battery...

Страница 38: ...ecure the power supply to the back of the computer frame 3 Reconnect the DC power cables 4 Connect the AC power cable to the connector 5 Run the cables underneath the clips and press the clips to close them over the cables 6 Replace the computer cover see Replacing the Computer Cover NOTE Note the routing of the DC power cables underneath the tabs in the computer frame as you remove them from the ...

Страница 39: ... plastic heat sink assembly shield 6 Rotate the heat sink assembly toward the rear of the computer and remove it from the computer CAUTION Before you begin any of the procedures in this section follow the safety instructions in the Product Information Guide NOTICE To prevent static damage to components inside your computer discharge static electricity from your body before you touch any of your co...

Страница 40: ...g a processor upgrade kit from Dell discard the original heat sink If you are not installing a processor upgrade kit from Dell reuse the original heat sink when you install your new processor 1 processor cover 2 processor 3 processor socket 4 release lever NOTICE When the release lever is freed the processor may shift in place Before securing the processor cover after it has been opened ensure tha...

Страница 41: ... sink assembly down towards the computer base and tighten the two captive screws 9 Place the floppy ribbon cable back across the top of the processor shroud inserting the sides under the clips Ensure that the cable does not block airflow from the fan and cooling vents 1 processor cover 2 securing tab 3 processor 4 processor socket 5 center cover latch 6 release lever 7 front alignment notch 8 sock...

Страница 42: ...ook the floppy drive cable from clips on processor shroud and move it out of the way NOTICE To connect a network cable first plug the cable into the network port or device and then plug the cable into the computer CAUTION Before you begin any of the procedures in this section follow the safety instructions in the Product Information Guide CAUTION To guard against electrical shock always unplug you...

Страница 43: ...e place 8 Disconnect the system fan cable from the system board 9 Ensure that all cables have been removed from the routing clips on the top of the system fan assembly 1 release tab 2 card retention mechanism 3 card retention door 4 heat sink captive screws 2 CAUTION The heat sink assembly may be very hot during normal operation Be sure that it has had sufficient time to cool before you touch it 1...

Страница 44: ...l Otherwise a jumper block is installed 16 If an optional IEEE 1394 cable is installed in the front port remove the cable from the front of the computer by following the instructions that came with the connector 17 Remove the mounting screw from the front of the I O panel 18 Remove the I O panel from the computer Installing the I O Panel 1 fan release lever 2 fan 3 drive panel NOTE If the I O pane...

Страница 45: ...ink assembly 6 Rotate the heat sink assembly towards the rear of the computer and remove it from the computer CAUTION Before you begin any of the procedures in this section follow the safety instructions in the Product Information Guide CAUTION To guard against electrical shock always unplug your computer from the electrical outlet before opening the cover NOTICE To prevent static damage to compon...

Страница 46: ...e system board and the fan Follow the removal procedure Removing the Processor Fan in reverse order Card Fan 1 heat sink and fan shroud assembly 2 captive screw housing 2 1 fan release lever 2 fan release lever tab 3 processor fan 4 card fan NOTICE Ensure that the four fan tabs are fully inserted into the four keyhole slots in the bottom cover so that the fan can slide back fully into position Ens...

Страница 47: ...puter and attached devices are turned off If your computer and attached devices did not automatically turn off when you shut down your computer turn them off now 1 fan release lever 2 fan release lever tab 3 processor fan 4 card fan NOTICE Ensure that the four fan tabs are fully inserted into the four keyhole slots in the bottom cover so that the fan can slide back fully into position Ensure that ...

Страница 48: ... Board 1 Gently align the board into the chassis and slide it toward the back of the computer 2 Replace the screws on the system board 3 Replace any components and cables that you removed from the system board 4 Install the memory modules that were removed from the old system board see Installing Memory 5 Reconnect all cables to their connectors at the back of the computer 6 Replace the computer c...

Страница 49: ...il it closes c Press down on the left side of the cover until it closes 4 Ensure that both sides of the cover are locked If not repeat all of step 3 5 Connect your computer and devices to electrical outlets and then turn them on Back to Contents Page NOTICE To connect a network cable first plug the cable into the network wall jack and then plug it into the computer ...

Страница 50: ...els eight Interrupt levels 24 BIOS chip NVRAM 4 MB NIC Integrated Intel 82566DC Gigabit Network Connection System clock 800 or 1066 MHz data rate depending on your processor Video Type PCI Express Audio Type Sigmatel 9227 audio codec Internal 7 1 channel or PCI option cards Expansion Bus Bus type PCI 32 bit PCI Specification 2 2 PCI Express x1 x4 and x16 PCI express 1 1a Bus speed PCI 33 MHz PCI E...

Страница 51: ...crophone rear surround side surround center subwoofer Low Frequency Effects LFE channel and S PDIF two front panel connectors for headphones microphone System board connectors Serial ATA six 7 pin connectors FlexBay Drive USB 9 pin header for optional Media Card Reader 3 5 inch bay devices Fan 5 pin connectors PCI three 120 pin connectors PCI Express x1 36 pin connector PCI Express x4 x8 98 pin co...

Страница 52: ...s in the Product Information Guide for important voltage setting information 90 to 135 V and 180 to 265 V at 50 60 Hz Backup battery 3 V CR2032 lithium coin cell Physical Height 46 05 cm 18 13 in Width 18 75 cm 7 38 in Depth 45 42 cm 17 88 in Weight 12 7 kg 28 lb Environmental Temperature Operating 10 to 35 C 50 to 95 F Storage 40 to 65 C 40 to 149 F Relative humidity 20 to 80 noncondensing Maximu...

Страница 53: ...e areas the options list active options field and key functions System Setup Options NOTICE Expert computer users only can safely change the settings for this program Certain changes can cause your computer to work incorrectly NOTE The F2 prompt indicates that the keyboard has initialized If you press F2 before you are prompted the keystroke will be lost Options List This field appears on the left...

Страница 54: ...uter attempts to boot from the next device in the boot sequence list Integrated Audio Enables or disables the onboard audio controller USB Controller Set to On default so that USB devices will be detected and supported in the operating system USB for FlexBay This field enables and disables the internal USB for FlexBay l Off Internal USB for FlexBay is disabled l On Internal USB for FlexBay is enab...

Страница 55: ...g a power strip or surge protector Remote Wake Up This option allows the computer to power up when a NIC or Remote Wakeup capable modem receives a wake up signal On is the default setting On w Boot to NIC allows the computer to attempt to boot from a network prior to using the boot sequence NOTE Normally the system can be powered up remotely from suspend mode hibernate mode or when powered off Qui...

Страница 56: ...evice Menu appears listing all available boot devices Each device has a number next to it 4 At the bottom of the menu enter the number of the device that is to be used for the current boot only For example if you are booting to a USB memory key highlight USB Device and press Enter Changing Boot Sequence for Future Boots 1 Enter system setup see Entering System Setup 2 Use the arrow keys to highlig...

Страница 57: ... turn them on Clearing CMOS Settings 1 Follow the procedures in Before Working Inside Your Computer 2 Reset the current CMOS settings a Locate the 2 pin CMOS jumper CLRCMOS on the system board see System Board Components b Remove the jumper plug from the password jumper CLRPSWD pins 1 and 2 c Place the jumper plug on the CMOS jumper CLRCMOS pins 1 and 2 and wait approximately five seconds d Remove...

Страница 58: ...es I Accept the Agreement The FIle Download window appears 5 Click Save this program to disk and then click OK The Save In window appears 6 Click the down arrow to view the Save In menu select Desktop and then click Save The file downloads to your desktop 7 Click Close when the Download Complete window appears The file icon appears on your desktop and is titled the same as the download BIOS update...

Страница 59: ...upply DC Connector Pin Assignments Inside View of Your Computer System Board Components CAUTION Before you use this information in any of the procedures follow the safety instructions in the Product Information Guide 1 floppy drive optional 2 CD or DVD drive 3 power supply 4 system board 5 hard drive 6 media card reader optional ...

Страница 60: ...A3 SATA4 SATA5 7 FlexBay USB connector 8 clear CMOS jumper CLRCMOS 9 password jumper CLRPSWD 10 PCI Express x1 card connector 11 PCI Express x16 card connector 12 PCI Express x4 card connector 13 PCI card connectors 14 floppy drive connector FLOPPY 15 PS 2 and Serial connector 16 rear fan connector 17 thermal sensor connector 18 CPU fan connector 19 processor and heat sink connector 20 processor p...

Страница 61: ...AWG 7 COM Black 18 AWG 8 POK Gray 18 AWG 9 5 VFP Purple 18 AWG 10 12 VB DC White 18 AWG 11 12VB DC White 18 AWG 12 3 3 VDC Orange 18 AWG 13 3 3 VDC Orange 18 AWG 14 12 VDC Blue 18 AWG 15 COM Black 18 AWG 16 PS ON Green 18 AWG 17 COM Black 18 AWG 18 COM Black 18 AWG 19 COM Black 18 AWG 20 N C N C 18 AWG 21 5 VDC Red 18 AWG 22 5 VDC Red 18 AWG 23 5 VDC Red 18 AWG 24 COM Black 18 AWG ...

Страница 62: ...Number Signal Name 18 AWG Wire 1 COM Black 2 COM Black 3 12 VA DC Yellow 4 12 VA DC Yellow Pin Number Signal Name 18 AWG Wire 1 N C N C 2 COM Black 3 COM Black 4 3 3 VDC Orange 5 5 VDC Red 6 12A VDC Yellow Pin Number Signal Name 18 AWG Wire 1 3 3 VDC Orange 2 COM Black 3 5 VDC Red 4 COM Black 5 12 VB DC White ...

Страница 63: ...A VDC Yellow Pin Number Signal Name 18 AWG Wire 1 12 VA DC Yellow 2 COM Black 3 COM Black 4 5V DC Red NOTE The P10 connector is intended for use with PCI Express graphics cards that have power requirements exceeding 75 watts Pin Number Signal Name 18 AWG Wire 1 12 B VDC White 2 12 B VDC White 3 12 B VDC White 4 COM Black 5 COM Black 6 COM Black ...

Отзывы: