background image

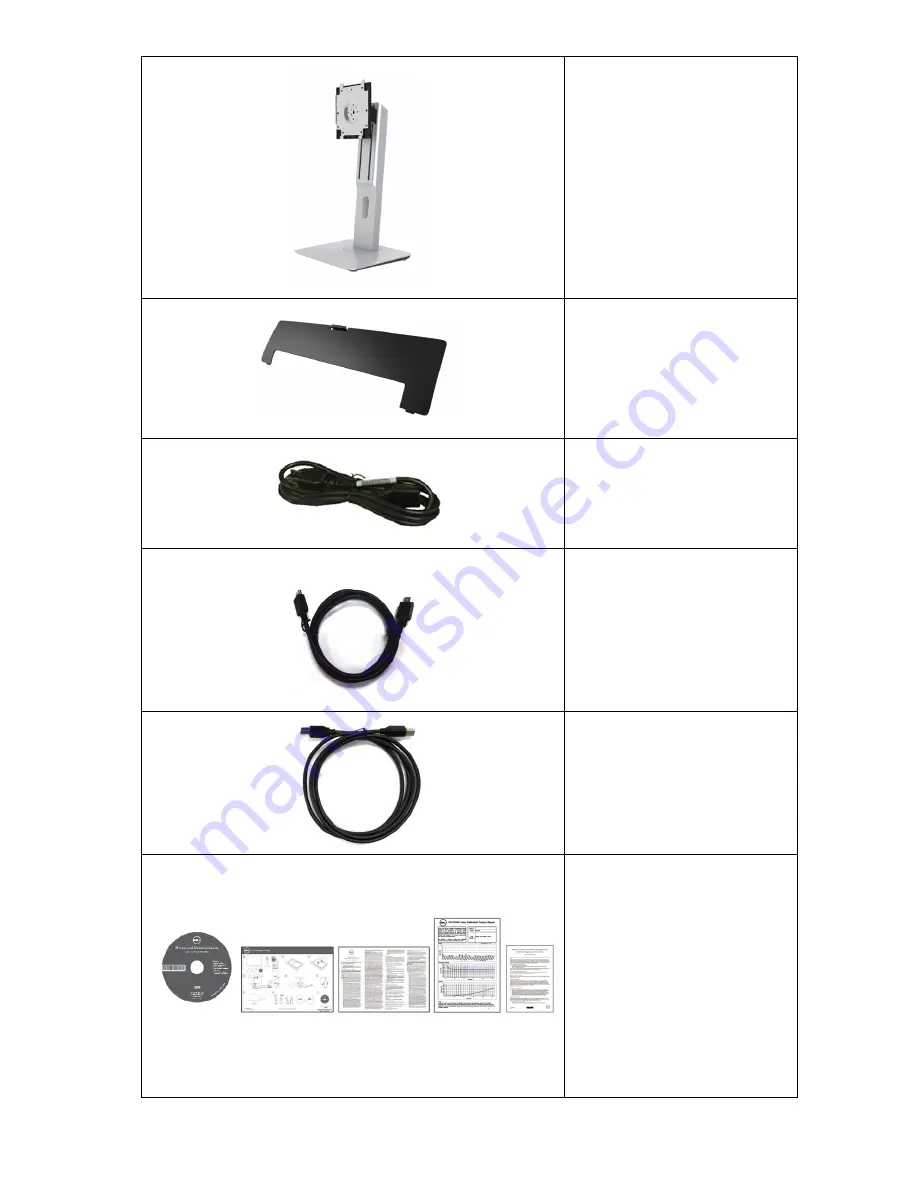
Stand

Cable Cover

Power Cable (Varies by 
Countr

ies

)

HDMI Cable

USB 3.0 Upstream Cable 
(Enables the USB Ports on 
the Monitor)

Drivers and 
Documentation Media

Quick Setup Guide

Safety, Environmental, 
and Regulatory 
Information

Factory Calibration 
Report

Wireless Safety and 
Regulatory Information

6

  |  About 

Your 

Monitor

Содержание U2417HWi

Страница 1: ...Dell UltraSharp U2417HWi Monitor User s Guide Model U2417HWi Regulatory model U2417HWib ...

Страница 2: ...operty damage personal injury or death ____________________ Copyright 2016 Dell Inc All rights reserved This product is protected by U S and international copyright and intellectual property laws DellTM and the Dell logo are trademarks of Dell Inc in the United States and or other jurisdictions Android Google Google Play and other marks are trademarks of Google Inc All other marks and names mentio...

Страница 3: ...lity 17 Universal Serial Bus USB Interface 17 LCD Monitor Quality and Pixel Policy 18 Maintenance Guidelines 19 Setting Up the Monitor 20 Attaching the Stand 20 Connecting Your Monitor 21 Organizing Your Cables 22 Attaching the Cable Cover 23 Removing the Monitor Stand 23 Removing the Cable Cover 24 Wall Mounting Optional 24 Operating the Monitor 26 Power On the Monitor 26 ...

Страница 4: ...isplay Settings of Your System 47 Mirroring Your Device s Screen on the Monitor 48 Setting Up Wireless Connection 48 Connecting the Monitor via Screencast or Screen Mirror 50 Troubleshooting 69 Self Test 69 Built in Diagnostics 70 Common Problems 71 Product Specific Problems 73 Universal Serial Bus USB Specific Problems 73 Wireless Connection Problems 74 Appendix 75 FCC Notices U S Only and Other ...

Страница 5: ...iFi Direct interface The Laptop is displayed in full screen and the Mobile Phone is displayed as an overlay PiP image NOTE The monitor is equipped with an antenna of the radio transmitter so we recommend that you keep a safe distance of 20 cm at least between the monitor and you Package Contents Your monitor ships with the components shown below Ensure that you have received all the components and...

Страница 6: ... Cable USB 3 0 Upstream Cable Enables the USB Ports on the Monitor Drivers and Documentation Media Quick Setup Guide Safety Environmental and Regulatory Information Factory Calibration Report Wireless Safety and Regulatory Information 6 About Your Monitor ...

Страница 7: ... only helps future proof your monitor Plug and play capability if supported by your system Color gamut of 96 sRGB CIE1931 with an average Delta E of 4 On Screen Display OSD adjustments for ease of set up and screen optimization Software and documentation media includes an Information File INF Image Color Matching File ICM and product documentation Dell Display Manager Software included comes in th...

Страница 8: ...bout Your Monitor Identifying Parts and Controls Front View Front panel controls Description 1 Function buttons For more information see Operating the Monitor 2 Power On Off button with LED indicator Label ...

Страница 9: ...nt kit 100 mm x 100 mm 2 Regulatory label Lists the regulatory approvals 3 Stand release button Releases stand from monitor 4 Security lock slot Secures monitor with security lock security lock not included 5 Barcode serial number label Refer to this label if you need to contact Dell for technical support 6 Cable management slot Use to organize cables by placing them through the slot Label ...

Страница 10: ...Soundbar mounting slots Attach the optional Dell Soundbar Concealed below removable plastic sheets 3 HDMI port connector Connect your computer with HDMI cable 4 Audio Line out Connect your speakers 5 USB upstream port Connect the USB cable that came with your monitor to the computer Once this cable is connected you can use the USB connectors on the monitor ...

Страница 11: ...ing Connect to charge your device 8 Micro B port This port is for service or debugging only NOT for end user 9 Stand lock feature To lock the stand to the monitor using a M3 x 6 mm screw screw not included Model U2417HWi Screen type Active matrix TFT LCD Panel technology In Plane Switching Type Viewable image Diagonal Horizontal Active Area Vertical Active Area Area 604 70 mm 23 8 inches 527 04 mm...

Страница 12: ...cklight LED edgelight system Response time 14 ms gray to gray typical 8 ms with Overdrive typical Color depth 16 77 million colors Color gamut CIE1976 85 CIE 1931 72 Model U2417HWi Model U2417HWi Display Mode Horizontal Frequency kHz Vertical Frequency Hz Pixel Clock MHz Sync Polarity Horizontal Vertical VESA 720 x 400 31 5 70 1 28 3 VESA 640 x 480 31 5 60 0 25 2 VESA 640 x 480 37 5 75 0 31 5 VESA...

Страница 13: ...rd for 2K and 4K digital cinema resolution Physical Characteristics VESA 1600 x 1200 75 0 60 0 162 0 VESA 1920 x 1080 67 5 60 0 148 5 Model U2417HWi Model U2417HWi Connector type HDMI USB 3 0 Signal cable type Digital HDMI 19 pins Universal Serial Bus USB 9 pins Dimensions with stand Height extended 485 8 mm 19 12 inches Height compressed 355 8 mm 14 00 inches Width 539 1 mm 21 23 inches Depth 185...

Страница 14: ...ondensing Non operating Storage 5 to 90 non condensing Shipping 5 to 90 non condensing Operating 5 000 m 16 404 ft maximum Non operating 12 192 m 40 000 ft maximum 115 94 BTU hour maximum 78 43 BTU hour typical Weight Weight with packaging 7 66 kg 16 88 lb Weight with stand assembly and cables 5 42 kg 11 95 lb Weight without stand assembly For wall mount or VESA mount considerations no cables 3 28...

Страница 15: ... W Energy Star Power Consumption On Mode 18 W NOTE This monitor is ENERGY STAR compliant The OSD functions only in the normal operation mode When any button is pressed under HDMI mode with Auto Select function turned Off the following message will be displayed Activate the computer and the monitor to gain access to the OSD Zero power consumption in OFF mode can only be achieved by disconnecting th...

Страница 16: ...d Pin Assignments HDMI Connector Pin Number 19 pin Side of the Connected Signal Cable TMDS DATA 2 TMDS DATA 2 SHIELD TMDS DATA 2 TMDS DATA 1 TMDS DATA 1 SHIELD TMDS DATA 1 TMDS DATA 0 TMDS DATA 0 SHIELD TMDS DATA 0 TMDS CLOCK TMDS CLOCK SHIELD TMDS CLOCK CEC Reserved N C on device DDC CLOCK SCL DDC DATA SDA DDC CEC Ground 5V POWER HOT PLUG DETECT 1 2 3 4 5 6 7 8 9 10 11 12 13 14 15 16 17 18 19 ...

Страница 17: ...re information about changing the monitor settings see Operating the Monitor Universal Serial Bus USB Interface This section gives you information about the USB ports that are available on the monitor Transfer Speed Data Rate Power Consumption Super speed 5 Gbps 4 5 W Max each port High speed 480 Mbps 4 5 W Max each port Full speed 12 Mbps 4 5 W Max each port NOTE This monitor is High Speed USB 3 ...

Страница 18: ...monitor s USB interface works only when the monitor is On or in the power save mode If you turn Off the monitor and then turn it On the attached peripherals may take a few seconds to resume normal functionality LCD Monitor Quality and Pixel Policy During the LCD Monitor manufacturing process it is not uncommon for one or more pixels to become fixed in an unchanging state which are hard to see and ...

Страница 19: ...ecial screen cleaning tissue or solution suitable for the anti static coating Do not use benzene thinner ammonia abrasive cleaners or compressed air Use a lightly dampened warm cloth to clean the monitor Avoid using detergent of any kind as some detergents leave a milky film on the monitor If you notice white powder when you unpack your monitor wipe it off with a cloth Handle your monitor with car...

Страница 20: ... applicable for a monitor with a stand When any other stand is bought please refer to the respective stand setup guide for the set up instructions To attach the monitor stand 1 Remove the cover and place the monitor on it 2 Fit the two tabs on the upper part of the stand to the groove on the back of the monitor 3 Press the stand till it snaps into place ...

Страница 21: ...that you keep a safe distance of 20 cm at least between the monitor and you NOTE Do not connect all cables to the computer at the same time To connect your monitor to the computer 1 Turn Off your computer and disconnect the power cable 2 Connect the HDMI to HDMI cable from your monitor to the computer Connecting the HDMI cable CAUTION The graphics are used for the purpose of illustration only Appe...

Страница 22: ...SB 3 0 peripherals to the downstream USB 3 0 ports on the monitor 3 Plug the power cables for your computer and monitor into a nearby outlet 4 Turn On the monitor and the computer If your monitor displays an image installation is complete If it does not display an image see Universal Serial Bus USB Specific Problems 5 Use the cable slot on the monitor stand to organize the cables Organizing Your C...

Страница 23: ...ver till it snaps into place Removing the Monitor Stand NOTE To prevent scratches on the LCD screen while removing the stand ensure that the monitor is placed on a soft clean surface NOTE This is applicable for a monitor with a stand When any other stand is bought please refer to the respective stand setup guide for the set up instructions To remove the stand 1 Place the monitor on a soft cloth or...

Страница 24: ... the back of the monitor Wall Mounting Optional Screw dimension M4 x 10 mm Refer to the instructions that come with the VESA compatible wall mounting kit 1 Place the monitor panel on a soft cloth or cushion on a stable flat table 2 Remove the stand 3 Use a Phillips crosshead screwdriver to remove the four screws securing the plastic cover 4 Attach the mounting bracket from the wall mounting kit to...

Страница 25: ...Monitor 25 5 Mount the monitor on the wall by following the instructions that comes with the wall mounting kit NOTE For use only with UL listed wall mount bracket with minimum weight load bearing capacity of 13 12 kg ...

Страница 26: ...by mode During standby mode the white LED indicator on the Power button blinks slowly a long press on the Power button will put the monitor into power off mode When the input source is set to HDMI a press on the Power button will put the monitor into power off mode NOTE If the HDMI cable is disconnected from the HDMI port or your system is in the standby mode the Power button blinks white indicati...

Страница 27: ...cut key Preset Modes Use this button to choose from a list of preset color modes 2 Shortcut key Brightness Contrast Use this button to directly access the Brightness Contrast menu 3 Menu Use the MENU button to launch the On Screen Display OSD and select the OSD Menu See Accessing the Menu System 4 Exit Use this button to go back to the main menu or exit the OSD main menu 5 Power with power light i...

Страница 28: ...e image settings Front Panel Button Description 1 Up Use the Up button to adjust increase ranges items in the OSD menu 2 Down Use the Down button to adjust decrease ranges items in the OSD menu 3 OK Use the OK button to confirm your selection 4 Back Use the Back button to go back to the previous menu ...

Страница 29: ... to launch the OSD menu and display the main menu 2 Press the and buttons to move between the setting options As you move from one icon to another the option name is highlighted See the following table for a complete list of all the options available for the monitor 3 Press the button once to activate the highlighted option 4 Press and button to select the desired parameter 5 Press to enter the sl...

Страница 30: ...the button to decrease the brightness min 0 max 100 NOTE Manual adjustment of Brightness is disabled when Dynamic Contrast is switched On Contrast Adjust the Brightness first and then adjust the Contrast only if further adjustment is necessary Press the button to increase the contrast and press the button to decrease the contrast min 0 max 100 The Contrast function adjusts the degree of difference...

Страница 31: ...he Wireless input when you intend to use the wireless connection Use to select the Wireless input source HDMI Select the HDMI input when you are using the HDMI connector Press to select the HDMI input source Auto Select Turning on the function allows you to scan for available input sources Reset Input Source Reset your monitor input settings to the factory settings ...

Страница 32: ...r movies Game Loads color settings ideal for most gaming applications Paper Loads brightness and sharpness settings ideal for viewing text Blend the text background to simulate paper media without affecting color images Applies to RGB input format only Color Temp Allows users to select the color temperature 10000K 9300K 7500K 6500K 5700K and 5000K sRGB Emulates 72 NTSC color Custom Color Allows yo...

Страница 33: ... using the HDMI cable or if the DVD color output setting is not RGB Gamma Allows you to set the Gamma to PC or MAC Hue This feature can shift the color of the video image to green or purple This is used to adjust the desired flesh tone color Use or to adjust the hue from 0 to 100 Press to increase the green shade of the video image Press to increase the purple shade of the video image NOTE Hue adj...

Страница 34: ... monitor color settings to the factory settings Display Use Display to adjust image Aspect Ratio Adjusts the image ratio to Wide 16 9 4 3 or 5 4 Sharpness This feature can make the image look sharper or softer Use or to adjust the sharpness from 0 to 100 Dynamic Contrast Allows you to increase the level of contrast to provide sharper and more detailed image quality Press the button to select the D...

Страница 35: ...th any user activity detected When disabled The monitor remains active at all times and does not go into Off mode Power Button LED Allows you to set the power LED indicator On or Off to save energy USB Allows you to enable or disable USB function during monitor standby mode NOTE USB ON OFF under standby mode is only available when the USB upstream cable is unplugged This option will be grayed out ...

Страница 36: ...his option to change the menu transparency by using the and buttons min 0 max 100 Timer OSD Hold Time sets the length of time the OSD will remain active after the last time you pressed a button Use or to adjust the slider in 1 second increments from 5 to 60 seconds Lock Controls user access to adjustments When Lock is selected no user adjustments are allowed All buttons are locked NOTE Unlock func...

Страница 37: ...Operating the Monitor 37 Personalize Users can choose a feature from Preset Modes Brightness Contrast Input Source Aspect Ratio or Rotation and set it as a shortcut key ...

Страница 38: ...Data Channel Command Interface allows your monitor parameters brightness color balance and etc to be adjustable via the software on your computer You can disable this feature by selecting Disable Enable this feature for best user experience and optimum performance of your monitor NOTE This function is only available when using an HDMI connection ...

Страница 39: ...hese preset modes Game or Movie manual brightness adjustment is disabled LCD Conditioning Helps reduce minor cases of image retention Depending on the degree of image retention the program may take some time to run You can enable this feature by selecting Enable Reset Others Reset all settings under the Others menu to the factory preset values Factory Reset Reset all settings to the factory preset...

Страница 40: ... it is receiving from the computer See Monitor Specifications for the Horizontal and Vertical frequency ranges addressable by this monitor Recommended mode is 1920 x 1080 You will see the following message before the DDC CI function is disabled When the monitor goes into power save mode the following message appears or Activate the computer and wake up the monitor to gain access to the OSD ...

Страница 41: ...than the power button the following message will appear under HDMI mode with Auto Select function turned off If HDMI input is selected and the corresponding cable is not connected a dialog box as shown below appears See Troubleshooting for more information ...

Страница 42: ...tings 2 Click Advanced display settings 3 Click the Dropdown list of Resolution and select 1920 x 1080 4 Click Apply If you do not see 1920 x 1080 as an option you may need to update your graphics driver Depending on your computer complete one of the following procedures If you have a Dell desktop or portable computer Go to http www dell com support enter your service tag and download the latest d...

Страница 43: ...pective stand setup guide for set up instructions Tilt Swivel With the stand attached to the monitor you can tilt and swivel the monitor for the most comfortable viewing angle NOTE The stand is detached when the monitor is shipped from the factory Vertical Extension NOTE The stand extends vertically up to 130 mm The figure below illustrates how to extend the stand vertically ...

Страница 44: ...the Monitor Rotating the Monitor Before you rotate the monitor your monitor should be fully vertically extended Vertical Extension and fully tilted up to avoid hitting the bottom edge of the monitor Rotate clockwise ...

Страница 45: ...andscape versus Portrait view with your Dell computer you require an updated graphics driver that is not included with this monitor To download the graphics driver go to www dell com support and see the Download section for Video Drivers for latest driver updates NOTE When in the Portrait View Mode you may experience performance degradation in graphic intensive applications 3D Gaming and etc ...

Страница 46: ...to rotate 90 clockwise 90 counterclockwise and reverse 180 mount enable the thinnest borders of each monitor to be placed side by side to ensure minimum gap between display images The recommended dual monitor setup Landscape side by side Landscape Top bottom ...

Страница 47: ...splay Settings 1 Right click on the desktop and click Properties 2 Select the Settings tab and click Advanced 3 If you have an ATI graphics card select the Rotation tab and set the preferred rotation 4 If you have an nVidia graphics card click the nVidia tab in the left hand column select NVRotate and then select the preferred rotation 5 If you have an Intel graphics card select the Intel graphics...

Страница 48: ...hen the input source for the monitor is set to wireless the Dell wireless home screen allows you to configure more advanced wireless settings Navigating the Home Screen Dell xxxx 1 2 3 Connect your device Windows users visit www dell com wirelessmonitors Get the app on Google Play DELL Wireless Monitor NOTE The illustration is for reference only and may differ from the newer versions Label Item De...

Страница 49: ...ox Then use the keyboard to change the network name SSID of the your monitor Advanced The default setting is Enabled allowing you to mirror two of your Screencast capable devices screens in real time Factory Reset Select OK to restore default settings Selecting Cancel will quit without saving About Select to view the current version number 2 Settings The Settings menu is your main hub for your wir...

Страница 50: ...ay store Click the link below to see more details Using Settings on an Android Smartphone Using DELL Wireless Monitor App on an Android Smartphone NOTE The environment surrounding the monitor and the computer may affect transmission signal and compromise signal strength Avoid placing objects between the monitor and the connecting device that may interfere with the normal wireless operations Using ...

Страница 51: ... the SSID name as displayed on your monitor from the list Then select on your monitor to accept connection and your device will start projecting images to your monitor NOTE You will not be asked to verify subsequent connections for the same device NOTE To control the projected images with keyboard and mouse connected to your monitor select Allow input from a keyboard or mouse connected to this dis...

Страница 52: ... Mirroring Your Device s Screen on the Monitor Changing the Projection Mode 1 Select Project from the Action Center Project 2 Select your Projection Mode PC screen only Duplicate Extend Second screen only ...

Страница 53: ... on the Monitor 53 Disconnecting from a Device 1 Select Connect from the Action Center Connect 2 Select Disconnect and your device will stop projecting images to your monitor Connected Second Screen Change projection mode Disconnect ...

Страница 54: ...illustrations below are for reference only and may differ from your actual computer screen based on the settings version and the language of your operating system Connecting to a Device 1 Select Devices from the Charms bar Devices 2 Select Project from the Devices menu Project ...

Страница 55: ...t Add a wireless display from the Project menu Then select on your monitor to accept connection and your device will start projecting images to your monitor NOTE You will not be asked to verify subsequent connections for the same device NOTE You may control the projected images with keyboard and mouse connected to your monitor ...

Страница 56: ...56 Mirroring Your Device s Screen on the Monitor Changing the Projection Mode 1 Select Devices from the Charms bar Devices 2 Select Project from the Devices menu Project ...

Страница 57: ...Duplicate Extend Second screen only Mirroring Your Device s Screen on the Monitor 57 3 Select your Projection Mode Disconnecting from a Device 1 Select Devices from the Charms bar Devices ...

Страница 58: ...Project 58 Mirroring Your Device s Screen on the Monitor 2 Select Project from the Devices menu 3 Select Disconnect and your device will stop projecting images to your monitor Disconnect ...

Страница 59: ...iffer from your actual computer screen based on the settings version and the language of your operating system Connecting to a Device 1 Open the Dell Wireless Monitor Software and it will automatically search for available devices Wireless Monitor Select a monitor Refresh Searching 2 When the SSID name as displayed on your monitor shows up on the list click Connect Wireless Monitor Select a monito...

Страница 60: ...on and your device will start projecting images to your monitor NOTE You will not be asked to verify subsequent connections for the same device Changing the Projection Mode 1 Click on the Dell Wireless Monitor Software 2 Select your Projection Mode Wireless Monitor Disconnect Dell xxxx PC only Duplicate Extend Second screen only ...

Страница 61: ... device 2 Tap Display then tap Screen Mirroring depending on your device manufacturer the name may be different 3 Tap Cast 4 Tap the Menu icon then select Enable wireless display 5 Wait for a couple of seconds for the connection then select on your monitor to accept connection and your device will start projecting images to your monitor Android_xxxx is trying to connect NOTE You will not be asked ...

Страница 62: ...n on Wi Fi and Bluetooth connection on your Android device NOTE If the Bluetooth on your Android device is turned on before making the connection you will be able to control the casted screen with keyboard or mouse connected to your monitor after connection is made 2 Tap to activate the DELL Wireless Monitor app on your Android device ...

Страница 63: ...the Monitor 63 3 Tap Cast Settings 4 Tap the SSID name as displayed on your monitor Wireless display Wireless display Then select on your monitor to accept connection and your Android device will start projecting images to your monitor ...

Страница 64: ...not be asked to verify subsequent connections for the same device NOTE If your device settings differ from those shown above please refer to your device manual for Cast Screen connection instructions Disconnecting from a device 1 Tap to activate the DELL Wireless Monitor app on your Android device ...

Страница 65: ...Mirroring Your Device s Screen on the Monitor 65 2 Tap Cast Settings 3 Tap the monitor name that is Connected Connected Connected ...

Страница 66: ...p DISCONNECT and your Android device will stop projecting images to your monitor NOTE To check whether your device is supported please visit Dell Support website www dell com wirelessmonitors or refer to your device manual or contact your device manufacturer for compatibility ...

Страница 67: ...econd screen on the Android device there are several functions you can use to control the image Search the web and Windows 11 31 AM 01 01 2016 11 33 Android_xxxx Cast screen Disconnect Dell xxxx Connected Left click the mouse to drag the windows Click on the icon on the upper right corner of the projected image to disconnect the Android Device Click on the icon on the upper right corner of the pro...

Страница 68: ...3 Connect your Windows system to the monitor for wireless display Connecting Keyboard and Mouse Dell Wireless Monitor allows user to control device from a single keyboard and mouse connected to the monitor NOTE Make sure Dell Wireless Monitor Software has been installed before using a keyboard or mouse to control the computer or Android device NOTE The function support standard keyboard and mouse ...

Страница 69: ...move all digital cables from the back of computer 3 Turn on the monitor The floating dialog box should appear on screen against a black background if the monitor cannot sense a video signal and is working correctly While in self test mode the power LED remains white Also depending upon the selected input the dialog shown below will continuously scroll through the screen 4 This box also appears dur...

Страница 70: ...from the back of the computer or monitor The monitor then goes into the self test mode 3 Press and hold Button 1 and Button 4 on the front panel simultaneously for 2 seconds A gray screen appears 4 Carefully inspect the screen for abnormalities 5 Press Button 4 on the front panel again The color of the screen changes to red 6 Inspect the display for any abnormalities 7 Repeat steps 5 and 6 to insp...

Страница 71: ...icture is fuzzy blurry or ghosting Eliminate video extension cables Reset the monitor to factory settings Change the video resolution to the correct aspect ratio Shaky Jittery Video Wavy picture or fine movement Reset the monitor to factory settings Check environmental factors Relocate the monitor and test in another room Missing Pixels LCD screen has spots Cycle power On Off Pixel that is permane...

Страница 72: ...is connected properly and is secure Reset the monitor to factory settings Perform monitor self test feature check to determine if the intermittent problem occurs in self test mode Missing Color Picture missing color Perform monitor self test feature check Ensure that the video cable connecting the monitor to the computer is connected properly and is secure Check for bent or broken pins in the vide...

Страница 73: ...he picture does not fill the entire screen The picture cannot fill the height or width of the screen Due to different video formats aspect ratio of DVDs the monitor may display in full screen Run the built in diagnostics Troubleshooting 73 Product Specific Problems Universal Serial Bus USB Specific Problems Specific Symptoms What You Experience Possible Solutions USB interface is not working USB p...

Страница 74: ...he operating system and Wi Fi driver the latest version Ensure that the Dell Wireless Monitor software or app has been installed and updated to the latest version No connection from the wireless monitor Restart the wireless monitor Remove the device that was connected from the list and then reconnect it Ensure that you have upgraded the operating system and Wi Fi driver the latest version Ensure t...

Страница 75: ...gulatory information see the regulatory compliance website located at www dell com regulatory_compliance Contact Dell For customers in the United States call 800 WWW DELL 800 999 3355 NOTE If you do not have an active Internet connection you can find contact information on your purchase invoice packing slip bill or Dell product catalog Dell provides several online and telephone based support and s...

Отзывы: