background image


Connecting the White DVI Cable 


Connecting the USB Cable 

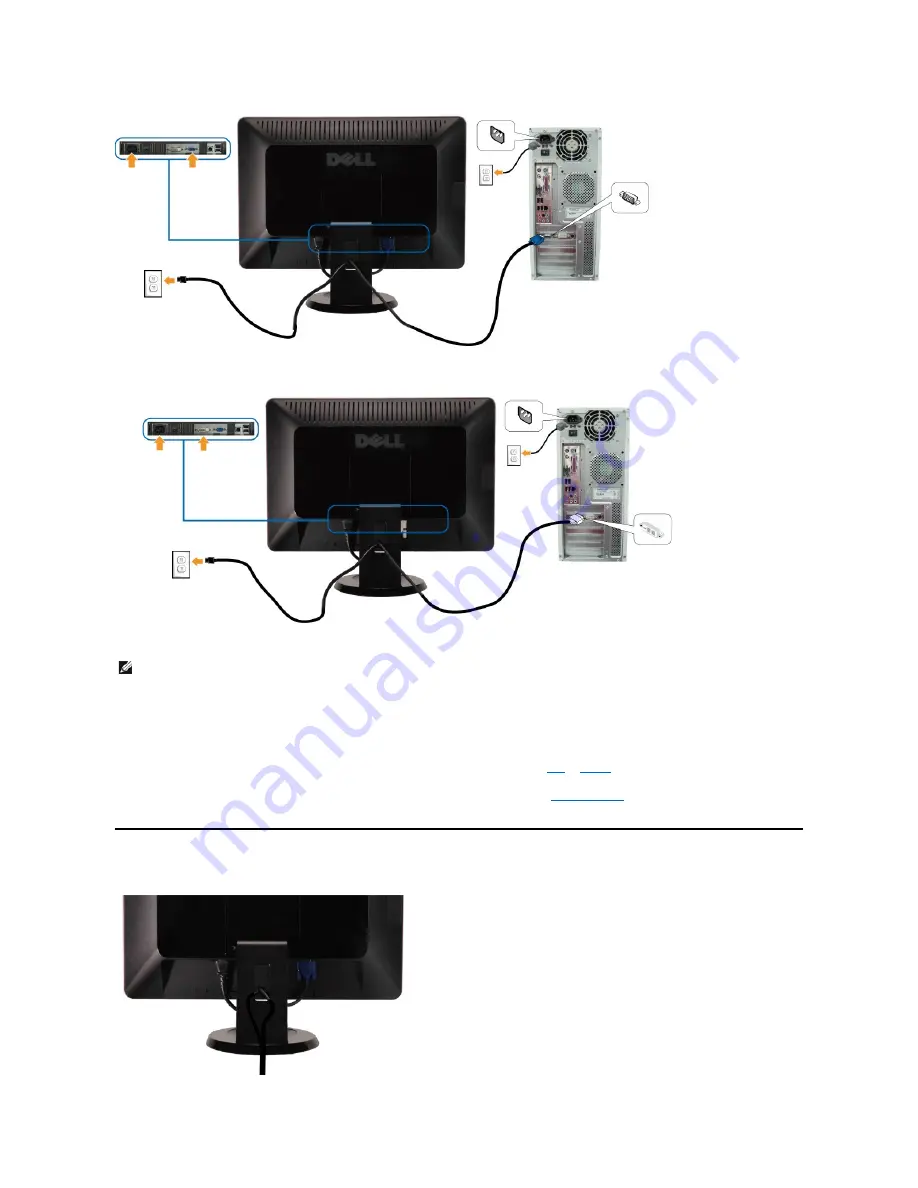
After you have completed connecting the DVI/VGA cable, follow the procedure below to connect the USB cable to the computer and complete your monitor 
setup: 

1.

Connect the upstream USB port (cable supplied) to an appropriate USB port on your computer.  

2.

Connect USB peripherals to the downstream USB ports (side or bottom) on the monitor. (See 

side

 or 

bottom

 view for details.)  

3.

Plug the power cables for your computer and monitor into a nearby outlet. 


4.

Turn on the monitor and the computer. 
If your monitor displays an image, installation is complete. If it does not display an image, see 

Solving Problems. 


5.

Use the cable holder on the monitor stand to organize the cables.  

Organizing Your Cables 


NOTE:

 The graphics are used for the purpose of illustration only. Appearance of the computer may vary.

Содержание SP2009W

Страница 1: ... Agency As an ENERGY STAR partner Dell Inc has determined that this product meets the ENERGY STAR guidelines for energy efficiency Other trademarks and trade names may be used in this document to refer to either the entities claiming the marks and names or their products Dell Inc disclaims any proprietary interest in trademarks and trade names other than its own Model SP2009Wc May 2008 Rev A00 Abo...

Страница 2: ...eatures Identifying Parts and Controls Monitor Specifications Universal Serial Bus USB Interface Plug and Play Capability Camera MIC Specifications Maintenance Guidelines NOTE Some items may be optional and may not ship with your Monitor Some features or media may not be available in certain countries l Monitor with stand l Power cable l VGA cable l DVI cable l USB up stream cable enables the USB ...

Страница 3: ...e mounting solutions Plug and play capability if supported by your system On Screen Display OSD adjustments for ease of set up and screen optimization Software and documentation media which includes an information file INF Image color Matching File ICM and product documentation Energy Saver feature for Energy Star compliance Security lock slot Asset management capable 2 0 Mega pixel internal webca...

Страница 4: ...serial number label To contact Dell for technical support 3 Security lock slot To help secure your monitor 4 Dell soundbar mounting brackets To attach the optional Dell Soundbar 5 Regulatory rating label Lists the regulatory approvals 6 Cable management slot To organize cables by placing them through the slot Left view Right view Label Description 1 USB downstream port ...

Страница 5: ...he monitor automatically resumes functioning The following table shows the power consumption and automatic power saving feature Activate the computer and wake up the monitor to gain access to the OSD Zero power consumption in OFF mode can only be achieved by disconnecting the main cable from the monitor VESA Modes Horizontal Sync Vertical Sync Video Power Indicator Power Consumption Normal operati...

Страница 6: ......

Страница 7: ...al Cable 1 Video Red 2 Video Green 3 Video Blue 4 GND 5 Self test 6 GND R 7 GND G 8 GND B 9 Computer 5V 10 GND sync 11 GND 12 DDC data 13 H sync 14 V sync 15 DDC clock Pin Number 24 pin Side of the Connected Signal Cable 1 TMDS RX2 2 TMDS RX2 3 TMDS Ground 4 Floating 5 Floating 6 DDC Clock ...

Страница 8: ...ating 9 TMDS RX1 10 TMDS RX1 11 TMDS Ground 12 Floating 13 Floating 14 5V power 15 Self test 16 Hot Plug Detect 17 TMDS RX0 18 TMDS RX0 19 TMDS Ground 20 Floating 21 Floating 22 TMDS Ground 23 TMDS Clock 24 TMDS Clock ...

Страница 9: ......

Страница 10: ......

Страница 11: ...ions Availability varies by country and product and some services may not be available in your area To contact Dell for sales technical support or customer service issues Back to Contents Page CAUTION Use of controls adjustments or procedures other than those specified in this documentation may result in exposure to shock electrical hazards and or mechanical hazards NOTE If you do not have an acti...

Страница 12: ... support dell com enter your service tag and download the latest driver for your graphics card 2 After installing the drivers for your graphics Adapter attempt to set the resolution to 1680x1050 again Back to Contents Page NOTE If you are unable to set the resolution to 1680x1050 please contact Dell to inquire about a graphics Adapter that supports these resolutions ...

Страница 13: ...ion at the top of the window e g NVIDIA ATI Intel etc 5 Refer to the graphic card provider website for updated driver for example http www ATI com OR http www NVIDIA com 6 After installing the drivers for your graphics Adapter attempt to set the resolution to 1680x1050 again Back to Contents Page NOTE If you are unable to set the resolution to 1680x1050 please contact the manufacturer of your comp...

Страница 14: ...to adjust the image settings Front panel Button Use the buttons on the front of the monitor to adjust the image settings Front panel Button Description A Preset modes Use the Preset modes button to choose from a list of preset color modes See Using the OSD Menu B Brightness Contrast Use the Brightness Contrast button to direct access to the Brightness and Contrast control menu C Input source Use t...

Страница 15: ...nge the settings and then wait for the OSD menu to disappear 1 Press the button to open the OSD menu and display the main menu Main Menu 2 Press the and buttons to toggle between options in the Menu As you move from one icon to another the option name is highlighted 3 To select the highlighted item on the menu press the again 4 Press the and buttons to select the desired parameter 5 Press the butt...

Страница 16: ...wing dialog appears on a black screen as the monitor self adjusts to the current input Auto Adjustment allows the monitor to self adjust to the incoming video signal After using Auto Adjustment you can further tune your monitor by using the Pixel Clock Coarse and Phase Fine controls under Image Settings NOTE Auto Adjust does not occur if you press the button while there are no active video input s...

Страница 17: ...st gaming applications l Warm Increase the color temperature The screen appears warmer with a red yellow tint l Cool Decreases the color temperature The screen appears cooler with a blue tint l Custom RGB Allows you to manually adjust the color settings Press the and buttons to adjust the Red Green and Blue values and create your own preset color mode In the Video mode you can set the color to the...

Страница 18: ...g the video format from DVD players YPbPr color space Phase If satisfactory results are not obtained using the phase adjustmenu use the Pixel Clock coarse adjustmenu and then use Phase fine NOTE Pixel Clock and Phade Adjustments are only available for VGA input Sharpness Allows you to increase or decrease the sharpness of the image Use and buttons to adjust the sharpness from 0 to 100 Dynamic Cont...

Страница 19: ...ts When Lock is selected no user adjustments are allowed All buttons are locked except button NOTE When the OSD is locked pressing the menu button takes you directly to the OSD settings menu with OSD Lock pre selected on entry Press and hold button for 15 seconds to unlock and allow user access to all applicable settings Button Sound Turns on or off the button sound DDC CI DDC CI Display Data Chan...

Страница 20: ...ear on the screen to indicate that the monitor is out of synchronization This means that the monitor cannot synchronize with the signal that it is receiving from the computer Either the signal is too high or too low for the monitor to use See Specifications for the Horizontal and Vertical frequency ranges addressable by this monitor Recommended mode is 1680 X 1050 at 60Hz If you press any button o...

Страница 21: ... portable or desktop Go to the support site for your computer and download the latest graphic drivers Go to your graphics card website and download the latest graphic drivers Using the Dell Soundbar Optional The Dell Soundbar is a stereo two channel system mountable on Dell Flat Panel Displays The Soundbar has a rotary volume and on off control to adjust the overall system level a LED for power in...

Страница 22: ...Accessing the Camera Help File To access the camera s help file right click the Dell Webcam Central icon in the notification area and click Click Help from the menu and select Contents NOTE To use the Display Rotation function Landscape versus Portrait view with your Dell computer you require an updated graphics driver that is not included with this monitor To download the graphics driver go to su...

Страница 23: ...the camera resolution using the Dell Webcam Central Resetting the Camera Defaults To reset the Camera settings using the Dell Webcam Central 1 Right click the Dell Webcam Central icon in the system tray located in the lower right corner of the screen Click Open Webcam Central 2 In the Webcam Central window Click the Settings icon and navigate to Settings Picture Control Click Restore Default Back ...

Страница 24: ...operties 2 Select the Settings tab 3 Move the slider bar to the right by pressing and holding left mouse button and adjust the screen resolution to 1680X1050 4 Click OK If you do not see 1680X1050 as an option you may need to update your graphics driver Please choose the scenario below that best describes the computer system you are using and follow the provided directions 1 If you have a Dell des...

Страница 25: ... Microsoft Corporation in the United States and or other countries ENERGY STAR is a registered trademark of the U S Environmental Protection Agency As an ENERGY STAR partner Dell Inc has determined that this product meets the ENERGY STAR guidelines for energy efficiency Other trademarks and trade names may be used in this document to refer to either the entities claiming the marks and names or the...

Страница 26: ...t your monitor to the computer 1 Turn off your computer and disconnect the power cable 2 Connect either the white digital DVI D or the blue analog VGA display connector cable to the corresponding video port on the back of your computer Do not use both cables on the same computer Use both the cables only when they are connected to two different computers with appropriate video systems Connecting th...

Страница 27: ...ripherals to the downstream USB ports side or bottom on the monitor See side or bottom view for details 3 Plug the power cables for your computer and monitor into a nearby outlet 4 Turn on the monitor and the computer If your monitor displays an image installation is complete If it does not display an image see Solving Problems 5 Use the cable holder on the monitor stand to organize the cables Org...

Страница 28: ...display from a desk mounted to a wall mounted display do the following 1 Verify that the Power button is turned Off then disconnect the power cord NOTICE Do not use with any device other than Dell Soundbar NOTE The soundbar power connector 12 V DC output is for the optional Dell Soundbar only 1 Working from the back of the monitor attach Soundbar by aligning the two slots with the two tabs along t...

Страница 29: ...sion M4 x 10mm 5 Remove the Rubber Plugs from inside the four VESA screw holes 6 Attach the mounting bracket from the VESA compatible wall mounting kit 100 mm x 100 mm distance 7 Attach the LCD display to the wall following the instructions in the wall mounting kit Back to Contents Page NOTE For use only with UL Listed Wall Mount Bracket with minimum weight load 4 44kg ...

Страница 30: ...he previous procedure check your video controller and computer because your monitor is functioning properly Built in Diagnostics Your monitor has a built in diagnostic tool that helps you determine if the screen abnormality you are experiencing is an inherent problem with your monitor or with your computer system and graphic card To run the built in diagnostics 1 Ensure that the screen is clean no...

Страница 31: ...the built in diagnostics Brightness Problems Picture too dim or too bright l Reset the monitor to Factory Settings l Auto Adjust via OSD l Adjust brightness contrast controls via OSD Geometric Distortion Screen not centered correctly l Reset the monitor to Factory Settings l Auto Adjust via OSD l Adjust brightness contrast controls via OSD NOTE When using DVI D the positioning adjustments are not ...

Страница 32: ...the monitor again l Reboot the computer l Some USB devices like external portable HDD require higher electric current connect the device directly to the computer system High Speed USB 2 0 interface is slow High Speed USB 2 0 peripherals working slowly or not working at all l Check that your computer is USB 2 0 capable l Some computers have both USB 2 0 and USB 1 1 ports Ensure that the correct USB...

Страница 33: ...or depth settings result in poor quality images NOTE The integrated webcam operates at a lower resolution than most commercially available digital cameras Most commercial digital cameras are 4 mega pixel or higher The integrated webcam operates up to 2 0 mega pixel Poor quality video on the Internet The camera captures grainy images while using it on the Internet Check your internet connection spe...

Страница 34: ...application other than the Dell Webcam Central To test the microphone 1 Click Start Control Panel Sound and Audio Devices 2 Click the Voice tab 3 Click the Test Hardware button and follow the instructions If the recording is successful reset the camera defaults or reinstall the Dell Webcam Software See Using the Camera for more information ...

Отзывы: