background image

 About your monitor


7

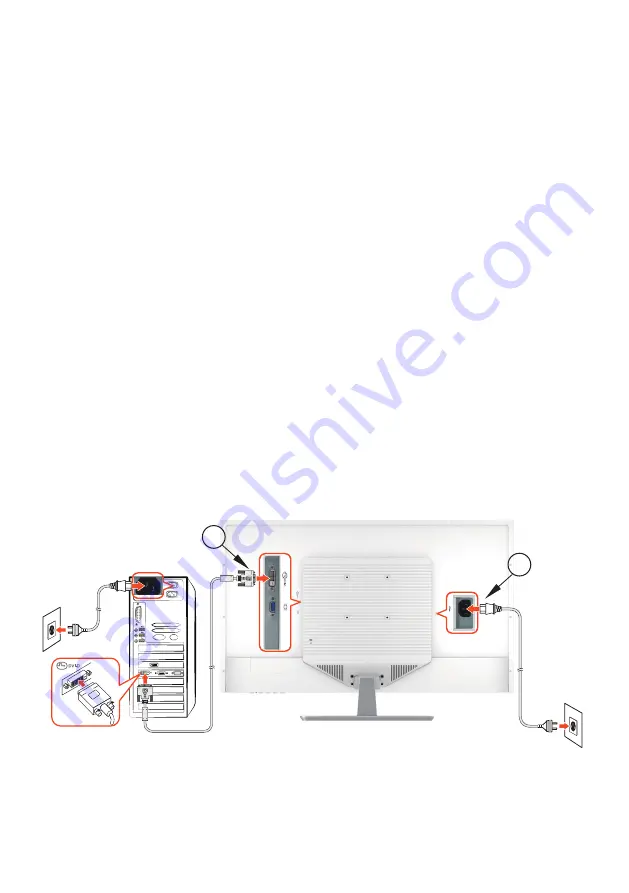
Connecting Your Monitor

1.  Connect the video cable

Ensure both monitor and computer are turned off. Connect one end of the 

DVI or VGA cable (optional) to the computer, and then connect the other 

end to the respective port on the monitor.

2. Connect the power cord

Connect the power cord to a properly-grounded AC outlet, and then to the 
monitor.

3. Turn on the monitor

Press the power button to turn on the monitor.

4. Set the resolution and refresh rate in Microsoft Windows


Windows 7

i) Right-click on the desktop, and then click 

Screen resolution

 > 

Resolution

.

ii) Set the appropriate resolution.


Windows 8 or Windows 8.1

i) Select the desktop tile to switch to classic desktop mode. 

ii) Right-click on the desktop, and then click 

Screen resolution

 > 

Resolution

.

iii) Set the appropriate resolution.


Windows 10

i) Right-click on the desktop, and then click 

Display settings

 > 

Advanced 

display settings

 > 

Resolution

ii) Set the appropriate resolution.

2

1

Содержание SE3218H

Страница 1: ...Regulatory model SE3218H Dell SE3218H User s Guide ...

Страница 2: ...lowed WARNING A WARNING indicates a potential for property damage personal injury or death 2017 Dell Inc All rights reserved This product is protected by U S and international copyright and intellectual property laws Dell and the Dell logo are trademarks of Dell Inc in the United States and or other jurisdictions All other marks and names mentioned herein may be trademarks of their respective comp...

Страница 3: ...oving the stand 6 Connecting Your Monitor 7 Parts and controls 8 Front view 8 Back view 8 Using On Screen Display OSD Functions 9 The main menu 9 Technical specifications 13 Monitor specifications 13 Supported resolutions and refresh rates 13 Maintenance guidelines 15 Care 15 Troubleshooting 15 Appendix 16 Contacting Dell 16 ...

Страница 4: ... To avoid electric shock do not attempt to remove any cover or touch the inside of the monitor Only a qualified service technician should open the monitor cover WARNING Stop using the monitor if the cover is damaged Have it checked by a service technician WARNING Place the monitor on a flat soft and clean surface If there is a liquid spill on the monitor unplug the monitor from the power source an...

Страница 5: ...s with the components shown below Make sure that you have received all the components and contact Dell if something is missing Monitor Stand base Screws Power cable varies by country DVI cable Drivers and documentation media Quick Setup Guide Safety and Regulatory Information ...

Страница 6: ...ce 2 Align the screw holes on the monitor with the screw holes on the stand 3 Replace the four screws that secure the monitor to the base Tighten the screws firmly Removing the stand 3 2 1 1 Place the monitor face down on a flat and clean surface 2 Remove the four screws that secure the monitor to the stand 3 Remove the stand ...

Страница 7: ...e monitor Press the power button to turn on the monitor 4 Set the resolution and refresh rate in Microsoft Windows Windows 7 i Right click on the desktop and then click Screen resolution Resolution ii Set the appropriate resolution Windows 8 or Windows 8 1 i Select the desktop tile to switch to classic desktop mode ii Right click on the desktop and then click Screen resolution Resolution iii Set t...

Страница 8: ... 2 3 4 5 6 Back view 7 8 9 1 OSD Menu On Off 6 Power ON OFF 2 Scroll Down Decrease Video Mode Adjustment 7 DVI input DVI 24 pin 3 Scroll Up Increase Picture Mode select 8 VGA input D Sub 15 pin 4 Confirm Select Input Select 9 Power input 5 LED Indicator ...

Страница 9: ...ly enters Video Mode Adjustment Recall both Contrast and Brightness when not in OSD menu Power Lock press 10 seconds to lock repeat press 10 seconds to unlock when not in OSD menu OSD Lock press 10 seconds to lock repeat press 10 seconds to unlock when not in OSD menu The main menu Use the monitor s menu to make adjustments D e l l S E 3 2 1 8 H A U T O M A T I C A D J U S T M E N T C O N T R A S ...

Страница 10: ...OOL Adds blue to screen image for cooler white NORMAL Adds red to screen image for warmer white and richer red WARM Adds green to screen image for a darker color USER COLOR Manually adjust settings for RED R GREEN G BLUE B 1 Press button to select the desired color 2 Press or button to adjust selected color INFORMATION Displays information about the input signal coming from the graphics card in yo...

Страница 11: ...ive OD Allows the user to change the Over Drive OD strength to improve the quality of motion pictures Press or key to toggle the OD strength between three levels VIDEO MODE ADJUSTMENT Toggles the video mode between FULL SCREEN or ASPECT RATIO ECO Allows the user to change the energy saving settings Press or key to adjust the ECO Mode between three levels PICTURE MODE Provides an optimum display en...

Страница 12: ...cal OSD position adjustment OSD H POSITION To horizontally adjust the OSD position move OSD to the right move OSD to the left OSD V POSITION To vertically adjust the OSD position move OSD up move OSD down OSD TIMEOUT To automatically turn off On Screen Display OSD after a preset period of time OSD BACKGROUND Allows the user to turn the OSD background On or Off MEMORY RECALL To recall factory setti...

Страница 13: ...on the refresh rate vertical frequency of the graphics card see the documentation that shipped with the graphics card Supported resolutions and refresh rates WARNING Do not set the graphics card on your computer to exceed these maximum refresh rates Doing so may result in permanent damage to your monitor VGA 720 x 400 70Hz VESA 1024 x 768 60Hz VGA 640 x 480 60Hz VESA 1024 x 768 70Hz MAC 640 x 480 ...

Страница 14: ...14 Technical specifications The following resolutions are supported only with a DVI source 480p 576p 720p 1080i 1080p ...

Страница 15: ... monitor and the wall outlet is properly connected and secure Plug another electrical device into the power outlet to verify that the outlet is supplying proper voltage Ensure that the video cable connecting the monitor and the computer is properly connected and secure No video power light turned on Make sure the video cable supplied with the monitor is tightly secured to the video output port on ...

Страница 16: ...vice issues see www dell com contactdell NOTE Availability varies by country and product and some services may not be available in your country NOTE If you do not have an active internet connection you can find contact information on your purchase invoice packing slip bill or Dell product catalog ...

Отзывы: