background image

Replacing a PSU 

Use this procedure to replace a failed power supply unit (PSU).

Prerequisites

Use SupportAssist to send diagnostic data to Dell Technical Support.

About this task

You can replace PSUs one at a time without shutting down the storage system.

Steps
1.

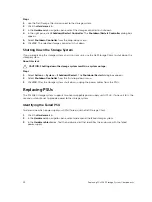
Press the power switch on the PSU to turn it off.

2.

Remove the power cable from the securing clip and disconnect the power cable from the PSU.

3.

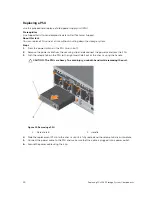
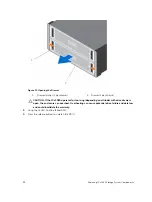
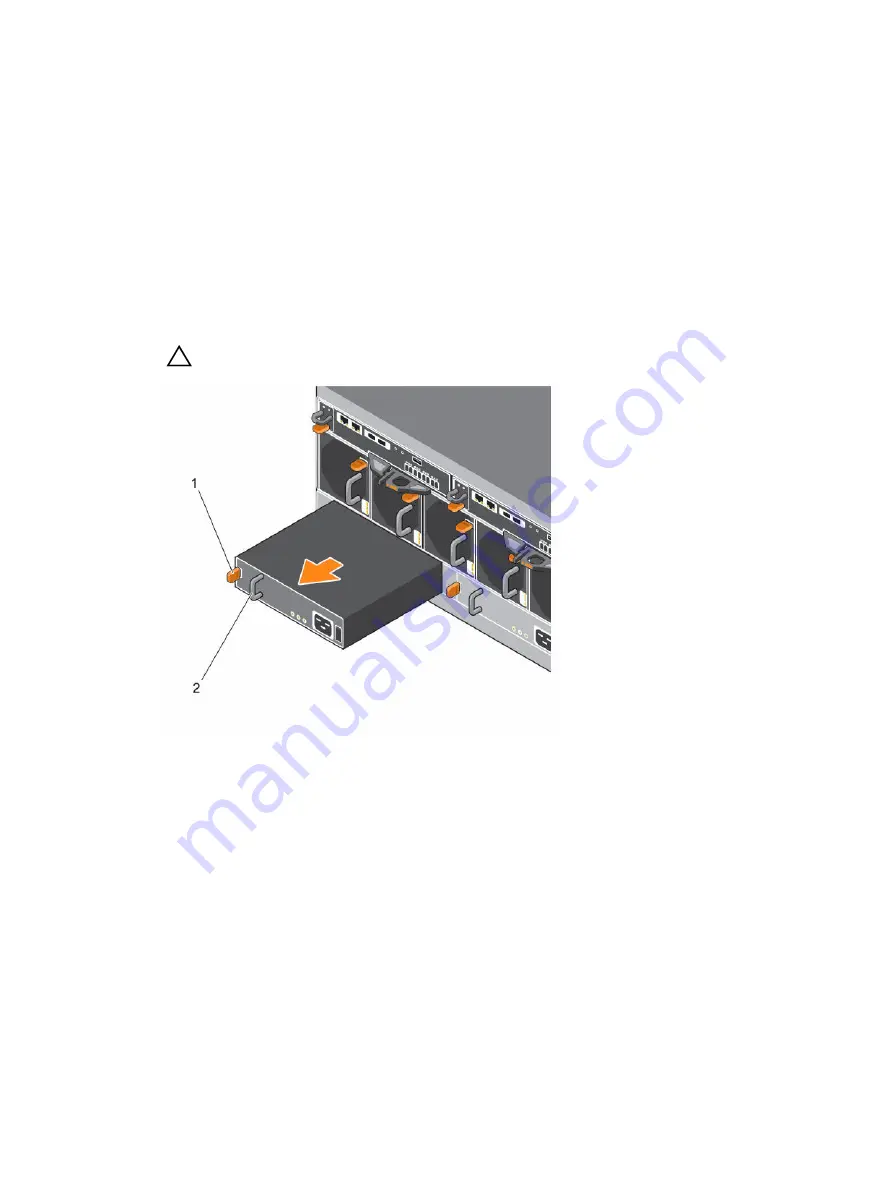
Push the release tab on the PSU to the right and slide it out of the chassis using the handle.

CAUTION: The PSUs are heavy. To avoid injury, use both hands while removing the unit.

Figure 13. Removing a PSU

1.

Release tab

2. Handle

4.

Slide the replacement PSU into the chassis until it is fully seated and the release tab clicks into place.

5.

Connect the power cable to the PSU and make sure that the cable is plugged into a power outlet.

6.

Secure the power cable using the clip.

24

Replacing SCv2080 Storage System Components

Содержание SCv2080

Страница 1: ...Dell Storage Center SCv2080 Storage System Owner s Manual Regulatory Model E11J Regulatory Type E11J001 ...

Страница 2: ... the problem WARNING A WARNING indicates a potential for property damage personal injury or death 2016 Dell Inc All rights reserved This product is protected by U S and international copyright and intellectual property laws Dell and the Dell logo are trademarks of Dell Inc in the United States and or other jurisdictions All other marks and names mentioned herein may be trademarks of their respecti...

Страница 3: ...s 20 General Safety Precautions 20 Pre Replacement Procedures 21 Send Diagnostic Data Using Dell SupportAssist 21 Put the Storage Center Into Maintenance Mode 21 Shut Down a Storage Controller 21 Shutting Down the Storage System 22 Replacing PSUs 22 Identifying the Failed PSU 22 Replacing a PSU 24 Replacing Cooling Fan Modules 25 Identifying the Failed Cooling Fan Module 25 Replacing a Cooling Fan...

Страница 4: ...rage Controller 43 Send Diagnostic Data Using Dell SupportAssist 43 3 Troubleshooting SCv2080 Components 44 Troubleshooting PSUs 44 Troubleshooting Cooling Fan Modules 44 Troubleshooting Hard Drives 44 Troubleshooting Storage Controllers 45 4 SCv2080 Storage System Technical Specifications 46 Technical Specifications 46 4 ...

Страница 5: ... service issues go to www dell com support For customized support type your system service tag on the support page and click Submit For general support browse the product list on the support page and select your product Related Publications The following documentation is available for the SCv2080 storage system Dell Storage Center SCv2080 Storage System Getting Started Guide Provides information a...

Страница 6: ...ter functionality on Windows Linux Solaris and AIX platforms Dell Storage Center Command Set for Windows PowerShell Provides instructions for getting started with Windows PowerShell cmdlets and scripting objects that interact with the Storage Center using the PowerShell interactive shell scripts and PowerShell hosting applications Help for individual cmdlets is available online Dell Storage Client...

Страница 7: ...s with the Storage Center NOTE Dell OpenManage Server Administrator is not supported on the SCv2080 SCv2080 Storage System Hardware The SCv2080 storage system supports up to 84 3 5 inch hot swappable SAS hard drives installed in a two drawer three row 14 column configuration The SCv2080 ships with two redundant power supply units five redundant cooling fans and up to two redundant storage controll...

Страница 8: ...pecific left and right side status indicators Sideplane OK Power Good Off Sideplane card or cable fault Green Sideplane card and cable are functional though a fault may be indicated by one or more of the following LEDs Drawer Fault Amber Sideplane card fault or drive failure causing loss of availability or redundancy Logical Fault Amber steady Host indicated drive fault Amber flashing Arrays in im...

Страница 9: ... system is in standby mode not operational Module Fault Amber Hardware fault an LED may be lit on a PSU drawer DDIC fan module or IO module indicating the part at fault Logical Status Amber Change of status or fault from something other than the storage system itself this status is typically associated with a disk drive as indicated by its own fault LED Drawer 1 Fault Amber Drive cable or sideplan...

Страница 10: ... ports Two 6 Gbps SAS ports Front end ports Fibre Channel ports iSCSI ports or SAS ports MGMT port Embedded Ethernet iSCSI port which is used for system management NOTE The MGMT port can share iSCSI traffic if the Flex Port license is installed REPL port Embedded iSCSI port which is typically used for replication to another Storage Center NOTE A Flex Port license is required to connect host server...

Страница 11: ...ront End Ports Figure 4 SCv2080 Storage System Storage Controller with Two 16 Gb Fibre Channel Front End Ports NOTE Storage Center 6 7 3 or later is required for SCv2080 storage systems with 16 Gb Fibre Channel front end ports Item Control Feature Icon Description 1 Battery status indicator Blinking green on 0 5 sec off 1 5 sec Battery heartbeat Fast blinking green on 0 5 sec off 0 5 sec Battery i...

Страница 12: ...ected an error Blinking amber Storage controller is performing POST 9 Recessed reset button Not currently used 10 Identification LED Off Identification disabled Blinking blue for 15 sec Identification is enabled Blinking blue continuously Storage controller shut down to the Advanced Configuration and Power Interface ACPI S5 state 11 USB port One USB 3 0 connector 12 Diagnostic LEDs 8 Green LEDs 0 ...

Страница 13: ...s The following figures show the features and indicators on a storage controller with iSCSI front end ports Figure 5 SCv2080 Storage System Storage Controller with Four 1 GbE iSCSI Front End Ports Figure 6 SCv2080 Storage System Storage Controller with Two 10 GbE iSCSI Front End Ports Item Control Feature Icon Description 1 Battery status indicator Blinking green on 0 5 sec off 1 5 sec Battery hea...

Страница 14: ...d nor active 6 Storage controller status On Storage controller completed POST 7 Recessed power off button Not currently used 8 Storage controller fault Off No faults Steady amber Firmware has detected an error Blinking amber Storage controller is performing POST 9 Recessed reset button Not currently used 10 Identification LED Off Identification disabled Blinking blue for 15 sec Identification is e...

Страница 15: ...amber Uncorrectable fault detected replace battery 3 MGMT port Slot 3 Port 1 Ethernet iSCSI port that is typically used for storage system management and access to the BMC NOTE To use the MGMT port as an iSCSI port for replication to another Storage Center a Flex Port license and replication license are required To use the MGMT port as a front end connection to host servers a Flex Port license is ...

Страница 16: ...EDs 8 Green LEDs 0 3 Low byte hex POST code Green LEDs 4 7 High byte hex POST code 13 Serial port 3 5 mm mini jack Not for customer use 14 Four Mini SAS High Density HD ports Slot 1 Port 1 Slot 1 Port 2 Slot 1 Port 3 and Slot 1 Port 4 Front end connectivity ports NOTE The mini SAS HD ports are for front end connectivity only and cannot be used for back end expansion 15 Mini SAS port B Slot 2 Port ...

Страница 17: ...ove the PSU 2 PSU fault Amber steady PSU fault PSU not supplying power Amber flashing PSU firmware is downloading 3 AC fault Amber steady AC power is not detected Amber flashing PSU firmware is downloading 4 Power OK Green steady This PSU is providing power Green flashing AC power is present but this PSU is in standby mode the other PSU is providing power 5 Power outlet Power outlet for the storag...

Страница 18: ...es one status indicator Figure 10 DDIC and Status Indicator Item Feature Indicator Code 1 DDIC fault indicator Amber Drive fault Amber flashing Flashes in 1 second intervals when drive or enclosure indicator is set to On in Dell Storage Client With the drive indicator the containing drawer fault LED will also flash With the enclosure indicator all drives and both drawers fault LEDs will flash 18 A...

Страница 19: ...ple to lift the storage system chassis from the shipping box and three people to install it in the rack The empty chassis weighs approximately 62 kg 137 lbs Make sure the storage system is always fully grounded to prevent damage from electrostatic discharge When handling the storage system hardware use an electrostatic wrist guard not included or a similar form of protection The chassis must be mo...

Страница 20: ...ithin 24 hours Unplug the storage system chassis before you move it or if you think it has become damaged in any way When powered by multiple AC sources disconnect all supply power for complete isolation Electrostatic Discharge Precautions Always follow electrostatic discharge ESD precautions to avoid injury and damage to Storage Center equipment Electrostatic discharge ESD is generated by two obj...

Страница 21: ...n the Status pane The Send SupportAssist Information Now dialog box opens 3 Select Storage Center Configuration and Detailed Logs 4 Click OK The Storage Client displays the status of the SupportAssist action A second dialog box opens when the transfer of SupportAssist information has completed successfully 5 Click OK 6 Optional If the Storage Center is in maintenance mode return it to normal opera...

Страница 22: ...results in a system outage Steps 1 Select Actions System Shutdown Restart The Shutdown Restart dialog box appears 2 Select Shutdown Controller from the first drop down menu 3 Click OK After the storage system shuts down unplug the power cables from the PSUs Replacing PSUs The SCv2080 storage system supports two hot swappable power supply units PSUs If one unit fails the second unit continues to pr...

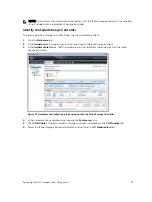
Страница 23: ... in the previous step 5 Select Power Supplies The status of each power supply is displayed in the Power Supplies tab 6 Select the failed power supply The location of the failed power supply is displayed in the Power Supply View tab Figure 12 Rear View of the Enclosure Showing the Failed the Power Supply Replacing SCv2080 Storage System Components 23 ...
Страница 24: ...d disconnect the power cable from the PSU 3 Push the release tab on the PSU to the right and slide it out of the chassis using the handle CAUTION The PSUs are heavy To avoid injury use both hands while removing the unit Figure 13 Removing a PSU 1 Release tab 2 Handle 4 Slide the replacement PSU into the chassis until it is fully seated and the release tab clicks into place 5 Connect the power cabl...

Страница 25: ...stem supports five cooling fan modules If one cooling fan module fails the remaining cooling fan modules continue to cool the storage system NOTE When a cooling fan module fails the cooling fan speed in the remaining modules increases significantly to provide adequate cooling The cooling fan speed decreases gradually when a new cooling fan module is installed Identifying the Failed Cooling Fan Mod...

Страница 26: ...ion pane expand the enclosure identified in the previous step 5 Select Cooling Fans The status of each cooling fan is displayed in the Cooling Fans tab 6 Select the failed cooling fan The location of the failed cooling fan module is displayed in the Fan View tab 26 Replacing SCv2080 Storage System Components ...
Страница 27: ...st to send diagnostic data to Dell Technical Support About this task You can replace cooling fan modules one at a time without shutting down the storage system Steps 1 Press the release tab and pull the cooling fan module out of the chassis using the handle CAUTION The fan modules are heavy To avoid injury use both hands while removing the module Replacing SCv2080 Storage System Components 27 ...
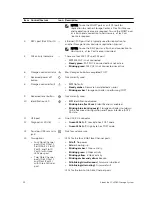
Страница 28: ...for the enclosure to recognize the cooling fan module and determine its status When the cooling fan is functioning properly the Module OK LED turns green and the Battery and Fan fault LEDs are off In addition the cooling fan status indicator turns green in the Dell Storage Client 4 In the Dell Storage Client make sure that the replacement cooling fan module is recognized and shown as up and runnin...

Страница 29: ...dentifies drives as XX YY where XX is the number of the unit ID of the storage system and YY is the drive position inside the storage system Figure 18 SCv2080 Storage System Drawers and Drive Numbering 1 Bottom drawer viewed from above 2 Top drawer viewed from above Identifying the Failed Hard Drive To determine which hard drive failed use the Dell Storage Client 1 Click the Hardware tab 2 In the ...

Страница 30: ...the enclosure identified in the previous step 5 Select Disks The status of each disk drawer is displayed in the Disks tab 6 Expand the drawer with the failed hard drive and then select the failed hard drive The location of the failed hard drive is displayed in the Disk View tab 30 Replacing SCv2080 Storage System Components ...

Страница 31: ...ge system Steps 1 Find the SCv2080 and drawer that contains the failed drive To identify the drawer with the failed driver look for a drawer fault LED CAUTION Before opening a drawer ensure that the Dell Storage Client does not display a temperature warning This issue must be corrected first to avoid potential drive failure and data loss 2 Push and hold both drawer latches toward the center of the...

Страница 32: ... for too long depending on altitude with drive drawers open the enclosure can overheat Overheating can cause potential drive failure and data loss and could invalidate the warranty 3 Using the lit LED find the failed DDIC 4 Press the release button to unlatch the DDIC 32 Replacing SCv2080 Storage System Components ...
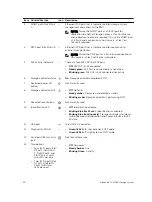
Страница 33: ...e in the carrier The replacement drive is also in a carrier and attempting to remove the carrier can cause the carrier to break 7 Install the replacement DDIC a Hold the drive by the DDIC and slide it most of the way into the slot b Using both hands thumbs and forefingers apply downward pressure firmly and equally across the DDIC Replacing SCv2080 Storage System Components 33 ...
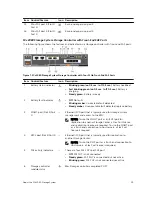
Страница 34: ... into the Drawer c While maintaining downward pressure slide the top plate of the DDIC toward the back of the drawer until it clicks in place Figure 24 Securing the Drive in the Drawer 34 Replacing SCv2080 Storage System Components ...
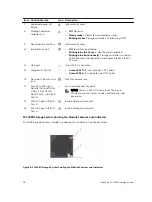
Страница 35: ...ush the drawer toward the chassis until the locks disengage c Place your hands on the front bezel and continue to push the drawer inward until the bezel is flush with the chassis and the front drawer locks engage Figure 25 Closing the Drawer WARNING Keep fingers clear of the chassis as the drawer is closed 9 In the Dell Storage Client make sure that the replacement hard drive is recognized and sho...

Страница 36: ...orage controller 2 Align the replacement battery with the slot on the storage controller 3 Slide the battery into the storage controller until the release tab clicks into place Next steps Use SupportAssist to send diagnostic data to Dell Technical Support Replacing a Storage Controller The SCv2080 storage system supports redundant hot swappable storage controllers Storage controllers provide the f...

Страница 37: ...and expand the failed storage system 3 In the Hardware Alerts area find the hardware alert that identifies the enclosure with the failed storage controller Figure 27 Hardware Alert Identifying the Enclosure with the Failed Storage Controller 4 In the Hardware tab navigation pane expand the Enclosures entry 5 Click I O Modules The status of each storage controller is displayed in the I O Modules ta...

Страница 38: ...nt About this task Storage controllers can be replaced one at a time without shutting down the storage system Steps 1 Make sure all of the cables are labeled 2 Disconnect all of the cables from the storage controller that was shut down 3 Remove the battery from the storage controller 4 Squeeze the release tab on the storage controller release lever 5 Pull the release lever away from the chassis 6 ...

Страница 39: ...wered on are the LEDs on the storage controller After the one minute delay the fans and LEDs turn on to indicate that the storage controller is starting up 11 In the Dell Storage Client make sure that the replacement storage controller is recognized and shown as up and running NOTE If the Storage Center software on the replacement storage controller is older than the software on the existing stora...

Страница 40: ...Use SupportAssist to send diagnostic data to Dell Technical Support 2 Shut down the left storage controller About this task This procedure is useful if you are swapping out degraded but still operational storage controllers Steps 1 Make sure all of the cables are labeled 2 Disconnect all of the cables from the left storage controller 3 Remove the battery from the left storage controller 4 Push dow...

Страница 41: ...powered on are the LEDs on the storage controller After the one minute delay the fans and LEDs turn on to indicate that the storage controller is starting up 10 In the Dell Storage Client make sure that the replacement storage controller is recognized and shown as up and running NOTE If the Storage Center software on the replacement storage controller is older than the software on the existing sto...

Страница 42: ...ollers Simultaneously If you need to replace both storage controllers at the same time contact Dell Technical Support for assistance Replacing Rack Rails Rack rails are used to install the SCv2080 storage system into a rack Prerequisites 1 Use SupportAssist to send diagnostic data to Dell Technical Support 2 Shut down the storage system using the Dell Storage Client About this task NOTE Replacing ...

Страница 43: ...e only indication that the SCv2080 is powered on are the LEDs on the storage controllers After the one minute delay the SCv2080 fans and LEDs turn on to indicate that the storage system is starting to come up 3 Use the Dell Storage Client to make sure that the replacement part is recognized and shown as up and running Send Diagnostic Data Using Dell SupportAssist Use Dell SupportAssist to send dia...

Страница 44: ...r PSU may still be supplying power 3 Reseat the PSU by removing and reinstalling it NOTE Allow several seconds for the storage system to recognize the PSU and determine its status Troubleshooting Cooling Fan Modules To troubleshoot cooling fan modules 1 Check the status of the cooling fan module using the Dell Storage Client 2 Determine the status of the cooling fan module LEDs If the cooling fan ...

Страница 45: ... of the storage controller using the Dell Storage Client 2 Check the position of the storage controllers The lower HSN should be on the left and the higher HSN should be on the right 3 Check the pins and reseat the storage controller a Remove the storage controller b Verify that the pins on the storage system backplane and the storage controller are not bent c Reinstall the storage controller 4 De...

Страница 46: ...Connectivity Configurations Storage Center supports up to 168 drives on a single redundant path SAS chain The SCv2080 storage system supports one SC180 Redundant Array of Independent Disks RAID Controller Two hot swappable storage controllers Management RAID management using Dell Storage Client 2015 R1 Back Panel Ports Connectors per Storage Controller Fibre Channel iSCSI or SAS connectors Connect...

Страница 47: ...ane card and power status One single color LED indicator for drawer fault status One single color LED indicator for logical fault status One single color LED indicator for cable fault status Six single color LED indicators for data transfer status Disk Drive In Carrier DDIC One single color LED for drive fault status 6 Gb SAS IO module 14 one color LED status indicators four each for the three SAS...

Страница 48: ...2 23 cm 8 8 inches Width 48 26 cm 19 inches Depth front mounting bracket to rear surface 91 44 cm 36 inches Depth front surface to rear surface 96 cm 38 inches Weight maximum configuration 130 1 kg 287 lb Weight without drives 62 1 kg 137 lb Environmental For additional information about environmental measurements for specific storage system configurations see dell com environmental_datasheets Tem...

Страница 49: ...4 G at 2 200 Hz for 15 min Maximum shock Operating Half sine shock 5 G 5 with a pulse duration of 10 ms 10 in operational orientations only Storage Z axis 30 g 10 ms half sine X and Y axes 20 g 10 ms half sine Altitude Operating 0 m to 3048 m 0 ft to 10 000 ft Storage 300 m to 12 000 m 1000 ft to 39 370 ft Airborne Contaminant Level Class G2 or lower as defined by ISA S71 04 1985 SCv2080 Storage S...

Отзывы: