background image

Operating 

your 

Monitor  |  

21

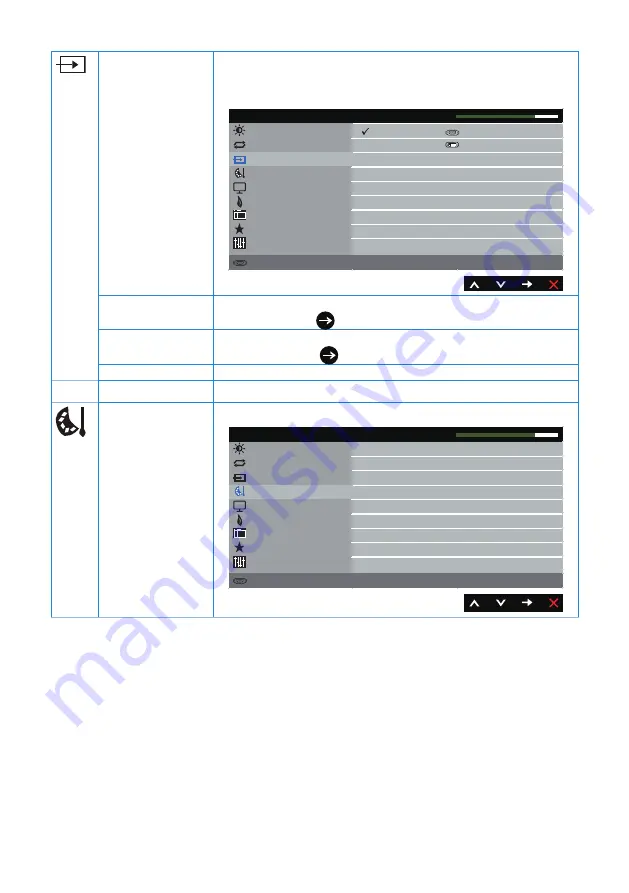
Input Source

Use the Input Source menu to select between the 
different video signals that may be connected to your 
monitor.

Brightness / Contrast

Color

Display

Energy

Menu

Personalize

Others

            Resolution: 1920x1080, 60Hz  

 Dell S2X18M                                                                                                       Energy Use

Auto Adjust

Input Source

VGA

DVI

Auto Select                            On          

Reset Input Source

VGA

Select VGA input when you are using the analog (VGA) 
connector. Push

  to select the VGA input source.

DVI

Select DVI input when you are using the Digital (DVI) 
connector. Push 

 to select the DVI input source.

Auto Select

Select auto select to scan for available input signals.

Reset Input Source

Select this option to restore default Input Source.

Color 

Use Color to adjust the color setting mode.

Brightness / Contrast

Display

Energy

Menu

Personalize

Others

            Resolution: 1920x1080, 60Hz  

 Dell S2X18M                                                                                                       Energy Use

Preset Modes

Auto Adjust

Input Source

Color

Standard

RGB

Input Color Format

Reset Color

Содержание S2218M

Страница 1: ...Model No S2218M S2318M Regulatory model S2218Mc S2318Mc User s Guide Dell S2218M S2318M ...

Страница 2: ... text Dell and the DELL logo are trademarks of Dell Inc Microsoft and Windows are either trademarks or registered trademarks of Microsoft Corporation in the United States and or other countries Intel is a registered trademark of Intel Corporation in the U S and other countries and ATI is a trademark of Advanced Micro Devices Inc ENERGY STAR is a registered trademark of the U S Environmental Protec...

Страница 3: ...pability 11 LCD Monitor Quality and Pixel Policy 11 Maintenance Guidelines 11 Setting Up the Monitor 12 Connecting the Stand 12 Connecting Your Monitor 13 Organizing Cables 14 Removing the Monitor Stand 15 Operating your Monitor 16 Power On the Monitor 16 Using the Front Panel Controls 16 Using the On Screen Display OSD Menu 18 ...

Страница 4: ...the Tilt 31 Troubleshooting 32 Self Test 32 Built in Diagnostics 33 Common Problems 34 Product Specific Problems 36 Appendix 37 FCC Notices U S Only and Other Regulatory Information 37 Contact Dell 37 Setting Up Your Monitor 38 Monitor Specifications 40 ...

Страница 5: ... and Contact Dell if something is missing NOTE Some items may be optional and may not ship with your monitor Some features or media may not be available in certain countries NOTE To set up with any other stand please refer to the respective stand setup guide for setup instructions Monitor Stand riser Stand base Power Adapter Power cable varies by countries ...

Страница 6: ...ions Wide viewing angle to allow viewing from a sitting or standing position or while moving from side to side Plug and play capability if supported by your system On Screen Display OSD adjustments for ease of set up and screen optimization Software and documentation media includes an Information File INF Image Color Matching File ICM and product documentation Dell Display Manager Software include...

Страница 7: ...About Your Monitor 7 time Optimize eye comfort with a flicker free screen and ComfortView feature which minimizes blue light emission ...

Страница 8: ...scription 1 Function buttons For more information see Operating your Monitor 2 Power On Off button with LED indicator NOTE For displays with glossy bezels the user should consider the placement of the display as the bezel may cause disturbing reflections from surrounding light and bright surfaces ...

Страница 9: ...ing Barcode serial number and Service Tag label Lists the regulatory approvals Refer to this label if you need to contact Dell for technical support The Dell service tag is used for Dell warranty and customer service management purposes and for records of the base system 3 Regulatory information engraving Lists the regulatory approvals 4 Stand release button Releases stand from monitor 5 Cable man...

Страница 10: ...onitor stand Label Description Use 1 Power adapter port To connect the monitor power cable using a 12V DC adapter for transition 2 DVI HDCP port To connect your computer to the monitor us ing a DVI cable 3 VGA port To connect your computer to the monitor using a VGA cable ...

Страница 11: ...ce Guidelines Cleaning Your Monitor WARNING Before cleaning the monitor unplug the monitor power cable from the electrical outlet CAUTION Read and follow the Safety Instructions before cleaning the monitor For best practices follow the instructions in the list below while unpacking cleaning or handling your monitor To clean your anti static screen lightly dampen a soft clean cloth with water If po...

Страница 12: ...from the factory NOTE The following steps is applicable for a monitor with a stand 2 1 1 To attach the monitor stand 1 Fit the stand riser and stand base together and then turn in the stand base 2 Fit the two tabs on the upper part of the stand to the groove on the back of the monitor Press the stand until it snaps into place ...

Страница 13: ... computer 1 Turn Off your computer and disconnect the power cable 2 Connect either the white digital DVI or the blue analog VGA display connector cable to the corresponding video port on the back of your computer Do not use both cables on the same at the same time Use both the cables only when they are connected to two different computers with appropriate video systems Connecting the VGA cable Con...

Страница 14: ...Organizing Cables After you connect all necessary cables to your monitor and computer organize all cables as shown above NOTE After the cables are connected they will have to be disconnected again to route them through the hole ...

Страница 15: ...re that the monitor is placed on a soft and clean surface NOTE The following steps is applicable for a monitor with a stand 2 3 2 2 3 2 2 To remove the stand 1 Place the monitor on a soft cloth or cushion 2 Use a long and thin screwdriver to push the release latch 3 Once the latch is released remove the base away from monitor ...

Страница 16: ...isplayed Control buttons 1 5 2 3 4 1 2 3 4 The following table describes the front panel buttons Front Panel Button Description 1 Shortcut key Preset Modes Use this button to choose from a list of preset modes 2 Shortcut key Brightness Contrast Use this button to directly access the Brightness Contrast menu 3 Menu Use the MENU button to launch the On Screen Display OSD and select the OSD Menu See ...

Страница 17: ...is On and fully functional Blinking white light indicates the power save mode OSD controls Use the buttons on the front of the monitor to adjust the image settings 1 2 3 4 Front Panel Button Description 1 Up Use the Up button to increase values or move up 2 Down Use the Down button to adjust decrease ranges items in the OSD menu 3 OK Use the OK button to confirm your selection 4 Back Use the Back ...

Страница 18: ...ness Contrast Auto Adjust Input Source Color Display Energy Menu Personalize Others Resolution 1920x1080 60Hz Dell S2X18M Energy Use 75 75 2 Press the and buttons to move between the setting options As you move from one icon to another the option name is highlighted See the following table for a complete list of all the options available for the monitor 3 Press the button once to activate the high...

Страница 19: ...e of the backlight Press the button to increase the brightness and press the button to decrease the brightness min 0 max 100 NOTE Manual adjustment of Brightness is disabled when Dynamic Contrast is switched on Contrast Adjust the Brightness first and then adjust the Contrast only if further adjustment is necessary Press the button to increase the contrast and press the button to decrease the cont...

Страница 20: ... a black screen as the monitor self adjusts to the current input Auto Adjustment in Progress Auto Adjustment allows the monitor to self adjust to the incoming video signal After using Auto Adjustment you can further tune your monitor by using the Pixel Clock Coarse and Phase Fine controls under Display Settings NOTE Auto Adjust does not occur if you press the button while there are no active video...

Страница 21: ...you are using the analog VGA connector Push to select the VGA input source DVI Select DVI input when you are using the Digital DVI connector Push to select the DVI input source Auto Select Select auto select to scan for available input signals Reset Input Source Select this option to restore default Input Source Color Use Color to adjust the color setting mode Brightness Contrast Display Energy Me...

Страница 22: ...ngs ideal for movies Game Loads color settings ideal for most gaming applications Warm Increases the color temperature The screen appears warmer with a red yellow tint Cool Decreases the color temperature The screen appears cooler with a blue tint Custom Color Allows you to manually adjust the color settings Press the and buttons to adjust the three colors R G B values and create your own preset c...

Страница 23: ...deo image to green or purple This is used to adjust the desired flesh tone color Use or to adjust the hue from 0 to 100 Press to increase the green shade of the video image Press to increase the purple shade of the video image NOTE Hue adjustment is available only when you select Movie or Game preset mode Saturation This feature can adjust the color saturation of the video image Use or to adjust t...

Страница 24: ...his feature can make the image look sharper or softer Use or to adjust the sharpness from 0 to 100 Pixel Clock The Phase and Pixel Clock adjustments allow you to adjust your monitor to your preference Use or buttons to adjust for best image quality Minimum is 0 Maximum is 100 Phase If satisfactory results are not obtained using the Phase adjustment use the Pixel Clock coarse adjustment and then us...

Страница 25: ... time the menu remains on screen and so on Brightness Contrast Energy Personalize Others Resolution 1920x1080 60Hz Dell S2X18M Energy Use Auto Adjust Input Source Color English 20 20 s Unlock Display Language Transparency Timer Lock Reset Menu Menu Language Language options set the OSD display to one of the eight languages English Spanish French German Brazilian Portuguese Russian Simplified Chine...

Страница 26: ...Energy Others Resolution 1920x1080 60Hz Dell S2X18M Energy Use Auto Adjust Input Source Color Display Menu Personalize Shortcut Key 1 Preset Modes Shortcut Key 2 Brightness Contrast Reset Personalization Shortcut Key 1 User can select one of the followings Preset Modes Brightness Contrast Auto Adjust Input Source and Aspect Ratio to set the Shortcut Key 1 Shortcut Key 2 User can select one of the ...

Страница 27: ...ning Reset Other Factory Reset Menu Others LCD Conditioning Helps reduce minor cases of image retention Depending on the degree of image retention the program may take some time to run To start LCD conditioning select Enable Brightness Contrast Energy Personalize Resolution 1920x1080 60Hz Dell S2X18M Energy Use Auto Adjust Input Source Color Enable Disable Display DDC CI LCD Conditioning Reset Oth...

Страница 28: ... input timing is not supported by the monitor display Please change your input timing to 1920x1080 60Hz or any other monitor listed timing as per the monitor specifications This means that the monitor cannot synchronize with the signal that it is receiving from the computer See Monitor Specifications for the Horizontal and Vertical frequency ranges addressable by this monitor Recommended mode is 1...

Страница 29: ... mouse to wake it up If there is no display press the monitor button now to select the correct input source on the On Screen Display menu If VGA or DVI cable is not connected a floating dialog box as shown below appears The monitor will enter Power Save Mode after 4 minutes if left at this state Dell S2X18M No VGA Cable The display will go into Power Save Mode in 4 minutes www dell com support mon...

Страница 30: ...d select 1920 x 1080 4 Click OK If you do not see 1920 x 1080 as an option you may need to update your graphics driver Depending on your computer complete one of the following procedures If you have a Dell desktop or portable computer Go to www dell com support enter your service tag and download the latest driver for your graphics card If you are using a non Dell computer portable or desktop Go t...

Страница 31: ...ght please refer to the respective stand setup guide for set up instructions Rotating the Monitor Before you rotate the monitor your monitor should be fully vertically extended and fully tilted up to avoid hitting the bottom edge of the monitor NOTE The stand is detached when the monitor is shipped from the factory 5 21 ...

Страница 32: ...m the back of monitor 3 Turn on the monitor If the monitor is working correctly it detects that there is no signal and one of the following message appears While in self test mode the power LED remains white Dell S2X18M The display will go into Power Save Mode in 4 minutes www dell com support monitors No DVI Cable Dell S2X18M No VGA Cable The display will go into Power Save Mode in 4 minutes www ...

Страница 33: ...ug the video cable s from the back of the computer or monitor The monitor then goes into the self test mode 3 Press and hold Button 1 for 5 seconds A gray screen appears 4 Carefully inspect the screen for abnormalities 5 Press Button 1 on the bottom of the monitor again The color of the screen changes to red 6 Inspect the display for any abnormalities 7 Repeat steps 5 and 6 to inspect the display ...

Страница 34: ...les Reset the monitor to Factory Settings Factory Reset Change the video resolution to the correct aspect ratio Shaky Jittery Video Wavy picture or fine movement Reset the monitor to Factory Settings Factory Reset Check environmental factors Relocate the monitor and test in another room Missing Pixels LCD screen has spots Cycle power On Off Pixel that is permanently Off is a natural defect that ca...

Страница 35: ...heck to determine if the intermittent problem occurs in self test mode Missing Color Picture missing color Perform monitor self test feature check Ensure that the video cable connecting the monitor to the computer is connected properly and is secure Check for bent or broken pins in the video cable connector Wrong Color Picture color not good Change the Color Setting Mode in the Color Settings OSD ...

Страница 36: ...OSD menu is locked If yes press and hold the button above the Power button for 6 seconds to unlock For more information see Lock No Input Signal when user controls are pressed No picture the LED light is white Check the signal source Ensure the computer is not in standby or sleep mode by moving the mouse or pressing any key on the keyboard Check if the video cable is plugged in properly Disconnect...

Страница 37: ... you do not have an active Internet connection you can find contact information on your purchase invoice packing slip bill or Dell product catalog Dell provides several online and telephone based support and service options Availability varies by country and product and some services may not be available in your area To get online Monitor support content 1 Visit www dell com support monitors To co...

Страница 38: ... or a Dell portable computer with internet access 1 Go to www dell com support enter your init caps and download the latest driver for your graphics card 2 After installing the drivers for your graphics adapter attempt to set the resolution to 1920 x 1080 again NOTE If you are unable to set the resolution to 1920 x 1080 please contact Dell to inquire about a graphics adapter that supports these re...

Страница 39: ...r your graphics adapter attempt to set the resolution to 1920 x 1080 again NOTE If you are unable to set the recommended resolution contact the manufacturer of your computer or consider purchasing a graphics adapter that will support the video resolution ...

Страница 40: ...ical Luminance output 250 cd m typical 250 cd m typical Contrast ratio 1000 to 1 typical 8 000 000 to 1 Dynamic Contrast 1000 to 1 typical 8 000 000 to 1 Dynamic Contrast Faceplate coating Low Haze with 3H hardness Low Haze with 3H hardness Backlight LED edgelight system LED edgelight system Response time 6ms gray to gray typical 6ms gray to gray typical Color depth 16 78 million colors 16 78 mill...

Страница 41: ... 0 60 0 108 0 VESA 1920 x 1080 67 5 60 0 148 5 Electrical Specifications Model S2218M S2318M Video input signals Analog RGB 0 7 Volts 5 positive polarity at 75 ohm input impedance Digital DVI TMDS 600 mV for each differential line positive polarity at 50 ohm input impedance Synchronization input signals Separate horizontal and vertical synchronizations polarity free TTL level SOG Composite SYNC on...

Страница 42: ...ight 293 9 mm 11 57 in 312 3 mm 12 29 in Width 489 5 mm 19 27 in 522 2 mm 20 56 in Depth 49 1 mm 1 93 in 49 1 mm 1 93 in Stand dimensions Height 171 6 mm 6 76 in 171 6 mm 6 76 in Width 246 6 mm 9 71 in 246 6 mm 9 71 in Depth 147 9 mm 5 82 in 147 9 mm 5 82 in Weight Weight with packaging 4 93 kg 10 87 lb 5 34 kg 11 78 lb Weight with stand assembly and cables 3 26 kg 7 19 lb 3 57 kg 7 88 lb Weight w...

Страница 43: ... 4 F to 140 F Shipping Humidity Operating 10 to 80 non condensing 10 to 80 non condensing Non operating Storage 5 to 90 non condensing Shipping 5 to 90 non condensing Storage 5 to 90 non condensing Shipping 5 to 90 non condensing Altitude Operating maximum 5 000 m 16 400 ft 5 000 m 16 400 ft Non operating maximum 12 192 m 40 000 ft 12 192 m 40 000 ft Thermal dissipation 78 48 BTU hour maximum 71 6...

Страница 44: ...g the main cable from the monitor S2218M VESA Modes Horizontal Sync Vertical Sync Video Power Indicator Power Consumption Normal operation Active Active Active White 23 W maximum 21 W typical Active off mode Inactive Inactive Blanked White Glowing Less than 0 3 W Switch off Off Less than 0 3 W Energy Star Power Consumption PON 16 W ETEC 50 59 Kwh S2318M VESA Modes Horizontal Sync Vertical Sync Vid...

Страница 45: ...cisions about electrical tolerances or otherwise No warranty as to accuracy or completeness is expressed or implied The OSD functions only in the normal operation mode When any button is pressed in the Active off mode one of the following messages will be displayed Dell S2X18M There is no signal coming from your computer Press any key on the keyboard or move the mouse to wake it up If there is no ...

Страница 46: ...nments VGA Connector Pin Number 15 pin Side of the Connected Signal Cable 1 Video Red 2 Video Green 3 Video Blue 4 GND 5 Self test 6 GND R 7 GND G 8 GND B 9 Computer 5V 3 3V 10 GND sync 11 GND 12 DDC data 13 H sync 14 V sync 15 DDC clock ...

Страница 47: ...X2 2 TMDS RX2 3 TMDS Ground 4 Floating 5 Floating 6 DDC Clock 7 DDC Data 8 Floating 9 TMDS RX1 10 TMDS RX1 11 TMDS Ground 12 Floating 13 Floating 14 5 V 3 3 V power 15 Self test 16 Hot Plug Detect 17 TMDS RX0 18 TMDS RX0 19 TMDS Ground 20 Floating 21 Floating 22 TMDS Ground 23 TMDS Clock 24 TMDS Clock ...

Отзывы: