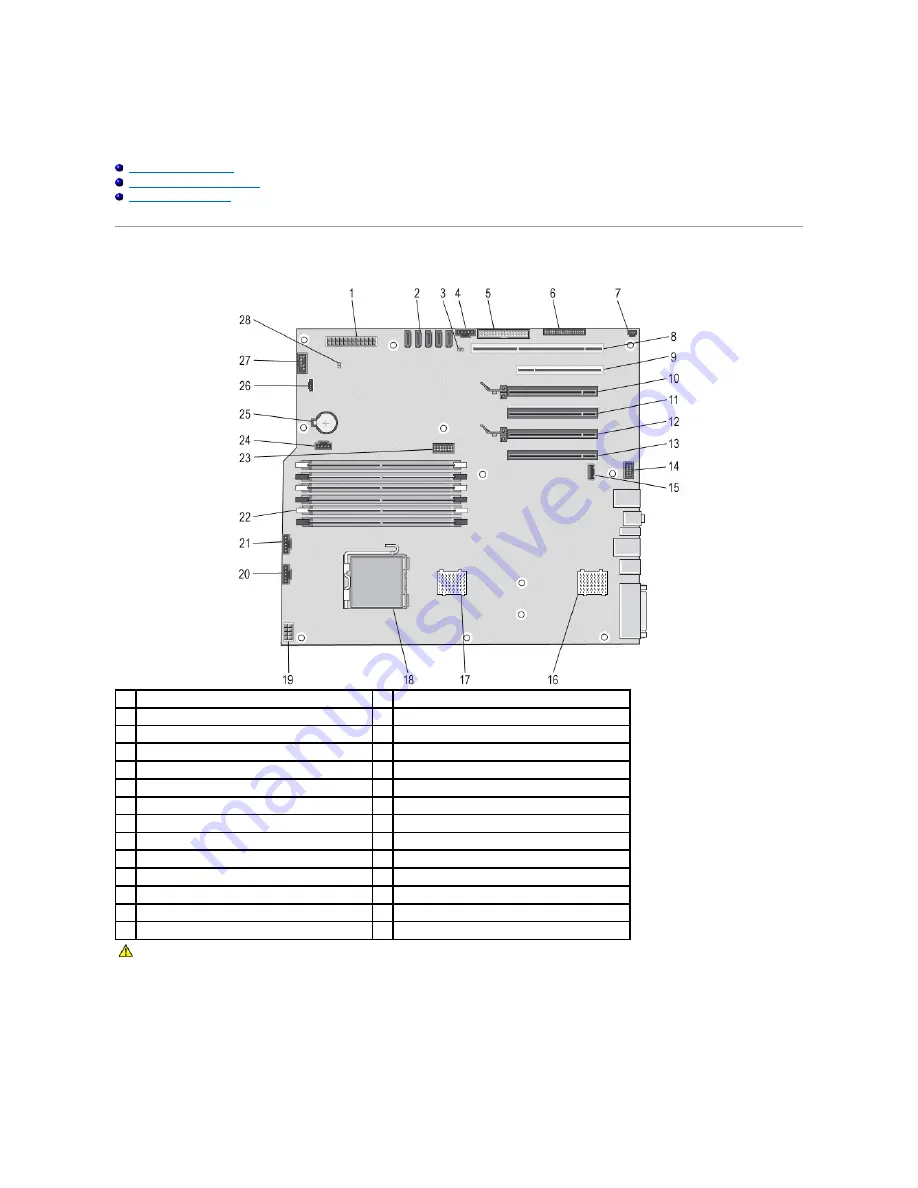
About Your System Board
Dell Precision™ T5500 Service Manual
System Board Schematic
Clearing Forgotten Passwords
1.
Remove the computer cover.
2.
Locate the 4-pin password connector (PSWD) on the system board.
3.
Remove the 2-pin jumper plug from pins 3 and 4 and set the jumper plug aside.
4.
Replace the computer cover.
5.
Connect your keyboard and mouse, then connect your computer and monitor to electrical outlets and turn them on.
6.
After the operating system loads, turn the computer off.
1
Main Power Connector (POWER1)
15
Type A USB Port (INT_USB2)
2
SATA Connectors (SATA0-4)
16
CPU Riser 2 (CPU2_RSR2)
3
Password Jumper (PSWD)
17
CPU Riser 1 (CPU_RSR1)
4
Hard Drive Fan Connector (FAN_HDD)
18
>Primary Processor Connector (CPU1)
5
Floppy Drive (DSKT)
19
Power Connector (POWER_CPU1)
6
Front Panel Connector (FRONTPANEL)
20
Front Fan Connector (FAN_FRONT)
7
Chassis Intrusion Header (INTRUDER)
21
Card Cage Fan (FAN_CCAG)
8
PCI-X Card Slot (SLOT6)
22
Memory Module Connectors (DIMM1-6)
9
PCI Card Slot (SLOT5)
23
Optional Serial/PS2 Connector (SERIAL2)
10
PCI Express 2.0 x16 Card Slot (SLOT4)
24
Auxiliary Hard-drive LED Connector (AUX_LED)
11
PCI Express 2.0 x16 Card Slot, wired as x8 (SLOT3)
25
Battery Socket (BATTERY)
12
PCI Express 2.0 x16 Card Slot (SLOT2)
26
Internal Speaker Connector (INT_SPKR)
13
PCI Express 2.0 x16 Card Slot, wired as x8 (SLOT1)
27
Flexbay USB (INT_USB)
14
Front Panel Audio Connector (FP_AUDIO)
28
RTC Reset Jumper (RTCRST)
WARNING:
Before working inside your computer, read the safety information that shipped with your computer. For additional safety best
practices information, see the Regulatory Compliance Homepage at www.dell.com/regulatory_compliance.
Содержание Precision T5500
Страница 19: ...5 Remove the coin cell from the computer ...
Страница 21: ...4 Remove the cover from the computer ...
Страница 23: ...4 Remove the hard drive bezel ...
Страница 24: ......
Страница 26: ...4 Slide the front bezel toward the top of the computer 5 Remove the front bezel from the computer ...
Страница 27: ......
Страница 29: ...6 Remove the screw that secures the front fan assembly 7 Remove the fan assembly from the computer ...
Страница 30: ......
Страница 33: ...4 Disconnect the power cable from the first hard drive 5 Disconnect the data cable from the first hard drive ...
Страница 35: ......
Страница 37: ...4 Lift and rotate the hard drive tray toward the bottom of the computer ...
Страница 38: ......
Страница 41: ...6 Remove the intrusion switch from the computer ...
Страница 42: ......
Страница 46: ......
Страница 50: ...6 Slide the optical drive out of the front of the chassis and remove from the computer ...
Страница 51: ...5 ...
Страница 54: ...7 Lift the processor cover 8 Lift the processor straight up and remove it from the computer ...
Страница 55: ......
Страница 63: ...16 Remove the dual processor from the dual processor board ...
Страница 64: ......
Страница 68: ......
Страница 74: ...18 Disconnect the optical drive data cable 19 Remove the system board ...
Страница 75: ......
Страница 77: ...4 Pull back the expansion card retention clip 4 Remove the expansion card from the computer ...
Страница 78: ......


