background image

1

tabs (2)

2

floppy drive

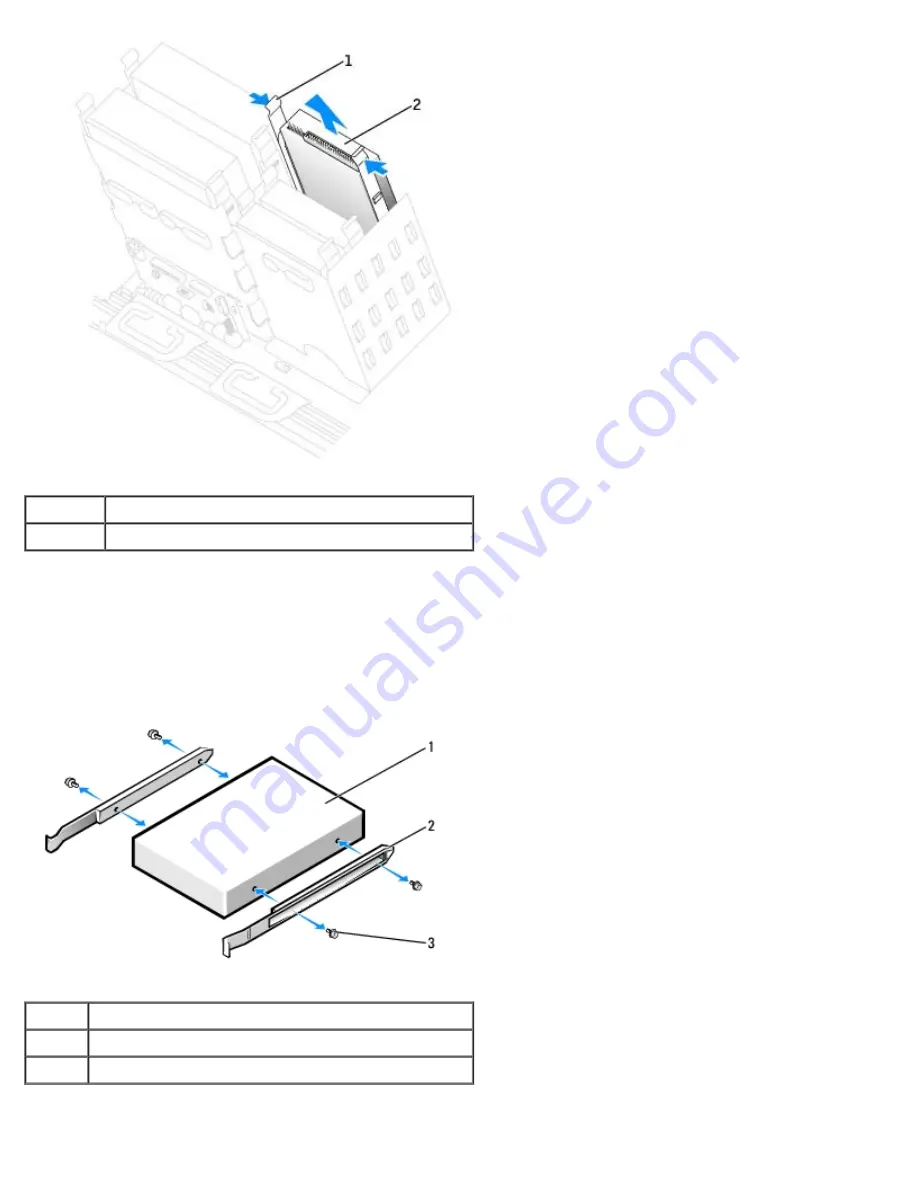
Installing a Floppy Drive

1.  If you are replacing a drive and the new drive does not have the bracket rails attached, remove the rails from the old

drive by removing the two screws that secure each rail to the drive. Attach the bracket to the new drive by aligning the

screw holes on the drive with the screw holes on the bracket rails and then inserting and tightening all four screws (two

screws on each rail). 

1

drive

2

bracket rails (2)

3

screws (4)

2.  Gently slide the drive into place until the tabs securely click into position. 

Содержание Precision 370 DHM

Страница 1: ...stalling the Card Fan Airflow Shroud Processor Battery Control Panel I O Panel Power Supply Tools to Help Solve Problems Diagnostic Lights Beep Codes Error Messages Dell Diagnostics Drivers Using Microsoft Windows XP System Restore Resolving Software and Hardware Incompatibilities Reinstalling Microsoft Windows XP Solving Problems Troubleshooting Tips Battery Problems Card Problems Card Fan Proble...

Страница 2: ...tes a potential for property damage personal injury or death Abbreviations and Acronyms For a complete list of abbreviations and acronyms see the Glossary If you purchased a Dell n Series computer any references in this document to Microsoft Windows operating systems are not applicable Information in this document is subject to change without notice 2004 Dell Inc All rights reserved Reproduction i...

Страница 3: ...un the Dell Diagnostics or access your documentation Readme files may be included on your CD to provide last minute updates about technical changes to your computer or advanced technical reference material for technicians or experienced users NOTE The latest drivers and documentation updates can be found at support dell com How to set up my computer How to care for my computer Troubleshooting info...

Страница 4: ... Service Tag to identify your computer when you use support dell com or contact technical support Enter the Express Service Code to direct your call when contacting technical support The Express Service Code is not available in all countries Latest drivers for my computer Answers to technical service and support questions Online discussions with other users and technical support Documentation for ...

Страница 5: ...creen How to use Linux Email discussions with Dell Precision and Linux users Additional information regarding Linux and my Dell Precision computer Dell Supported Linux Sites http linux dell com http lists us dell com mailman listinfo linux precision http docs us dell com docs software oslinux http docs us dell com docs software OSRHEL3 How to reinstall my operating system Operating System CD The o...

Страница 6: ...ormation Chipset Intel 925X Express Data bus width 64 bits Address bus width 32 bits DMA channels eight Interrupt levels 24 BIOS chip NVRAM 4 Mb Memory speed 400 533 MHz NIC Integrated network interface with ASF 1 0 support as defined by DMTF Capable of 10 100 1000 communication Green A good connection exists between a 10 Mbps network and the computer Orange A good connection exists between a 100 ...

Страница 7: ...front 6 back Bus speed PCI 33 MHz PCI Express x1 slot bidirectional speed 500 MB s x16 slot bidirectional speed 8 GB s PCI connectors mini tower computer three desktop computer four connector size 120 pins connector data width maximum 32 bits PCI Express connectors one x1 connector size 36 pins connector data width maximum 1 PCI Express lane PCI Express connectors one x16 connector size 164 pins c...

Страница 8: ...s Audio three connectors for line in line out and microphone one front panel connector for headphones I O panel 34 pin connector CD drive audio interface 4 pin connector Power_1 connector 24 pin connector System board connectors Primary IDE drive 40 pin connector on PCI local bus Serial ATA 4 7 pin connector Fan 5 pin connector PCI 2 3 120 pin connector CD drive audio interface 4 pin connector Key...

Страница 9: ...er and front of desktop Standby power light AUX_PWR on the system board Power DC power supply Wattage 350 W Heat dissipation 910 BTU hr Voltage fixed voltage power supply 110 V at 50 60 Hz manual selection and auto sensing power supplies 90 to 135 V at 50 60 Hz 180 to 265 V at 50 60 Hz 100 V at 50 60 Hz for Japanese computers Backup battery 3 V CR2032 lithium coin cell Physical Mini tower computer...

Страница 10: ...locity change of 200 inches sec 508 cm sec Altitude Operating 15 2 to 3048 m 50 to 10 000 ft Storage 15 2 to 10 668 m 50 to 35 000 ft Caring for Your Computer To help maintain your computer follow these suggestions To avoid losing or corrupting data never turn off your computer when the hard drive light is on Schedule regular virus scans using virus software Manage hard drive space by periodically...

Страница 11: ... activity light The floppy drive light is on when the computer reads data from or writes data to the floppy drive Wait until this light turns off before you remove the floppy disk from the drive 3 floppy drive eject button Press to eject a floppy disk from the floppy drive 4 hard drive activity The hard drive light is on when the computer reads data from or writes data to the hard drive The light ...

Страница 12: ...mputer is in a normal operating state Blinking green The computer is in a power saving state Blinking or solid amber See Power Problems To exit from a power saving state press the power button or use the keyboard or the mouse if it is configured as a wake device in the Windows Device Manager For more information about sleep states and exiting from a power saving state see Power Management See Diag...

Страница 13: ...ors Plug serial USB and other devices into the appropriate connector 6 voltage selection switch See the safety instructions located in the Product Information Guide for more information 1 parallel connector Connect a parallel device such as a printer to the parallel connector If you have a USB printer plug it into a USB connector NOTE The integrated parallel connector is automatically disabled if ...

Страница 14: ...On computers with a network connector card use the connector on the card It is recommended that you use Category 5 wiring and connectors for your network If you must use Category 3 wiring force the network speed to 10 Mbps to ensure reliable operation 7 network activity light Flashes a yellow light when the computer is transmitting or receiving network data A high volume of network traffic may mak...

Страница 15: ...s section follow the safety instructions located in the Product Information Guide 1 hard drive 5 processor airflow shroud and fan 2 system board 6 power supply 3 padlock ring 7 floppy drive optional 4 security cable slot 8 CD DVD drive Cable Colors Device Color Hard drive Blue cable Floppy drive Black pull tab CD DVD drive Orange pull tab ...

Страница 16: ...r PASS 15 PCI Express x16 up to 150w card slot 5 SCSI LED connector 16 CD audio input CD IN 6 front panel connector 17 processor power connector 7 speaker 18 processor socket 8 secondary serial port SERIAL 2 19 processor fan connector CPU FAN 9 card fan connector PCI FAN 20 main power connector POWER 10 clear CMOS jumper CLR CMOS 21 memory modules connectors 11 battery socket BATTERY Back to Conte...

Страница 17: ......

Страница 18: ...evice such as your CD player is operating 3 floppy drive eject button Press to eject a floppy disk from the floppy drive 4 diagnostic lights 4 Use the lights to help you troubleshoot a computer problem based on the diagnostic code For more information see Diagnostic Lights 5 USB 2 0 connectors 2 Use the front USB connectors for devices that you connect occasionally such as flash memory keys or cam...

Страница 19: ...ostic Lights for a description of light codes that can help you troubleshoot problems with your computer 9 power button Press to turn on the computer NOTE The power button can also be used to wake the system or to place it into a power saving state See Power Management for more information NOTICE To avoid losing data do not use the power button to turn off the computer Instead perform an operating...

Страница 20: ...egrity light Green A good connection exists between a 10 Mbps network and the computer Orange A good connection exists between a 100 Mbps network and the computer Yellow A good connection exists between a 1000 Mbps or 1 Gbps network and the computer Off The computer is not detecting a physical connection to the network 6 network adapter connector To attach your computer to a network or broadband d...

Страница 21: ...or to attach a personal computer microphone for voice or musical input into a sound or telephony program On computers with a sound card the microphone connector is on the card 11 keyboard connector If you have a standard keyboard plug it into the purple keyboard connector If you have a USB keyboard plug it into a USB connector 12 serial connector Connect a serial device such as a handheld device t...

Страница 22: ...lors Device Color Hard drive Blue cable Floppy drive Black pull tab CD DVD drive Orange pull tab System Board Components 1 floppy drive FLOPPY 12 PCI card slots 1 3 2 IDE drive PRI IDE 13 front panel audio FP AUD 3 SATA connectors SATA 0 SATA 1 SATA 2 SATA 3 14 PCI Express x1 card slot 4 password jumper PASS 15 PCI Express x16 up to 150w card slot ...

Страница 23: ...r power connector 7 speaker 18 processor socket 8 secondary serial port SERIAL 2 19 processor fan connector CPU FAN 9 card fan connector PCI FAN 20 main power connector POWER 10 clear CMOS jumper CLR CMOS 21 memory modules connectors 11 battery socket BATTERY Back to Contents Page ...

Страница 24: ...to effect the changes Manageability Alert Standard Format ASF is a DMTF management standard that specifies pre operating system or operating system absent alerting techniques The standard is designed to generate an alert on potential security and fault conditions when the operating system is in a sleep state or the system is powered down ASF is designed to supersede previous operating system absen...

Страница 25: ...age Client instrumentation which is based on DMI and CIM is available for your computer For information on IT Assistant see the Dell OpenManage IT Assistant User s Guide available on the Dell Support website at support dell com Dell OpenManage Client Instrumentation Dell OpenManage Client Instrumentation is software that enables remote management programs such as IT Assistant to do the following A...

Страница 26: ...r a padlock and looped security cable with the padlock ring A padlock alone prevents the computer from being opened A security cable looped around a stationary object is used in conjunction with a padlock to prevent unauthorized movement of the computer Attach a commercially available antitheft device to the security cable slot on the back of the computer NOTE Before you purchase an antitheft devi...

Страница 27: ...ht System Password and then press Enter The option heading changes to Enter Password followed by an empty 32 character field in square brackets 3 Type your new system password You can use up to 32 characters To erase a character when entering your password press Backspace or the left arrow key The password is not case sensitive Certain key combinations are not valid If you enter one of these combi...

Страница 28: ...ncorrect or incomplete system password the computer displays the following message Incorrect password Number of unsuccessful password attempts 3 System halted Must power down Even after your computer is turned off and on the previous message is displayed each time you type an incorrect or incomplete system password NOTE You can use Password Status in conjunction with System Password and Admin Pass...

Страница 29: ...y the password After you verify the password the Admin Password setting changes to Enabled The next time you enter system setup the computer prompts you for the setup password 4 Exit system setup A change to Admin Password becomes effective immediately no need to restart the computer Operating Your Computer With a Admin Password Enabled When you enter system setup the Admin Password option is high...

Страница 30: ...ndows desktop Then shut down your computer and try again System Setup Screens The system setup screen displays current or changeable configuration information for your computer Information on the screen is divided into three areas the options list active options field and key functions Options List This field appears on the left side of the system setup window The field is a scrollable list contai...

Страница 31: ... connector on the system board Drive 1 Identifies the secondary serial hard drive attached to the SATA1 connector on the system board Drive 2 Identifies the primary hard drive attached to the IDE1 connector on the system board Drive 3 Identifies the primary hard drive attached to the IDE1 connector on the system board Drive 4 Identifies the secondary hard drive attached to the IDE2 connector on th...

Страница 32: ...does not alter your hard drive image Security Admin Password This option provides restricted access to the computer s System Setup program in the same way that access to the system can be restricted with the System Password option System Password Displays the current status of the system s password security feature and allows a new system password to be assigned and verified Drive Password Passwor...

Страница 33: ...ary Video POST Behavior Fastboot When set to On default your computer will start more quickly since it will skip certain configurations and tests Numlock Key This option involves the rightmost bank of keys on your keyboard When set to On default this option activates the numeric and mathematical features shown at the top of each key When set to Off this option activates the cursor control function...

Страница 34: ... a USB device connect the USB device to a USB connector 2 Turn on or restart your computer 3 When F2 Setup F12 Boot Menu appears in the upper right corner of the screen press F12 If you wait too long and the operating system logo appears continue to wait until you see the Microsoft Windows desktop Then shut down your computer and try again The Boot Device Menu appears listing all available boot de...

Страница 35: ...atures are enabled Password features are disabled CLR_CMOS Normal CMOS function Clears the CMOS settings jumpered unjumpered 2 Locate the 3 pin password jumper PSWD on the system board and attach the jumper plug to pins 2 and 3 to clear the password For more information for the mini tower computer see System Board Components for the desktop computer see System Board Components NOTE When you receiv...

Страница 36: ...nd admin password options appear as Not Set meaning that the password feature is enabled but no password is assigned 12 Assign a new system and or setup password Clearing CMOS Settings CAUTION Before you begin any of the procedures in this section follow the safety instructions located in the Product Information Guide 1 Follow the procedures in Before You Begin 2 Reset the current CMOS settings a ...

Страница 37: ...remotely start your computer using a power management event such as Remote Wake Up The following table lists the sleep states and the methods you can use to wake the computer from each state Sleep State Wake Up Methods Windows XP Standby Press the power button Auto power on Move or click the mouse Type on the keyboard USB device activity Power management event Hibernate Press the power button Auto...

Страница 38: ...the same bus as the LVD devices such as U320 U160 or Ultra2 the SCSI bus operates in SE mode and runs at maximum of Ultra 40 MBps speed For more information installing a SCSI device and SCSI ID settings for your mini tower computer see Drives for your desktop computer Drives About RAID Configurations This section provides an overview of the RAID configuration that you might have selected when you ...

Страница 39: ...evel 1 RAID level 1 uses a data redundancy storage technique known as mirroring When data is written to the primary drive it is then duplicated or mirrored on the other drive A RAID level 1 configuration sacrifices high data access rates for its data redundancy advantages If a drive failure occurs subsequent read and write operations are directed to the surviving drive A replacement drive can then...

Страница 40: ...ave copyright protection and cannot be copied using Sonic RecordNow 1 Click the Start button point to All Programs Sonic RecordNow and then click RecordNow 2 Click either the audio tab or the data tab depending on the kind of CD or DVD you want to copy 3 Click Exact Copy 4 To copy the CD or DVD If you have one CD or DVD drive ensure that the settings are correct and click Copy The computer reads y...

Страница 41: ...You cannot create audio DVDs with Sonic RecordNow Music MP3 files can be played only on MP3 players or on computers that have MP3 software installed Do not burn a blank CD R or CD RW to its maximum capacity for example do not copy a 650 MB file to a 650 MB blank CD The CD RW drive needs 1 or 2 MB of the blank CD to finalize the recording Use a blank CD RW to practice CD recording until you are fam...

Страница 42: ...ms before you turn off your computer 1 Shut down the operating system a Save and close any open files exit any open programs click the Start button and then click Turn Off Computer b In the Turn off computer window click Turn off The computer turns off after the operating system shutdown process finishes 2 Ensure that the computer and any attached devices are turned off If your computer and attach...

Страница 43: ... the following steps before you begin working inside the computer 1 Turn off your computer NOTICE To disconnect a network cable first unplug the cable from your computer and then unplug it from the network wall jack 2 Disconnect any telephone or telecommunication lines from the computer 3 Disconnect your computer and all attached devices from their electrical outlets and then press the power butto...

Страница 44: ...the back panel remove the padlock NOTICE Ensure that sufficient space exists to support the open cover at least 30 cm 1 ft of desk top space 3 Lay the computer on its side as shown in the illustration 4 Open the cover a Facing the back of the computer press the release button on the right side of the computer with one hand while pulling up on the top of the cover with the other hand b Press the re...

Страница 45: ...3 padlock ring Back to Contents Page ...

Страница 46: ... the label in the upper right corner of the module to determine the module s capacity NOTE Always install memory modules in the order indicated on the system board The recommended memory configurations are A pair of matched memory modules installed in connectors DIMM_1 and DIMM_2 or A pair of matched memory modules installed in connectors DIMM_1 and DIMM_2 and another matched pair installed in con...

Страница 47: ...XP can only use a maximum of 4 GB of address space however the amount of memory available to the operating system is less than 4 GB Certain components within the computer require address space in the 4 GB range Any address space reserved for these components cannot be used by computer memory The following components require memory address space System ROM APIC s Integrated PCI devices such as netw...

Страница 48: ...u can do so by touching an unpainted metal surface on the computer 1 Follow the procedures in Before You Begin 2 Press out the securing clip at each end of the memory module connector 1 memory connector closest to processor 2 securing clips 2 3 connector 3 Align the notch on the bottom of the module with the crossbar in the connector 1 cutouts 2 2 memory module 3 notch 4 crossbar NOTICE To avoid d...

Страница 49: ...ver and check the installed memory modules to ensure that they are seated properly in their sockets Then repeat steps 5 6 and 7 9 When the System Memory total is correct press Esc to exit system setup 10 Run the Dell Diagnostics to verify that the memory modules are operating properly Removing Memory CAUTION Before you begin any of the procedures in this section follow the safety instructions loca...

Страница 50: ......

Страница 51: ...DVD Drive Overview Your computer supports Two hard drives Serial ATA or SCSI with optional SCSI controller Two floppy drives Two CD or DVD drives 1 CD DVD drive s 2 floppy drive s 3 hard drive s General Installation Guidelines Connect hard drives to the connector labeled SATA and connect CD DVD drives to the connector labeled IDE ...

Страница 52: ...s When you install a drive you connect two cables a DC power cable and a data cable to the back of the drive and to the system board Some CD DVD drives may also have an audio connector one end of the audio cable will attach to the drive connector and the other will attach to the system board Drive Interface Connectors Serial ATA Connector 1 interface cable 2 interface connector Most connectors are...

Страница 53: ...roller 7 Controller 7 Boot hard drive 0 Boot hard drive 0 CD or DVD drive 5 tape or DAT drive 6 NOTE There is no requirement that SCSI ID numbers be assigned sequentially or that devices be attached to the cable in order by ID number If two or more devices use the same ID your computer may hang during POST and in SCSI BIOS SCSI devices installed by Dell are configured correctly during the manufact...

Страница 54: ...to partition and format SCSI hard drives See the documentation that came with your SCSI software drivers for information on installing the appropriate drivers and preparing your SCSI hard drive for use SCSI Cables Ultra 320 optional on the Dell Precision 370 computer Ultra 160 m and Ultra2 Wide LVD drives typically hard drives both use a 68 pin cable One end of the cable attaches to the SCSI conne...

Страница 55: ... in Before You Begin Removing a Hard Drive 1 Disconnect the power and hard drive cables from the drive 1 power cable 2 hard drive cable 2 Press in on the tabs on each side of the drive and slide the drive up and out 1 tabs 2 ...

Страница 56: ... from the old drive by removing the two screws that secure each rail to the drive Attach the bracket rails to the new drive by aligning the screw holes on the drive with the screw holes on the bracket rails and then inserting and tightening all four screws two screws on each rail 1 drive 2 bracket rails 2 3 screws 4 4 Install the hard drive into the computer by gently sliding the drive into place ...

Страница 57: ...alled is the primary drive install your operating system on the hard drive Adding a Second Hard Drive CAUTION Before you begin any of the procedures in this section follow the safety instructions in the Product Information Guide CAUTION To guard against electrical shock always unplug your computer from the electrical outlet before opening the cover NOTICE To avoid damage to the drive do not set it...

Страница 58: ...then plug it into the computer 9 Connect your computer and devices to their electrical outlets and turn them on 10 See the documentation that came with the drive for instructions on installing any software required for drive operation Front Panel Inserts If you are installing a new floppy or CD DVD drive instead of replacing a drive remove the front panel inserts 1 Open the cover to a 90 degree an...

Страница 59: ...t frame by pressing on the four tabs 1 insert frame for CD DVD drive bay 2 insert frame for floppy drive bay 6 Reattach the empty insert frame over the front of the drive bay The insert frame fits only one way a Face the front of the computer and slip the left side of the insert in to the left side of the drive bay opening ...

Страница 60: ...ore you begin any of the procedures in this section follow the safety instructions in the Product Information Guide CAUTION To guard against electrical shock always unplug your computer from the electrical outlet before opening the cover NOTE If you are adding a floppy drive see Installing a Floppy Drive Removing a Floppy Drive 1 Follow the procedures in Before You Begin 2 Disconnect the power and...

Страница 61: ...tach the bracket to the new drive by aligning the screw holes on the drive with the screw holes on the bracket rails and then inserting and tightening all four screws two screws on each rail 1 drive 2 bracket rails 2 3 screws 4 2 Gently slide the drive into place until the tabs securely click into position 3 Attach the power and floppy drive cables to the floppy drive 4 Connect the other end of th...

Страница 62: ...computer 8 Connect your computer and devices to their electrical outlets and turn them on See the documentation that came with the drive for instructions on installing any software required for drive operation 9 Enter system setup and select the appropriate Diskette Drive option 10 Verify that your computer works correctly by running the Dell Diagnostics CD DVD Drive CAUTION Before you begin any o...

Страница 63: ...You Begin 2 Disconnect the power audio and CD DVD drive cables from the back of the drive 1 power cable 2 audio cable 3 CD DVD drive cable 3 Press inward on the two tabs on the sides of the drive and then slide the drive upward and remove it from the drive bay ...

Страница 64: ...ot attached inside the cover contact Dell 3 If you are installing a replacement drive and the new drive does not have the bracket rails attached remove the rails from the old drive by removing the two screws that secure each rail to the drive Attach the bracket to the new drive by aligning the screw holes on the drive with the screw holes on the bracket rails and then inserting and tightening all ...

Страница 65: ...cover NOTICE To connect a network cable first plug the cable in to the network wall jack and then plug it in to the computer 9 Connect your computer and devices to their electrical outlets and turn them on See the documentation that came with the drive for instructions on installing any software required for drive operation 10 Enter system setup and select the appropriate Drive option 11 Verify th...

Страница 66: ...a card follow the procedures in the next section If you are removing but not replacing a card see Removing a PCI Card If you are replacing a card remove the current driver for the card from the operating system If you are installing or replacing a PCI Express card see Installing a PCI Express Card Installing a PCI Card NOTE For your Dell Precision 370 desktop computer Dell offers a customer kit fo...

Страница 67: ...that came with the card for information on configuring the card making internal connections or otherwise customizing it for your computer CAUTION Some network adapters automatically start the computer when they are connected to a network To guard against electrical shock be sure to unplug your computer from its electrical outlet before installing any cards 6 Place the card in the connector and pre...

Страница 68: ...eated card 7 Before you lower the retention arm ensure that The tops of all cards and filler brackets are flush with the alignment bar The notch in the top of the card or filler bracket fits around the alignment guide 8 Press the retention arm into place securing the card s in the computer ...

Страница 69: ...the setting to Off b Connect the network cable to the add in network adapter s connectors Do not connect the network cable to the integrated connector on the back panel 13 Install any drivers required for the card as described in the card documentation Removing a PCI Card 1 Follow the procedures in Before You Begin 2 Press the lever on the card retention arm and raise the retention arm 3 If necess...

Страница 70: ...ooling fan installed Otherwise your card could overheat and damage your computer If your computer has a PCI Express graphics card without a cooling card fan contact Dell to purchase a card fan 1 PCI Express card x16 3 PCI Express card slot x1 2 PCI Express card x1 4 PCI Express card slot x16 If you are installing or replacing a PCI Express card follow the procedures in the next section If you are ...

Страница 71: ...ou are installing a new card remove the filler bracket to create a card slot opening Then continue with step 5 4 If you are replacing a card that is already installed in the computer remove the card If necessary disconnect any cables connected to the card If your card includes a retention mechanism remove the top of the retention mechanism by pressing the tab and pulling up on the top Gently pull ...

Страница 72: ...lot is aligned with the securing tab and gently pull the securing tab 7 Place the card in the connector and press down firmly Ensure that the card is fully seated in the slot Insert the card firmly into the card connector on the system board 1 bracket within slot 2 bracket caught outside of slot 3 fully seated card 4 not fully seated card 8 If you replaced a card that was already installed in the ...

Страница 73: ...ug it into the computer 13 Close the computer cover reconnect the computer and devices to electrical outlets and turn them on 14 If you installed a sound card a Enter system setup select Audio Controller and change the setting to Off b Connect external audio devices to the sound card s connectors Do not connect external audio devices to the microphone speaker headphone or line in connectors on the...

Страница 74: ...press it into place securing the card s in the computer NOTICE To connect a network cable first plug the cable into the network wall jack and then plug it into the computer 8 Close the computer cover reconnect the computer and devices to electrical outlets and turn them on 9 Remove the card s driver from the operating system 10 If you installed a sound card a Enter system setup select Audio Contro...

Страница 75: ...installing a graphics card that runs higher than 75 W contact Dell to purchase a card fan CAUTION Before you begin any of the procedures in this section follow the safety instructions located in the Product Information Guide CAUTION To guard against electrical shock always unplug your computer from the electrical outlet before opening the cover 1 Follow the procedures in Before You Begin 2 If spar...

Страница 76: ...h the cabling slots 1 card fan bracket 4 card fan cable 2 top edge of card fan bracket 5 card fan connector on system boards 3 cabling slot 6 Plug the card fan cable into the card fan connector labeled PCI FAN on the system board For more information on system board see System Board Components 7 If you removed drive rails in step 2 you may attach them to the side of the card fan bracket for conven...

Страница 77: ...9 Connect your computer and devices to their electrical outlets and turn them on Back to Contents Page ...

Страница 78: ...ns in the Product Information Guide 1 Follow the procedures in Before You Begin 2 Disconnect the cooling fan cable from the fan connector on the system board 3 Disconnect the power cable from the power connector on the system board 4 Lift up the airflow shroud Removing the Airflow Shroud for the Desktop Computer CAUTION Before you begin any of the procedures in this section follow the safety instr...

Страница 79: ... prevent static damage to components inside your computer discharge static electricity from your body before you touch any of your computer s electronic components You can do so by touching an unpainted metal surface on the computer 1 Follow the procedures in Before You Begin CAUTION The heat sink can get very hot during normal operation Be sure that the heat sink has had sufficient time to cool b...

Страница 80: ...the retention base tab until the heat sink pops up slightly c Press out on the second retention tab while lifting the heat sink up and out of the retention base NOTICE Lay the heat sink down on its side Do not touch or remove the thermal grease on the bottom of the heat sink ...

Страница 81: ...a processor upgrade kit from Dell discard the original heat sink If you are not installing a processor upgrade kit from Dell reuse the original heat sink and blower when you install your new processor 3 Push down and out on the socket release lever 4 Open the processor cover ...

Страница 82: ...the back of the computer 1 Unpack the new processor NOTICE You must position the processor correctly in the socket to avoid permanent damage to the processor and the computer when you turn on the computer 2 If the release lever on the socket is not fully extended move it to that position 3 Align the pin 1 corners of the processor and socket NOTICE To avoid damage ensure that the processor aligns p...

Страница 83: ...he center cover latch on the socket 6 Pivot the socket release lever back toward the socket and snap it into place to secure the processor NOTICE If you are not installing a processor upgrade kit from Dell reuse the original heat sink assembly when you replace the processor If you installed a processor replacement kit from Dell return the original heat sink assembly and processor to Dell in the sa...

Страница 84: ...nector on the system board 11 Reconnect the power cable to the power connector on the system board 12 Close the computer cover NOTICE To connect a network cable first plug the cable into the network wall jack and then plug it into the computer 13 Connect your computer and devices to electrical outlets and turn them on Back to Contents Page ...

Страница 85: ... outlet for a few hours then reconnect the computer turn it on and enter system setup If the date and time are not correct in system setup replace the battery You can operate your computer without a battery however without a battery the configuration information is erased if the computer is turned off or unplugged from the electrical outlet In this case you must enter system setup and reset the co...

Страница 86: ...device and then plug it into the computer 6 Connect your computer and devices to electrical outlets and turn them on 7 Enter system setup and restore the settings you recorded in step 1 8 Properly dispose of the old battery For more information see your Product Information Guide Back to Contents Page ...

Страница 87: ...e procedures in this section follow the safety instructions located in the Product Information Guide CAUTION To guard against electrical shock always unplug your computer from the electrical outlet before opening the cover Control Panel Components Mini Tower Computer 1 control panel connector 2 alignment hole 3 hard drive access light 4 power button 5 power light 6 screw hole Desktop Computer ...

Страница 88: ...anel 3 Disconnect the control panel cable from the I O panel connector 4 Disconnect the I O panel cable from the connector on the system board To locate the system board connector for mini tower computer see System Board Components for the desktop computer see System Board Components 5 Remove the mounting screw from the control panel 6 Lift the control panel away from the computer Mini Tower Compu...

Страница 89: ...Desktop Computer 1 control panel 2 mounting screw ...

Страница 90: ...Replacing the Control Panel Follow the removal procedure in reverse order ensuring that the tabs on the top panel bottom panel and front panel are secure Back to Contents Page ...

Страница 91: ... in this section follow the safety instructions in the Product Information Guide CAUTION To guard against electrical shock always unplug your computer from the electrical outlet before opening the cover I O Panel Components Mini Tower Computer 1 control panel connector 4 USB 2 0 connectors 2 2 front panel connector 5 headphone connector 3 speaker connector 6 audio connector Desktop Computer ...

Страница 92: ...ights 4 6 control panel connector Removing the I O Panel 1 Follow the procedures in Before You Begin 2 Disconnect all cables that are connected to the I O panel Note the routing of the control panel cable as you remove it from the computer so that you can replace it correctly 3 From inside the computer cover remove the mounting screw that secures the I O panel to the computer 4 Remove the I O pane...

Страница 93: ...Desktop Computer Replacing the I O Panel ...

Страница 94: ...To replace the I O panel follow the removal procedures in the reverse order Back to Contents Page ...

Страница 95: ...n do so by touching an unpainted metal surface on the computer Removing the Power Supply 1 Disconnect the DC power cables from the system board and the drives Note the routing of the DC power cables underneath the tabs in the computer frame as you release the tabs and remove the cables from the system board and drives You must route these cables properly when you replace them to prevent their bein...

Страница 96: ...f the computer frame 3 Reconnect the DC power cables 4 On the desktop computer reattach the power cables to the side of the hard drive 5 Run the cables underneath the tabs and press the tabs to close them over the cables 6 Close the computer cover NOTICE To connect a network cable first plug the cable into the network wall jack and then plug it into the computer 7 Connect your computer and devices...

Страница 97: ...ty wait for recovery completion and then restart the computer A possible processor failure has occurred Reinstall the processor and restart the computer Memory modules are detected but a memory failure has occurred 1 Reseat the memory modules to ensure that your computer is successfully communicating with the memory 2 Restart the computer 3 Run the Dell Diagnostics 4 If the problem persists contac...

Страница 98: ...ctor placement requirements exist Verify that the memory modules that you are installing are compatible with your computer Reinstall the memory modules and restart the computer If the problem persists contact Dell A possible system board resource and or hardware failure has occurred Perform the procedures in Resolving Software and Hardware Incompatibilities If the problem persists contact Dell A p...

Страница 99: ...RAM read write failure 1 1 4 ROM BIOS checksum failure 1 2 1 Programmable interval timer failure 1 2 2 DMA initialization failure 1 2 3 DMA page register read write failure 1 3 Video Memory Test failure 1 3 1 through 2 4 4 Memory not being properly identified or used 3 1 1 Slave DMA register failure 3 1 2 Master DMA register failure 3 1 3 Master interrupt mask register failure 3 1 4 Slave interrup...

Страница 100: ...ect the program you want to remove 3 Click the Change or Remove Program icon 4 See the program documentation for installation instructions Alert CPU Fan Not Detected Ensure that the cooling fan and airflow shroud are properly installed and working Alert Previous attempts at booting this system have failed at checkpoint nnnn For help in resolving this problem please note this checkpoint and contact...

Страница 101: ...tware Problems Hard disk configuration error Hard disk controller failure Hard disk drive failure Hard disk drive failure See Drive Problems Insert bootable media Insert a bootable floppy disk or CD Invalid configuration information please run SETUP program Enter system setup and correct the computer configuration information Keyboard failure See Keyboard Problems Memory address line failure at ad...

Страница 102: ...ogram that you want to use In some cases you might have to restart your computer to restore computer resources If so run the program that you want to use first Operating system not found Contact Dell Please Connect USB Keyboard Mouse to USB Ports on the Back of the Computer Turn your computer off connect the USB keyboard and or mouse to the USB connectors on the back of the computer and then resta...

Страница 103: ...e Dell Diagnostics If you experience a problem with your computer perform the checks in Solving Problems and run the Dell Diagnostics before you contact Dell for technical assistance It is recommended that you print these procedures before you begin NOTICE The Dell Diagnostics works only on Dell computers Enter system setup review your computer s configuration information and ensure that the devic...

Страница 104: ...ostics loads and the Main Menu screen appears click the button for the option you want Option Function Express Test Performs a quick test of devices This test typically takes 10 to 20 minutes and requires no interaction on your part Run Express Test first to increase the possibility of tracing the problem quickly Extended Test Performs a thorough check of devices This test typically takes an hour ...

Страница 105: ...Menu screen To exit the Dell Diagnostics and restart the computer close the Main Menu screen Drivers What Is a Driver A driver is a program that controls a device such as a printer mouse or keyboard All devices require a driver program A driver acts like a translator between the device and any other programs that use the device Each device has its own set of specialized commands that only its driv...

Страница 106: ...evice icon If an exclamation point is next to the device name you may need to reinstall the driver or install a new driver Reinstalling Drivers and Utilities NOTICE The Dell Support website at support dell com and your Drivers and Utilities CD provide approved drivers for Dell computers If you install drivers obtained from other sources your computer might not work correctly Using Windows XP Devic...

Страница 107: ...and Support 2 Click System Restore 3 Follow the instructions on the screen Restoring the Computer to an Earlier Operating State NOTICE Before you restore the computer to an earlier operating state save and close any open files and exit any open programs Do not alter open or delete any files or programs until the system restoration is complete 1 Click the Start button point to All Programs Accessor...

Страница 108: ...disabled To see if System Restore is enabled 1 Click the Start button and click Control Panel 2 Click Performance and Maintenance 3 Click System 4 Click the System Restore tab 5 Ensure that Turn off System Restore is unchecked Resolving Software and Hardware Incompatibilities If a device is either not detected during the operating system setup or is detected but incorrectly configured you can use ...

Страница 109: ... button and click Help 2 Click Troubleshooting and Maintenance on the Contents tab click Windows 2000 troubleshooters and then click Hardware 3 In the Hardware Troubleshooter list click I need to resolve a hardware conflict on my computer and click Next Reinstalling Microsoft Windows XP NOTICE You must use Windows XP Service Pack 1 SP1 or later when you reinstall Windows XP Before You Begin If you...

Страница 110: ... up and down arrow keys to select IDE CD drive from the menu or enter the associated menu option number 6 After the system boots using the ResourceCD select the number associated with the Create a SATA RAID driver diskette menu option 7 Follow the instructions on the screen to create the floppy disk 8 After you create the floppy disk exit to DOS 9 Remove the ResourceCD 10 Remove the floppy disk La...

Страница 111: ...ed type s to select Specify Additional Device NOTE If your system is unable to find a drive for installation go back to step 3 and try again Make sure you follow each step 3 When prompted insert the Intel SATA Drivers floppy disk you created and press Enter 4 Highlight Intel R 82801ER SATA RAID Controller and press Enter 5 Press Enter again to continue 6 Leave the Intel SATA Drivers floppy disk in...

Страница 112: ...nter your selections If you are unsure of your settings accept the default selections Windows XP installs the operating system components and configures the computer The computer automatically restarts NOTICE Do not press any key when the following message appears Press any key to boot from the CD 13 When the Welcome to Microsoft screen appears click Next 14 When the How will this computer connect...

Страница 113: ...or message appears on the screen write down the exact message This message may help technical support personnel diagnose and fix the problem s If an error message occurs in a program see the program s documentation Battery Problems Fill out the Diagnostics Checklist as you complete these checks CAUTION There is a danger of a new battery exploding if it is incorrectly installed Replace the battery ...

Страница 114: ...ler card and not to one of the system board IDE connectors leave the drive controller card installed in the computer 3 Close the computer cover reconnect the computer and devices to electrical outlets and then turn them on 4 Run the Dell Diagnostics Test the cards 1 Turn off the computer and devices disconnect them from their electrical outlets wait 10 to 20 seconds and then open the computer cove...

Страница 115: ... all DVD titles work in all DVD drives Adjust the Windows volume control Click the speaker icon in the lower right corner of your screen Ensure that the volume is turned up by clicking the slidebar and dragging it up Ensure that the sound is not muted by clicking any boxes that are checked Check the speakers and subwoofer See Sound and Speaker Problems Problems writing to a CD DVD RW drive Close o...

Страница 116: ...then click Security 2 Click Do not allow attachments to remove the checkmark Check the telephone line connection Check the telephone jack Connect the modem directly to the telephone wall jack Use a different telephone line Verify that the telephone line is connected to the jack on the modem The jack has either a green label or a connector shaped icon next to it Ensure that you hear a click when yo...

Страница 117: ... and into the connector on the computer Ensure that the IEEE 1394 device is recognized by Windows Windows XP 1 Click the Start button and click Control Panel 2 Click Printers and Other Hardware If your IEEE 1394 device is listed Windows recognizes the device Windows 2000 1 Click the Start button point to Settings Control Panel and then click System 2 Click the Hardware tab 3 Click Device Manager a...

Страница 118: ...omputer off If you are unable to get a response by pressing a key on your keyboard or moving your mouse press and hold the power button for at least 8 to 10 seconds until the computer turns off Then restart your computer A program stops responding End the program 1 Press Ctrl Shift Esc simultaneously 2 Click Applications 3 Click the program that is no longer responding 4 Click End Task A program c...

Страница 119: ...all the program Back up your files immediately Use a virus scanning program to check the hard drive floppy disks or CDs Save and close any open files or programs and shut down your computer through the Start menu Run the Dell Diagnostics If all tests run successfully the error condition is related to a software problem Memory Problems Fill out the Diagnostics Checklist as you complete these checks...

Страница 120: ...ter 4 Start the computer Test the mouse Connect a properly working mouse to the computer and try using the mouse If the new mouse works the original mouse is faulty Check the mouse settings Windows XP 1 Click the Start button click Control Panel and then click Printers and Other Hardware 2 Click Mouse 3 Try adjusting the settings Windows 2000 1 Click the Start button point to Settings and then cli...

Страница 121: ...d the electrical outlet If the computer is plugged into a power strip ensure that the power strip is plugged into an electrical outlet and that the power strip is turned on Also bypass power protection devices power strips and power extension cables to verify that the computer turns on properly Ensure that the electrical outlet is working by testing it with another device such as a lamp Ensure tha...

Страница 122: ...sure that the Print to the following port s setting is LPT1 Printer Port For a USB printer ensure that the Print to the following port s setting is USB Windows 2000 1 Click the Start button point to Settings and then click Printers If the printer is listed right click the printer icon 2 Click Properties and click the Ports tab For a parallel printer ensure that the Print to the following port s se...

Страница 123: ... outlet Ensure that the electrical outlet is working by testing it with another device such as a lamp Enable digital mode Your speakers do not work if the CD drive is operating in analog mode Windows XP 1 Click the Start button click Control Panel and then click Sounds Speech and Audio Devices 2 Click Sounds and Audio Devices 3 Click the Hardware tab 4 Double click the name of your CD drive 5 Clic...

Страница 124: ...cable connection If you purchased a graphics card ensure that the monitor is connected to the card Ensure that your monitor is properly connected see the Setup and Quick Reference Guide that came with your computer If you are using a graphics extension cable and removing the cable solves the problem the cable is defective Swap the computer and monitor power cables to determine if the power cable i...

Страница 125: ...rces Fans fluorescent lights halogen lamps and other electrical devices can cause the screen image to appear shaky Turn off nearby devices to check for interference Adjust the Windows display settings Windows XP 1 Click the Start button click Control Panel and then click Appearance and Themes 2 Click Display and click the Settings tab 3 Try different settings for Screen resolution and Color qualit...

Страница 126: ...ly dampen a soft clean cloth with water If possible use a special screen cleaning tissue or solution suitable for the monitor s antistatic coating Wipe the keyboard computer and plastic part of the monitor with a soft cleaning cloth moistened with a solution of three parts water and one part dishwashing detergent Do not soak the cloth or let water drip inside your computer or keyboard Mouse If you...

Страница 127: ...f you notice problems such as skipping with the playback quality of your CDs or DVDs try cleaning the discs 1 Hold the disc by its outer edge You can also touch the inside edge of the center hole NOTICE To prevent damaging the surface do not wipe in a circular motion around the disc 2 With a soft lint free cloth gently wipe the bottom of the disc the unlabeled side in a straight line from the cent...

Страница 128: ...as a writable CD or floppy disk To prepare the new computer for the file transfer 1 Click the Start button point to All Programs Accessories System Tools and then click Files and Settings Transfer Wizard 2 When the Files and Settings Transfer Wizard welcome screen appears click Next 3 On the Which computer is this screen click New Computer and click Next 4 On the Do you have a Windows XP CD screen...

Страница 129: ... the Finished screen appears 3 Click Finished and restart the new computer Trademarks that appear in this module Microsoft Windows Dell Switching to Microsoft Windows Classic View You can change the appearance of the Windows desktop Start menu and Control Panel so that they look more like previous versions of the Windows operating system NOTE The procedures in this document were written for the Wi...

Страница 130: ... down menu Tile to place multiple copies of an image across the screen Center to place a single copy of an image in the center of the screen Stretch to place a single copy of an image to fit the size of the screen 5 Click OK to accept the settings and close the Display Properties window Choosing a Screen Saver 1 Click the Start button click Control Panel and then click Appearance and Themes 2 Unde...

Страница 131: ...You can double click the shortcut icon that appears on your desktop to open the item Arranging Shortcuts To move a shortcut click and drag the shortcut to the desired location To arrange all the shortcut icons at one time 1 Right click an empty spot on the Windows desktop to display a pop up menu 2 Point to Arrange Icons By and click the option for the icon arrangement you prefer Desktop Cleanup W...

Страница 132: ... firewall icon appears with a red background in the Network Connections section of the Control Panel Note that enabling the Internet Connection Firewall does not reduce the need for virus checking software For more information see the Windows Help and Support Center Microsoft Windows XP Setting Up a Home and Office Network Connecting to a Network Adapter Before you connect your computer to a netwo...

Страница 133: ...n a home or small office 1 Click the Start button point to All Programs Accessories Communications and then click Network Setup Wizard 2 On the welcome screen click Next 3 Click Checklist for creating a network NOTE Selecting the connection method This computer connects directly to the Internet enables the integrated firewall provided with Windows XP 4 Complete the checklist and required preparati...

Страница 134: ...ur computer s electronic components You can do so by touching an unpainted metal surface on the computer NOTICE The system board and metal tray are connected and are removed as one piece Removing the System Board 1 Follow the procedures in Before You Begin 1 Remove any components that restrict access to the system board 2 Disconnect all cables from the system board 3 Before you remove the existing...

Страница 135: ... for more information 2 Configure the settings of the replacement system board 3 Set the jumpers on the replacement system board so they are identical to the ones on the existing board NOTE Some components and connectors on the replacement system board may be in different locations than the corresponding connectors on the existing system board 4 Orient the replacement board by aligning the notches...

Страница 136: ... not get caught underneath the drives 2 Ensure that no tools or extra parts are left inside the computer 3 Close the cover a Pivot the cover down b Press down on the right side of the cover until it closes c Press down on the left side of the cover until it closes d Ensure that both sides of the cover are locked If not repeat all of step 3 NOTICE To connect a network cable first plug the cable int...

Страница 137: ...ic damage to components inside your computer discharge static electricity from your body before you touch any of your computer s electronic components You can do so by touching an unpainted metal surface on the computer 1 Follow the procedures in Before You Begin 2 Slide the cover release latch to the left 3 Raise the cover and pivot it toward the front of the computer 1 security cable slot 2 cove...

Страница 138: ... Overview Hard Drive Floppy Drive Front Panel CD DVD Drive Overview Your computer supports Two hard drives Serial ATA or SCSI with optional SCSI controller One floppy drive Two CD or DVD drives 1 hard drive s 2 floppy drive s 3 CD DVD drive s General Installation Guidelines ...

Страница 139: ...pgrade kit for information on configuring devices for the cable select setting Connecting Drive Cables When you install a drive you connect two cables a DC power cable and a data cable to the back of the drive and to the system board Some CD DVD drives may also have an audio connector one end of the audio cable will attach to the drive connector and the other will attach to the system board Drive ...

Страница 140: ... connector on the system board and a SCSI controller card installed in your computer you have two separate SCSI buses operating Each SCSI bus has a set of SCSI ID numbers from 0 to 15 When SCSI devices are shipped from the factory the default SCSI ID numbers are assigned as follows System Board Controller Controller Card Device ID Device ID Controller 7 Controller 7 Boot hard drive 0 Boot hard dri...

Страница 141: ...ernal SCSI cable to the connector on the back of the SCSI device Attach the other end of the external SCSI cable to the connector on the controller card installed in the computer After you install a SCSI hard drive Primary Drive 0 and Primary Drive 1 should be set to None in system setup if no IDE hard drives are installed You may need to use programs other than those provided with the operating s...

Страница 142: ...rive 1 If you are replacing a hard drive that contains data you want to keep back up your files before you begin this procedure 2 Follow the instructions in Before You Begin 3 Disconnect the power and hard drive cables from the drive 1 power cable 2 serial ATA hard drive cable 4 Press in on the tabs on each side of the drive and slide the drive up and out Serial ATA Drive ...

Страница 143: ...ter 3 If your replacement hard drive does not have the bracket rails attached remove the rails from the old drive by removing the two screws that secure each rail to the drive Attach the bracket rails to the new drive by aligning the screw holes on the drive with the screw holes on the bracket rails and then inserting and tightening all four screws two screws on each rail 1 drive 2 bracket rails 2...

Страница 144: ...er connector is on the left hand side opposite of the top hard drive Serial ATA Drive 5 If you are installing a drive that has its own controller card install the controller card in an expansion slot See the documentation that accompanied the drive and controller card to verify that the configuration is correct for your computer 6 Connect the power and hard drive cables to the drive Serial ATA Dri...

Страница 145: ...ons on installing any software required for drive operation 10 If the drive you just installed is the primary drive insert a bootable floppy disk into drive A 11 Turn on the computer 12 Enter system setup and update the appropriate Primary Drive option 0 or 1 13 Exit system setup and reboot the computer 14 Partition and logically format your drive before you proceed to the next step See the docume...

Страница 146: ...cedures in Before You Begin 2 Disconnect the power and floppy drive cables from the back of the floppy drive 3 Disconnect the other end of the floppy drive cable from the system board labeled DSKT 1 power cable 2 floppy drive cable 3 floppy drive connector DSKT 4 Press inward on the two tabs on the sides of the drive slide the drive upward and remove it from the floppy drive bay ...

Страница 147: ...ve by removing the two screws that secure each rail to the drive Attach the bracket to the new drive by aligning the screw holes on the drive with the screw holes on the bracket rails and then inserting and tightening all four screws two screws on each rail 1 drive 2 bracket rails 2 3 screws 4 2 Gently slide the drive into place until the tabs securely click into position ...

Страница 148: ...3 Attach the power and floppy drive cables to the floppy drive 1 power cable 2 floppy drive cable ...

Страница 149: ...ns on installing any software required for drive operation 9 Enter system setup and update the appropriate Diskette Drive A option to reflect the size and capacity of your new floppy drive 10 To verify that your computer works correctly run the Dell Diagnostics Front Panel CAUTION To prevent static damage to components inside your computer discharge static electricity from your body before you tou...

Страница 150: ...the computer Replacing the Front Panel To replace the front panel perform the removal procedure in reverse CD DVD Drive CAUTION Before you begin any of the procedures in this section follow the safety instructions in the Product Information Guide Removing a CD DVD Drive 1 Follow the procedures in Before You Begin 2 Disconnect the power and CD DVD drive cables from the back of the drive ...

Страница 151: ...1 CD DVD drive cable 2 power cable 3 Press inward on the two tabs on the sides of the drive and then slide the drive upward and remove it from the drive bay ...

Страница 152: ...f rails that are attached to the inside of the computer cover If a set of rails is not attached inside the cover see Contacting Dell for the number to call for assistance 3 If you are installing a replacement drive and the new drive does not have the bracket rails attached remove the rails from the old drive by removing the two screws that secure each rail to the drive Attach the bracket to the ne...

Страница 153: ...io and CD DVD drive cables to the drive 6 If you are installing a drive that has its own controller card install the controller card in an expansion slot See the documentation that accompanied the drive and controller card to verify that the configuration is correct for your computer 7 Connect the power and CD DVD drive cables to the drive ...

Страница 154: ...nections and fold cables out of the way to provide airflow for the fan and cooling vents 10 Close the computer cover NOTICE To connect a network cable first plug the cable into the network wall jack and then plug it into the computer 11 Connect your computer and devices to electrical outlets and turn them on See the documentation that came with the drive for instructions on installing any software...

Страница 155: ...13 To verify that your computer works correctly run the Dell Diagnostics Back to Contents Page ...

Страница 156: ...contact Dell NOTE Call technical support from a telephone near or at the computer so that technical support can assist you with any necessary procedures NOTE Dell s Express Service Code system may not be available in all countries When prompted by Dell s automated telephone system enter your Express Service Code to route the call directly to the proper support personnel If you do not have an Expre...

Страница 157: ...and use your e mail address as your password Electronic Support Service mobile_support us dell com support us dell com apsupport dell com Asian Pacific countries only support jp dell com Japan only support euro dell com Europe only Electronic Quote Service sales dell com apmarketing dell com Asian Pacific countries only sales_canada dell com Canada only Electronic Information Service info dell com...

Страница 158: ...rt service see Getting Help and then call the number for your country as listed in Contacting Dell Problems With Your Order If you have a problem with your order such as missing parts wrong parts or incorrect billing contact Dell for customer assistance Have your invoice or packing slip handy when you call For the telephone number to call contact numbers see the for your region Product Information...

Страница 159: ...from a telephone at or near the computer You may be asked to type some commands at the keyboard relay detailed information during operations or try other troubleshooting steps possible only at the computer itself Ensure that the computer documentation is available CAUTION Before working inside your computer read the safety instructions in your System Information Guide Diagnostics Checklist Name Da...

Страница 160: ...des Local Numbers and Toll Free Numbers Anguilla General Support toll free 800 335 0031 Antigua and Barbuda General Support 1 800 805 5924 Argentina Buenos Aires International Access Code 00 Country Code 54 City Code 11 Website www dell com ar Tech Support and Customer Care toll free 0 800 444 0733 Sales 0 810 444 3355 Tech Support Fax 11 4515 7139 Customer Care Fax 11 4515 7138 Aruba General Supp...

Страница 161: ... Tech Support Fax 51 481 5470 Customer Care Fax 51 481 5480 Sales 0800 90 3390 British Virgin Islands General Support toll free 1 866 278 6820 Brunei Country Code 673 Customer Technical Support Penang Malaysia 604 633 4966 Customer Service Penang Malaysia 604 633 4949 Transaction Sales Penang Malaysia 604 633 4955 Canada North York Ontario International Access Code 011 Online Order Status www dell...

Страница 162: ...0 Large Corporate Accounts East Government and Education toll free 800 858 2669 Large Corporate Accounts Queue Team toll free 800 858 2222 Large Corporate Accounts South toll free 800 858 2355 Large Corporate Accounts West toll free 800 858 2811 Large Corporate Accounts Spare Parts toll free 800 858 2621 Colombia General Support 980 9 15 3978 Costa Rica General Support 0800 012 0435 Czech Republic...

Страница 163: ...Code 33 City Codes 1 4 Website support euro dell com E mail support euro dell com fr fr emaildell Home and Small Business Technical Support 0825 387 270 Customer Care 0825 823 833 Switchboard 0825 004 700 Switchboard calls from outside of France 04 99 75 40 00 Sales 0825 004 700 Fax 0825 004 701 Fax calls from outside of France 04 99 75 40 01 Corporate Technical Support 0825 004 719 Customer Care ...

Страница 164: ...16 0910 Large Corporate Accounts 3416 0907 Global Customer Programs 3416 0908 Medium Business Division 3416 0912 Home and Small Business Division 2969 3105 India Technical Support 1600 33 8045 Sales 1600 33 8044 Ireland Cherrywood International Access Code 16 Country Code 353 City Code 1 Website support euro dell com E mail dell_direct_support dell com Technical Support 1850 543 543 U K Technical ...

Страница 165: ...t Axim toll free 0120 981 690 Technical Support outside of Japan Axim 81 44 556 3468 Faxbox Service 044 556 3490 24 Hour Automated Order Service 044 556 3801 Customer Care 044 556 4240 Business Sales Division up to 400 employees 044 556 1465 Preferred Accounts Division Sales over 400 employees 044 556 3433 Large Corporate Accounts Sales over 3500 employees 044 556 3430 Public Sales government agen...

Страница 166: ...8 0193 Technical Support Dimension and Inspiron toll free 1 800 88 1306 Customer Service 04 633 4949 Transaction Sales toll free 1 800 888 202 Corporate Sales toll free 1 800 888 213 Mexico International Access Code 00 Country Code 52 Customer Technical Support 001 877 384 8979 or 001 877 269 3383 Sales 50 81 8800 or 01 800 888 3355 Customer Service 001 877 384 8979 or 001 877 269 3383 Main 50 81 ...

Страница 167: ...bsite support euro dell com E mail Support portable computers nor_nbk_support dell com E mail Support desktop computers nor_support dell com E mail Support servers nordic_server_support dell com Technical Support 671 16882 Relational Customer Care 671 17514 Home Small Business Customer Care 23162298 Switchboard 671 16800 Fax Switchboard 671 16865 Panama General Support 001 800 507 0962 Peru Genera...

Страница 168: ...cal Support 011 709 7710 Customer Care 011 709 7707 Sales 011 709 7700 Fax 011 706 0495 Switchboard 011 709 7700 Southeast Asian and Pacific Countries Customer Technical Support Customer Service and Sales Penang Malaysia 604 633 4810 Spain Madrid International Access Code 00 Country Code 34 City Code 91 Website support euro dell com E mail support euro dell com es es emaildell Home and Small Busin...

Страница 169: ...ction Sales toll free 0080 651 228 Corporate Sales toll free 0080 651 227 Thailand International Access Code 001 Country Code 66 Technical Support toll free 0880 060 07 Customer Service Penang Malaysia 604 633 4949 Sales toll free 0880 060 09 Trinidad Tobago General Support 1 800 805 8035 Turks and Caicos Islands General Support toll free 1 866 540 3355 U K Bracknell International Access Code 00 C...

Страница 170: ...oll free 1 800 283 2210 Business Customer Service and Technical Support toll free 1 800 822 8965 Employee Purchase Program EPP Customers toll free 1 800 695 8133 Printers and Projectors Technical Support toll free 1 877 459 7298 Public government education and healthcare Customer Service and Technical Support toll free 1 800 456 3355 Employee Purchase Program EPP Customers toll free 1 800 234 1490...

Страница 171: ...pendent B backup A copy of a program or data file on a floppy disk CD or hard drive As a precaution back up the data files from your hard drive regularly battery An internal power source used to operate portable computers when not connected to an AC adapter and an electrical outlet battery life span The length of time years during which a portable computer battery is able to be depleted and rechar...

Страница 172: ... be erased or written over CD RW CD rewritable A rewritable version of a CD Data can be written to a CD RW disc and then erased and written over rewritten CD RW drive A drive that can read CDs and write to CD RW rewritable CDs and CD R recordable CDs discs You can write to CD RW discs multiple times but you can write to CD R discs only once CD RW DVD drive A drive sometimes referred to as a combo ...

Страница 173: ...as an extension of your display Also referred to as extended display mode DVD digital versatile disc A disc usually used to store movies DVDs are double sided whereas CDs are single sided DVD drives read most CD media as well DVD drive A drive that uses optical technology to read data from DVDs and CDs DVD player The software used to watch DVD movies The DVD player displays a window with buttons t...

Страница 174: ...drive or disk is formatted the existing information on it is lost FSB front side bus The data path and physical interface between the processor and RAM FTP file transfer protocol A standard Internet protocol used to exchange files between computers connected to the Internet G G gravity A measurement of weight and force GB gigabyte A measurement of data storage that equals 1024 MB 1 073 741 824 byt...

Страница 175: ...ection integrated Usually refers to components that are physically located on the computer s system board Also referred to as built in I O input output An operation or device that enters and extracts data from your computer Keyboards and printers are I O devices I O address An address in RAM that is associated with a specific device such as a serial connector parallel connector or expansion slot a...

Страница 176: ... The process by which the computer assigns memory addresses to physical locations at start up Devices and software can then identify information that the processor can access memory module A small circuit board containing memory chips which connects to the system board MHz megahertz A measure of frequency that equals 1 million cycles per second The speeds for computer processors buses and interfac...

Страница 177: ...screen Pixels are arranged in rows and columns to create an image A video resolution such as 800 x 600 is expressed as the number of pixels across by the number of pixels up and down Plug and Play The ability of the computer to automatically configure devices Plug and Play provides automatic installation configuration and compatibility with existing hardware if the BIOS operating system and all de...

Страница 178: ...om access memory A type of DRAM that is synchronized with the optimal clock speed of the processor serial connector An I O port often used to connect devices such as a handheld digital device or digital camera to your computer Service Tag A bar code label on your computer that identifies your computer when you access Dell Support at support dell com or when you call Dell for customer service or te...

Страница 179: ... functionality the option to underline change fonts and so on travel module A plastic device designed to fit inside the module bay of a portable computer to reduce the weight of the computer U UPS uninterruptible power supply A backup power source used when the electrical power fails or drops to an unacceptable voltage level A UPS keeps a computer running for a limited amount of time when there is...

Страница 180: ... a current of 1 ampere flows through that resistance W W watt The measurement of electrical power One W is 1 ampere of current flowing at 1 volt WHr watt hour A unit of measure commonly used to indicate the approximate capacity of a battery For example a 66 WHr battery can supply 66 W of power for 1 hour or 33 W for 2 hours wallpaper The background pattern or picture on the Windows desktop Change ...

Страница 181: ...signed to provide reasonable protection against harmful interference when the equipment is operated in a commercial environment This equipment generates uses and can radiate radio frequency energy and if not installed and used in accordance with the manufacturer s instruction manual may cause harmful interference with radio communications Operation of this equipment in a residential area is likely...

Страница 182: ...llowing information is provided on the device or devices covered in this document in compliance with FCC regulations Model number DHM and WHM Company name Dell Inc One Dell Way Round Rock Texas 78682 USA 512 338 4400 Back to Contents Page ...

Отзывы: