background image

A-12 Dell PowerVault 120T DDS4 Autoloader User's Guide

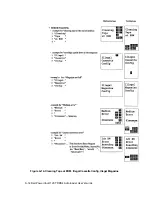
Figure A-12. Select and Load Tape

Содержание PowerVault 120T

Страница 1: ...Dell PowerVault 120T DDS4 Autoloader USER S GUIDE USER S GUIDE www dell com ...

Страница 2: ...Dell PowerVault 120T DDS4 Autoloader User s Guide www dell com ...

Страница 3: ...lem ____________________ Information in this document is subject to change without notice 1999 Dell Computer Corporation All rights reserved Trademarks used in this text Dell PowerVault and the DELL logo are trademarks of Dell Computer Corporation Windows NT is a trademark of Microsoft Corporation Novell and Netware are trademarks of Novell Inc Seagate and Seagate Backup Exec are trademarks of Sea...

Страница 4: ...tting SCSI ID Internal 2 4 Option Switches Internal External 2 5 Mounting Holes for 5 25 Internal 2 6 Orientation 2 7 Loading Device Drivers 2 7 Native Operating System Backup Utilities 2 7 Tape Backup Applications 2 7 Chapter 3 Using the Autoloader 3 1 Autoloader Modes of Operation 3 1 Front Panel 3 2 Front Panel LCD 3 3 Front Panel LEDs 3 3 Operator Action 3 4 Loading and Unloading Definition 3 ...

Страница 5: ...installing Drivers for Windows NT 4 1 Autoloader Makes Noises During System Startup 4 1 Drive Failures During Backup or Restore Operations 4 1 LCD Indication for Autoloader Status 4 2 Tape Backup Software Errors 4 3 Running Dell Diagnostics 4 3 Cleaning the Autoloader 4 3 Emergency Cassette Removal Procedure 4 4 Emergency Ejecting a Magazine 4 4 Ejecting Magazine by Manual Operation 4 4 Ejecting T...

Страница 6: ...broad range of compatible tape drives The tape autoloader is fully READ and WRITE compatible with the DDS4 DDS3 DDS2 DDS and DDSDC format tapes Features The tape autoloader has the following features Data capacity 160 native to 320 GB typical Transfer rate sustained 2 4 native to 4 7 MB sec typical 8 cartridge tape magazine Compatibility with SCSI 2 medium changer command set 80 seconds maximum to...

Страница 7: ...vary since compression is depending upon data type Tape Backup Software Drivers Please see instructions supplied with the tape backup application software Native Operating System Backup Utilities Tape autoloaders are not supported by Microsoft Windows NT 4 0 and Novell NetWare native backup utilities Tape Backup Applications Microsoft Windows NT 4 0 Computer Associates ARCServeIT 6 6 Seagate Backu...

Страница 8: ... 8 Tape Present 9 Busy Status The Select button allows you to select any of the cartridges present in the magazine once the magazine has been inserted into the loader The number selected is displayed on the LCD If you press the Select button repeatedly the display cycles through the cartridges available in the magazine see Figure 2 1 Once a cartridge has been selected the Enter button should be pr...

Страница 9: ... Figure 2 1 NOTE The host can disable the Eject button by sending a SCSI PREVENT MEDIA REMOVAL command The Front Panel Liquid Crystal Display Displays autoloader function and status Figure 2 1 Power Button External Only Press to turn autoloader on or off External Power SCSI Connection Setting SCSI ID Figure 2 2 Rear Panel External 1 Rotary Selector Switch for setting SCSI ID 2 Cooling Fan 3 AC In ...

Страница 10: ...CSI cable Make sure the SCSI connectors are pressed tightly together and the screw tabs are secure Termination Please make sure to apply supplied External SE LVD Terminator to the last device on the SCSI bus SCSI ID The SCSI ID is set by the push button switches on the rear panel Press the or buttons to move the number up or down respectively The default SCSI ID is set to 0 see Figure 2 2 NOTE The...

Страница 11: ...igure 2 3 Rear Connectors and Jumpers Internal NOTE Dell performs the installation and setup of tape autoloaders that are shipped as part of a system If the software has been recently upgraded however you may need to install the software In this case installation instructions are provided with the software ...

Страница 12: ...ovided DC Control 1 DC Control 2 Definition OFF OFF Compression disabled at power on The host is allowed to control compression OFF ON Compression disabled at power on The host is not allowed to control compression ON OFF Compression enabled at power on The host is allowed to control compression ON ON Compression enabled at power on The host is not allowed to control compression ...

Страница 13: ...2 6 Dell PowerVault 120T DDS4 Autoloader User s Guide Internal Mounting Holes for 5 25 inch Figure 2 5 Mounting Holes 5 25 inch autoloader Internal ...

Страница 14: ...up Utilities Tape autoloaders are not supported by Microsoft Windows NT 4 0 or Novell NetWare native backup utilities Tape Backup Applications Microsoft Windows NT 4 0 Computer Associates ARCServeIT 6 6 Seagate Backup Exec 7 2 Veritas Backup Exec 7 3 Novell NetWare Computer Associates ARCServe 6 1 Seagate Backup Exec 8 0 Installing the Tape Backup Software See instructions supplied with the tape b...

Страница 15: ... button has been pressed and the selected tape is loaded successfully In this mode the autoloader will load the cartridges sequentially Upon receiving an UNLOAD command LUN 0 the cartridge will be automatically replaced in its slot in the magazine and the next highest cartridge is loaded This continues until there are no more cartridges If the unload command is received for the last cartridge for ...

Страница 16: ...ader The number selected is displayed on the LCD If you press the Select button repeatedly the display cycles through the cartridges available in the magazine see Figure 3 1 Once a cartridge has been selected the Enter button should be pressed for confirmation and the autoloader will load the selected cartridge into the drive The Eject Button The Eject button starts the unload process The drive un...

Страница 17: ... to LCD Panel specification in Appendix A Figures A 1 to A 15 for further details Two LEDs Tape Present Busy Status BUSY Off Not active see Figure 3 1 Steady green SCSI active Flashing green Drive active TAPE Off Cartridge outside drive see Figure 3 1 Steady green Cartridge inside drive Flashing green Loading unloading ...

Страница 18: ...nd that all 8 cartridges are inserted in the magazine but the autoloader can operate even if the magazine is not full The following cartridge numbers 1 7 8 are effective for operation If you place incorrect numbers of cartridges into the magazine not 1 7 8 cartridges the autoloader automatically ejects the magazine Eight Cartridges Setting It is recommended that 8 data cartridges are placed in the...

Страница 19: ...nded that the cleaning cartridge is placed to slot 8 How to Insert the Cartridges Insert cartridges into the magazine as follows 1 First insert data cartridges into the bottom shelf of the magazine see Figure 3 6 Insert cartridge No 3 first followed by cartridge No 2 and No 1 in that order Figure 3 6 Inserting cartridges into the bottom magazine shelf 2 Insert data cartridges into the top shelf of...

Страница 20: ... is inserted into the magazine upside down magazine is automatically ejected After correcting to insert the cartridges with correct direction and setting them in turn as setting first insert the magazine again into the autoloader The autoloader starts to do the rotation check from the first How to Remove the Cartridges To remove the cartridges from the magazine may upset the orders of them So you ...

Страница 21: ... continue sliding the cartridges toward the front of the magazine see Figure 3 10 Figure 3 10 Pushing cartridges through the bottom of the magazine 3 Repeat step 1 and 2 to remove five of the cartridges 4 Turn the magazine so that the open end faces up and tap it gently against your hand or a soft object This makes cartridges move from the top shelf to the bottom shelf see Figure 3 11 ...

Страница 22: ...Guide Figure 3 11 Moving top shelf cartridges to the bottom shelf 5 Repeat steps 1 and 2 to remove the cartridges from the bottom shelf 6 Finally remove the cartridge in the middle shelf see Figure 3 12 Figure 3 12 Removing cartridge from middle shelf ...

Страница 23: ...dges is ineffective see Figure 3 13 To record data release the lock by sliding the tab on the magazine in the direction of the arrow REC not black but reflecting sheet metal can be seen In this case it depends on the tab direction of each cartridge whether the cartridge is write protected or not NOTE The write protection status is demonstrated by checking for the reflective plate on the write prot...

Страница 24: ... as necessary by using the Select button the Enter button on the front panel When you press the Select button the LCD displays the number of the selected cartridge The number changes sequentially each time you press the Select button When the Enter button is pressed for confirmation the cartridge whose number is displayed is loaded By Host Operation Data cartridges can also be selected as necessar...

Страница 25: ...nloads the cartridge back to the magazine 5 The cartridges in the magazine are rotated and put back in order 6 The magazine is ejected NOTE If the host has previously sent a PREVENT MEDIA REMOVAL command the unloading action is different in two ways The Eject button is disabled and has no effect It does not initiate an unload sequence An Unload command puts the drive into the semi loaded state Tha...

Страница 26: ...readed and the drive will become Ready The noise and vibration associated with this activity are normal for this technology and do not indicate a problem with the drive Drive Failures During Backup or Restore Operations Make sure you are using the correct type of tape cartridge Make sure that the tape cartridge is not write protected Remove and reinsert the tape cartridge by the tape magazine Try ...

Страница 27: ...gure 4 1 Front Panel LCD Indication for Autoloader Status Figure 4 2 LCD Panel Please refer to Appendix A LCD Panel Figures A 1 to A 15 for further details Tape Backup Software Errors Check the user s guide supplied with your tape backup software application ...

Страница 28: ... Mode 1 Place the cleaning cartridge into one of the magazine slots for example slot 8 and insert the magazine into the autoloader 2 Use the Select button to select the slot in which you placed the cleaning cartridge The autoloader will automatically perform a cleaning cycle 3 At the end of the cleaning cycle the drive automatically ejects the cartridge and the autoloader replaces it in the magazi...

Страница 29: ...g a power reset or attempting an emergency eject The emergency eject sequence will be described hereafter If Magazine is still in the autoloader after the following procedure the drive has a serious problem and should be returned for repair with the magazine in place Ejecting by Manual Operation When the elevator is located in front of the Magazine and occupies its way out perform steps 1 through ...

Страница 30: ...ader User s Guide 4 5 Figures 4 16 4 17 4 18 4 19 Internal Mechanical Link 3 Slide the Hook to Unlock Magazine right and push the stuck magazine through the Hole to Push Magazine with a screwdriver see Figure 4 4 Figure 4 4 Rear View ...

Страница 31: ... trouble 3 Rotate the Loading Threading motor clockwise with a small screwdriver ex Phillips No 1 put into the plastic screw head on the back of the drive see the location in a drawing below This will enable you to move back the threading mechanism to the initial position NOTES Do not rotate the screw further when you reach to the mechanical limit to avoid damage on the mechanism To prevent damage...

Страница 32: ...Dell PowerVault 120T DDS4 Autoloader User s Guide A 1 Appendix A LCD Panel Figure A 1 Front Panel ...

Страница 33: ...A 2 Dell PowerVault 120T DDS4 Autoloader User s Guide LCD Indication for Autoloader Status Figure A 2 LCD Panel ...

Страница 34: ...Dell PowerVault 120T DDS4 Autoloader User s Guide A 3 Figure A 3 Magazine Loading ...

Страница 35: ...A 4 Dell PowerVault 120T DDS4 Autoloader User s Guide Figure A 4 Magazine Loading Continued ...

Страница 36: ...Dell PowerVault 120T DDS4 Autoloader User s Guide A 5 Figure A 5 Magazine Loading Continued ...

Страница 37: ...A 6 Dell PowerVault 120T DDS4 Autoloader User s Guide Figure A 6 Move Medium Command ...

Страница 38: ...Dell PowerVault 120T DDS4 Autoloader User s Guide A 7 Figure A 7 Read Erase ...

Страница 39: ...A 8 Dell PowerVault 120T DDS4 Autoloader User s Guide Figure A 8 Erase Locate Tape Space Tape Unload Tape ...

Страница 40: ...Dell PowerVault 120T DDS4 Autoloader User s Guide A 9 Figure A 9 Load Tape Continued ...

Страница 41: ...A 10 Dell PowerVault 120T DDS4 Autoloader User s Guide Figure A 10 Unload Tape Ejecting Magazine ...

Страница 42: ...Dell PowerVault 120T DDS4 Autoloader User s Guide A 11 Figure A 11 Send Diag Checking Init Element Status Eject Prevent Select Prevent ...

Страница 43: ...A 12 Dell PowerVault 120T DDS4 Autoloader User s Guide Figure A 12 Select and Load Tape ...

Страница 44: ...Dell PowerVault 120T DDS4 Autoloader User s Guide A 13 Figure A 13 Cleaning in Process Cleaning Req Updating Firmware ...

Страница 45: ...A 14 Dell PowerVault 120T DDS4 Autoloader User s Guide Figure A 14 Cleaning Tape at EOM Illegal Cassette Config Illegal Magazine ...

Страница 46: ...Dell PowerVault 120T DDS4 Autoloader User s Guide A 15 Config Medium Error Loader HW Error ResetReq Figure A 15 Drive HW Error Cassette Stuck in Drive Version ...

Страница 47: ...A 16 Dell PowerVault 120T DDS4 Autoloader User s Guide Figure A 16 Auto Load Unload Continuous Contrast Adjust Orientation Language ...

Страница 48: ...a compression DDS4 40 0 GB assuming 2 1 compression ratio Type of Compression Hardware DCLZ adaptive coding with embedded dictionary Data Transfer Rate 2 36 MB sec Native to 4 72 MB sec 2 1 Compression ratio Burst Transfer Rate 14 MB sec Asynchronous 40 MB sec Synchronous Initialize Time less than 1 second Magazine Initialization Time Typical 90 seconds Load Time less than 24 seconds for a single ...

Страница 49: ...eld level the entire drive is considered a Field Replacable Unit FRU Durability Autoloader Cartridge Swap MSBF 180 000 Magazine Load Unload 30 000 Drive Start Stop 400 000 times Reposition 3 000 000 times Thread Unthread 10 000 times Load Eject 10 000 times Recommended Tapes DDS 4 Sony DGD150F DDS 3 Sony DGD125P DDS 2 Sony DGD120P DDS 1 Sony DG90P Cleaning Sony DGD15CL Power External 100 120 V 0 5...

Страница 50: ...ondensing Maxium wet bulb temperature 26C Non Operating Humidity mech 5 to 95 RH RH 30 h Non Operating Humidity tape 20 to 80 RH RH 30 h Operating Altitude 0 to 4572 meters 0 to 15 000 feet Operating Dust Less than 150 microgram m3 Based sampling period 24 hours Operating Vibration Swept Sine 5 to 500 Hz 0 5 G Peak 25 Octave min 3 axis 3 direction Non Operating Vibration Swept Sine 5 to 500 Hz 0 7...

Страница 51: ...y Equipment including Electrical Business Equipment EMC Directive CE Mark TUV This device complies with EN 60950 92 A1 A2 A3 A4 A11 FCC Compliance Statement External Only FCC Part 15 Subpart B Class B Canadian Compliance Industry Canada ICES 003 Class B Manufacturer Declaration This certifies that this product is in compliance with EU Directive 89 336 EEC using the EMC standards EN55022 Class B A ...

Страница 52: ...ear 2000 Statement Neither the performance nor the functionality of the Dell PowerVault 120T DDS4 Autoloader will be affected by the date change before during and after the year 2000 See Dell Computer Corporations s World Wide Web site for more information ...

Страница 53: ...Printed in Japan www dell com P N 79EJG Rev A00 ...

Отзывы: