background image

100

Guía de instalación del rack

Configuración de los ensamblajes de rieles deslizantes

El ensamblaje de rieles deslizantes presenta un soporte de montaje giratorio en cada extremo del riel. 
La posición del soporte determina si el ensamblaje de rieles se utiliza como RapidRail o como VersaRail. 
El lado RapidRail del soporte tiene un gancho y un pestillo que lo fijan al riel vertical. El lado VersaRail 
del soporte tiene tres orificios y se fija al riel vertical mediante tornillos.


NOTA: 

el kit de rack se suministra con los ensamblajes deslizantes en la configuración RapidRails.

Para cambiar de un tipo de ensamblaje de rieles a otro:

1

Levante la palanca azul del soporte de montaje giratorio (vea la figura 1-4).

2

Gire el soporte y levántelo para sacarlo de los dos topes.

3

Continúe girando el soporte 180 grados hasta que pueda volver a colocar las muescas sobre los topes.

4

Gire el soporte en el sentido contrario hasta que se asiente en su lugar.

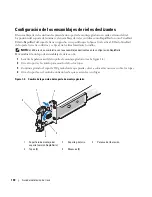
Figura 1-4.

Cambio de la posición del soporte de montaje giratorio

1

Superficie de montaje del 
soporte (versión RapidRails)

2

Soporte giratorio

3

Palanca de liberación

4

Topes (2)

5

Muescas (2)

1

4

3

5

2

Содержание PowerEdge 2950

Страница 1: ...w w w d e l l c o m s u p p o r t d e l l c o m Rack Installation Guide Guide d installation du rack Rack Installationsanleitung ラック取り付けガイド Guía de instalación del rack ...

Страница 2: ......

Страница 3: ...Rack Installation Guide ...

Страница 4: ... in this document is subject to change without notice 2007 Dell Inc All rights reserved Reproduction in any manner whatsoever without the written permission of Dell Inc is strictly forbidden Trademarks used in this text Dell the DELL logo RapidRails and VersaRails are trademarks of Dell Inc Other trademarks and trade names may be used in this document to refer to either the entities claiming the m...

Страница 5: ...t Contents 7 Installation Tasks 8 Removing the Rack Doors 9 Marking the Rack 9 Configuring the Sliding Rail Assemblies 11 Installing the Mounting Rails in the Rack 12 Installing RapidRails Mounting Rails 12 Installing the VersaRails Mounting Rails 13 Installing the System in the Rack 15 Removing the System From the Rack 16 Installing the Cable Management Arm 17 Routing Cables 18 Attaching the Cabl...

Страница 6: ...4 Contents ...

Страница 7: ...ing unit and as a component for use in a Dell rack cabinet using the customer rack kit The installation of your system and rack kit in any other rack cabinet has not been approved by any safety agencies It is your responsibility to ensure that the final combination of system and rack complies with all applicable safety standards and local electric code requirements Dell disclaims all liability and...

Страница 8: ...control may occur Extend the leveling feet for support and to prevent the cabinet from rolling NOTE For instructions on installing the system itself see Installing the System in the Rack on page 15 Important Safety Information Observe the safety precautions in the following subsections when installing your system in the rack CAUTION You must strictly follow the procedures in this document to prote...

Страница 9: ... in a four post rack cabinet 2 Phillips screwdriver Masking tape or a felt tip pen for use in marking the mounting holes to be used Rack Kit Contents One pair of slide assemblies One cable management arm One left cable management arm ramp assembly One right cable management arm ramp assembly One status indicator cable if applicable Eight 10 32 x 0 5 inch flange head Phillips screws NOTE The nonmet...

Страница 10: ...s 4 Installing the mounting rails in the rack RapidRails installation VersaRails installation 5 Installing the system in the rack 6 Installing the cable management arm 7 Routing cables 8 Attaching the cable management arm ramp assembly 9 Replacing the rack doors 1 cable management arm 2 left cable management arm ramp assembly 3 right cable management arm ramp assembly 4 slide assemblies 5 10 32 x ...

Страница 11: ...holes per rack unit with center to center hole spacing beginning at the top hole of a 1 U space of 15 9 mm 15 9 mm and 12 7 mm 0 625 inch 0 625 inch and 0 5 inch for the front and back vertical rails see Figure 1 2 Rack cabinets may have round or square holes NOTE The vertical rails may be marked by horizontal lines and numbers in 1 U increments If you want you can make a note of the number markin...

Страница 12: ...th a horizontal line on some rack cabinets see Figure 1 3 2 Place a mark 88 mm 3 5 inches above the original mark you made or count up three holes in a rack that meets EIA 310 standards and mark the rack s front vertical rails with a felt tipped pen or masking tape if you counted holes place a mark just above the top hole This mark or piece of tape indicates where the system s upper edge will be l...

Страница 13: ...ips with the slide assemblies in the RapidRails configuration To change from one type of rail assembly to the other type of rail assembly 1 Lift the blue lever on the rotating mounting bracket see Figure 1 4 2 Rotate the bracket and slide it up off of the two shoulder standoffs 3 Continue to rotate the bracket 180 degrees until you can set the notches back over the shoulder standoffs 4 Rotate the ...

Страница 14: ...et position one of the mounting rails so that its mounting bracket flange fits between the marks or tape you placed or numbered locations on the vertical rails in Marking the Rack on page 9 see Figure 1 5 The top mounting hook on the front mounting bracket flange should enter the top hole between the marks you made on the vertical rails Figure 1 5 Installing RapidRails Mounting Rails 1 mounting ho...

Страница 15: ... cabinet position one of the mounting rails so that its mounting bracket flange fits between the marks you placed or numbered locations on the vertical rails in Marking the Rack on page 9 see Figure 1 6 The three holes on the front of the mounting bracket flange should align with the holes between the marks you made on the front vertical rail 2 Install two 10 32 x 0 5 inch flange head Phillips scr...

Страница 16: ... Rack Installation Guide Figure 1 6 Installing VersaRails Mounting Rails 1 mounting bracket flange 2 10 32 x 0 5 inch flange head Phillips screws 4 per mounting rail 3 mounting rails 2 front of rack 1 2 3 ...

Страница 17: ...e back of the system while aligning the back shoulder screws on the sides of the system with the back J slots on the slide assemblies 4 Engage the back shoulder screws into their respective J slots 5 Lower the front of the system and fit the middle and front shoulder screws into the J slots in the slide assemblies The system release latch at the front of the inner slide rail will snap back as the ...

Страница 18: ... system and attached peripherals and disconnect the system from the electrical outlet 2 Remove the I O cable connectors and power cable connectors from their respective connectors on the system back panel 3 Loosen the thumbscrews on each side of the front chassis panel that secures the system to the rack 1 slide release latch 2 shoulder screws 6 3 J slots 6 4 front release latch 1 2 4 3 ...

Страница 19: ... ramp assembly to the side opposite of where you attach the cable management arm 1 Fit the latch on the front end of the cable management arm onto the bracket on the end of the mounting rail until the latch clicks see Figure 1 8 2 Fit the latch on the unattached end of the cable management arm onto the bracket on the end of the slide assembly until the latch clicks see Figure 1 8 CAUTION Both ends...

Страница 20: ...nt arm until it snaps into place 3 Attach the I O cable connectors and power cable connectors to their respective connectors on the system back panel For details on cable connections see your system s Getting Started Guide or Hardware Owner s Manual NOTE Use the retainer brackets on the back of the power supplies to provide strain relief for the power cables 4 Route the cables along the bend in th...

Страница 21: ...gement arm ramp assembly 1 Select only one ramp assembly depending on the orientation of the cable management arm a If the cable management arm is attached on the right side of the rack as shown in Figure 1 11 attach the left cable management arm ramp assembly to the rack see Figure 1 10 b If the cable management arm is attached on the left side of the rack attach the right cable management arm ra...

Страница 22: ... installed with the cable management arm attached on the right To disengage the cable management arm ramp assembly press the ramp assembly release button on the ramp assembly latch and pull the ramp assembly off the bracket see Figure 1 11 Figure 1 11 Installing the Cable Management Arm Ramp Assembly NOTE In Figure 1 11 the cable management arm is attached on the right side of the rack and the lef...

Страница 23: ...1 Replacing the Rack Doors See the procedures for replacing doors in the documentation provided with your rack CAUTION Because of the size and weight of the rack cabinet doors never attempt to remove or install them by yourself ...

Страница 24: ...22 Rack Installation Guide ...

Страница 25: ...Guide d installation du rack ...

Страница 26: ...ans ce document peuvent être modifiées sans préavis 2007 Dell Inc Tous droits réservés La reproduction de ce document de quelque manière que ce soit sans l autorisation écrite de Dell Inc est strictement interdite Marques utilisées dans ce document Dell le logo DELL RapidRails et VersaRails sont des marques de Dell Inc Tous les autres noms de marques et marques commerciales utilisés dans ce docume...

Страница 27: ...e rack 29 Tâches d installation 30 Retrait des portes du rack 31 Marquage du rack 31 Configuration des assemblages à glissière 33 Installation des rails de montage dans le rack 34 Installation des rails de montage RapidRails 34 Installation des rails de montage VersaRails 35 Installation du système dans le rack 37 Retrait d un système installé dans le rack 39 Installation du bras de gestion des câ...

Страница 28: ...26 Sommaire ...

Страница 29: ...posants sortis du rack risquerait de le faire basculer et de blesser quelqu un gravement REMARQUE le système est certifié sur le plan de la sécurité en tant qu unité autonome et en tant que composant destiné à être utilisé dans un rack Dell à l aide du kit de rack client L installation du système et du kit d installation en rack dans une autre armoire n a reçu aucune homologation des organismes de...

Страница 30: ...nstallation avant de passer au suivant PRÉCAUTION les racks peuvent être extrêmement lourds mais se déplacent assez facilement sur leurs roulettes Cependant les roulettes ne possèdent pas de système de freinage Procédez avec la plus grande prudence pour déplacer un rack Rentrez ses pieds réglables lorsque vous le changez d emplacement Évitez de déplacer le rack le long de rampes ou de plans inclin...

Страница 31: ...t fixer les pieds stabilisateurs Outils et fournitures recommandés Les outils et fournitures suivants peuvent être nécessaires pour installer le système dans un rack à quatre montants Tournevis cruciforme n 2 Bande adhésive ou stylo feutre pour marquer les trous de montage à utiliser Contenu du kit de rack Une paire d assemblages à glissière Un bras de gestion des câbles Un assemblage de fixation ...

Страница 32: ...stallation du kit RapidRails Installation du kit VersaRails 5 Installation du système dans le rack 6 Installation du bras de gestion des câbles 7 Acheminement des câbles 8 Installation de l assemblage de fixation du bras de gestion des câbles 9 Remise en place des portes du rack 1 Bras de gestion des câbles 2 Assemblage de fixation du bras de gestion des câbles gauche 3 Assemblage de fixation du b...

Страница 33: ...ois trous par unité L espacement entre les trous mesuré de centre à centre en commençant par le trou supérieur est respectivement de 15 9 mm 15 9 mm et 12 7 mm 0 625 pouce 0 625 pouce et 0 5 pouce pour les rails verticaux avant et arrière voir la figure 1 2 Les racks peuvent comporter des trous ronds ou carrés REMARQUE les rails verticaux peuvent être marqués par des lignes horizontales et des chi...

Страница 34: ... voir la figure 1 3 2 Placez une marque à environ 88 mm 3 5 pouces au dessus de la marque que vous avez faite au départ ou remontez de 3 trous dans les racks conformes à la norme EIA 310 puis marquez les rails verticaux du rack avec un stylo feutre ou de la bande adhésive si vous avez compté les trous placez une marque juste au dessus du trou supérieur Cette marque ou ce morceau de bande adhésive ...

Страница 35: ...ont montés selon la configuration RapidRails Pour passer d une configuration à l autre procédez comme suit 1 Relevez le levier bleu du support de montage rotatif voir la figure 1 4 2 Faites pivoter le support puis faites le glisser vers le haut pour le dégager des deux dispositifs à épaulement 3 Continuez de faire pivoter le support à 180 degrés jusqu à ce que vous puissiez de nouveau placer les e...

Страница 36: ...tte du support de montage s insère entre les marques que vous avez faites section Marquage du rack à la page 31 les morceaux de bande adhésive ou les emplacements numérotés sur les rails verticaux Voir la figure 1 5 Le crochet de fixation supérieur situé sur la collerette avant du support de montage doit pénétrer dans le trou supérieur qui se trouve entre les marques faites sur les rails verticaux...

Страница 37: ...sitionnez l un des rails de façon que la collerette du support de montage s insère entre les marques que vous avez faites section Marquage du rack à la page 31 les morceaux de bande adhésive ou les emplacements numérotés sur les rails verticaux Voir la figure 1 6 Les trois trous situés à l avant de la collerette du support de montage doivent s aligner avec ceux qui se trouvent entre les marques qu...

Страница 38: ...llation du rack Figure 1 6 Installation des rails de montage VersaRails 1 Collerette du support de montage 2 Vis cruciformes à tête plate 10 32 x 0 5 pouce 4 par rail de montage 3 Rails de montage 2 Avant du rack 1 2 3 ...

Страница 39: ...en alignant les vis à épaulement arrière situées sur les côtés du système avec les fentes en J situées à l arrière des assemblages à glissière 4 Emboîtez les vis à épaulement arrière dans les fentes correspondantes 5 Abaissez l avant du système jusqu à ce que les vis à épaulement avant et centrale s emboîtent dans les fentes en J Le loquet d éjection du système situé à l avant du rail coulissant i...

Страница 40: ...uide d installation du rack Figure 1 7 Installation du système dans le rack 1 Loquet d éjection de l assemblage à glissière 2 Vis à épaulement 6 3 Fentes en forme de J 6 4 Loquet d éjection frontal 1 2 4 3 ...

Страница 41: ...r le système vers l avant 6 Retirez complètement le système du rack Installation du bras de gestion des câbles REMARQUE le bras de gestion des câbles peut être installé sur le côté droit ou gauche du rack REMARQUE l assemblage de fixation du bras de gestion des câbles doit être installé du côté opposé à celui où vous avez fixé le bras 1 Emboîtez le loquet situé à l extrémité avant du bras de gesti...

Страница 42: ...40 Guide d installation du rack Figure 1 8 Installation du bras de gestion des câbles 1 Rails de montage 2 2 Supports 2 3 Loquets 2 4 Bras de gestion des câbles Arrière du système 1 2 4 3 ...

Страница 43: ...s d E S et les câbles d alimentation sur les connecteurs correspondants à l arrière du système Pour plus de détails sur le branchement des câbles consultez les documents Getting Started Guide Guide de mise en route ou Hardware Owner s Manual Manuel du propriétaire REMARQUE pour éviter une tension excessive des câbles d alimentation faites les passer dans les boucles situées à l arrière des blocs d...

Страница 44: ...les permet de maintenir ce dernier en position stable Pour installer cet assemblage 1 Choisissez l assemblage gauche ou droit selon le sens dans lequel le bras de gestion des câbles est installé a Si le bras de gestion des câbles est attaché sur le côté droit du rack comme dans la figure 1 11 vous devez installer l assemblage de fixation de gauche voir la figure 1 10 b Si le bras de gestion des câ...

Страница 45: ...dispositif et faites le remonter jusqu au cran situé sur la rampe de l assemblage de fixation c Si vous avez choisi le bon assemblage le dispositif de guidage s emboîte correctement sur ce cran chaque fois que le système est inséré dans le rack La figure 1 11 montre l assemblage de fixation de gauche installé et le bras de gestion des câbles attaché sur le côté droit du rack Pour désenclencher l a...

Страница 46: ...us devez installer l assemblage de fixation de droite sur le côté droit du rack Remise en place des portes du rack Pour savoir comment remettre en place les portes du rack reportez vous à la documentation fournie avec ce dernier PRÉCAUTION compte tenu de leur poids et de leur taille ne retirez ou n installez jamais les portes sans l assistance d une autre personne 6 2 3 4 1 5 1 Support de l assemb...

Страница 47: ...Rack Installationsanleitung ...

Страница 48: ...ungen oder zum Tod führen könnte ____________________ Irrtümer und technische Änderungen vorbehalten 2007 Dell Inc Alle Rechte vorbehalten Die Reproduktion dieses Dokuments in jeglicher Form ist ohne schriftliche Genehmigung von Dell Inc streng untersagt In diesem Text verwendete Marken Dell das DELL Logo RapidRails und VersaRails sind Marken von Dell Inc Alle anderen in dieser Dokumentation genan...

Страница 49: ...ck Kits 52 Ablauf der Installation 53 Abnehmen der Rack Türen 53 Markieren des Racks 53 Konfiguration der Gleitschienensätze 56 Installation der Montageschienen im Rack 57 Installation der RapidRails Montageschienen 57 Installation der RapidRails Montageschienen 58 Installation des Systems im Rack 60 Entfernen des Systems aus dem Rack 61 Installation des Kabelführungsarms 62 Verlegen der Kabel 63 ...

Страница 50: ...48 Inhalt ...

Страница 51: ...einem Rack niemals mehr als eine Komponente gleichzeitig auf den Gleitschienen aus dem Rack Durch das Gewicht von mehr als einer Komponente kann das Rack umkippen und Verletzungen verursachen ANMERKUNG Das System ist als frei stehende Einheit und für die Verwendung als Komponente in einem Dell Rack unter Verwendung des kundenseitigen Rack Kits sicherheitszertifiziert Die Installation des Systems u...

Страница 52: ...lergestellschränken mit Rechtecklöchern installieren und die VersaRails Konfiguration in den meisten Standardgestellschränken mit Rechteck oder Rundlöchern Für jedes im Rack installierte System wird ein Rack Kit benötigt Bevor Sie beginnen Bevor Sie mit der Installation des Systems im Rack beginnen lesen Sie aufmerksam den Abschnitt Sicherheitshinweise auf Seite 49 sowie die Sicherheitshinweise im...

Страница 53: ...SI EIA 310 D 92 American National Standards Institute bzw Electronic Industries Association IEC 297 International Electrotechnical Commission und der DIN 41494 Deutsches Institut für Normung entspricht Für jedes in einem Rack montierte System wird ein Rack Kit benötigt Rack Stabilisatoren VORSICHT Bevor Sie Systeme in einem Rack einbauen installieren Sie bei frei stehenden Racks die vorderen und s...

Страница 54: ...mit 32 Windungen pro Zoll als 10 32 Schraube bezeichnet ANMERKUNG Die linke und rechte Halterampe für den Kabelführungsarm sind in Abbildung 1 1 dargestellt Je nach Orientierung des Kabelführungsarms wird eine der Halterampen verwendet um den Kabelführungsarm auf der Rückseite des Racks zu befestigen Weitere Informationen erhalten Sie unter Anbringen der Halterampe für den Kabelführungsarm auf Sei...

Страница 55: ...de Hilfe abzunehmen oder einzubauen VORSICHT Stellen Sie die Türen so ab dass niemand verletzt wird wenn diese versehentlich umfallen Markieren des Racks Bei einem 2 U System benötigen Sie für jedes System das Sie im Rack installieren einen vertikalen Abstand von 2 U 88 mm bzw 3 5 Zoll Gestellschränke die den EIA 310 Standards entsprechen weisen ein sich wiederholendes Muster aus drei Löchern pro ...

Страница 56: ...erkante jeder 1 U Einheit befindet sich in der Mitte des schmalsten Metallstücks zwischen den Löchern bei einigen Racks mit einer horizontalen Linie gekennzeichnet siehe Abbildung 1 3 2 Bringen Sie eine Markierung 88 mm 3 5 Zoll über der ursprünglichen Markierung an oder zählen Sie in einem EIA 310 Rack drei Löcher nach oben Markieren Sie die vorderen vertikalen Schienen mit einem Filzstift oder e...

Страница 57: ...Rack Installationsanleitung 55 Abbildung 1 3 Markieren der vertikalen Schienen 1 Markierungen auf vertikalen Schienen 2 1 ...

Страница 58: ...satz ANMERKUNG Bei Auslieferung befinden sich die Gleitschienensätze des Rack Kits in der RapidRails Konfiguration So ändern Sie wechselseitig den Montagetyp des Schienensatzes 1 Heben Sie den blauen Hebel an der drehbaren Montagehalterung an Abbildung 1 4 2 Drehen Sie die Halterung und schieben Sie sie von den zwei Abstandshaltern nach oben weg 3 Drehen Sie die Halterung weiter bis auf 180 Grad b...

Страница 59: ... des Gestellschranks an dass sich der zugehörige Montagehalterungsflansch zwischen den Markierungen oder an der Markierung mit der richtigen Zahl aus dem Schritt Markieren des Racks auf Seite 53 an den vertikalen Schienen befindet siehe Abbildung 1 5 Der obere Montagehaken am vorderen Montagehalterungsflansch sollte in das obere Loch zwischen den Markierungen auf den vertikalen Schienen eingreifen...

Страница 60: ...ntageschienen so an der Vorderseite des Gestellschranks an dass sich der zugehörige Montagehalterungsflansch zwischen den Markierungen oder an der Markierung mit der richtigen Zahl aus dem Schritt Markieren des Racks auf Seite 53 an den vertikalen Schienen befindet siehe Abbildung 1 6 Die drei Löcher an der Vorderseite des Montagehalterungsflansches sollten mit den Löchern zwischen Ihren Markierun...

Страница 61: ...tionsanleitung 59 Abbildung 1 6 Installation der VersaRails Montageschienen 1 Flansch der Montagehalterung 2 10 32 x 0 5 Zoll Kreuzschlitzbundschrauben 4 pro Montageschiene 3 Montageschienen 2 Rack Vorderseite 1 2 3 ...

Страница 62: ...stems ab und richten Sie dabei die hinteren Ansatzschrauben auf den Seiten des Systems mit den J förmigen Aussparungen in den Schienensätzen aus 4 Lassen Sie die hinteren Ansatzschrauben in die jeweiligen J förmigen Aussparungen eingreifen 5 Senken Sie die Systemvorderseite ab und führen Sie die mittleren und vorderen Ansatzschrauben in die jeweiligen J förmigen Aussparungen in den Schienensätzen ...

Страница 63: ...geschlossenen Peripheriegeräte aus und trennen Sie das System vom Netzstrom 2 Entfernen Sie die Daten und Netzstromkabel von den entsprechenden Anschlüssen auf der Rückseite des Systems 3 Lösen Sie die Flügelschrauben auf beiden Seiten der Gehäusefrontplatte die das System am Rack sichern 1 Sperrklinke der Laufschiene 2 Ansatzschrauben 6 3 J förmige Aussparungen 6 4 Verriegelung auf der Vorderseit...

Страница 64: ...ür den Kabelführungsarm auf der Seite die dem Befestigungspunkt des Kabelführungsarms gegenüber liegt 1 Befestigen Sie die Sperrklinke am vorderen Ende des Kabelführungsarms am äußeren Halter der Montageschiene bis die Verbindung einrastet siehe Abbildung 1 8 2 Befestigen Sie die Sperrklinke am losen Ende des Kabelführungsarms am äußeren Halter des Schienensatzes bis die Verbindung einrastet siehe...

Страница 65: ...einrastet 3 Verbinden Sie die Daten und Netzstromkabel mit den entsprechenden Anschlüssen auf der Rückseite des Systems Ausführliche Informationen zu Kabelverbindungen finden Sie in der Getting Started Guide Anleitung Erste Schritte oder im Hardware Owner s Manual Hardware Benutzerhandbuch zum System ANMERKUNG Verwenden Sie die Halteklammern auf der Rückseite der Netzteile um die Netzstromkabel zu...

Страница 66: ...ie Halterampe dient dazu den Kabelführungsarm in eine stabile ebene Position zu bringen Befestigen Sie die Halterampe für den Kabelführungsarm wie folgt 1 Wählen Sie eine der Halterampen entsprechend der Orientierung des Kabelführungsarms aus a Wenn der Kabelführungsarm auf der rechten Seite des Racks befestigt ist wie dargestellt in Abbildung 1 11 montieren Sie die linke Halterampe am Rack siehe ...

Страница 67: ...für die Rampenvorrichtung b Heben Sie die Drahtführung an und schieben Sie sie auf die Halterampe bis die Sperre eingreift c Wenn Sie die richtige Halterampe ausgewählt haben ruht die Drahtführung danach bei jedem Einschieben korrekt in der Sperre auf der Oberseite der Halterampe Abbildung 1 11 zeigt die linke Halterampe mit dem Kabelführungsarm auf der rechten Seite Um die Halterampe zu entfernen...

Страница 68: ...en Seite des Racks montieren müssen Sie die rechte Halterampe auf der rechten Seite des Racks anbringen Wiederanbringen der Rack Türen Siehe Vorgehensweise zum Anbringen der Türen in der Dokumentation des Racks VORSICHT Da die Rack Türen sehr groß und schwer sind versuchen Sie niemals die Türen ohne fremde Hilfe abzunehmen oder einzubauen 1 Montagehalter für Halterampe 2 Riegel der Halterampe 3 Sp...

Страница 69: ...ラック取り付けガイド ...

Страница 70: ...となる可能性があることを示しています ____________________ 本書の内容は予告なく変更されることがあります 2007 すべての著作権は Dell Inc にあります Dell Inc の書面による許可のない複製は いかなる形態においても厳重に禁じられています 本書に使用されている商標 Dell DELL ロゴ RapidRails および VersaRails は Dell Inc の商標です 本書では 必要に応じて上記以外の商標や会社名が使用されている場合がありますが それらの商標や会社名は 一切 Dell Inc に帰属するものではありません 2007 年 3 月 P N TP579 Rev A00 ...

Страница 71: ...rsaRails のラック要件 73 ラックスタビライザ 73 推奨する工具および備品 73 ラックキットの内容 73 取り付け手順 74 ラック扉の取り外し 75 ラックへの印付け 75 スライドレールアセンブリの構成 77 ラックへのマウントレールの取り付け 78 RapidRails マウントレールの取り付け 78 VersaRails マウントレールの取り付け 79 ラックへのシステムの取り付け 81 ラックからのシステムの取り外し 82 ケーブルマネージメントアームの取り付け 83 ケーブルの配線 84 ケーブルマネージメントアームランプアセンブリの取り付け 85 ラック扉の取り付け 87 ...

Страница 72: ...70 目次 ...

Страница 73: ...ーネントを取り付けた後は 一度に複数のコンポーネントをラックのスラ イドアセンブリを使って引き出さないでください 重みでラックが転倒し 大けがをするおそれがあ ります メモ お使いのシステムは 独立型のユニットとして また カスタマーラックキットで構成される Dell ラックキャビネットに取り付けるコンポーネントとして その安全性が保証されています それ 以外のラックキャビネットにシステムおよびラックキットを取り付ける場合は 安全性が保証されま せん 最終的に組み合わせたシステムおよびラックについては ユーザーの責任において 適用され る安全基準および地域の電気規約の要件に適合することを確認してください デルでは このような 組み合わせに関連するいかなる保証責任も負いません システムラックキットは トレーニングを受けたサービス技術者がラックに取り付けます キットを別のラックに取り付ける場合...

Страница 74: ...の 安全にお使いいただくための 注意 と 製品情報ガイド に記載された安全に関する注意をよく読んでください 警告 複数のシステムをラックに取り付ける場合は 1 台のシステムの取り付け手順を完了してから 次のシステムの取り付けに進んでください 警告 ラックキャビネットはサイズが非常に大きく重量もありますが キャスターで簡単に移動でき るようになっています このキャスターにはブレーキがないため ラックキャビネットを移動すると きは十分な注意が必要です ラックキャビネットを別の場所に移動するときは 水平調節用の脚を収 納してください 長い傾斜面 急勾配のある場所 スロープなど バランスが取りにくい場所には キャビネットを設置しないでください 水平調節用の脚を伸ばしてキャビネットを支え キャビネッ トが動かないようにしてください メモ システム自体の設置方法については 81 ページの ラックへのシ...

Страница 75: ...ザはラックの転倒を防ぎます スタビライザを取り付けて床に固定する手順については ラックキャビネットに付属のマニュアルを参照してください 推奨する工具および備品 システムを 4 柱型ラックキャビネットに取り付ける際 以下の工具および備品が必要な場合があり ます 2 プラスドライバ マスキングテープまたはフェルトペン 取り付け穴に印を付けるときに使用 ラックキットの内容 スライドアセンブリ 1 組 ケーブルマネージメントアーム 1 本 左ケーブルマネージメントアームランプアセンブリ 1 個 右ケーブルマネージメントアームランプアセンブリ 1 個 ステータスインジケータケーブル 1 本 必要な場合 10 32 x 0 5 インチフランジヘッドプラスネジ 8 本 メモ 図と手順の説明に示すメートル法規格以外のネジは サイズとインチ当たりのネジ山数で表記 されています たとえば 1 インチに 32 ...

Страница 76: ...ドレールアセンブリの構成 4 ラックへのマウントレールの取り付け RapidRails の取り付け VersaRails の取り付け 5 ラックへのシステムの取り付け 6 ケーブルマネージメントアームの取り付け 7 ケーブルの配線 8 ケーブルマネージメントアームランプアセンブリの取り付け 9 ラック扉の取り付け 1 ケーブルマネージメントアーム 2 左ケーブルマネージメント アームランプアセンブリ 3 右ケーブルマネージメント アームランプアセンブリ 4 スライドアセンブリ 5 10 32 x 0 5 インチフランジヘ ッドプラスネジ 8 6 ステータスインジケータケー ブル 必要な場合 5 1 6 4 2 3 ...

Страница 77: ...必要があります EIA 310 規格を満たすラックキャビネットには 1 ラックユニット 1 U ごとに 3 つの穴が交互に 並んでいます 穴の中心から中心までの距離は 前面および背面垂直レールの 1 U スペースの一番 上の穴から計測して 15 9 mm 15 9 mm 12 7 mm となっています 図 1 2 を参照 ラックキャ ビネットの穴には丸型または角型があります メモ 垂直レールには 1 U 間隔の水平の線と数字で印が付いていることがあります ラックの垂直 レールについている印の番号を控える方法もあるので ラックに印を付けたりテープを貼る作業は必 須ではありません 図 1 2 1 ラックユニット 1 U 警告 2 台以上のシステムを取り付ける場合は ラックの使用可能な最下段に 1 台目のシステムを取 り付けられるようにマウントレールをセットしてください 44 mm 1 U 12...

Страница 78: ...て印を付けます 底部にあたる各 1 U スペースの位 置は 穴と穴の間が狭い方の金属部分の中央です 横線で印が付いているラックキャビネット もあります 図 1 3 を参照 2 最初に印を付けた場所から 88 mm 上 あるいは EIA 310 規格に適合したラックであれば ラックの穴を上に 3 つ数えた場所 を決め フェルトペンまたはマスキングテープを使って ラック前面の垂直レールに印を付けます 穴を数えた場合は一番上の穴の真上に印を付ける このマークまたはテープが 垂直レール上でシステムの上端が来る位置になります 図 1 3 を参照 図 1 3 垂直レールの印付け 1 垂直レールの印 2 1 ...

Страница 79: ...トの VersaRail 側には 3 つの穴があり ネジを使って垂直レールに取り付ける ようになっています メモ ラックキットは RapidRails 構成のスライドアセンブリに付属しています レールアセンブリのタイプを切り替えるには 以下の手順を実行します 1 回転取り付けブラケットの青色のレバーを押し上げます 図 1 4 を参照 2 ブラケットを回転させ スライドさせて 2 つの肩付き突起から取り外します 3 肩付き突起が切り込みに再び入るまで ブラケットをさらに 180 度回転させます 4 所定の位置にカチッとはまるまで ブラケットを反対方向に回転させます 図 1 4 回転取り付けブラケットの位置の変更 1 取り付けブラケットフランジ 図は RapidRails バージョン 2 回転ブラケット 3 リリースレバー 4 肩付き突起 2 5 切り込み 2 1 4 3 5 2 ...

Страница 80: ...成になっていることを確認 します 図 1 5 を参照してください 1 ラックキャビネットの前面で 取り付けブラケットのフランジが 75 ページの ラックへの 印付け の垂直レールに付けた印やテープの間のスペースに収まるように または穴の数を数 えて 1 つ目のマウントレールの位置を合わせます 図 1 5 を参照 マウントレールの前面取り付けブラケットフランジの上部取り付けフックを 垂直レールに付 けた印の間にある一番上の穴に差し込みます 図 1 5 RapidRails マウントレールの取り付け 1 取り付けフック 4 2 押しボタン 2 3 マウントレール 2 ラック正面 1 2 3 ...

Страница 81: ...り付け メモ スライドアセンブリ上の回転取り付けブラケットが VersaRail 構成になっていることを確認 します 図 1 6 を参照してください 1 ラックキャビネットの前面で 取り付けブラケットのフランジが 75 ページの ラックへの 印付け の垂直レールに付けた印の間のスペースに収まるように または穴の数を数えて 1 つ目のマウントレールの位置を合わせます 図 1 6 を参照 取り付けブラケットフランジの前面にある 3 個の穴を 前面垂直レールに付けた印の間の穴に 合わせます 2 2 本の 10 32 x 0 5 インチフランジヘッドプラスネジを取り付けブラケットフランジの上下の穴 に差し込んで マウントレールを前面垂直レールに固定します 3 キャビネットの背面から 取り付けブラケットフランジを後ろに引いて 取り付け穴を背面垂 直レールのそれぞれ対応する穴に合わせます 4 2 本の...

Страница 82: ...80 ラック取り付けガイド 図 1 6 VersaRails マウントレールの取り付け 1 取り付けブラケットフランジ 2 10 32 x 0 5 インチフランジヘ ッドプラスネジ マウント レール 1 本につき 4 本 3 マウントレール 2 ラック正面 1 2 3 ...

Страница 83: ...ライドアセンブリの対応する J スロット 図 1 7 を参照 に差し込みます 3 システムの側面にある後部肩付きネジを スライドアセンブリの背面 J スロットに合わせなが ら システム背面を下げます 4 後部肩付きネジをそれぞれの J スロットにはめ込みます 5 システム前面を下げて 中央と前部の肩付きネジをスライドアセンブリの J スロットに差し込 みます 肩付きネジを前面スロットに差し込むと 内部スライドレールの前面にあるシステムリリース ラッチが元の位置に戻ってカチッと固定されます システムをスライドアセンブリから取り外 すときは このシステムリリースラッチを使用します 6 各内部スライドの外側にあるスライドリリースラッチを押し システムをラックに押し込 みます 7 ケーブルマネージメントアームの取り付け 83 ページの ケーブルマネージメントアームの取 り付け を参照してください ...

Страница 84: ...システムの取り外し システムをラックから取り外すには 次の手順を実行します 1 システムの電源を切り システムに接続されている周辺機器の電源を切って 電源コンセント から抜きます 2 I O ケーブルコネクタと電源ケーブルコネクタを システム背面パネルの各コネクタから取り 外します 3 正面シャーシパネルの両側でシステムのシャーシをラックに固定している蝶ネジを緩めます 1 スライドリリースラッチ 2 肩付きネジ 6 3 J スロット 6 4 フロントリリースラッチ 1 2 4 3 ...

Страница 85: ...ックキャビネットの左右どちら側にでも取り付けることが できます メモ ケーブルマネージメントアームランプアセンブリは ケーブルマネージメントアームとは反対側 に取り付けます 1 ケーブルマネージメントアーム前端部のラッチをマウントレールの端のブラケットにはめ 込み カチッと音がするまで押し込みます 図 1 8 を参照 2 ケーブルマネージメントアームのまだ取り付けていない一端のラッチをスライドアセンブリの 端のブラケットにはめ込み カチッと音がするまで押し込みます 図 1 8 を参照 警告 システムケーブルの配線は ケーブルマネージメントアームの両端を接続してから行ってくだ さい 図 1 8 ケーブルマネージメントアームの取り付け 1 マウントレール 2 2 ブラケット 2 3 ラッチ 2 4 ケーブルマネージメントアーム システム背面 1 2 4 3 ...

Страница 86: ...す システムステータスインジケータケーブルをケーブルマネージメントアームに通し LED が付 いた端をケーブルマネージメントアームの端のスロットに差し込み 所定の位置にカチッと収 まるまで押し込みます 3 I O ケーブルコネクタと電源ケーブルコネクタを システム背面パネルの各コネクタに接続し ます ケーブル接続の詳細については お使いのシステムの はじめに または ハードウェア オーナーズマニュアル を参照してください メモ リテーナブラケットを電源の背面に取り付けて 電源ケーブルのストレインリリーフに役 立てます 4 ケーブルをケーブルマネージメントアームのベンドに沿って配線します 1 タイラップ 2 2 システムステータスインジ ケータケーブルのコネクタ 3 ケーブルマネージメントアーム 4 ワイヤーケーブルバスケット 3 4 2 1 ...

Страница 87: ...に押し込みます 8 ケーブルが正しく配線できたら システムをラックに完全に押し込みます ケーブルマネージメントアームランプアセンブリの取り付け ケーブルマネージメントアームランプアセンブリによって ケーブルマネージメントアームが安定 した水平な位置に誘導されます ケーブルマネージメントアームランプアセンブリの取り付けは 次の手順で行います 1 ケーブルマネージメントアームの向きに応じて 片方だけのランプアセンブリを選びます a 図 1 11 のようにケーブルマネージメントアームをラックの右側に取り付ける場合は 左ケーブルマネージメントアームランプアセンブリをラックに取り付けます 図 1 10 を参照 b ケーブルマネージメントアームをラックの左側に取り付ける場合は 右ケーブルマネージ メントアームランプアセンブリをラックに取り付けます 図 1 10 を参照 警告 ケーブルマネージメントアー...

Страница 88: ...ランプアセンブリワイヤフォームガイドの 位置を確認します b ランプアセンブリワイヤフォームガイドを持ち上げ ランプの上にスライドさせ ランプ アセンブリの取付留め具のところで止めます c 正しいランプアセンブリを選んでいれば ラックにシステムを差し替える度に ワイヤ フォームガイドは毎回ランプアセンブリ上部の留め具に正しく固定されます 図 1 11 は ケーブルマネージメントアームを右側に取り付け 左のランプアセンブリを取り付けた状 態を示しています ケーブルマネージメントアームランプアセンブリを外すには ランプアセンブリラッチのランプア センブリリリースボタンを押し ランプアセンブリをブラケットから引き抜きます 図 1 11 を参照 1 左ケーブルマネージメント アームランプアセンブリ 2 右ケーブルマネージメント アームランプアセンブリ 3 金属製のランプ 1 2 3 ...

Страница 89: ...けられています 逆に ケーブルマ ネージメントアームをラックの左側に取り付ける場合は 右ケーブルマネージメントアームランプア センブリをラックの右側に取り付けます ラック扉の取り付け ラックに付属のマニュアルに記載されている扉の取り付け手順を参照してください 警告 ラックキャビネットの扉の大きさと重さを考慮して 取り付けおよび取り外しは 1 人では行わ ないでください 1 ランプアセンブリブラケット 2 ケーブルマネージメントア ームランプアセンブリラッチ 3 ランプアセンブリリリ ースボタン 4 ランプアセンブリの取付留め具 5 左ケーブルマネージメント アームランプアセンブリ 6 ランプアセンブリワイヤ フォームガイド 6 2 3 4 1 5 ...

Страница 90: ...88 ラック取り付けガイド ...

Страница 91: ...Guía de instalación del rack ...

Страница 92: ...odificarse sin previo aviso 2007 Dell Inc Reservados todos los derechos Queda estrictamente prohibida la reproducción de este documento en cualquier forma sin la autorización por escrito de Dell Inc Marcas comerciales utilizadas en este texto Dell el logotipo de DELL RapidRails y VersaRails son marcas comerciales de Dell Inc Otras marcas y otros nombres comerciales pueden utilizarse en este docume...

Страница 93: ...areas de instalación 97 Extracción de las puertas del rack 97 Marcado del rack 97 Configuración de los ensamblajes de rieles deslizantes 100 Instalación de los rieles de montaje en el rack 101 Instalación de los rieles de montaje RapidRails 101 Instalación de los rieles de montaje VersaRails 102 Instalación del sistema en el rack 104 Extracción del sistema del rack 105 Instalación del brazo para t...

Страница 94: ...92 Contenido ...

Страница 95: ... del rack más de un componente a la vez por sus ensamblajes deslizantes El peso de más de un componente extendido puede hacer que vuelque el rack y producir lesiones graves NOTA este sistema está homologado en cuanto a seguridad como unidad independiente y como componente para uso en un armario rack Dell utilizando el kit de rack del cliente La instalación del sistema y el kit de rack en cualquier...

Страница 96: ...VersaRails se puede instalar en la mayoría de los armarios rack estándar que tengan orificios cuadrados o redondos Para cada sistema que se montará en el armario rack se precisa un kit de rack Antes de comenzar Antes de montar el sistema en el rack lea detenidamente la sección Instrucciones de seguridad en la página 93 y las instrucciones de seguridad que se incluyen en la Guía de información del ...

Страница 97: ...en montar únicamente técnicos de servicio cualificados en un rack que cumpla las especificaciones siguientes ANSI EIA 310 D 92 IEC 297 y DIN 41494 Se precisa un kit de rack para cada sistema que se instale en el rack Pies estabilizadores del rack PRECAUCIÓN antes de instalar sistemas en un rack instale los estabilizadores frontales y laterales para racks individuales o bien los estabilizadores fro...

Страница 98: ...roscas por pulgada se identifica como un tornillo 10 32 NOTA en la figura 1 1 se ilustran los conjuntos de rampa del brazo para tendido de cables izquierdo y derecho Según la orientación del brazo para tendido de cables CMA sólo utilizará un conjunto de rampa para asegurar el CMA a la parte posterior del rack Para obtener más información consulte Fijación del conjunto de rampa del brazo para tendi...

Страница 99: ...PRECAUCIÓN debido al tamaño y el peso de las puertas del armario rack nunca debe intentar montarlas ni desmontarlas una sola persona PRECAUCIÓN guarde las puertas en un lugar en el que no puedan lesionar a nadie en caso de caer accidentalmente Marcado del rack Para un sistema 2 U debe asignar 2 U 88 mm de espacio vertical para cada sistema que instale en el rack Los armarios rack que cumplen los e...

Страница 100: ...pacio 1 U se encuentra en el centro de la zona metálica más estrecha entre orificios marcados con una línea horizontal en algunos armarios rack vea la figura 1 3 2 Coloque una marca unos 88 mm por encima de la marca original que ha realizado o cuente tres orificios en un rack que cumpla los estándares EIA 310 y marque los rieles verticales frontales del rack con un rotulador de punta de fieltro o ...

Страница 101: ...Guía de instalación del rack 99 Figura 1 3 Marcado de los rieles verticales 1 Marcas en el riel vertical 2 1 ...

Страница 102: ...tornillos NOTA el kit de rack se suministra con los ensamblajes deslizantes en la configuración RapidRails Para cambiar de un tipo de ensamblaje de rieles a otro 1 Levante la palanca azul del soporte de montaje giratorio vea la figura 1 4 2 Gire el soporte y levántelo para sacarlo de los dos topes 3 Continúe girando el soporte 180 grados hasta que pueda volver a colocar las muescas sobre los topes...

Страница 103: ...ontaje de forma que la superficie de montaje del soporte quede situada entre las marcas o la cinta que ha colocado o las posiciones numeradas en los rieles verticales en la sección Marcado del rack en la página 97 vea la figura 1 5 El gancho de montaje superior de la superficie de montaje del soporte delantero debe encajar en el orificio superior entre las marcas realizadas en los rieles verticale...

Страница 104: ...l del armario rack coloque uno de los rieles de montaje de forma que la superficie de montaje del soporte quede situada entre las marcas que ha colocado o las posiciones numeradas en los rieles verticales en la sección Marcado del rack en la página 97 vea la figura 1 6 Los tres orificios de la parte frontal de la superficie de montaje del soporte deben alinearse con los orificios situados entre la...

Страница 105: ...k 103 Figura 1 6 Instalación de los rieles de montaje VersaRails 1 Superficie de montaje del soporte 2 Tornillos Phillips con arandela 10 32 x 0 5 pulgadas 4 por riel de montaje 3 Rieles de montaje 2 Parte frontal del rack 1 2 3 ...

Страница 106: ...ados en los lados del sistema con las ranuras J posteriores de los ensamblajes deslizantes 4 Coloque los tornillos de pivote posteriores en sus respectivas ranuras J 5 Baje la parte frontal del sistema y encaje los tornillos de pivote centrales y frontales en sus respectivas ranuras J de los ensamblajes deslizantes El pestillo de liberación del sistema de la parte frontal del riel deslizante inter...

Страница 107: ...eriféricos conectados y desconecte el sistema de la toma eléctrica 2 Desenchufe los conectores de cable de E S y de cable de alimentación de sus conectores respectivos en el panel posterior del sistema 3 Afloje los tornillos mariposa de ambos lados del panel frontal del chasis que fija el sistema al rack 1 Pestillo de liberación deslizante 2 Tornillos de pivote 6 3 Ranuras J 6 4 Pestillo de libera...

Страница 108: ...dido de cables en el lado en el que no haya fijado el brazo para tendido de cables 1 Encaje el pestillo del extremo frontal del brazo para tendido de cables en el soporte del extremo del riel de montaje hasta que se oiga un clic vea la figura 1 8 2 Encaje el pestillo del extremo sin fijar del brazo para tendido de cables en el soporte del extremo del ensamblaje deslizante hasta que se oiga un clic...

Страница 109: ...s conectores de cable de E S y de cable de alimentación en sus conectores respectivos del panel posterior del sistema Para obtener más información sobre las conexiones de los cables consulte la Guía de introducción del sistema o el Manual del propietario del hardware NOTA utilice los soportes de retención situados en la parte posterior de las fuentes de alimentación para liberar la tensión de los ...

Страница 110: ...e rampa guía al brazo para tendido de cables para que quede situado en una superficie plana y estable Para fijar el conjunto de rampa del brazo para tendido de cables 1 Seleccione sólo uno de los conjuntos de rampa según la orientación del brazo para tendido de cables a Si el brazo para tendido de cables está fijado a la parte derecha del rack como se muestra en la figura 1 11 fije el conjunto de ...

Страница 111: ...bre hacia arriba hasta llegar al retén de asentamiento del conjunto de rampa c Si ha seleccionado el conjunto de rampa adecuado la guía de alambre quedará encajada correctamente en el retén de la parte superior del conjunto de rampa cada vez que se apague y se encienda el sistema en el rack En la figura 1 11 se muestra el conjunto de rampa izquierdo instalado con el brazo para tendido de cables fi...

Страница 112: ...dido de cables derecho al lado derecho del rack Colocación de las puertas del rack Para colocar las puertas consulte los procedimientos correspondientes en la documentación suministrada con el rack PRECAUCIÓN debido al tamaño y el peso de las puertas del armario rack nunca debe intentar montarlas ni desmontarlas una sola persona 1 Soporte del conjunto de rampa 2 Pestillo del conjunto de rampa del ...

Отзывы: