background image

Rack Installation Guide

1-29

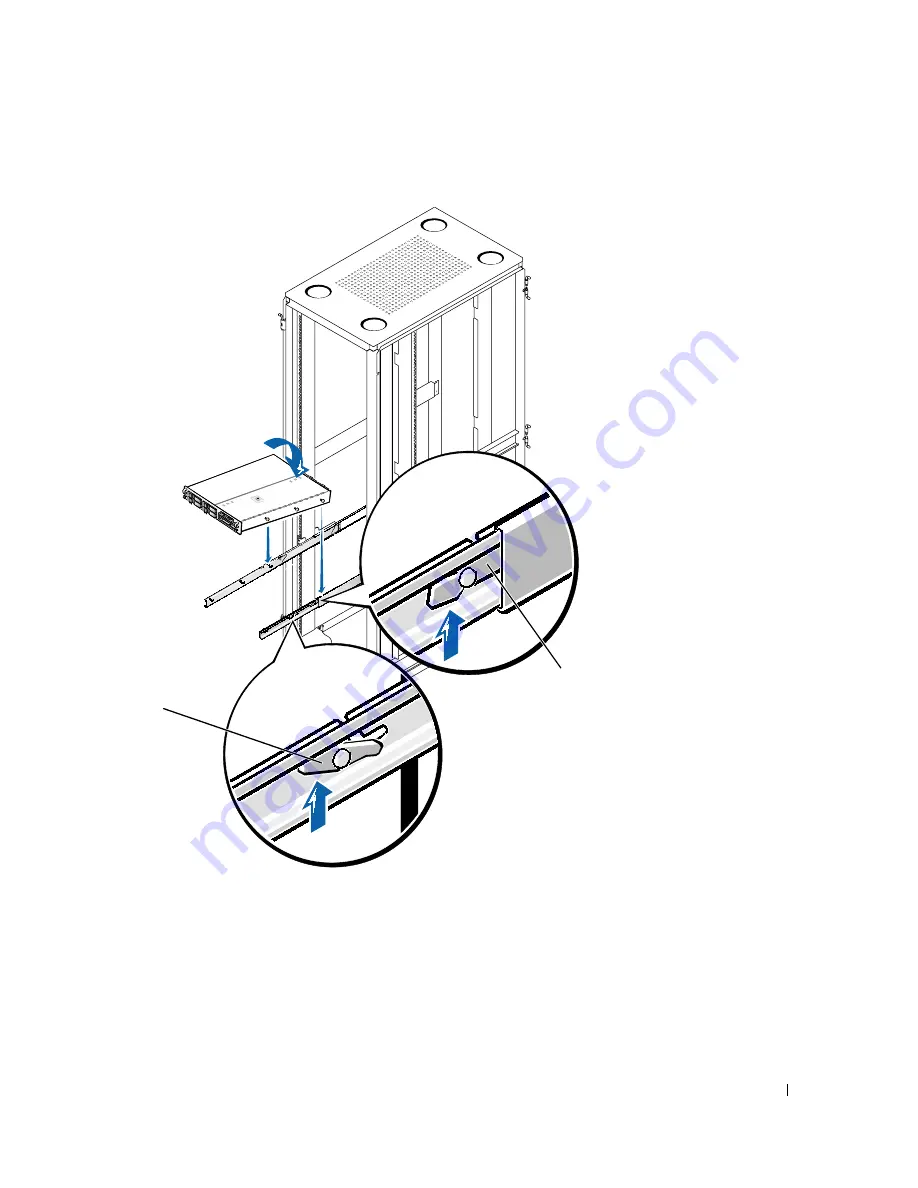
F i g u r e   1 - 2 2 .   I n s t a l l i n g   t h e   S y s t e m   i n   t h e   Ra c k

7

Press up on the green latches and push the chassis into the rack.

8

Tighten the captive thumbscrews on each side of the front chassis panel.

9

If available, install the optional front bezel.

back latch 
(green)

middle latch 
(yellow)

Содержание PowerEdge 2550

Страница 1: ...www dell com support dell com Dell Systems RACK INSTALLATION GUIDE ...

Страница 2: ...evere injury ____________________ Information in this document is subject to change without notice 2001 Dell Computer Corporation All rights reserved Reproduction in any manner whatsoever without the written permission of Dell Computer Corporation is strictly forbidden Trademarks used in this text Dell the DELL logo PowerEdge and RapidRails are trademarks of Dell Computer Corporation Other tradema...

Страница 3: ...a rack never pull more than one component out of the rack on its slide assemblies at one time The weight of more than one extended component could cause the rack to tip over and injure someone NOTE Dell s servers storage systems and appliances are certified as components for use in Dell s rack cabinet using the Dell customer rack kit The final installation of Dell systems and rack kits in any othe...

Страница 4: ...onent into or out of a rack the slide rails can pinch your fingers After a component is inserted into the rack carefully extend the rail into a locking position and then slide the component into the rack Do not overload the AC supply branch circuit that provides power to the rack The total rack load should not exceed 80 percent of the branch circuit rating Ensure that proper airflow is provided to...

Страница 5: ...tallation Tasks 1 24 Marking the Rack 1 24 Installing the Slide Assemblies in the Rack 1 26 Installing the System in the Rack 1 28 Installing the Cable Management Arm 1 30 Figures Figure 1 1 Two Post Support Tray Rack Kit Components 1 2 Figure 1 2 Two Post Open Frame Relay Rack With Universal Hole Spacing 1 4 Figure 1 3 Two Post Open Frame Relay Rack With Wide Hole Spacing 1 5 Figure 1 4 Installin...

Страница 6: ... Flush Mount Installation 1 16 Figure 1 13 Installing the Slide Assemblies for Flush Mount Configuration 1 17 Figure 1 14 Installing the System in the Rack Flush Mount Configuration 1 18 Figure 1 15 Securing the System in the Rack Flush Mount Configuration 1 19 Figure 1 16 Installing the Cable Management Arm 1 20 Figure 1 17 Attaching the Strain Relief Bracket 1 21 Figure 1 18 Four Post RapidRails...

Страница 7: ...it is used to install a Dell system in a two post open frame relay rack such as those found in telecommunications equipment facilities Both 3 inch and 6 inch wide two post racks are accommodated You can install this kit in a center mount or a flush mount configuration You must properly secure the two post rack to the floor to the ceiling or upper wall and where applicable to adjacent racks using f...

Страница 8: ... head Phillips screws Eight 10 32 x 0 375 inch truss head Phillips screws Eight 10 internal star lock washers One pair center mount brackets One 2 U two post template Fig u re 1 1 Two Po s t S u p p o rt Tra y Ra c k K it C o m p o ne n ts support tray 12 24 x 0 5 inch pan head Phillips screw 4 2 U two post template 10 32 x 0 375 inch truss head Phillips screw 8 center mount brackets 2 10 internal...

Страница 9: ...nstalling other components in the rack install the heaviest items at the bottom of the rack 2 Place the 2 U template over the front of the rack rails in the desired location 3 Position the bottom of the template in line with the desired bottom position of the system chassis NOTE If your rack has wide hole spacing go to step 5 If your rack has universal hole spacing continue with the next step 4 Ma...

Страница 10: ... spacing see Figure 1 3 mark the lower and middle mounting positions on the vertical rails as shown by the bottom and middle V notches on the sides of the template Each 1 U 1 75 inch vertical space on a rack with wide hole spacing has two holes with center to center spacing between holes beginning at the top of a 1 U space of 1 25 inches see Figure 1 3 3 5 inches 2 U 1 75 inch 1 625 5 inch 625 ...

Страница 11: ...made in step 4 for a universal hole spacing rack or in step 5 for a wide hole spacing rack in the section Marking the Rack The center mount brackets the 10 32 x 0 375 inch truss head screws and the 10 internal star washers are not used when mounting the support tray s front mounting bracket flush against the 2 post rack 2 If you are installing the support tray in a rack with universal hole spacing...

Страница 12: ...port tray in a rack with wide hole spacing install the four 12 24 x 0 5 inch pan head Phillips screws provided to secure the support tray using the bottom and the middle hole that you marked on the rack s front surface see Figure 1 5 An internally threaded stud projecting from the front of the support tray flange accepts the captive fastener on the front of the system R 12 24 x 0 5 inch pan head P...

Страница 13: ...ped L on its side so that it faces the stamped L on the left side of the support tray Ensure that the four holes on the side of the bracket align with the four matching holes on the left side of the support tray 2 Secure the left hand center mount bracket to the support tray using four 10 32 x 0 375 inch truss head Phillips screws with 10 star washers see Figure 1 6 R 12 24 x 0 5 inch pan head Phi...

Страница 14: ... bracket faces the stamped R on the right side of the support tray 4 If you are installing the center mount support tray into a universal hole spacing rack with the bottom of the support tray positioned at the place you marked on the rack install the four 12 24 x 0 5 inch screws finger tight into the top and bottom holes of the center mount bracket see Figure 1 7 5 Tighten the center mount bracket...

Страница 15: ...pac ing 6 If you are installing the support tray onto a wide hole spacing relay rack with the bottom of the support tray positioned at the place you marked on the rack install the screws finger tight into the bottom and the marked middle hole of the center mount bracket see Figure 1 8 12 24 x 0 5 inch pan head Phillips screws 4 ...

Страница 16: ... system never attempt to install the computer system by yourself NOTE The procedure for installing a system into a rack is identical for flush mounted and center mounted support trays 1 If your system has a bezel remove it see the system Installation and Troubleshooting Guide for instructions 2 Lift the system into position on the support tray 3 Slide the system completely into position and secure...

Страница 17: ...s are accommodated You can install this kit in a center mount or a flush mount configuration The kit incorporates slide assemblies which enable the system to be pulled out of the rack cabinet for servicing You must properly secure the two post open frame relay rack to the floor the ceiling or upper wall and where applicable to adjacent racks using floor and wall fasteners and bracing specified or ...

Страница 18: ... Rack Kit Contents The two post RapidRails kit includes see Figure 1 10 One pair of RapidRails slide assemblies two post One cable management arm Eight 12 24 x 0 5 inch pan head Phillips screws One 2 U two post template Fig u re 1 1 0 Two Po s t Ra pi dRa i l s Ra c k Kit C o mp o n en t s RapidRails slide assemblies 2 template 12 24 x 0 5 inch pan head Phillips screw 8 cable management arm ...

Страница 19: ...here you want to place the bottom of the system If you are installing other components in the rack install the heaviest items at the bottom of the rack 2 Place the 2 U template over the front of the rack rails in the desired location 3 Position the bottom of the template in line with the desired bottom position of the system chassis NOTE If your rack has wide hole spacing go to step 5 If your rack...

Страница 20: ...Do not attempt to install any other system using this kit Damage to the system and personal injury to you and others may result Center Mount Installation To prepare the RapidRails slide assemblies for center mount installation in the 2 post rack perform the following steps 1 Using a 3 8 inch nut driver loosen by one half turn the two locking nuts that attach the center bracket to each slide assemb...

Страница 21: ...e Place the right slide assembly to the right of the left slide assembly Position both rails so that the center brackets are facing upwards NOTE The slide assemblies are factory configured for center mount use For flush mount installation you must remove rotate 180 degrees and reinstall the mounting bracket on the opposite slide assembly 2 Remove two locking nuts and two shoulder washers from each...

Страница 22: ... 2 Po s i tio n i n g B r ac k e ts f or Flu s h M o u n t In s ta l l at io n 5 Holding the left slide assembly into position in the two post rack at the location you marked adjust the front and rear brackets tightly against the vertical two post rack and secure the front and rear center mounting brackets to the rack with two 12 24 x 0 5 inch pan head Phillips screws on each back mounting flange ...

Страница 23: ... to the back of the two post rack using two 12 24 x 0 5 inch screws 11 Tighten the two locking nuts that secure the center bracket on each slide assembly Installing the System in the Rack CAUTION Due to the size and weight of the computer system never attempt to install the computer system by yourself NOTE The procedure for installing a system into a rack is identical for flush mounted and center ...

Страница 24: ...ystem Installation and Troubleshooting Guide for instructions CAUTION Because of the size and weight of the system never attempt to install the system in the slide assemblies by yourself 3 Lift the system into position Fig u re 1 1 4 I n s ta l l i n g th e S y s te m i n th e Ra c k Fl u s h M o u n t C o n fi g u ra ti o n system lock yellow lift to release slide release green lift to release ...

Страница 25: ... slot near the middle yellow latch Finally engage the front shoulder nut in the front slot 7 Push the system inward on the slide assemblies until the middle yellow latch clicks into place locking the slide to the middle shoulder nut see Figure 1 14 8 Release the locking latch at the back of the slide and slide the system completely into the rack and secure it using the captive fasteners at the low...

Страница 26: ...g u re 1 1 6 I n s ta l l i n g th e C a b l e M a n a g em e nt A rm 3 Align the free end of the cable management arm the end with the half hinge to the hinge half mate on the back right side as viewed from the back of the system see Figure 1 16 4 Squeeze the quick disconnect knobs on the free end of the cable management arm and align the two hinge halves to attach the arm to the bracket on the b...

Страница 27: ...tep 4 through the slots of the strain relief bracket b Insert the ends of the four long portions of the strain relief bracket into the four matching holes beside the hinge bracket c Secure the captive thumbscrew to the back of the system Fig u re 1 1 7 A t ta c hi ng t h e S t ra i n Re l i e f B ra ck e t bracket inserted into four holes strain relief bracket captive thumbscrew Velcro strap cable...

Страница 28: ...nd do not bind stretch or pinch with the movement of the cable management arm NOTE As you pull the system out to its furthest extension the slide assemblies lock in the extended position To push the system back into the rack press the green locking latch on the side of the slide to release the locks and then slide the system completely into the rack You have completed the installation of the Rapid...

Страница 29: ...ty instructions found earlier in this guide If you have a Dell PowerEdge 4210 rack see the procedures in the Dell PowerEdge 4210 Rack Installation Guide Recommended Tools Although no tools are required to install the rack kit the following items make the installation easier An installation template helpful in slide assembly placement and alignment Masking tape or a felt tip pen for use in marking ...

Страница 30: ...e cable management arm Marking the Rack You must allow 2 U 3 5 inches of vertical space for each system you install in the rack Fig u re 1 1 9 O n e Rac k Un i t For more information about requirements for installing components in a Dell rack see the Dell Rack Advisor software available on the Dell Web site at http support dell com CAUTION If you are installing more than one system install the sli...

Страница 31: ...es the side facing outward as the template front 2 Mark the rack s front vertical rails with a felt tipped marker or place self adhesive masking tape where the system s upper and lower edges will be located see Figure 1 19 3 Make a mark or place tape on the vertical rails next to the template s V shaped notches that are marked in red Figure 1 20 U sing the Te mplat e to Mar k Ve rt ical Ra ils tem...

Страница 32: ...he hooks on the mounting bracket should align with the marks you made from the V shaped notches in the template 3 Align the slide assembly mounting bracket flange on the front of the slide assembly with the square holes in the front vertical rail see Figure 1 20 4 Push forward until the mounting tabs are secure in the square holes on the vertical rail and the push button clicks and pops out 5 Push...

Страница 33: ...Rack Installation Guide 1 27 Fig u re 1 2 1 I n s ta l l i n g th e S l i d e A s s e m bl i es slide assembly mounting bracket flange push button front of rack slide assembly 2 mounting tabs ...

Страница 34: ... system never attempt to install the system in the slide assemblies by yourself 2 Lift the system into position 3 Place one hand on the front bottom of the system and the other hand on the back bottom of the system 4 Tilt the system while aligning the back shoulder nuts on the sides of the system with the back slots on the slide assemblies see Figure 1 21 5 Engage the back shoulder nuts in the slo...

Страница 35: ...n g th e S y ste m i n th e Ra c k 7 Press up on the green latches and push the chassis into the rack 8 Tighten the captive thumbscrews on each side of the front chassis panel 9 If available install the optional front bezel back latch green middle latch yellow ...

Страница 36: ...into the square mounting holes on the vertical rail and is secured with the captive thumbscrew Fig u re 1 2 3 I n s ta l l i n g th e C a b l e M a n a g em e nt A rm 2 Align the free end of the cable management arm the end with the half hinge to the hinge half mate on the back right side as viewed from the back of the system 3 Squeeze the quick disconnect knobs on the free end of the cable manage...

Страница 37: ...re 1 23 a Thread the I O cables you connected in step 4 through the slots of the strain relief bracket b Insert the ends of the four long portions of the strain relief bracket into the four matching holes beside the hinge bracket c Secure the captive thumbscrew to the back of the system Fig u re 1 2 4 A t ta c hi ng t h e S t ra i n Re l i e f B ra ck e t bracket inserted into four holes strain re...

Страница 38: ... allowing some additional cable slack at the hinge positions and secure the cables to the cable management arm with the Velcro straps attached to the cable management arm 8 Slide the system in and out of the rack to verify that the cables are routed correctly and do not bind stretch or pinch with the movement of the cable management arm NOTE As you pull the system out to its furthest extension the...

Страница 39: ...upport tray rack 1 10 two post rack 1 17 K kit contents four post RapidRails 1 22 support tray kit 1 2 two post RapidRails kit 1 12 M marking rack four post RapidRails kit 1 24 support tray kit 1 3 two post RapidRails kit 1 13 R routing 1 22 routing cables 1 22 1 32 T tasks four post RapidRails kit 1 24 support tray kit 1 3 two post RapidRails kit 1 13 tools four post RapidRails kit 1 23 two post ...

Страница 40: ...2 Index 2 Index two post support tray kit contents 1 2 installing system 1 10 marking the rack 1 3 tasks 1 3 tools 1 3 ...

Отзывы: