


Page
2
Part 3: Connect the Management Device
Connect the management device to the services gateway using either of the following
methods:
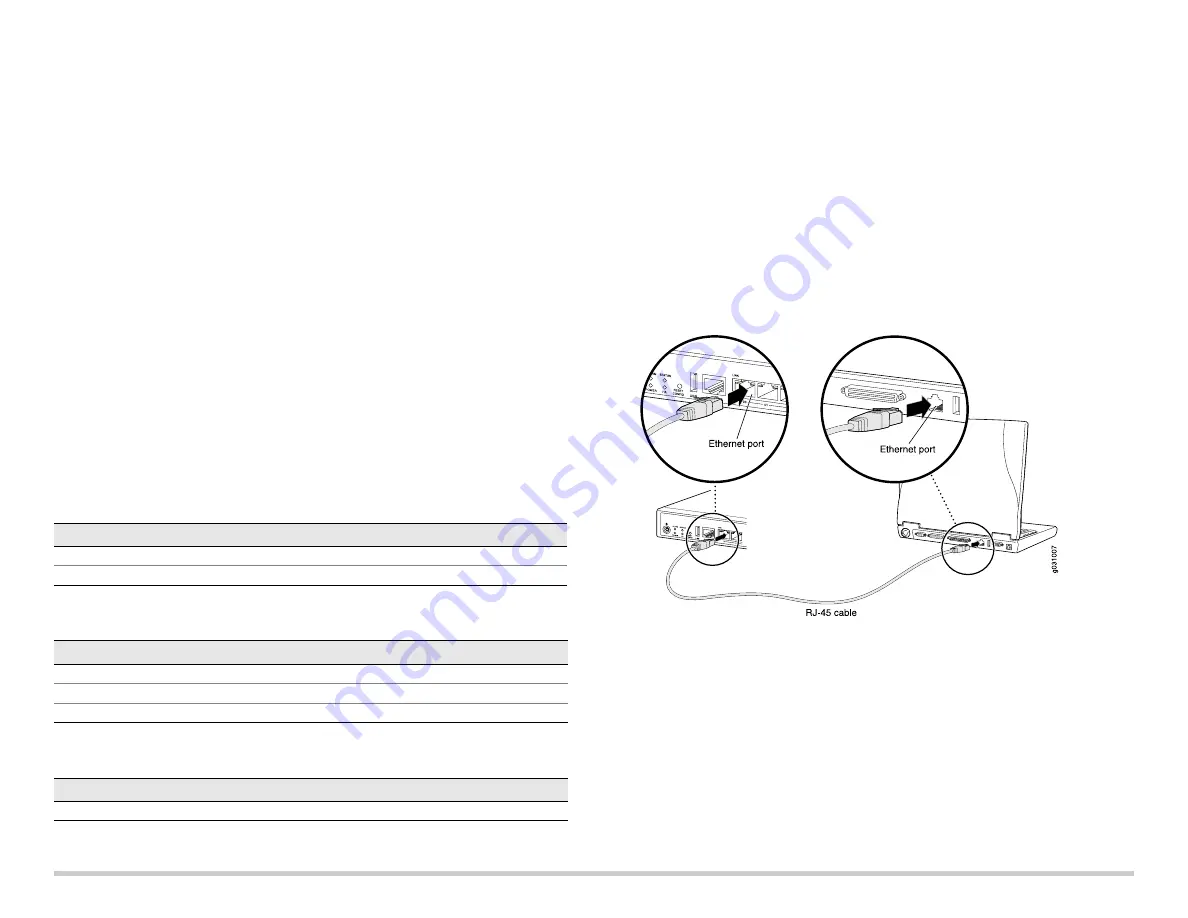
Connect an RJ-45 cable (Ethernet cable) from any one of the fe-0/0/1 through
fe-0/0/7
ports on the front panel to the Ethernet port on the management device
(workstation or laptop) as shown on page 2. We recommend this connection
method. If you are using this method to connect, proceed with Part 4.
Connect an RJ-45 cable (Ethernet cable) from the port labeled CONSOLE to the
supplied DB-9 adapter, which then connects to the serial port on the management
device. (Serial port settings:
9600 8-N-1
.)
If you are using this method to connect, proceed with the CLI configuration
instructions available in the
Branch SRX Series Services Gateways Golden
Configurations
at http://www.juniper.net/us/en/local/pdf/app-notes/3500153-en.pdf.
Part 4: Understanding the Default Configuration Settings
The PowerConnect J-SRX100 Services Gateway is a secure routing device that requires
these basic configuration settings to function properly:
Interfaces must be assigned IP addresses.
Interfaces must be bound to zones.
Policies must be configured between zones to permit/deny traffic.
Source NAT rules must be set.
The device has the following default configuration set when you power it on for the first
time. To be able to use the device, you do not need to perform any initial configuration.
F
ACTORY
D
EFAULT
S
ETTINGS
F
OR
I
NTERFACES
F
ACTORY
D
EFAULT
S
ETTINGS
F
OR
S
ECURITY
P
OLICIES
F
ACTORY
D
EFAULT
S
ETTINGS
F
OR
NAT R
ULE
Part 5: Ensure That the Management Device Acquires an IP Address
After connecting the management device to the services gateway, the DHCP server
process on the services gateway will assign an IP address automatically to the
management device. Ensure that the management device acquires an IP address on the
192.168.1/24
subnetwork (other than
192.168.1.1
) from the device.
NOTE:
The services gateway functions as a DHCP server and will assign an IP address to
the management device.
If an IP address is not assigned to the management device, manually configure an
IP address in the
192.168.1.0/24
subnetwork. Do not assign the
192.168.1.1
IP
address to the management device, as this IP address is assigned to the device. By
default, the DHCP server is enabled on the L3 VLAN interface, (IRB) vlan.0 (fe-0/0/1
to fe-0/0/7), which is configured with an IP address of
192.168.1.1/24
.
When a J-SRX100 Services Gateway is powered on for the first time, it boots using
the factory default configuration.
See the illustration below for details on connecting a management interface:
Part 6: Ensure that an IP Address is Assigned to the Services Gateway
Use one of the following methods to obtain an IP address on the services gateway:
M
ETHOD
1: O
BTAINING
A
D
YNAMIC
IP A
DDRESS
O
N
Y
OUR
S
ERVICES
G
ATEWAY
Use the fe-0/0/0 port to connect to your Internet Service Provider (ISP). Your ISP will
assign an IP address using the DHCP process.
If you are using this method to obtain an IP address on your services gateway,
proceed with the steps from Part 7 to Part 10 in this document to configure your
device and pass traffic.
Port Label
Interface
Security Zone
DHCP State
IP Address
0/0
fe-0/0/0
untrust
client
unassigned
0/1 to 0/7
fe-0/0/1 to fe-0/0/7
trust
server
192.168.1.1/24
Source Zone
Destination Zone
Policy Action
trust
untrust
permit
trust
trust
permit
untrust
trust
deny
Source Zone
Destination Zone
Policy Action
trust
untrust
source NAT to untrust zone interface


