background image

Replacing the power button with fingerprint

reader

NOTE:

 Before working inside your computer, read the safety information that shipped with your computer and follow

the steps in 

Before working inside your computer

. After working inside your computer, follow the instructions in 

After

working inside your computer

. For more safety best practices, see the Regulatory Compliance home page at 

www.dell.com/

regulatory_compliance

.

Procedure

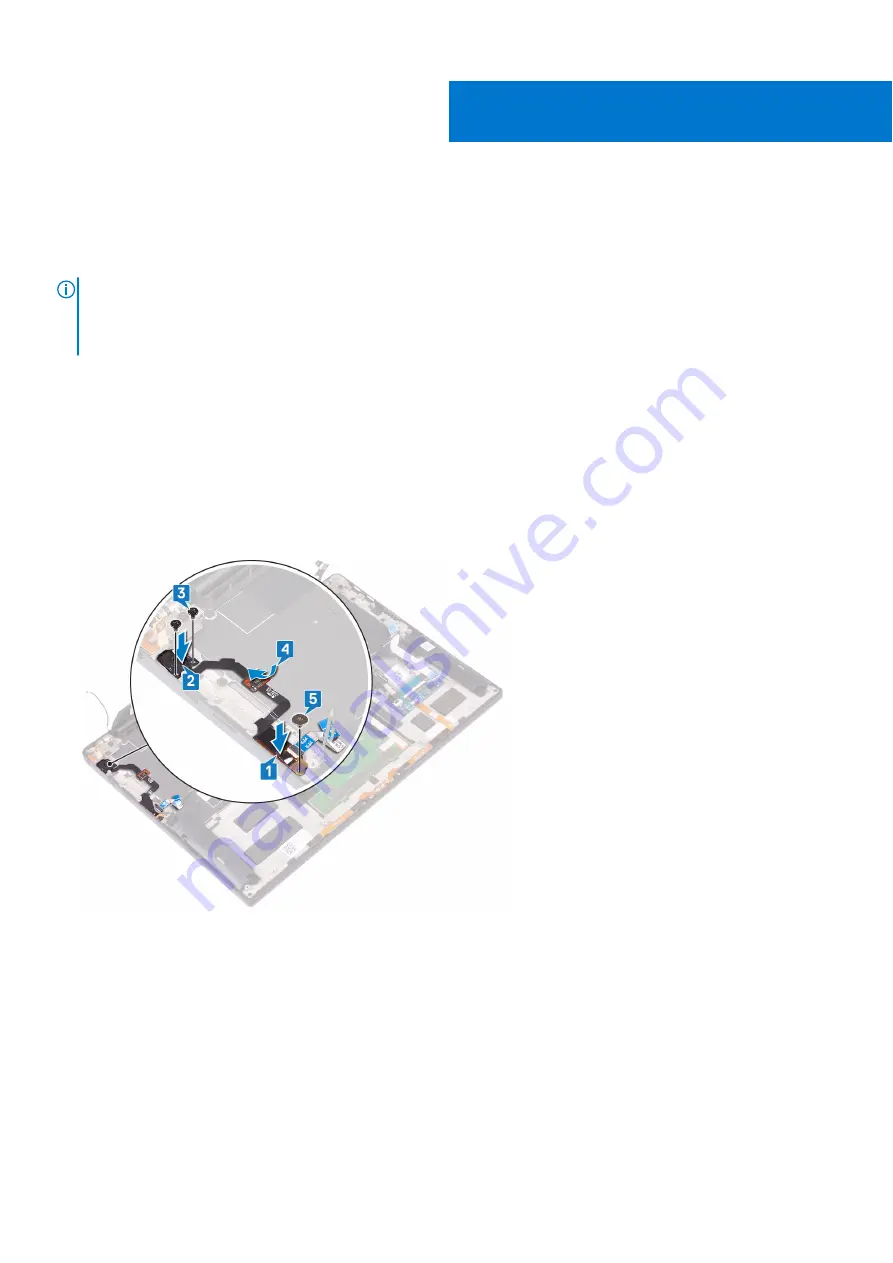
1. Place the fingerprint-reader board into its slot on the palm-rest assembly.
2. Place the power button into its slot on the palm-rest assembly.
3. Pressing down on the power button, replace the two screws (M1.4x1.7) that secure the power button to the palm-rest

assembly.

4. Adhere the power button cable to the keyboard.
5. Replace the screw (M1.6x1.5) that secures the fingerprint-reader board to the palm-rest assembly.

Post-requisites

1. Replace the 

system board

.

2. Replace the 

fans

.

3. Replace the 

solid-state drive

.

4. Replace the 

battery

.

5. Replace the 

base cover

.

28

56

Replacing the power button with fingerprint reader

Содержание P82G

Страница 1: ...XPS 13 9305 Service Manual Regulatory Model P82G Regulatory Type P82G004 January 2021 Rev A00 ...

Страница 2: ...ential damage to hardware or loss of data and tells you how to avoid the problem WARNING A WARNING indicates a potential for property damage personal injury or death 2021 Dell Inc or its subsidiaries All rights reserved Dell EMC and other trademarks are trademarks of Dell Inc or its subsidiaries Other trademarks may be trademarks of their respective owners ...

Страница 3: ...ions 17 Prerequisites 17 Procedure 17 Chapter 6 Replacing the battery 19 Lithium ion battery precautions 19 Procedure 19 Post requisites 20 Chapter 7 Removing the solid state drive 21 Prerequisites 21 Procedure to remove M 2 2280 and M 2 2230 solid state drives 21 Procedure to remove M 2 2280 solid state drive 21 Procedure to remove M 2 2230 solid state drive 22 Chapter 8 Replacing the solid state...

Страница 4: ...e 30 Post requisites 30 Chapter 15 Removing the fans 31 Prerequisites 31 Procedure 31 Chapter 16 Replacing the fans 33 Procedure 33 Post requisites 34 Chapter 17 Removing the heat sink assembly 35 Prerequisites 35 Procedure 35 Chapter 18 Replacing the heat sink assembly 37 Procedure 37 Post requisites 38 Chapter 19 Removing the display assembly 39 Prerequisites 39 Procedure 39 Chapter 20 Replacing...

Страница 5: ...ce Tag in the BIOS setup program 54 Chapter 27 Removing the power button with fingerprint reader 55 Prerequisites 55 Procedure 55 Chapter 28 Replacing the power button with fingerprint reader 56 Procedure 56 Post requisites 56 Chapter 29 Removing the keyboard 57 Prerequisites 57 Procedure 57 Chapter 30 Replacing the keyboard 58 Procedure 58 Post requisites 58 Chapter 31 Removing the palm rest asse...

Страница 6: ...g BIOS System Setup and System passwords 74 Chapter 35 Troubleshooting 75 SupportAssist diagnostics 75 System diagnostic lights 75 Recovering the operating system 76 Flashing the BIOS 76 Flashing BIOS USB key 77 Backup media and recovery options 77 Drain residual flea power perform hard reset 77 WiFi power cycle 77 Chapter 36 Getting help and contacting Dell 79 6 Contents ...

Страница 7: ...place all covers panels and screws before connecting your computer to an electrical outlet CAUTION To avoid damaging the computer ensure that the work surface is flat dry and clean CAUTION To avoid damaging the components and cards handle them by their edges and avoid touching the pins and the contacts CAUTION You should only perform troubleshooting and repairs as authorized or directed by the Del...

Страница 8: ...tall the component Before unwrapping the anti static packaging ensure that you discharge static electricity from your body Before transporting a static sensitive component place it in an anti static container or packaging ESD field service kit The unmonitored Field Service kit is the most commonly used service kit Each Field Service kit includes three main components anti static mat wrist strap an...

Страница 9: ...sitive devices should be removed from packaging only at an ESD protected work surface and parts should never be placed on top of the ESD bag because only the inside of the bag is shielded Always place parts in your hand on the ESD mat in the system or inside an anti static bag Transporting Sensitive Components When transporting ESD sensitive components such as replacement parts or parts to be retu...

Страница 10: ...ponent is replaced NOTE Some computers have magnetic surfaces Ensure that the screws are not left attached to such surfaces when replacing a component NOTE Screw color may vary with the configuration ordered Table 1 Screw list Component Secured to Screw type Quantity Screw image Keyboard Palm rest assembly M1 6x1 5 29 Fingerprint reader board Palm rest assembly M1 6x1 5 1 Power button Palm rest as...

Страница 11: ... 6x2 5 2 Solid state drive shield and solid state drive System board M2x3L 1 Battery Palm rest assembly M2x2 4 Battery Palm rest assembly M1 6x4 1 Base cover Palm rest assembly M2x3 Torx 8 Major components of XPS 13 9305 The following image shows the major components of XPS 13 9305 Removing and installing components 11 ...

Страница 12: ...r button with fingerprint reader 13 Camera cable bracket 14 Coin cell battery 15 Heat sink assembly NOTE Dell provides a list of components and their part numbers for the original system configuration purchased These parts are available according to warranty coverages purchased by the customer Contact your Dell sales representative for purchase options 12 Removing and installing components ...

Страница 13: ...low the instructions in After working inside your computer For more safety best practices see the Regulatory Compliance home page at www dell com regulatory_compliance Procedure 1 Align the screw holes on the base cover with the screw holes on the palm rest assembly and slide in the base cover into place 2 Replace the eight screws M2x3 Torx that secure the base cover to the palm rest assembly 3 Re...

Страница 14: ...14 Replacing the base cover ...

Страница 15: ...est practices see the Regulatory Compliance home page at www dell com regulatory_compliance Procedure CAUTION To avoid causing damage to the computer do not pry the base cover from the rear near the hinges 1 Remove the eight screws M2x3 Torx that secure the base cover to the palm rest assembly 2 With the computer face down open the computer at an angle 3 Using a plastic scribe pry the base cover f...

Страница 16: ...4 Moving the base cover from left to right release the clips securing the base cover to the palm rest assembly 5 Lift the base cover from the palm rest assembly 16 Removing the base cover ...

Страница 17: ...rop mutilate or penetrate the battery with foreign objects Do not expose the battery to high temperatures or disassemble battery packs and cells Do not apply pressure to the surface of the battery Do not bend the battery Do not use tools of any kind to pry on or against the battery Ensure any screws during the servicing of this product are not lost or misplaced to prevent accidental puncture or da...

Страница 18: ...st assembly 3 Remove the screw M1 6x4 that secures the battery to the palm rest assembly 4 Lift the battery off the palm rest assembly 5 Turn the computer over open the display and press the power button for about 5 seconds to ground the computer 18 Removing the battery ...

Страница 19: ...ose the battery to high temperatures or disassemble battery packs and cells Do not apply pressure to the surface of the battery Do not bend the battery Do not use tools of any kind to pry on or against the battery Ensure any screws during the servicing of this product are not lost or misplaced to prevent accidental puncture or damage to the battery and other system components If the battery gets s...

Страница 20: ...Post requisites Replace the base cover 20 Replacing the battery ...

Страница 21: ...not remove the solid state drive while the computer is in sleep or on state Prerequisites 1 Remove the base cover 2 Remove the battery Procedure to remove M 2 2280 and M 2 2230 solid state drives Procedure to remove M 2 2280 solid state drive 1 Remove the screw M2x3 that secures the solid state drive shield and the solid state drive to the system board 2 Slide and remove the solid state drive shie...

Страница 22: ... Slide and remove the solid state drive shield from the solid state drive slot 3 Lift the solid state drive at an angle then slide and remove the solid state drive from the solid state drive slot NOTE The 2230 solid state drive has a unique thermal plate and cannot be interchanged with the 2280 solid state drive thermal plate 22 Removing the solid state drive ...

Страница 23: ... notches on the solid state drive with the tabs in the solid state drive slot then slide the solid state drive at an angle into the solid state drive slot 2 Slide the solid state drive shield into the solid state drive shield slot Then align the screw hole on the solid state drive shield and solid state drive to the screw hold on the system board NOTE The 2280 solid state drive has a unique therma...

Страница 24: ...rive to the screw hold on the system board NOTE The 2230 solid state drive has a unique thermal plate and cannot be interchanged with the 2280 solid state drive thermal plate 3 Replace the screw M2x3 that secures the solid state drive to the system board Post requisites 1 Replace the battery 2 Replace the base cover 24 Replacing the solid state drive ...

Страница 25: ...see the Regulatory Compliance home page at www dell com regulatory_compliance Prerequisites 1 Remove the base cover 2 Remove the battery Procedure 1 Disconnect the speaker cable from the system board 2 Remove the four screws M2x2 that secure the left and right speakers to the palm rest assembly 3 Note the speaker cable routing and peel off the tapes 4 that secure the speaker cable to the keyboard ...

Страница 26: ...ww dell com regulatory_compliance Procedure 1 Using the alignment posts on the palm rest assembly place the left speaker on the palm rest assembly 2 Route the speaker cable on the system board and adhere the tape to the system board 3 Using the alignment posts on the palm rest assembly place the right speaker on the palm rest assembly 4 Replace the four screws M2x2 that secure the speakers to the ...

Страница 27: ...s see the Regulatory Compliance home page at www dell com regulatory_compliance CAUTION Removing the coin cell battery resets the BIOS setup program s settings to default It is recommended that you note the BIOS setup program s settings before removing the coin cell battery Prerequisites 1 Remove the base cover 2 Remove the battery Procedure 1 Disconnect the coin cell battery cable from the system...

Страница 28: ...nside your computer follow the instructions in After working inside your computer For more safety best practices see the Regulatory Compliance home page at www dell com regulatory_compliance Procedure 1 Adhere the coin cell battery to the system board 2 Connect the coin cell battery cable to the system board Post requisites 1 Replace the battery 2 Replace the base cover 12 28 Replacing the coin ce...

Страница 29: ...normal operation Allow sufficient time for the heat sink to cool before you touch it CAUTION For maximum cooling of the processor do not touch the heat transfer areas on the heat sink The oils in your skin can reduce the heat transfer capability of the thermal grease Prerequisites 1 Remove the base cover 2 Remove the battery Procedure NOTE The following procedure applies only to computers shipped ...

Страница 30: ...t of the heat sink can damage the system board and processor NOTE If either the system board or the heat sink is replaced use the thermal pad paste provided in the kit to ensure that thermal conductivity is achieved Procedure NOTE The following procedure applies only to computers shipped with Intel Core i3 processor 1 Align the screw holes on the heat sink with the screw holes on the system board ...

Страница 31: ...ntel Core i3 processor NOTE For computers shipped with Intel Core i5 or i7 processors see Removing the heat sink assembly 1 Remove the screw M1 6x3 that secures the wireless antenna and camera cable bracket to the system board 2 Lift the wireless antenna and camera cable bracket from the system board 3 Disconnect and lift the camera cable from the system board peeling off the tape securing the cam...

Страница 32: ...32 Removing the fans ...

Страница 33: ...r computers shipped with Intel Core i5 or i7 processors see Replacing the heat sink assembly 1 Align the screw holes on the left and the right fans with the screw holes on the system board 2 Replace the two screws M1 6x3 that secure the left and the right fans to the system board 3 Connect the left fan and the right fan cables to the system board 4 Connect the camera cable to the system board 5 Al...

Страница 34: ...Post requisites 1 Replace the battery 2 Replace the base cover 34 Replacing the fans ...

Страница 35: ...he heat transfer capability of the thermal grease Prerequisites 1 Remove the base cover 2 Remove the battery Procedure NOTE The following procedure applies only to computers shipped with Intel Core i5 or Intel Core i7 processor 1 Remove the screw M1 6x3 that secures the wireless antenna and camera cable bracket to the system board 2 Lift the wireless antenna and camera cable bracket from the syste...

Страница 36: ...the two screws M1 6x3 that secure the heat sink assembly to the system board 8 Lift the heat sink assembly along with the left fan and the right fan cable off the system board 36 Removing the heat sink assembly ...

Страница 37: ...achieved Procedure NOTE The following procedure applies only to computers shipped with Intel Core i5 or Intel Core i7 processor 1 Align the screw holes on the heat sink assembly with the screw holes on the system board 2 Replace the two screws M1 6x3 that secure the heat sink assembly to the system board 3 Replace the four screws M2x3 that secure the heat sink assembly to the system board in seque...

Страница 38: ...Post requisites 1 Replace the battery 2 Replace the base cover 38 Replacing the heat sink assembly ...

Страница 39: ...emove the screw M1 6x3 that secures the wireless antenna and camera cable bracket to the system board 2 Lift the wireless antenna and camera cable bracket from the system board 3 Disconnect and lift the camera cable from the system board peeling off the tape securing the camera cable to the fans 4 Remove the two screws M1 6x2 5 that secure the display cable bracket to the system board 5 Lift the d...

Страница 40: ...the top surface of the computer on a flat and clean surface then open the computer at a 90 degree angle 10 Gently slide and lift the display assembly from the palm rest assembly 40 Removing the display assembly ...

Страница 41: ...Procedure 1 Slide the palm rest assembly under the hinges of the display assembly 2 Using the alignment posts press the display hinges down on the palm rest assembly aligning the screw holes on the display hinges with the screw holes on the palm rest assembly 3 Connect the antenna cables to the system board The following table provides the antenna cable color schemes for the wireless card supporte...

Страница 42: ...to screw hole on the system board 6 Replace the screw M1 6x3 that secures the wireless antenna and camera cable bracket to the system board 7 Connect the display cable to the system board 8 Align the screw holes on the display cable bracket with the screw holes on the system board 9 Replace the two screws M1 6x2 5 that secure the display cable bracket to system board Post requisites 1 Replace the ...

Страница 43: ...uctions in After working inside your computer For more safety best practices see the Regulatory Compliance home page at www dell com regulatory_compliance Prerequisites 1 Remove the base cover 2 Remove the battery Procedure 1 Remove the two screws M2 5x4 that secure the left hinge to the palm rest assembly 2 Place the top surface of the computer on a flat and clean surface then open and close the ...

Страница 44: ...onnect the headset port cable from the system board 4 Remove the screw M1 6x3 that secures the headset port to the palm rest assembly 5 Lift the headset port from the system board 44 Removing the headset port ...

Страница 45: ... page at www dell com regulatory_compliance Procedure 1 Place the headset port in its slot on the palm rest assembly 2 Replace the screw M1 6x3 that secures the headset port to the palm rest assembly 3 Reconnect the headset port cable to the system board 4 Using the alignment posts press the right display hinge down to the palm rest assembly aligning the screw holes on the display hinge to the scr...

Страница 46: ...Post requisites 1 Replace the battery 2 Replace the base cover 46 Replacing the headset port ...

Страница 47: ...ntel Core i3 processor NOTE For computers shipped with Intel Core i5 or i7 processors see Removing the heat sink assembly 1 Remove the screw M1 6x3 that secures the wireless antenna and camera cable bracket to the system board 2 Lift the wireless antenna and camera cable bracket from the system board 3 Disconnect and lift the camera cable from the system board peeling off the tape securing the cam...

Страница 48: ...48 Removing the fans ...

Страница 49: ...r computers shipped with Intel Core i5 or i7 processors see Replacing the heat sink assembly 1 Align the screw holes on the left and the right fans with the screw holes on the system board 2 Replace the two screws M1 6x3 that secure the left and the right fans to the system board 3 Connect the left fan and the right fan cables to the system board 4 Connect the camera cable to the system board 5 Al...

Страница 50: ...Post requisites 1 Replace the battery 2 Replace the base cover 50 Replacing the fans ...

Страница 51: ...he location of the connectors so that you can reconnect the cables correctly after you replace the system board Prerequisites 1 Remove the base cover 2 Remove the battery 3 Remove the solid state drive 4 Remove the heat sink or heat sink assembly 5 Remove the fans Procedure 1 Disconnect the antenna cables from the system board 2 Disconnect the headset port cable from the system board 3 Disconnect ...

Страница 52: ...10 Remove the 10 screws M1 6x2 5 securing the system board to the palm rest assembly 11 Lift the system board from the palm rest assembly 52 Removing the system board ...

Страница 53: ...ng the alignment posts place the system board on the palm rest assembly and align the screw holes on the system board with the screw holes on the palm rest assembly 2 Replace the 10 screws M1 6x2 5 that secure the system board to the palm rest assembly 3 Connect the display cable to the system board 4 Align and place the display cable bracket on the system board 5 Replace the two screws M1 6x2 5 t...

Страница 54: ...isites 1 Replace the fans 2 Replace the heat sink or heat sink assembly 3 Replace the solid state drive 4 Replace the battery 5 Replace the base cover Entering the Service Tag in the BIOS setup program 1 Turn on or restart your computer 2 Press F2 when the Dell logo is displayed to enter the BIOS setup program 3 Navigate to the Main tab and enter the Service Tag in the Service Tag Input field NOTE...

Страница 55: ...dell com regulatory_compliance Prerequisites 1 Remove the base cover 2 Remove the battery 3 Remove the solid state drive 4 Remove the fans 5 Remove the system board Procedure 1 Remove the two screws M1 4x1 7 that secure the power button to the palm rest assembly 2 Remove the screw M1 6x1 5 that secures the fingerprint reader board to the palm rest assembly 3 Lift the power button from the palm res...

Страница 56: ... Procedure 1 Place the fingerprint reader board into its slot on the palm rest assembly 2 Place the power button into its slot on the palm rest assembly 3 Pressing down on the power button replace the two screws M1 4x1 7 that secure the power button to the palm rest assembly 4 Adhere the power button cable to the keyboard 5 Replace the screw M1 6x1 5 that secures the fingerprint reader board to th...

Страница 57: ... Remove the battery 3 Remove the solid state drive 4 Remove the fans 5 Remove the system board 6 Remove the power button with fingerprint reader Procedure 1 Open the latch and disconnect the keyboard backlight cable from the keyboard controller board 2 Open the latch and disconnect the keyboard controller board cable from the keyboard controller board 3 Remove the 29 screws M1 6x1 5 that secure th...

Страница 58: ... with the screw holes on the palm rest assembly and slide the keyboard under the display hinges into the palm rest assembly 3 Replace the 29 screws M1 6x1 5 that secure the keyboard to the palm rest assembly 4 Adhere the keyboard backlight cable and the keyboard controller board cable to the keyboard 5 Slide the keyboard backlight cable into the keyboard controls board and close the latch to secur...

Страница 59: ... For more safety best practices see the Regulatory Compliance home page at www dell com regulatory_compliance Prerequisites 1 Remove the base cover 2 Remove the battery 3 Remove the speakers 4 Remove the display assembly 5 Remove the headset port 6 Remove the fans 7 Remove the system board 8 Remove the power button with fingerprint reader 9 Remove the keyboard Procedure After performing all the pr...

Страница 60: ...r For more safety best practices see the Regulatory Compliance home page at www dell com regulatory_compliance Procedure Place the palm rest assembly face down on a clean and flat surface Post requisites 1 Replace the keyboard 2 Replace the power button with fingerprint reader 3 Replace the system board 4 Replace the fans 5 Replace the headset port 6 Replace the display assembly 7 Replace the spea...

Страница 61: ...ivers and downloads When troubleshooting downloading or installing drivers it is recommended that you read the Dell Knowledge Based article Drivers and Downloads FAQ SLN128938 33 Drivers and downloads 61 ...

Страница 62: ...and press F2 immediately Navigation keys NOTE For most of the System Setup options changes that you make are recorded but do not take effect until you restart the system Table 4 Navigation keys Keys Navigation Up arrow Moves to the previous field Down arrow Moves to the next field Enter Selects a value in the selected field if applicable or follow the link in the field Spacebar Expands or collapse...

Страница 63: ...le SATA Hard Drive if available Diagnostics The boot sequence screen also displays the option to access the System Setup screen System setup options NOTE Depending on this computer and its installed devices the items that are listed in this section may or may not be displayed Table 5 System setup options Overview menu Overview XPS 13 9305 BIOS Version Displays the BIOS version number Service Tag D...

Страница 64: ...omputer memory available Memory Speed Displays the memory speed Memory Channel Mode Displays single or dual channel mode Memory Technology Displays the technology that is used for the memory DEVICES Panel Type Displays the Panel Type of the computer Video Controller Displays the integrate graphics information of the computer Video Memory Displays the video memory information of the computer Wi Fi ...

Страница 65: ...mputer date in MM DD YYYY format Changes to the date take effect immediately Time Sets the computer time in HH MM SS 24 hour format You can switch between 12 hour and 24 hour clock Changes to the time take effect immediately Thunderbolt Adapter Configuration Enables or disables booting from USB mass storage devices such as external hard drive optical drive and USB drive By default Enable External ...

Страница 66: ...board drives M 2 PCIe SSD Enables or disables the M 2 PCIe SSD Default ON Drive Information Displays the information of onboard drives M 2 PCIe SSD Enables or disables the M 2 PCIe SSD Default ON Enable MediaCard Enables to switch all media cards On Off or set the media card to read only state By default Enable Secure Digital SD Card is selected Table 9 System setup options Display menu Display Di...

Страница 67: ...k period Advanced Battery Charged maximizes battery health while still supporting heavy use during the work day Default OFF Peak Shift Enable Peak Shift Enables the computer to run on battery during peak power usage hours Default OFF Thermal Management Thermal Management Adjusts system performance noise and temperature Default Optimized Standard setting for balance of performance noise and tempera...

Страница 68: ...o use the TPM for signature operations Default ON Key Storage Enable Enables to control whether the TPM Endorsement Hierarchy is available to the OS Disabling this setting restricts the ability to use the TPM for storing owner data Default ON SHA 256 Enables or disables the BIOS and the TPM to use the SHA 256 hash algorithm to extend measurements into the TPM PCRs during BIOS boot Default ON Clear...

Страница 69: ...etes the administrator admin password sometimes called the setup password System Password Sets Changes or deletes the system password Password Configuration Upper Case Letter Enables or disables the requirement for at least one upper case letter Default OFF Lower Case Letter Enables or disables the requirement for at least one lower case letter Default OFF Digit Enables or disables the requirement...

Страница 70: ...re cannot work in the event of EC corruption ME corruption or a hardware issue The recovery image must exist on an unencrypted partition on the drive BIOS Downgrade Allow BIOS Downgrade Controls flashing of the system firmware to previous revisions Default ON SupportAssist OS Recovery SupportAssist OS Recovery Enables or disables the boot flow for SupportAssist OS Recovery tool in the event of cer...

Страница 71: ...e F1 F12 keys scan the code for their secondary functions Keyboard Illumination Keyboard Illumination Configures the operating mode of the keyboard illumination feature Default Bright Enable the keyboard illumination feature at 100 brightness level Keyboard Backlight Timeout on AC Keyboard Backlight Timeout on AC Configures the timeout value for the keyboard when an AC adapter is connected to the ...

Страница 72: ...r dongle with the selected MAC address from the computer Default System Unique MAC Address Mouse Touchpad Mouse Touchpad Defines how the computer handles mouse and touchpad input Default Touchpad and PS 2 Mouse Leave the integrated touchpad enabled when an external PS 2 mouse is present Table 18 System setup options Virtualization menu Virtualization Intel Virtualization Technology Enable Intel Vi...

Страница 73: ...g Technology Enabled or disabled the Intel Hyper Threading mode of the processor If enabled the Intel Hyper Threading increases the efficiency of the processor resources when multiple threads run on each core Default ON Table 20 System setup options System Logs menu System Logs BIOS Event Log Clear Bios Event Log Select keep or clear BIOS events Default Keep Thermal Event Log Clear Thermal Event L...

Страница 74: ...r the system or BIOS passwords contact Dell technical support as described at www dell com contactdell NOTE For information on how to reset Windows or application passwords refer to the documentation accompanying Windows or your application 74 System setup ...

Страница 75: ...s than 5 charge Off Power adapter is connected and the battery is fully charged Computer is running on battery and the battery has more than 5 charge Computer is in sleep state hibernation or turned off The power and battery status light may blink amber or white according to pre defined beep codes indicating various failures For example the power and battery status light blinks amber two times fol...

Страница 76: ...ge If problem persists replace the system board Recovering the operating system When your computer is unable to boot to the operating system even after repeated attempts it automatically starts Dell SupportAssist OS Recovery Dell SupportAssist OS Recovery is a standalone tool that is preinstalled in all Dell computers installed with Windows 10 operating system It consists of tools to diagnose and ...

Страница 77: ...ation see Dell Windows Backup Media and Recovery Options Drain residual flea power perform hard reset Flea power is the residual static electricity that remains in the computer even after it has been powered off and the battery is removed For your safety and to protect the sensitive electronic components in your computer you are requested to drain residual flea power before removing or replacing a...

Страница 78: ...1 Turn off your computer 2 Turn off the modem 3 Turn off the wireless router 4 Wait for 30 seconds 5 Turn on the wireless router 6 Turn on the modem 7 Turn on your computer 78 Troubleshooting ...

Страница 79: ...r Express Service Code at www dell com support For more information on how to find the Service Tag for your computer see Locate the Service Tag on your computer Dell knowledge base articles for a variety of computer concerns 1 Go to www dell com support 2 On the menu bar at the top of the Support page select Support Knowledge Base 3 In the Search field on the Knowledge Base page type the keyword t...

Отзывы: